Ultracast 1/32 Japanese Naval Pilot
| KIT #: | 54003 |
| PRICE: | CDN $17.95 |
| DECALS: | None |
| REVIEWER: | Scott Van Aken |
| NOTES: | Resin |
| BACKGROUND |
I've not done one of these very nice resin figures before; though I have done some in much larger scales. Looking over the smaller scale military figures at a recent show, I was quite impressed with how they looked and that got the idea going that perhaps I could do the same.
Another real plus is that there is no airbrushing required, as masking would be an impossible chore on something of this size. That means some relaxing time with a paintbrush and some acrylics. In fact, for this figure, I used Vallejo acrylics for the huge majority of the colors. I find them perfect for the brush right out of the bottle and since there are no large, flat areas, there isn't any concern about brush marks.
| THE KIT |
Modeled by figure maker extraordinaire, Mike Good, you know that you are getting the finest representation available. Back when I was living in San Diego and attending IPMS San Diego meetings, Mike basically built a figure from scratch in about 20-25 minutes while telling us how he did things during the build. To say that I was impressed is an understatement. Any figure by Mike is the best there is, regardless of who is marketing it for him.
 This particular kit is marketed by Ultracast and so
that means not only superb resin quality that is free from ANY defects, but also
that the parts will be easy to remove from the mold and a breeze to clean up
prior to use. For a preview of this kit, please
follow this link.
This particular kit is marketed by Ultracast and so
that means not only superb resin quality that is free from ANY defects, but also
that the parts will be easy to remove from the mold and a breeze to clean up
prior to use. For a preview of this kit, please
follow this link.
| CONSTRUCTION |
With figures, it is really impossible to deliniate specific portions of the build process as one is assembling and painting as one goes along. In fact, it would be safe to say that most of a figure kit's development into a model is with painting.
Step one takes about 20 minutes. This is where I remove the parts from the sprue and then look carefully for mold seams so that I can remove them. For this process, I use fine files as it is the best way to get into the various nooks and crannies. The only large space is the helmet and for that I used sanding sticks. It is important to somewhat polish these areas when done and I used small bits of sandpaper for that. It sort of gets things smoothed out .
Then I started painting. As I mentioned earlier, I used Vallejo colors for this as I happen to like them quite a bit. These are colors I've been using for about a year for detail painting on other models and they are really very nice. Right from the bottle they seem to be the proper consistency for brush painting, but are easily thinned if one needs to.
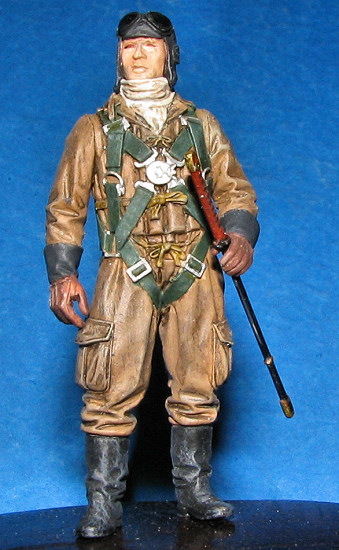
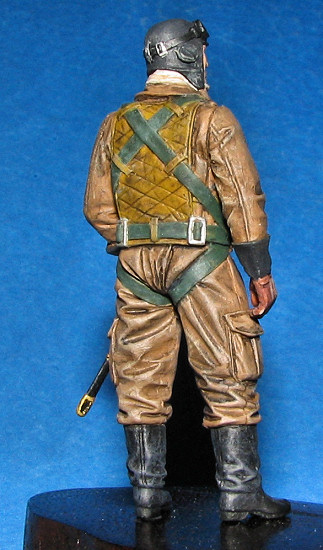
First thing I did was to paint the boots with Matte Black. Then I painted the entire torso and arms with Earth Brown. The Ultracast header has a front image of the figure for a guide. It does not have a view of the back and I'd like to recommend they add this. References are given but for those of us who don't want to spend the money on a reference for one figure would appreciate this additional view.
 Once
the two main colors were applied, I did a bit of detail work by first painting
the rear portion of the gloves with Floquil's Weathered Black. The wide straps
were painted using Testors Model Master enamels FS 34097. I did not mix the
paint too well as I wanted this to be a bit glossy. Then I used Vallejo
'Japanese Uniform' color for the back pack and ties. The scarf was painted Matte
White, and the gloves 'Saddle Brown'. At this stage, I glued the arms in place.
You'll note that none of the metallics have been done nor is there any wash/drybrusing
at this stage. It is important to have the base colors down before that and to
touch up any overlapping or bare areas.
Once
the two main colors were applied, I did a bit of detail work by first painting
the rear portion of the gloves with Floquil's Weathered Black. The wide straps
were painted using Testors Model Master enamels FS 34097. I did not mix the
paint too well as I wanted this to be a bit glossy. Then I used Vallejo
'Japanese Uniform' color for the back pack and ties. The scarf was painted Matte
White, and the gloves 'Saddle Brown'. At this stage, I glued the arms in place.
You'll note that none of the metallics have been done nor is there any wash/drybrusing
at this stage. It is important to have the base colors down before that and to
touch up any overlapping or bare areas.
During all this handling, some of the paint had worn
off so I used white glue and cemented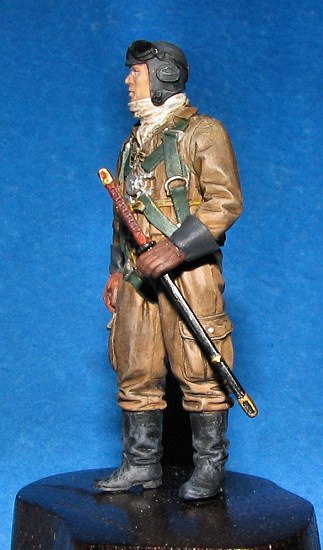 the figure to a small wooden block to help
protect the figure. You'll also note that there is no head. Due to the design of
the kit, it is easier to add that after all the painting has been done. To ease
in handling of the head, I drilled a small hole in the base of the neck and
inserted a small section of plastic rod.
the figure to a small wooden block to help
protect the figure. You'll also note that there is no head. Due to the design of
the kit, it is easier to add that after all the painting has been done. To ease
in handling of the head, I drilled a small hole in the base of the neck and
inserted a small section of plastic rod.
With the base color down, I used some Burnt Umber to do a wash and fill in the various cracks and crevices. This wasn't bad, but not quite what I wanted so I did a very dilute black wash to add to the whole thing. Much more to my liking. That was left to dry for a while and then I drybrushed all the brown areas with a Beige. This added highlights and seemed to provide even more depth. I dry brushed the straps with a Light Green.
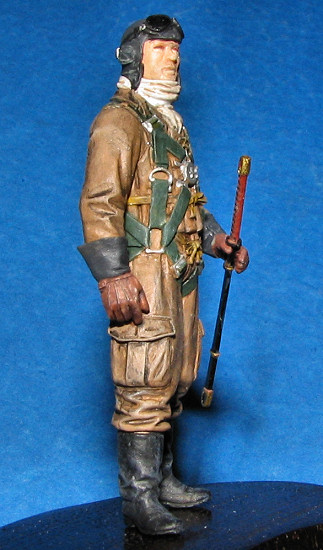
At the head, I painted it with Base Flesh and did the helmet in both Matte Black and Weathered Black. It was also given a Burnt Umber wash which seemed to work out well.
Back at the torso, I sprayed the whole thing with a matte clear to seal in the colors. I then took a bright silver paint pen and used it to transfer paint to a fine brush so I could do the buckles and harness release. A little slop meant some touchup paint. The head was then glued on as I tried to figure how to do the eyes. This is always a problem area on small scale figures as I sure didn't want a 'bug eye' effect. I settled for a strip in the upper eye socket as it seemed to be what was done from the image I had on the package.
I then googled 'Japanese Navy Sword' and found several images of Naval samurai swords as given in the kit. The sword was painted the appropriate colors and then set aside after I put a wash on the handle. I then gave everything a coat of clear matte and used some clear gloss on the lens portion of the goggles. Locating a nice base, I drilled a hole in the base and one in one of the figure's feet. Then a small piece of paper clip was installed and the whole thing glued to the base by the one leg. I used white glue for this so I could remove the figure if I had to. This glue was also used to attach the sword to the figure's hand, and that was it.
| CONCLUSIONS |
 This is the first military
figure kit that I've done. I found it to be an enjoyable build, mostly because I
was able to brush paint it and the kit itself is a beautifully cast one. I'm
pleased with the way the various shadings worked out, but not as happy with the
face. It is pretty obvious that I'll have to spend a bit more time and effort on
this part of the figure in the future. I should also have blended in the arms at
the shoulders a bit better. It is easy to be rough on yourself when you see
these things, but the larger than life photos really make these stand out.
Overall, I can highly recommend this kit to you if you are so inclined to want
to do things like this.
This is the first military
figure kit that I've done. I found it to be an enjoyable build, mostly because I
was able to brush paint it and the kit itself is a beautifully cast one. I'm
pleased with the way the various shadings worked out, but not as happy with the
face. It is pretty obvious that I'll have to spend a bit more time and effort on
this part of the figure in the future. I should also have blended in the arms at
the shoulders a bit better. It is easy to be rough on yourself when you see
these things, but the larger than life photos really make these stand out.
Overall, I can highly recommend this kit to you if you are so inclined to want
to do things like this.
July 2006
#1416 in a series
Copyright ModelingMadness.com. All rights reserved.
Review copy courtesy of the fine folks at Ultracast. Visit them at their website.
If you would like your product reviewed fairly and fairly quickly, please contact the editor or see other details in the Note to Contributors.