Bandai 1/144 MS-06FZ Zaku II FZ
| KIT #: | 5058262 |
| PRICE: | $10.00 at an auction |
| DECALS: | One option |
| REVIEWER: | Scott Van Aken |
| NOTES: | 2008 release |
| BACKGROUND |
 This is one of the literally dozens of characters in the wide Gundam world.
For those of you who, like I, know next to nothing about this, here is a bit
from Wikipedia: Mobile Report Gundam Wing (新機動戦記ガンダムWウイング, Shin
Kidō Senki Gandamu Uingu), is a 1995 Japanese mecha anime series directed by
Masashi Ikeda and written by Katsuyuki Sumizawa. The plot of Gundam Wing centers
on a war in the future (specifically, the year After Colony 195) between Earth
and its orbital colonies in the Earth-Moon system.
This is one of the literally dozens of characters in the wide Gundam world.
For those of you who, like I, know next to nothing about this, here is a bit
from Wikipedia: Mobile Report Gundam Wing (新機動戦記ガンダムWウイング, Shin
Kidō Senki Gandamu Uingu), is a 1995 Japanese mecha anime series directed by
Masashi Ikeda and written by Katsuyuki Sumizawa. The plot of Gundam Wing centers
on a war in the future (specifically, the year After Colony 195) between Earth
and its orbital colonies in the Earth-Moon system.
If you want to know more, a google will provide you with more info.
| THE KIT |
Bandai SF kits are, for the most part, snap kits designed to provide a completed model in the least amount of time without the use of cements. This one appears to be the same. Gundam kits come in two major scales. The larger, more expensive ones are in 1/100 scale while the smaller and somewhat less complex kits are 1/144. While this one is the smaller scale. the 44 construction steps belies any attempt at calling this one less complex.
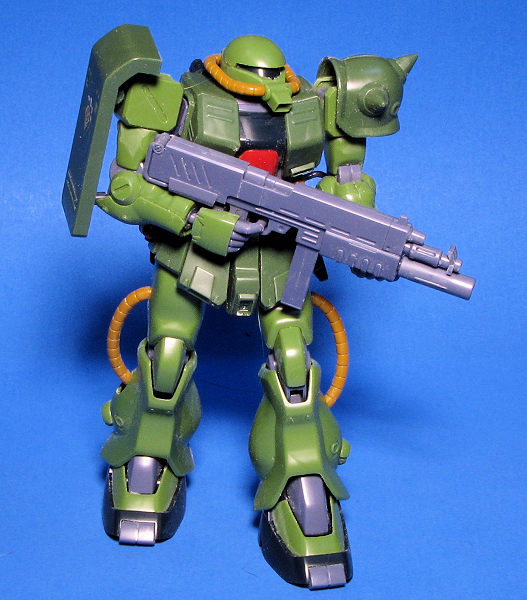
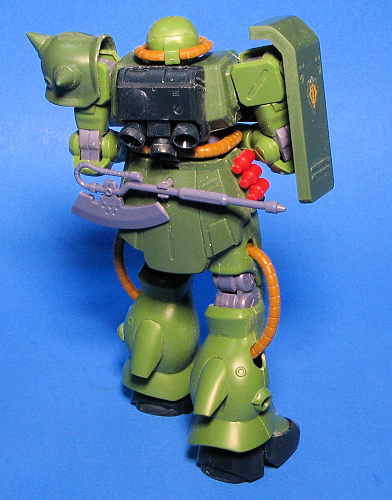
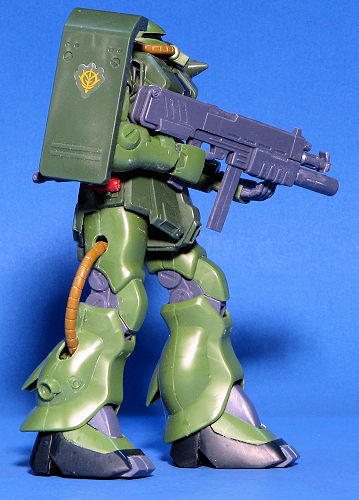
These kits are molded in color in order to alleviate any need for paint and this one is not exception. The majority of the kit is in olive green and medium grey with parts of the sprues in dark grey, red, and a light brown. A fair number of the sprue parts are dedicated to the various joints and hinges. This allows the figure to assume just about any pose you might wish. This also increases its play value among younger builders.
 I have no idea how this one fits into the Gundam universe as everything is
written in Japanese. Instructions show it armed with one of two weapons. One is
a large machine gun and the other is an axe of some sort with a glowing blade.
Despite the lack of English, the construction steps are very easy to follow and
should result in a hassle free build. Of course it can be painted if desired and
a painting guide is provided, but it is not necessary. There is a small sticker
sheet included which looks as if it is to be applied to the shoulder armor.
I have no idea how this one fits into the Gundam universe as everything is
written in Japanese. Instructions show it armed with one of two weapons. One is
a large machine gun and the other is an axe of some sort with a glowing blade.
Despite the lack of English, the construction steps are very easy to follow and
should result in a hassle free build. Of course it can be painted if desired and
a painting guide is provided, but it is not necessary. There is a small sticker
sheet included which looks as if it is to be applied to the shoulder armor.
| CONSTRUCTION |
After some on-line encouragement, I decided to give this kit a try. I've never been a Gundam fan, but this seems to be a very popular genre of kit as those hobby shops still left seem to sell quite a few of them. Though I have a larger 1/100 kit, I thought that perhaps the smaller 1/144 version may well be the way to get started in these sorts of kits.
Naturally I followed the instructions on this one. I also decided not to paint it, fill seams, or glue any parts, relying on their reputation for being able to be assembled without cement. Since I wasn't going to use any of those items, it is important that the parts are cleaned up prior to assembly. In fact, I dare say that a good 70% of the time I spent on this kit was cleaning up parts. In order to reduce sprue attachment nubs to a minimum, a wise builder will use flush cutters. I have a pair of Meng flush cutters that I started using some 3-4 years ago and though more expensive than the Xuron cutters I used before, provided a superior cut. I also used a four grit sanding stick and most often just used the two finer grits.
 The engineering of the kit is really superb. For instance, all the sprue
attachment points are in places that are flat or relatively so, which makes
sanding what's left a snap. I also found that the fit of the parts is as superb
as the engineering so while there are seams, they don't look too out of place.
The engineering of the kit is really superb. For instance, all the sprue
attachment points are in places that are flat or relatively so, which makes
sanding what's left a snap. I also found that the fit of the parts is as superb
as the engineering so while there are seams, they don't look too out of place.
The instructions start with building the torso, move on to your choice of head, then on to the arms and those items that attach to them. Hands are next and you have options in this case as well. Two weapons are included; an axe and a rather large machine gun. Your choice of hands depends on which of these are deployed.
Things then move to the feet, then the legs. Finally, all of these items are attached together to form the completed model. You spend quite a bit of actual construction time installing the vinyl attachment gromments inside the halves of various parts of the figure. These are what give the figure the ability to assume a wide variety of poses. Thanks to the wide feet, the model is fairly stable. A nice feature of the instructions is that they have you build up one side before tackling the next. So you build up a right arm assembly before moving on to the left arm. This prevents any issues with using the wrong parts (besides which they probably wouldn't fit anyway). The only time you do a 'build two' is the feet. There is a sticker for the outside of the shield and that is about it.
| CONCLUSIONS |
Despite being a bit concerned about the number of parts in the box, the build went very quickly. Working on and off over the course of two days was all it took to complete the model. I'd say I worked perhaps 7-8 hours on it. Quite the confidence booster in regards to building the larger kit that I have. Having it molded in so many colors also adds to the overall look.
I know these sorts of things are not for everyone, but it was a relaxing and truly trouble-free building experience. I'd very much recommend it and I'm sure that if you decided to fill seams and paint it, it would look even better.
21 February 2025
Copyright ModelingMadness.com. All rights reserved. No reproduction in part or in whole without express permission from the editor.
If you would like your product reviewed fairly and fairly quickly, please contact the editor or see other details in the Note to Contributors.
Back to the Main Page Back to the Review Index Page Back to the Previews Index Page