| THE KIT |
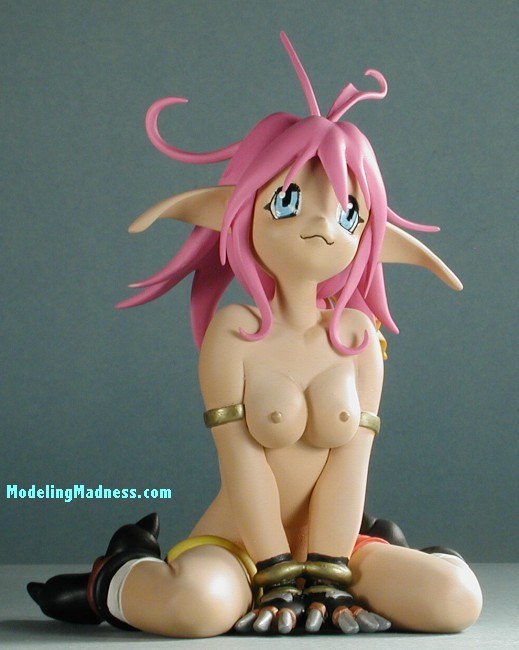
This is another if the interesting anime figures that can be found at various websites which cater to those who are interested in these subjects. Unlike many of the figures around, this one does not seem to be associated with any specific cartoon series or characters. A web search was also unable to come up with any associations.
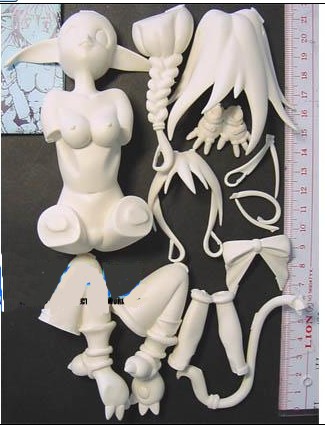
Typical of Hong Kong or Japanese produced resin figure kits, this one was molded in a fine, white resin. It was totally devoid of any glitches such as air bubbles, chipped sections, large resin sprue block or broken pieces. Test fitting showed that there would be some work needed to fill in gaps, but nothing out of the ordinary for figures such as this. In fact, most of the join lines were made where there was a piece of clothing or jewelry present to hide the join.
| CONSTRUCTION |
 First order of business was to clean up the parts. Some of the parts had some rather prominent mold seams that needed to be sanded down. There were also some very small pour stubs that needed to be sanded down and a few of the parts (like the ends of the hair) had some extra bits that had to be removed. In all, this is one of the more time intensive parts of the build. After that, the next order of business was to see what parts could be joined prior to painting. Often times, the kit parts will have to be painted separately and then joined, but it always helps to join as many pieces as possible in order to just have the painting process be a bit easier. In this case, I joined the legs and arms to the torso. I used epoxy putty to fill in the large join seams as it is easiest to work with. Since it doesn't shrink, once the general form is made, then all that is needed is some final shaping with sandpaper.
| PAINTING |
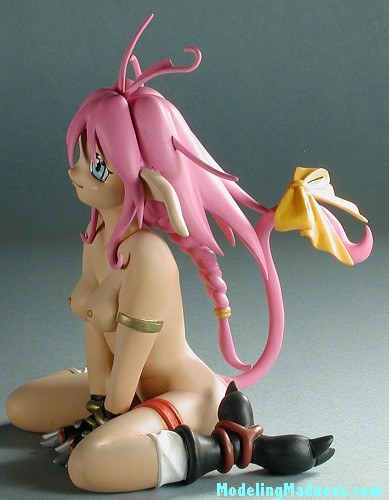
Painting is the other major portion of doing these kits. Since most of them are not that parts intensive (though some I have do have dozens of pieces) one spends a majority of time painting. For the skin, I like to use Badger Accu-flex. There are several skin tones available and by some judicious mixing, one can get the tone that they like. I started with the darker tones and then used lighter ones, finally using a very small amount of white for some surfaces. I airbrushed all of these as I just can't get the same quality of finish using a brush.
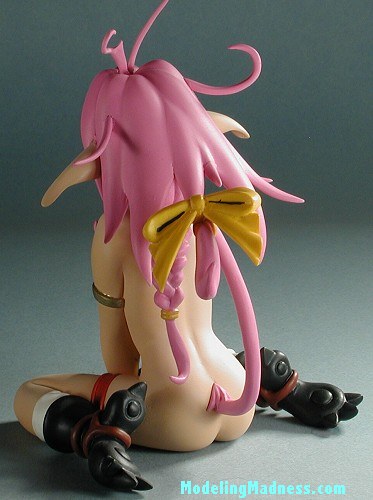 With the main body done, all the hair and the tail were painted purple using Vallejo's acrylics. Again, I airbrushed these parts. I used Badger Ogre Ochre for the yellow/orange ribbon. For the gold and silver bits, I used some paint pens that I bought at an art store. These give a very nice result and you can always get enough out of them for fine brush work if you need to.
During construction I did manage to break a few parts. One was an ear and the other a finger. The ear was easy to reattach, but the finger I broke went missing so I had to make a new one out of a section of paper clip and some epoxy putty.
For other detail colors, I generally used Vallejo acrylics. They are fairly easy to brush on and provide good coverage. I have always had trouble with eyes and this figure proved to be no exception. Guess I'll just have to keep on trying as the old adage of practice makes perfect is certainly true when it comes to doing model building. For the eyes, I used a light blue, after trying darker colors and not liking the effects. The eyes themselves were outlined using a drafting pen.
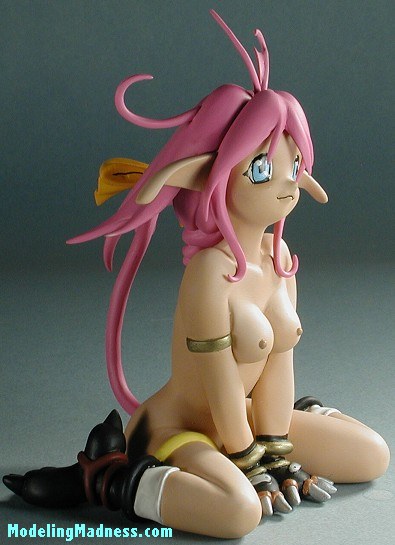
With the eyes done, I turned to painting and attaching more parts. At this stage, I had the main figure done, minus the hands, tail and hair. The hands were in gloves that I painted black with silver and gold parts. I chose to paint the feet in black with dark brown straps. The leggings were done in white and the two bands around the upper portion of the legs were done in red on one side and yellow on the other. No reason to do so other than to add more color. With all the lower bodywork painting done, I attached the hands only to find that they were a bit high off the ground. Not only that, but after the superglue dried, I discovered that one side had slipped down quite a bit. Since the parts are difficult to see, I left them as they were. These kits are all shelf models anyway so I won't be embarrassing myself in any competitions with it!
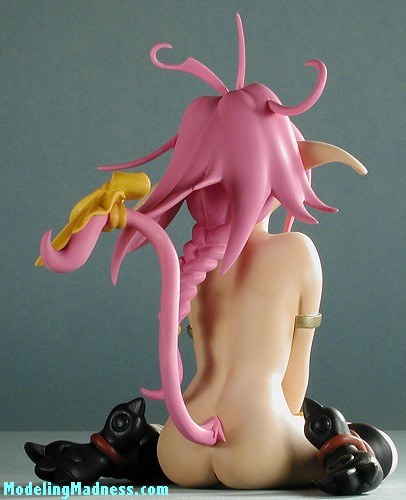 Moving to the top, I assembled the hair, which comes in three sections. First is a lower back piece that is a braided pony-tail. With that in place, the upper section, which covers portions of the ears from the back was installed. So far so good. Then came the forward section which includes the bangs and the portion that drapes forward. This was a very tight fit and required a lot of gently 'grunt' work to get into place before gluing. During the installation, portions of this piece rubbed against the body of the figure, leaving little bits of lavender paint. These were gently scraped off using a new scalpel blade. The final parts were the tail, which fit very well, and the large, ribbon on the tail.
This pretty well completed the figure. I did the usual touch-up painting where things had been rubbed away or I noticed that I'd misses a spot. Then the entire figure was given a coat of clear matte. I've seen a lot of figures painted in a gloss or semi-gloss and frankly, they just don't look good. Skin is closer to matte than anything and shiny skin is just wrong unless the figure has been doing a LOT of sweating. Same for most of the clothing and other apparel. If you look at what you are wearing, most of your apparel is matte. With that done, the final step was to paint the eyes a gloss clear and the figure was then complete.
| CONCLUSIONS |
 While not a difficult build, figures require most of their time being painted. For me, this means a lot more time painting than what I do on most aircraft kits, but because the majority of painting is detail stuff, I can sit down with a brush and take my time doing it. While the subject may not appeal to some of you, it does to a surprising number of modelers, including myself, who prefer them over military figure subjects. The excellent casting and interesting subject make for a figure that was a most enjoyable build. If your interests lean in this direction or you'd like more information on anime modeling, I'd be happy to help.
June 2004
#1317 in a series