
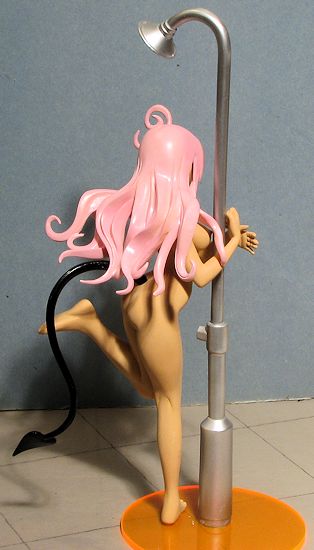
E-2046 1/9 Lala Satalin Deviluke
| KIT #: | FG 4911 |
| PRICE: | $41.95 which includes shipping from Hong Kong |
| DECALS: | None |
| REVIEWER: | Scott Van Aken |
| NOTES: | Resin kit |
| HISTORY |
The story of To Love-Ru revolves around Rito Yūki, a high-school student who cannot confess to the girl of his dreams, Haruna Sairenji. One day when coming home and sulking in the bathtub, a mysterious, nude girl appears out of nowhere. Her name is Lala and she comes from the planet Deviluke, where she is the heir to the throne. Her father wants her to return to her home planet so she can marry one of the husband candidates. But she decides that she wants to marry Rito in order to stay on Earth. Commander Zastin has been ordered to bring Lala back and has already battled Rito. He reports to the emperor that Rito would be suited to marry Lala, after hearing Rito, who was actually defending himself instead of Lala, says that marriage is impossible unless it is with the person you love. Lala truly falls in love with Rito and decides that she wants to marry Rito after hearing what he said. Her father decides that, if Rito is able to protect Lala from her fiancés, then he can marry her, but if Rito cannot protect Lala from her other fiancés and meet the king's expectations, Lala's father will kill Rito and destroy the Earth.
 to keep herself from getting married, but really
does fall in love with him after she misinterprets a statement that Rito
shouts that was meant for Haruna. Although Lala appears to be somewhat
airheaded, she is well known on Deviluke for her genius-level intellect and
enjoys making all manners of inventions, often prompting some disastrous
effect or another. Throughout the series, she frequently tries to get Rito
to love her, although her grand gestures generally end up putting Rito and
company in embarrassing situations. Although Rito frequently chastises her
for causing embarrassing and otherwise troublesome incidents, Lala rarely
shows any form of negativity towards him and even states it is impossible
for her to hate him. Even after finding out that he was in love with Haruna
as well, she instead cheered and stated that they could both marry him, and
becoming even happier after he accidentally said "I love you" to the rest of
the female cast, as they could all be together.
to keep herself from getting married, but really
does fall in love with him after she misinterprets a statement that Rito
shouts that was meant for Haruna. Although Lala appears to be somewhat
airheaded, she is well known on Deviluke for her genius-level intellect and
enjoys making all manners of inventions, often prompting some disastrous
effect or another. Throughout the series, she frequently tries to get Rito
to love her, although her grand gestures generally end up putting Rito and
company in embarrassing situations. Although Rito frequently chastises her
for causing embarrassing and otherwise troublesome incidents, Lala rarely
shows any form of negativity towards him and even states it is impossible
for her to hate him. Even after finding out that he was in love with Haruna
as well, she instead cheered and stated that they could both marry him, and
becoming even happier after he accidentally said "I love you" to the rest of
the female cast, as they could all be together.| THE KIT |
 E-2046
kits are among the finest resin figure kits of this type produced. Rarely are
the kits such that any real modeling effort is required to assemble them, though
this does happen from time to time, an expected result of having many different
casting 'shops' making the kits. This one, however, seems to be among the best.
Not only did the parts test fit very well once they were cleaned up, but the
design of
E-2046
kits are among the finest resin figure kits of this type produced. Rarely are
the kits such that any real modeling effort is required to assemble them, though
this does happen from time to time, an expected result of having many different
casting 'shops' making the kits. This one, however, seems to be among the best.
Not only did the parts test fit very well once they were cleaned up, but the
design of 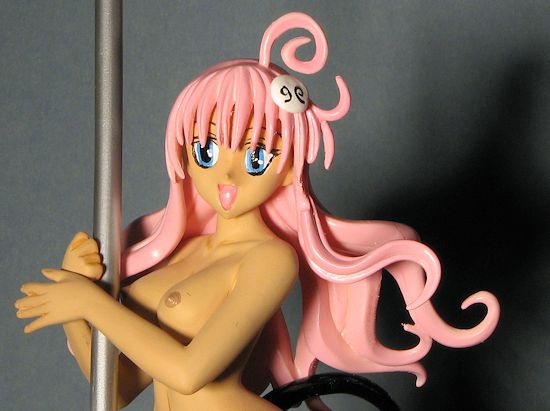 the arms and leg having rounded ends that fit into sockets in the main
body makes the inevitable filler required for the seams on the kit like this an
easy task.
the arms and leg having rounded ends that fit into sockets in the main
body makes the inevitable filler required for the seams on the kit like this an
easy task.
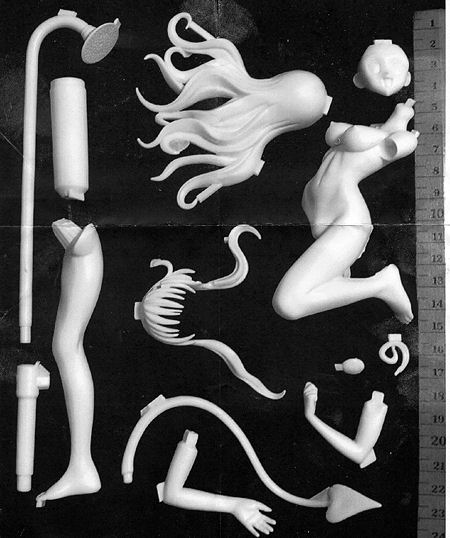
This one is pretty simple as kits go. I have some kits that have over 50 parts, many of them small. That is not the case with this one as there are but 12 parts, three of them used for the shower and only two of them that could be considered small. One of the benefits of doing unclothed figures! Of course, figures like this are not for everyone, but I like them. The kit instructions are generally little more than a parts illustration of some sort and a photo of the completed model is also provided. Most of the time, figuring out what goes where is not an issue. There is no painting scheme, but most will follow the photo. No scale was provided with this kit, but the figure measures out to be about 7.5 inches tall so I would guesstimate it at about 1/9 scale, assuming the character is about 5 foot 9 inches tall. This is a bit smaller of a scale than the norm as most tend to range between 1/8 and 1/6 scale, though there are those which are larger and those smaller. Typically, if there is a prop included in the kit, the scale will be smaller. I know one kit I would love to have, but know I would never build has the character on a hopped up motorcycle, which is in itself 1/8 scale. But that is also a bit on the pricey side. No stand is included, but those are easy enough to find or make.
| CONSTRUCTION |
 Clean up with
multiple grades of sandpaper takes about an hour. The parts themselves are super
clean with no real mold lines as you might expect. I found one void in the hair
and the more I look at the image that comes with the kit the less I am sure it
is a glitch. Resin pour stubs are quite s
Clean up with
multiple grades of sandpaper takes about an hour. The parts themselves are super
clean with no real mold lines as you might expect. I found one void in the hair
and the more I look at the image that comes with the kit the less I am sure it
is a glitch. Resin pour stubs are quite s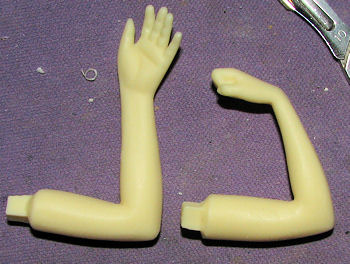 mall
as any large pieces have already been trimmed. One will have to trim them closer
to the part, but one has to be careful not to get too close as attempts at flush
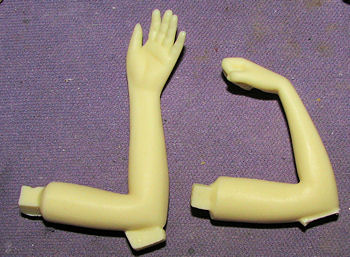
cutting will only result in a divot. As you can see by the first of two photos
of the arms, the left side is as it comes in the box and the right is after I
have trimmed it using sprue cutters. The other is of the two parts after a few
minutes of sanding. I use a multi-grade sanding stick and use the coarsest for
the initial sanding. When it is down to just a bump, I go with the next grade
and use the two finer grades on the stick to blend things in. I recommend either
wet sanding these or wearing a dust mask to prevent from breathing in the resin
dust. You will find that some parts, like the hair where it curls, will
have thin sheets of resin. This can be cleaned up by first using a sharp scalpel
to remove most of the resin then using either rolled up sandpaper or fine fines
to take care of the residue.
mall
as any large pieces have already been trimmed. One will have to trim them closer
to the part, but one has to be careful not to get too close as attempts at flush
cutting will only result in a divot. As you can see by the first of two photos
of the arms, the left side is as it comes in the box and the right is after I
have trimmed it using sprue cutters. The other is of the two parts after a few
minutes of sanding. I use a multi-grade sanding stick and use the coarsest for
the initial sanding. When it is down to just a bump, I go with the next grade
and use the two finer grades on the stick to blend things in. I recommend either
wet sanding these or wearing a dust mask to prevent from breathing in the resin
dust. You will find that some parts, like the hair where it curls, will
have thin sheets of resin. This can be cleaned up by first using a sharp scalpel
to remove most of the resin then using either rolled up sandpaper or fine fines
to take care of the residue.
 It is important to test fit each piece prior to starting any
gluing. Since most will use super glue, any fit issues will not be able to be
corrected easily. This also allows any minor resin build up that one frequently
finds to be cleaned away. It just makes the assembly process that much smoother.
It is important to test fit each piece prior to starting any
gluing. Since most will use super glue, any fit issues will not be able to be
corrected easily. This also allows any minor resin build up that one frequently
finds to be cleaned away. It just makes the assembly process that much smoother.
Once the bits were done, I started gluing. I first glued together the three parts that make up the shower. The fit was excellent, though it can hardly be called perfectly straight! I then attached the one leg and the arms. The left arm is not a really good fit as once the right arm is in place, one has to use some pressure on the left until the super glue dries. I then filled the seams for the arms and the leg. The seam for the leg goes right through the rear end, giving new meaning to the term 'butt crack'. I purposely used a bit too much super glue to have it ooze from the seams, but despite that I still ended up using standard filler.
The last body part I added was the head and it was time to think about painting.
| COLORS & MARKINGS |
First of all, all the bits were primed with Tamiya
white extra fine primer. This is to give the paint something to stick to and
while the primer is rather easily scratched, it will prevent paint issues with
the flesh. For this I used my dwindling supply of Badger Freak Flex standard
flesh tone. While that
 was drying I lost interest in the kit and it sat for many
months before I returned to it.
was drying I lost interest in the kit and it sat for many
months before I returned to it.
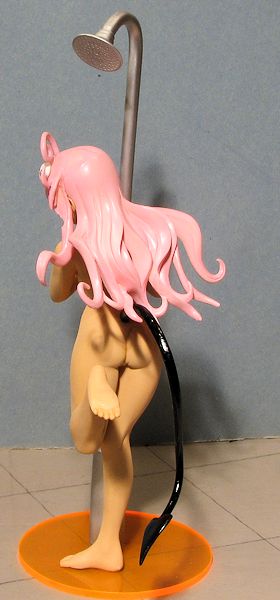
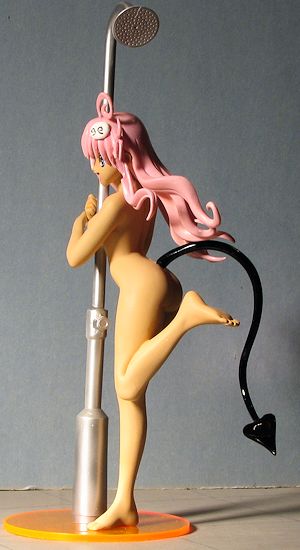
When I got back into the kit, the shower was painted Alclad II Aluminum and the hair was given a nice pink color from some shades I mixed using Pactra slot car body acrylics. The tail was painted Tamiya gloss black and 'Peke' was painted gloss white. I used rose flesh tone for the nipples and painted the eyes white before using Vallejo acrylics for the blue. I did a few seam bits using Vallejo medium fleshtone. Other details were painted using semi-gloss black.
| FINAL CONSTRUCTION |
Now it was time to attach the hair to the head. The curls need to be carefully placed when gluing on the front half. I also had to hold this piece and the back piece quite tightly to ensure a good fit while the super glue dried. There was a seam between the front and back hair pieces as normal, but this one was bigger than most so super glue was used to fill it. The upper curl was installed and I used the same pink used to airbrush it to repaint it. Since the paint is rather thin, it took several applications. I then drilled a hole in the bottom of the foot for a pin. The same was done to the shower.
It was then that I realized that building the shower
ahead of time was not exactly a good thing as I could not fit it in between her
arms and chest. I had to cut it so I could thread it through later. A hole was
drilled in both these parts and like the feet and bottom of the shower, a pin
was installed using
 a section of paper clip.
I then set up the figure about where I felt it should go and drilled a hole in a disc base that I was going to use. Be sure to cut the pin shorter than the base thickness so it doesn't protrude through. The figure was glued in place and the shower pieces placed in the proper spot prior to drilling a hole for it as well. I used the protruding pin to scratch the surface of the base to see where the hole should be drilled. The base of the shower was glued on, followed by the rest of it.
A bit of touch up painting was done to take care of scratches, 'Peke' was attached after painting, and that was it.
| CONCLUSIONS |
I say this at the end of every one of these figure builds and it is true. Not everyone likes these sorts of things, but I do and so I continue to build them. Apparently a lot of other modelers in the world like them as well as the place I buy these sells out all the time. In fact, I have to pre-order the kits I would like to have in order to be sure they are available. Once sufficient orders are received, the company has them made.
Generally I do figures from various anime episodes that I have seen as it gives them a bit more interest. 15 years ago I knew nothing of the genre, but in my old age, I have come to really enjoy a field of entertainment that really did not exist when I was growing up. Most of these figures are pretty simple and most build very well. I recommend checking them out and giving one a go.
September 2013
Thanks to me for this one.
If you would like your product reviewed fairly and fairly quickly, please contact the editor or see other details in the Note to Contributors.