| KIT # | ? |
| PRICE: | $59.00 |
| DECALS: | none |
| REVIEW : | |
| NOTES: | Resin Japanese Garage Kit |
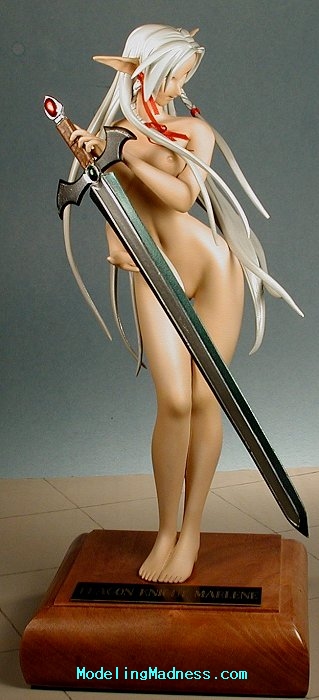
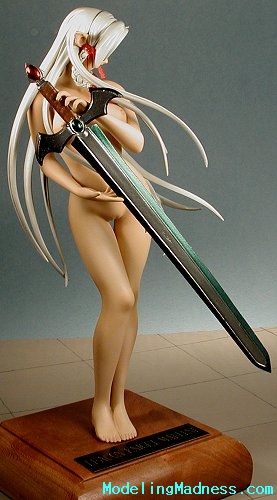
1/6 Dragon Knight Marlene
| KIT # | ? |
| PRICE: | $59.00 |
| DECALS: | none |
| REVIEW : | |
| NOTES: | Resin Japanese Garage Kit |
| THE KIT |
Take a look at the preview for a breakdown of the parts and some background on the kit itself. (Preview may be unavailable at this time)
| CONSTRUCTION & PAINTING |
 As with
all resin kits, construction starts with clean-up. Also typical of figure kits,
painting is a constant process. For that reason, I have included it in with the
construction steps. Back to clean-up. In this case, it meant sanding off as much of the mold seams as possible and then giving the parts a nice
wash in luke-warm water with plenty of detergent. It also meant removing the
small mold blocks that were on the parts. Once that is done, the next thing to do
is to give the parts a coat of primer. This does two things. It shows up any
areas missed and it also preps the parts for painting.
As with
all resin kits, construction starts with clean-up. Also typical of figure kits,
painting is a constant process. For that reason, I have included it in with the
construction steps. Back to clean-up. In this case, it meant sanding off as much of the mold seams as possible and then giving the parts a nice
wash in luke-warm water with plenty of detergent. It also meant removing the
small mold blocks that were on the parts. Once that is done, the next thing to do
is to give the parts a coat of primer. This does two things. It shows up any
areas missed and it also preps the parts for painting.
As you can imagine, a number
of small pinholes appeared that were not there before
Once that was done, the pinholes and other glitches were filled with Mr. Surfacer 500. In addition tothe pinholes, there were some rather large holes on the inside of the feet and ankles that needed several applications. This stretched out preparation to over a week as I gave each application of Mr. Surfacer and primer a good day to dry.
Finally, I was at a point where I could start cementing parts together.
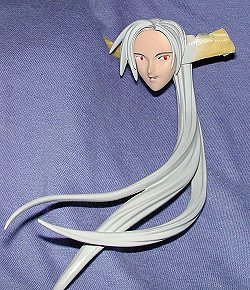
 The kit has long, flowing hair.
This assembly is in three parts and attaches to the back of the head when done.
There are some guide pins and slots to help with assembly. I glued the left main
section of hair to the head assembly and then glued the other two hair sections
together. The two lone sections fit OK, but there was a step and gap that needed
filled. Again, several days were needed to get this right.
The kit has long, flowing hair.
This assembly is in three parts and attaches to the back of the head when done.
There are some guide pins and slots to help with assembly. I glued the left main
section of hair to the head assembly and then glued the other two hair sections
together. The two lone sections fit OK, but there was a step and gap that needed
filled. Again, several days were needed to get this right.
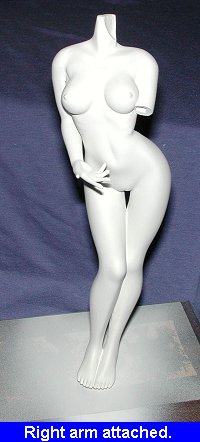
Backat the body of the kit, the right arm was glued in place. This had some chips taken out of the resin at the attachment point so also needed several applications of filler to smooth out. The end result looks like something you'd see in a museum in Athens!
After I had applied enough primer to get it ready for painting, I applied several coats of paint using Badger Accuflex acrylic paint. I used the 'suntanned flesh' color. Once done, I took a look at the result and didn't like it. Too dark for my tastes. There were also some areas that had run and a few other glitches.
Some fix-it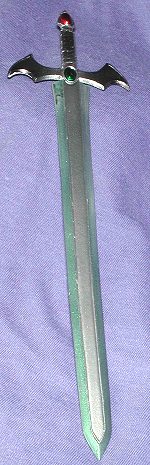 work, mostly with fine grades
of sandpaper, was done to the body to take care of the rough spots and oversprays. Then a normal flesh color, also Badger Accuflex, was sprayed in many very
light coats. This seemed to do the trick in terms of lightening up the flesh tone
and getting it more to what I was looking for.
work, mostly with fine grades
of sandpaper, was done to the body to take care of the rough spots and oversprays. Then a normal flesh color, also Badger Accuflex, was sprayed in many very
light coats. This seemed to do the trick in terms of lightening up the flesh tone
and getting it more to what I was looking for.
While all of that sat around and cured for a while, I went to work on the other parts of the kit. Specifically the sword and the hair. Try as I might, I couldn't get the sword to be completely straight. A problem with these long, skinny resin bits. Wasn't sure what colors the sword would be painted in, but I did know that it would be a metallic of some sort for most of it. To that end, the sword was painted gloss black over the white primer coat. I then painted the sword using greenish metallic color from Alclad II. The effect is quite interesting. This was then masked off and the rest of the sword painted with dark aluminum, another Alclad II color. The two 'jewels' in the handle were painted clear red and green using Tamiya paint. The only color left to do is whatever I decide to paint the handle in, probably a leather color.
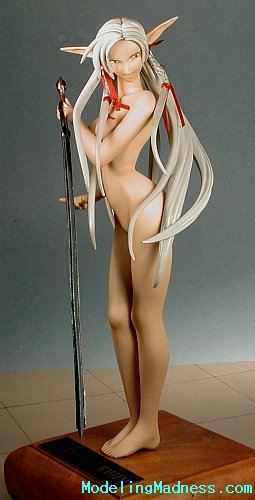
 The figure's
hair is to be a grey color in keeping with the color card that came with it. That
is not a problem for a military modeler as I have lots of greys. I chose Testors Model Master Canadian Voodoo Grey enamel as the base color for the hair. It
took several sessions to finally get all of the hair sprayed in that particular
color. The head was masked with Tamiya tape to prevent any grey overspray.
The figure's
hair is to be a grey color in keeping with the color card that came with it. That
is not a problem for a military modeler as I have lots of greys. I chose Testors Model Master Canadian Voodoo Grey enamel as the base color for the hair. It
took several sessions to finally get all of the hair sprayed in that particular
color. The head was masked with Tamiya tape to prevent any grey overspray.
Once the hair was painted, the face got a bit of attention with the whites of the eyes painted it. Then the irises were painted, this time using a semi-transparent orange color. The pupils were done in black . Next the eyebrows were painted in a dark brown and the area under the eyelid was done in black using a drafting pen. After that had dried, the two forward sections of hair were attached using superglue. There is a bit of a gap in the forward section and it was filled, again using superglue. The hair was touched up using the Voodoo grey.
 Now I've looked at a lot of figures, and they are generally
overly accentuated with various washes. I know this is considered the norm, but
I really don't like the effect so tend to not do the wash thing. Instead, I
mixed some of the normal color with some white and sprayed that lightened color on
the areas that would normal take a highlight. This includes the cheeks,
forehead, tops of shoulders, breasts and buttocks as well as knees, and other
upper surface areas. The parts that may be in shadowed was painted with suntanned flesh,
also a Badger color. The shading is subtle and more of what I like. The areas in
between the toes as well as the areas between the arm and body and the bellybutton were darkened using a Rapidograph pen
Now I've looked at a lot of figures, and they are generally
overly accentuated with various washes. I know this is considered the norm, but
I really don't like the effect so tend to not do the wash thing. Instead, I
mixed some of the normal color with some white and sprayed that lightened color on
the areas that would normal take a highlight. This includes the cheeks,
forehead, tops of shoulders, breasts and buttocks as well as knees, and other
upper surface areas. The parts that may be in shadowed was painted with suntanned flesh,
also a Badger color. The shading is subtle and more of what I like. The areas in
between the toes as well as the areas between the arm and body and the bellybutton were darkened using a Rapidograph pen
The next step was to attach the head to
the neck. This was the worst fitting part of the 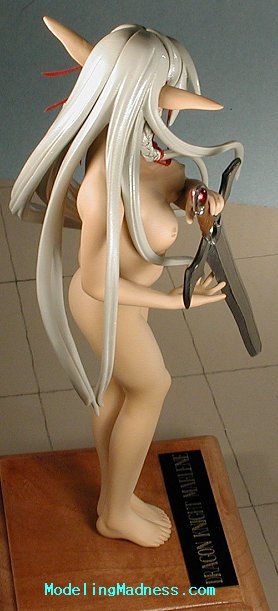 model. No matter how I tried,
I just couldn't get a good fit. Not sure just exactly how to go about correcting
that other than to attach the head to the neck prior to putting on the back
sections of hair. Then those would probably not fit well and need fussing with.
The final back section of hair was glued in place and the fit here was not as
good as I'd have liked, mainly because the head had been glued on and the hair
interfered with the body.
model. No matter how I tried,
I just couldn't get a good fit. Not sure just exactly how to go about correcting
that other than to attach the head to the neck prior to putting on the back
sections of hair. Then those would probably not fit well and need fussing with.
The final back section of hair was glued in place and the fit here was not as
good as I'd have liked, mainly because the head had been glued on and the hair
interfered with the body.
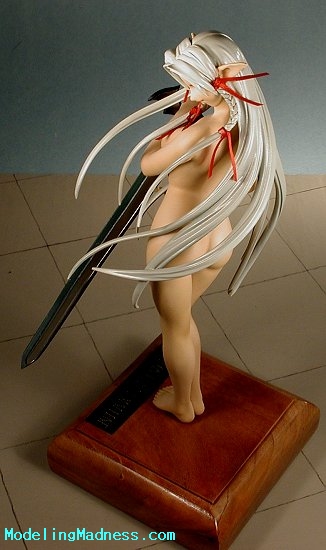
Last parts to be glued on were the sections of hair just below the ears. These needed some ribbons on them. I went to a place that sells ribbons and bought some red ones that I could cut. These were trimmed into small sections and tied onto the appropriate areas on the figure. I'll have to find something more flexible next time as I found the one I bought to be too stiff. These sections were glued in place. Then the resin section was glued in place with the ribbon covering much of the join. The sword was a real tricky part of the kit. It seemed more like an afterthought as anything else. There seemed to be no proper way to attach it to the hands. Finally I ended up just placing in the figure's hands in a pose that seemed to match what was on the artwork that came in the box.
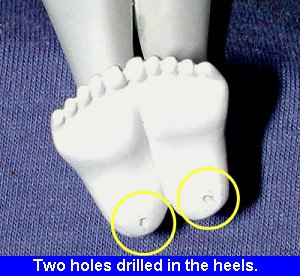
 Last step was to mount the figure to a base.
I had already drilled holes for the mountings in the feet and these were
deepened. A good friend provided me with a nice cherry base and that was given
several coats of Future to bring out the highlights in the wood (yes, Future works on wood, too). Holes
were drilled in it to fit the pins glued to the feet. A small name tag from Almer Awards was then stuck on, the
figure inserted into the holes and it was done!
Last step was to mount the figure to a base.
I had already drilled holes for the mountings in the feet and these were
deepened. A good friend provided me with a nice cherry base and that was given
several coats of Future to bring out the highlights in the wood (yes, Future works on wood, too). Holes
were drilled in it to fit the pins glued to the feet. A small name tag from Almer Awards was then stuck on, the
figure inserted into the holes and it was done!
| CONCLUSIONS |
 This was my first large scale resin figure, and one that has alot of skin. Despite my apprehension about painting all of that, the kit went alot better than I thought it would. Since then I have started on several
other resin figures and I can tell you that they are not all made the same. Some
of them are downright terrible in terms of the quality of the molding. However,
these were all cheapie kits selling for around $20-30. I guess that one gets for
what one pays for.
This was my first large scale resin figure, and one that has alot of skin. Despite my apprehension about painting all of that, the kit went alot better than I thought it would. Since then I have started on several
other resin figures and I can tell you that they are not all made the same. Some
of them are downright terrible in terms of the quality of the molding. However,
these were all cheapie kits selling for around $20-30. I guess that one gets for
what one pays for.
If you are looking for a change from the norm and can handle the painting that is required, I can heartily recommend one of these kits.
Review kit courtesy of me and my wallet. Thanks to Almer Awards for the name tag and to Kevin Powers for the base.
August 2001
Copyright ModelingMadness.com. All rights reserved.
If you would like your product reviewed fairly and
fairly quickly, please contact the editor or see other details in the
Back to Reviews Page 2019