
| KIT #: | FG 6144 |
| PRICE: | $38.66 (which includes shipping) |
| DECALS: | None |
| REVIEWER: | Scott Van Aken |
| NOTES: | Resin |
| BACKGROUND |
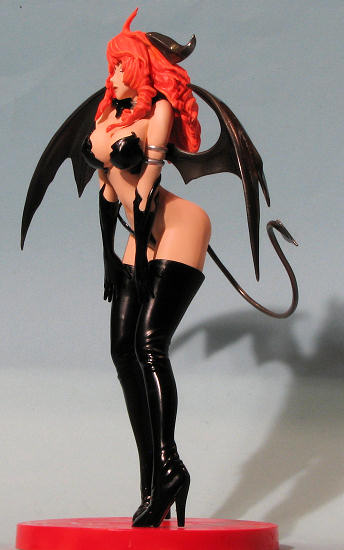 Actually, there is not any background. This is a resin fantasy figure of a properly (un)dressed female devil or succubus or something like that as it has wings and a forked tail. Yes, not all anime figures are related to a TV show or manga. Some are done just to do them and pander to the prurient interests of figure buyers (fast forward to cover of Jethro Tull's "Aqualung").
| THE KIT |
 E-2046 figure kits are almost always superbly molded. I have very infrequently found a broken part or an air pocket or shifted mold. In fact, as some of you know, E-2046 does recasts, taking an original (frequently Japanese) and using it as a master. Having bought some original Japanese kits, I can tell you that the E-2046 kits are very much better cast. They have small pour stubs and the mold seams have pretty well been removed before the kit is packaged.
The kits are generally packaged in several bubble bags, surrounded in bubble wrap and shipped in a plastic container that itself is bubble wrapped before the outer paper wrap is put on it. This keeps the kit well protected and even if at times the outer container is cracked, the kit itself is unharmed.
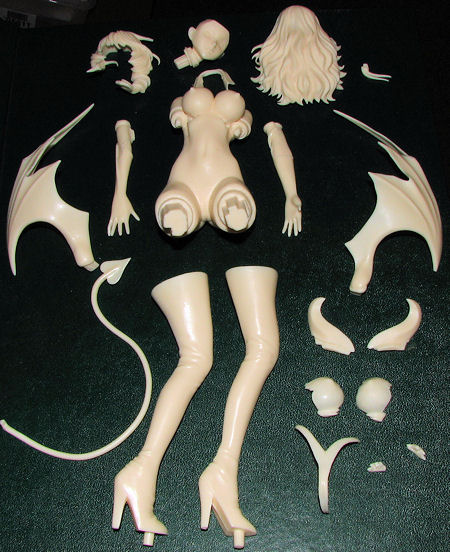
This kit is an example of their own Antihero line of kits. No scale is provided, but the overall height of the figure is about 8 inches, minus the base. Assuming the 'real' being would be a bit over five feet tall, that would round out to about 1/8 scale, which is in line with many other figures of this sort. In addition to a base (which is not shown in the parts layout image), the kit includes optional pieces for those who wish to not have a naked 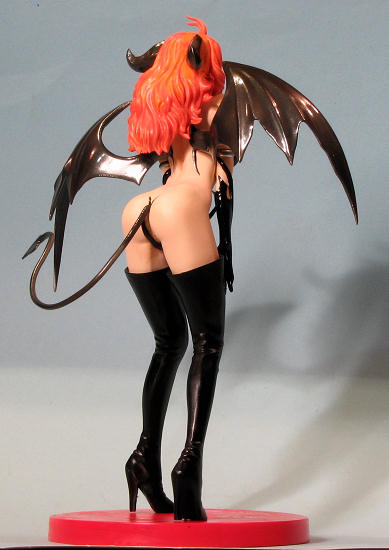 torso. Instructions consist of little more than an exploded view and a parts layout.
| CONSTRUCTION |
The first thing to do with these kits is to clean up the parts. This generally means removing the pour stub pieces and verifying that the pieces will fit as planned. It is very important to take time when doing this. What I have learned from other kits, is that it is a good idea to basically do a dry build. This will ensure that all the components fit where they should. I found on this kit that the arm attachment areas had to have a bit more wiggle room as the hands have to fit over the tops of the boots. These boots stick out farther than the figure's legs and as molded, the hands will not fit atop them as designed.
I also had to adjust the attachment points for the boob covers and their optional inserts (which are the very small bits on the lower right). These pieces fit into keyed slots and I discovered that without trimming, I could not get the arms to fit all the way in as these sections are right next to the arm attachment points. As a matter of point, all of the parts which could be put in wrong are keyed. It makes things so very easy once construction actually gets underway.
Typical of figure kits, one will be doing a lot of painting prior to assembly. While the kit does provide a photo of a completed kit, how one chooses to paint the figure is totally up to them.
| PAINTING |
 The hair was later dry brushed with a lighter orange and then Vallejo Golden Yellow. I painted the base with Tamiya XF-7 Red and crudely brushed on several coats of Pledge.
 | FINAL CONSTRUCTION |
Putting the bits in place was the next step. For this, I started with the head by installing the two collar pieces. I had to hold this in place as the outer collar made things very springy. Be advised that anything which is painted will rub off on the flesh so care has to be taken with installation. Next, I glued on the little bits under the breasts, the boots and the arms. These need to be done about the same time and the little breast bits need to be the first parts installed or you will not get them in place.
With the figure on its legs, I glued it on the base. I needed to drill out one of the mounting holes to get the left leg peg to fit flush. Next step were the wings. These fit quite well. If you recall, the first construction task was to test fit all the parts. Painting some of these made the fit rather tight so keep that in mind. With the wings in place, I glued on the back section of hair. I then did more d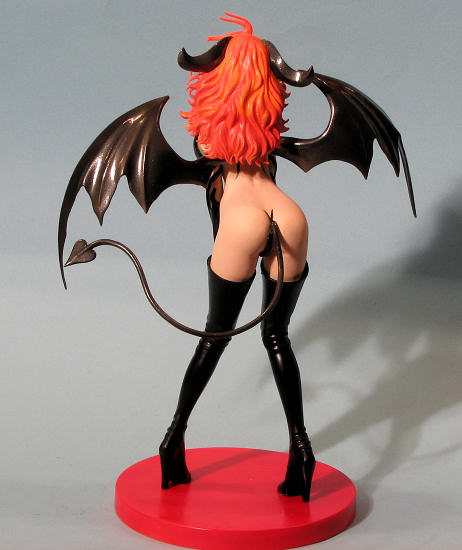 etail work on the eyes by outlining them in black, painting the iris red, then later outlining the outside of the iris in black. The center of the eye was painted black and life lights in white.
With this done, the forward hair section was installed. In hindsight, I should have had the face all painted then installed both hair sections at the same time as by not doing so, I had some difficulty getting the two pieces to fit. The small bit was added to the top of the hair and more yellow drybrushing was done. Then the horns, which were painted the same shade as the wings and tail, were glued on. Next was the tail.
Now I installed the beaver blocker. This was a real mess. It really needed to be installed before the legs as installing it at this time only scratched up a lot of paint and the fit is not good. It was intended to be removable, but if I do that, I will destroy it taking it out. The breast coverings had the original mounting tabs cut away as those had already been installed for the bare breast option. In this case, once cleaned up and painted, a small piece of Blu-Tak was placed inside them and they were simply pressed into place. The last thing I did was to brush on some clear matte for the hair as the un-drybrushed areas were still glossy. This took a couple of applications as it always seemed I missed a spot. Each check I darkened the room and shone a flashlight on the hair. The glossy bits easily reflected in the light.
| CONCLUSIONS |
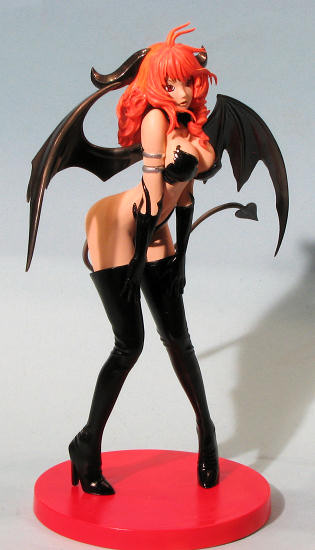
Despite the few surprises, this one turned out to be a very easy to build kit. I am sure that many would have had this one done in a few days instead of the few weeks it usually takes me to do one of these. The end result, for those who like such things, is a pretty neat figure.
August 2012
Thanks to me for this one. If you have never tried a resin anime figure, they are pretty fun.
If you would like your product reviewed fairly and fairly quickly, please contact the editor or see other details in the