| KIT #: | FG 6378 |
| PRICE: | $47.49 which includes registered shipment from Hong Kong |
| DECALS: | None |
| REVIEWER: | Scott Van Aken |
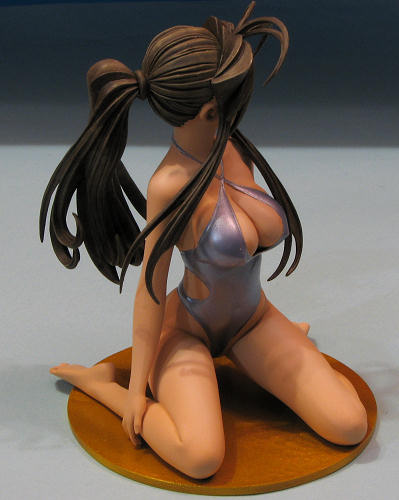
| NOTES: | Resin figure, 15 cm in height |

| BACKGROUND |
E-2046 15 cm Belldandy
| KIT #: | FG 6378 |
| PRICE: | $47.49 which includes registered shipment from Hong Kong |
| DECALS: | None |
| REVIEWER: | Scott Van Aken |
| NOTES: | Resin figure, 15 cm in height |
| BACKGROUND |
 Belldandy (ベルダンディーBerudandī) is a character in the popular anime and manga series Oh My Goddess!. She was created by Kōsuke Fujishima as one of three Goddesses who come to Earth to reside with Keiichi Morisato, and she serves as his love interest. She is depicted as a beautiful and powerful young woman, with strong nurturing tendencies, a trusting and innocent character, and an extremely kind heart. Belldandy is accidentally summoned from heaven by Keiichi in order to grant him a wish and stays when Keiichi wishes for "a goddess like you to be by my side forever". The stories follow Belldandy as she builds a relationship with Keiichi, using her powers (which include teleportation, telekinesis and levitation) to help both Keiichi and his friends while keeping her true identity a secret.
Her first appearance was in Afternoon in August 1988, and the manga has now been running for more than 20 years and has over 200 chapters. Belldandy has also featured in a novel, two TV series, a movie, and in an OVA series. The character has gained considerable respect throughout the various formats, as evidenced by her appearance as one of the most popular characters in the Newtype and Animage polls. The concept of Belldandy draws loosely from Norse mythology, with "Belldandy" being a transliteration of the Old NorseVerðandi, one of a trio ofNorns. She is joined by characters representing the other two of the trio of Norns — her sisters Urd and Skuld.
Belldandy is regarded by commentators as an example of the magical girlfriend character, and comparisons have been drawn with the characters of Samantha fromBewitched and Jeannie from I Dream of Jeannie. The character's very conservative nature, however, which almost completely subordinates her to her fictional boyfriend, Keiichi, has led to some concerns from critics and has polarized the audience.
| THE KIT |
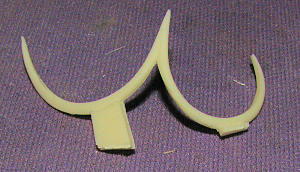 E-2046 kits are often copies of original Japanese resin kits, and are usually of superior casting and a much lower price. Like all of E-2046's kits, this one is cast in a flawless off white resin with nearly all the mold seams already removed from the major parts. Only small pour stubs and some hard to reach mold seams are left. Since the resin is relatively soft, these are a breeze to tackle with sanding items and files. One thing about the pour stub remnants is that they need to be cut a small distance away from the part else one get a chip in the part. I've included an image of a section of hair that has one stub trimmed. The remainder can then be safely sanded down.
 One of the major drawbacks for some is that the documentation that accompanies the kit is normally minimal at best. In this case, the instruction sheet is a scan of the original and a layout of the parts. No assembly instructions are provided. You are frequently reliant upon a photo of the completed model that accompanies the well packaged kit.
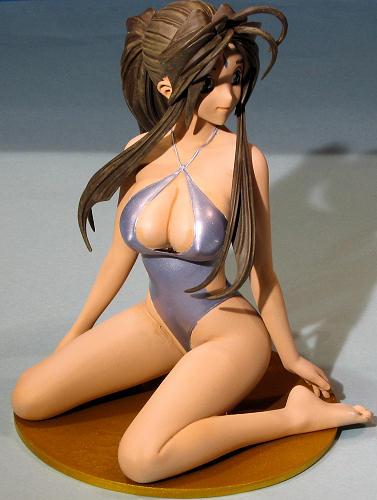
 In this case, however, the image that came with the kit is one of the incomplete kit, with major parts taped together and most of the 'hair' parts unattached. Fortunately for most of us, these kits are not complex and figuring out what goes where is simply a matter of test fitting parts. These kits, for the most part, have unique keyways for the parts and this one is no different. No painting information is supplied with, again, the enclosed photo to be used for inspiration. In this case, one can use their imagination. Finding images of Belldandy on the internet is super simple so that can be used for hair color. The swimsuit is up to the builder to paint whatever color he wants. Typical of anime figures, this one is considerably more buxom than the original, which I guess is part of the appeal.
| CONSTRUCTION |
Often, when I get one of these kits, I like to do some test fitting by first removing the pour stubs from the major pieces and seeing how well things go together. When I did the arms and legs and toro of this one, the fit was really quite good and so I decided to start applying the super glue. Now on some kits, I pin the major parts, but on many of these, the pins and sockets molded in are so good that this isn't necessary.
So the first parts I glued were the legs. After I did that, I had some second thoughts about doing that, figuring that as the legs attached at the swimsuit line, I could have painted them separately and then attached them later. Something to take into consideration when building these kits. As mentioned, the fit is excellent and I applied the glue a bit thicker in spots where there was a bit of a gap in hopes it would fill it. Primer will tell if I was successful.
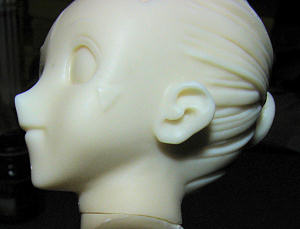 Next, the head was attached. As is often the case with resin, the fit is not 100% perfect. The head portion of the neck is a tad larger than the torso portion. Again, a bit extra in terms of glue was used in hopes of filling the seam, but in this case, it wasn't enough. I hesitate to use so much that it oozes out of the seam as it may well drip onto detail and in any case, only makes clean up more difficult thanks to the very hard dry superglue and much softer surrounding resin. I used standard Tamiya grey putty for the seam.
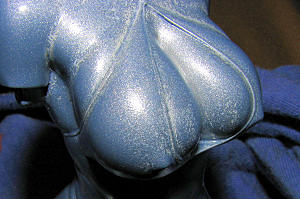
While that dried, I went to work on the pony tail. T his rather large piece has several attaching strands that have to be glued in place. Each one is keyed to get it in the correct spot. Each one also needs filler and sanding after attachment. In this case, it is best to start from the bottom and inside. There are five additional sections to attach to the main body of the pony tail. This was a rather time consuming portion of the build as one had to wait for the underlying segment to be completed before moving on to the next. There was also the issue of room as darn little of it is available for normal sanding methods. Fortunately, I used a combination of thin sanding strips and micro-files to take care of the seams. In the image you can see one section done, one with filler and one with the keyway waiting to be tended.
 Back at the torso, I cleaned up the head/neck seam and gave the figure a coat of Tamiya white primer. Next, I used Tamiya rattle can blue pearlescent paint to use on her swimsuit. For some odd reason, I got some fisheyes and other indications of a non-clean surface. This was despite the excellent coverage of the Tamiya white primer. Nothing to do but sand things down a bit and give it another go.
Second try turned out better so I went ahead and masked off the suit, figuring this would be easier than brush painting the suit. Well, I have to say, that looking back on it from having completed things, I should have picked an easy shade for the suit and painted it on by brush. Masking doesn't always work out the way you'd like and so it was in this case. But I am getting ahead of myself.
 So the now masked figure was again primered and then sprayed with Badger's pale flesh. With that completed and dry, I took some very pale flesh (basically I added some of the standard flesh to white) and then airbrushed the upper surfaces of the body in various spots. I'm sure it won't be very visible in the photos, but it is in person. Using sun tanned flesh (all of this is Badger paint), I brushed a few areas where there were creases in the skin like the area around the knees for instance. I'm not a big fan of all this shadow painting as it often turns out to look grotesque. I'd rather let natural lighting take care of the shadow situation.
Once that was done, I unmasked the suit and did much scraping of leaks and touch up painting. When it came to the hair, I painted all of it with burnt umber using Vallejo's acrylics. I used a brush. Then it was heavily dry-brushed with desert yellow, another Vallejo color. The eyes were painted gloss white than had the eyes painted in black, dark blue and white for the life lights. This was then outlined on three sides with a fine black drafting pen. All the various bits were then glued in place and the base was painted a gold metalflake. As I hadn't cleaned the resin base, the paint provided some interesting patterns which I decided to keep. It is only a base.
| CONCLUSIONS |
I know that there are those of you out there who would finish a kit like this in a week or two. Well, I seem to over-think things and it gets me into trouble. Not only that, but delays the build. This one was on a slow build track and took the better part of four months from start to finish. However, it looks fine to me and I'm glad I took the plunge on this one.
It is a fun kit to assemble and paint. One that is somewhat complex, but not to the point of distraction. It is one that anyone with a small amount of resin experience can do.
| REFERENCES |
 http://en.wikipedia.org/wiki/Belldandy
July 2011
Thanks to me for this one. Hope you find it entertaining.
If you would like your product reviewed fairly and quickly, please contactme or see other details in the