Double
Swords Girl (Sonsaku Hafuku)
|
KIT # |
none |
|
PRICE: |
$54.00 |
|
DECALS: |
None |
|
REVIEWER: |
Scott Van Aken |
|
NOTES: |
1/6 scale, resin |
 As with many modelers, I have a penchant for more than the norm, or in my
case, aircraft kits. I build a lot of airplane models and I like them. I
also like to build other things from time to time and in the last few
years I've become hooked on anime' resin figure kits. Not sure just why I
like them, but I do and there it is.
As with many modelers, I have a penchant for more than the norm, or in my
case, aircraft kits. I build a lot of airplane models and I like them. I
also like to build other things from time to time and in the last few
years I've become hooked on anime' resin figure kits. Not sure just why I
like them, but I do and there it is.
One thing about these figure
kits is that they are generally superbly molded, especially if you get
them from a reputable source. I mail order just about all of them from
overseas. It seems as if Hong Kong is the place to get them and the
quality is nothing but first rate. Unlike resin kits from many other
places, these have very small resin sprue gates, are exquisitely molded
and have almost no flaws in them, such as air bubbles, resin trash in
crevices and other major molding glitches. I've bought some figures in
the US at shows that have been so bad as to be basically unbuildable once
the depth of the problems comes to light.
They are not inexpensive, but
you do get what you pay for in terms of high quality resin kits.
Generally cost is dependent on scale as much as in the amount of detail
that goes into the kits. A 1/8 kit runs around $30, 1/6 around $50 and
larger scales, up to 1/4 or 1/3 can easily be well over $100, again,
depending on the level of detail and the number of parts involved. These
resin kits are for the most part, very well engineered with keyways that
ensure proper parts mating and alignment. What is usually missing are any
sort of detailed assembly instructions past an exploded diagram and
perhaps a photo of the completed item.
Now on to what some consider a
sticky situation. What I buy are mostly what are known as recasts. Most
of the masters of these kits are made in Japan and in a very short run of
50 or fewer. Working with the original caster or perhaps not, recasts are
made by using an original kit and making molding casts from it. Then new
resin is poured into the new molds and out comes a recast. The benefit of
recasts is that they are usually a LOT less expensive than an original,
generally by more than half, and are equally as well done. I've seen
originals and properly done recasts side by side and could not tell the
difference.
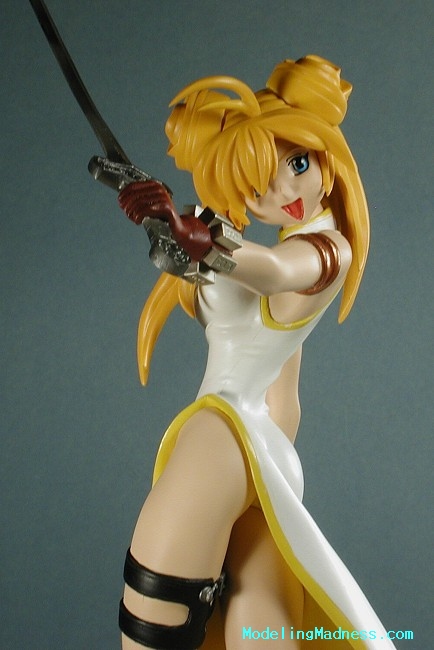
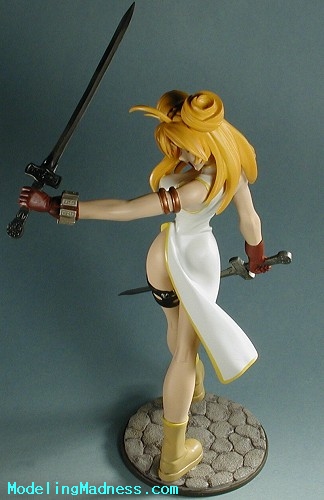
This particular kit is called 'Double Swords Girl' and as soon as I saw it
advertised, I knew I had to have it. Unlike my usual debauched sense of
what makes an 'acceptable' figure, there was just something a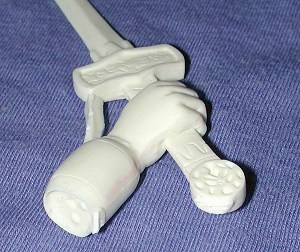 bout this one
that appealed. For one thing, I like ladies with swords (...yes,
mistress....). This one also had a fun look about her that I found quite
intriguing, so I ordered it.
bout this one
that appealed. For one thing, I like ladies with swords (...yes,
mistress....). This one also had a fun look about her that I found quite
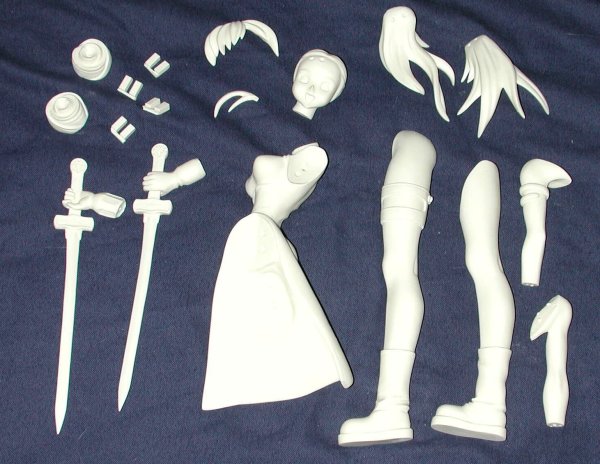
intriguing, so I ordered it.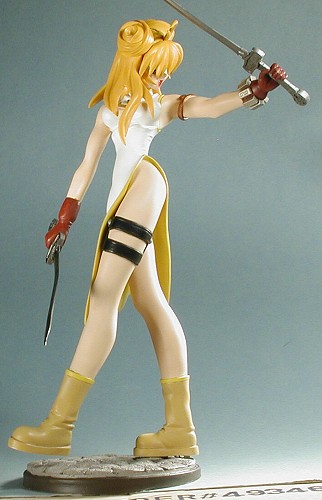 The place I get these ships everything in a
sturdy plastic container and double-checks every kit to be sure all the
parts are there and unbroken. The swords were taped onto a piece of
cardboard, but still managed to become warped during transit. No problem as
a careful application of heat is all that is needed to straighten them out.
The place I get these ships everything in a
sturdy plastic container and double-checks every kit to be sure all the
parts are there and unbroken. The swords were taped onto a piece of
cardboard, but still managed to become warped during transit. No problem as
a careful application of heat is all that is needed to straighten them out.
This kit also had a very slight mold mismatch, not at all uncommon and not
really that bad at all. It just required a bit of extra time to clean up
the parts. I use sanding sticks and use them wet to remove sprue gates and
the small mismatch. I also took the time to test fit all the parts to see
if there would be any problems. While not an air-tight Tamiya-like fit, it
was quite good and showed that I would have little problems in
construction.
There are several theories and ways to do these figures.
One is to pre-paint everything and then assemble it, doing touch-ups as
needed. The other way is to do subassemblies (as much as one can) then
assemble and touch-up. The third is to build it up and then do any
painting. I've not found this last one to work too well unless the figure
is very simple with no overlapping parts (such as hair) or any other
complications. Generally, I do the subassemblies way. I also spray paint my
figures for the most part, relying on brush painting only for small detail
bits and touch-ups. Acrylics all the way for the paints,
 though I do use
lacquers for the undercoat as they dry quickly and tend to 'bite' into the
resin much better. I should also mention that just about all of the figure
gets some sort of light sanding with very fine paper to get rid of any
surface oils.
though I do use
lacquers for the undercoat as they dry quickly and tend to 'bite' into the
resin much better. I should also mention that just about all of the figure
gets some sort of light sanding with very fine paper to get rid of any
surface oils.
Preparation also means spending quality time ensuring the
removal of as many mold lines as possible. This often means the use of
various files and doing some quality scraping to make sure they disappear.
It also means that one has to replace detail that is invariably sanded off.
I use very fine-toothed saws for much of this as they seem to have about
the same cut as the original detail. With most of the bits cleaned up, it
is now time for the most time consuming portion of the kit and that is
painting.
For figures, I like to use acrylic paints. They just seem to be easier
to work with when dealing with large areas. The first thing I did was to
paint the areas that would need white. This basically meant the figures
clothing. With that drying, I painted all the flesh areas. For most of the
colors, I used Badger Accu-flex. This paint covers very well and dries
rather quickly, a real plus for doing figures. The flesh is a mixture of
Badger's Pale Flesh and White. I find that even the pale flesh is too dark
for my liking, so I lightened it.
When these two colors had dried, I masked them off and then painted the
trim around the dress and the top of the boots with a light yellow. I also
painted the hair with a darkish orange. I had thought about reversing the
colors and using the light yellow for the hair, but am glad I did not.
With those dry, I masked the yellow on the boots and painted the boots a
tan color instead of the white that was recommended on the photo that came
with it. Anime figures rarely come with anything close to proper
construction or painting information, so much of how the kit goes together
and is painted is up to the builder.
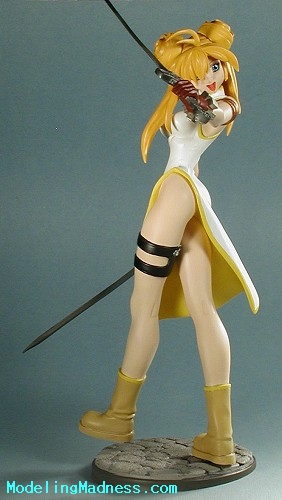 With the boots done, the black thigh belt was brush painted black with the
buckles in Testors Aluminum. I then painted the two swords (which I
unsuccessfully tried to straighten out) using Alclad II Steel. The gloves
were then painted using Vallejo reddish brown and the little metal blocks
on the one glove painted Alclad II Pale burnt metal, which looks sort of
golden.
With the boots done, the black thigh belt was brush painted black with the
buckles in Testors Aluminum. I then painted the two swords (which I
unsuccessfully tried to straighten out) using Alclad II Steel. The gloves
were then painted using Vallejo reddish brown and the little metal blocks
on the one glove painted Alclad II Pale burnt metal, which looks sort of
golden.
The face then had the eyes painted using a light blue for the eyes. I find
eyes to be the most difficult to paint, but I'm getting a bit better at
doing them as I complete each figure. I also took this time to hunt up a
suitable base. Having purchased a number of interesting ones at Wonderfest
this year, I chose the largest one that seemed to be some sort of
cobblestone. It was painted using Badger Concrete and then given a black
wash. I painted the outside rim of the base with a medium brown.
Then I started gluing on parts. I started with the legs and glued them to
the underside of the torso. After getting them solidly in place, I looked
to see how the figure would stand. It appears that it is designed to be on
one let with the other taking a step. To facilitate cementing onto the
base, I drilled a hole in the back leg and inserted a section of paper clip
to provide a modicum of support. Then I glued on the two arms. One of them
has a band around it and this was painted Tamiya Copper. I really don't
like the way that this brush paints as it does not go on well compared to
other brands of acrylic. Once I finally had everything in place, I tossed
the bottle. I also found that one of the arms didn't want to fit very well.
It required additional gluing and then I had to fill the most egregious gap
with superglue and repaint it after the glue dried.
Next was the head. There are several pieces of hair that have to be glued
in place. Most fit well, 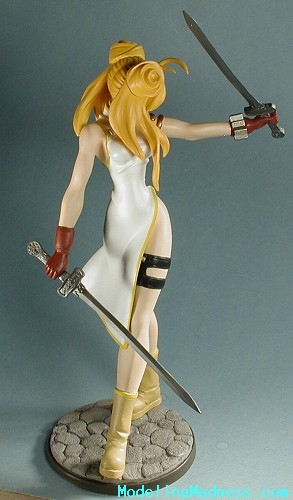 but the front piece just didn't seem to want to
cooperate, seeming to be too large. I glued it as best I could and then
left everything to dry for a while. Once dry, the head was fit in place on
the rest of the body, but it was a real struggle to get it in place. Next
one, I'll glue on the head first and then glue on the hair bits. Perhaps
that will make the fit better.
but the front piece just didn't seem to want to
cooperate, seeming to be too large. I glued it as best I could and then
left everything to dry for a while. Once dry, the head was fit in place on
the rest of the body, but it was a real struggle to get it in place. Next
one, I'll glue on the head first and then glue on the hair bits. Perhaps
that will make the fit better.
With that done, the last parts to attach were the hands with the swords.
But before that, I decided to at least get the figure onto the base. After
figuring the best place to put it, I drilled a hole in the base and then,
using copious amounts of superglue, attached the rear foot to the base.
With things nice and sturdy, I then glued on the little gold 'bits' to the
one glove and then glued the two hands onto the arms. Attaching a small
section of 'hair' was the final bit and I was pretty much done. I did have
to do quite a bit of touch-up in various areas as handling had worn off
some of the paint. Then the entire figure was given a coat of matte clear
to cut down on the shine of some of the parts.
For some reason, it takes me an age to get these kits
underway, but once I get into it, they seem to go rather quickly. They are
not something that will appeal to all, but if you are able to work with
resin aftermarket, then doing something like this is very similar. Though
not always the best fitting kits in the world, they are fun to build and to
paint. What's more, they are a nice change from the norm.
May 2004
#1316 in a series
Copyright ModelingMadness.com. All rights reserved.
If you would like your product reviewed fairly and fairly quickly, please contact the editor or see other details in the Note to
Contributors.
Back to the Main Page
Back to the Reviews Index
Page 2019