Kit: Yak -11 'Moose'
Scale: 1/72
Kit Number: ??
Manufacturer: ??
Price: about $7.00
Media: Resin with a vacuformed canopy
Decals : none
Date of Review: 30 April, 1996
Comments: Back in 1988, I attended the airshow at Mildenhall, England. While there, I picked up a number of resin kits of unknown origin that were in bags. They came with no instructions, no decals, and were priced at 5 pounds each. This is one of them.
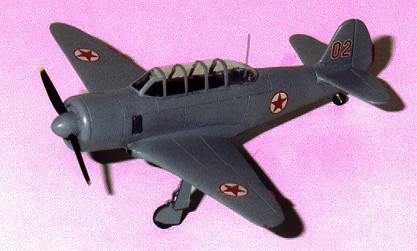
A little history on the Yak-11. It is a trainer derivation of the very successful Yak-3 and Yak-7 fighters of WWII. In fact, it has the same wings and tail section with the fuselage being built larger to accommodate the instructor and student pilot. The in-line engine was replaced by the Russian's equivalent of the 935 single row radial. This made it relatively powerful and easy to maintain. The Yak-11 itself is made very much like a Hurricane with a tube frame wrapped in canvas and wood with semi-wooden wings and a few metal panels. It was built in great numbers and any air force supplied by the Russians in the late 1940's and 1950's got some of these aircraft. Sort of a 'Commie T-6'.
Building the kit is simplicity itself. The airframe is in one piece with only the interior, landing gear, propeller and various antennas being in resin. The little resin bits came imbedded in one large piece of resin flash. This is quite normal for resin kits. On word of warning on resin. Resin aircraft are generally one solid piece of resin so are pretty heavy. The scale landing gear normally had some trouble holding up all that weight. The better resin kits will have wire embedded in the landing gear to help support the weight. This kit did not and after several years of sitting on the shelf, developed a rather pronounced bow in the main landing gear. Replacement with styrene or scratchbuilt landing gear reinforced with paperclip wire would be advisable.
After opening the kit and spreading out all the bits, the first thing I did was to carefully remove all the pieces from the flash, clean them up, and put them in a small container for later use. I then turned to the airframe. Unfortunately for me, my copy had a mold mismatch that was quite pronounced in the front. This meant that I would have to do a lot of sanding and rescribing to take care of the problem. It was mostly confined to the cowling area and that helped, but it took a long time. Safety note: wear a mask while sanding resin as the dust can lead to respiratory difficulties later in life. After sanding, I checked the depth of the cockpit by placing the seats in it and checking for clearance. Fortunately, there was enough room. Some resin kits need to be drilled out in the cockpit, and nose wheel kits must be hollowed out in the nose to put in weight.
Once the body was sanded down and any chips puttied (some resin is brittle and may chip), the entire airframe was primered. Inexpensive resin kits (like this one) are prone to air bubbles in the resin making their way to the top and leaving pinholes. These can be puttied in and then lightly sanded. Heavy sanding will inevitably reveal more and more holes. Some of these can be filled in with paint while putting on the final coats. After attending to the pinholes and other defects, the entire airframe was painted a medium grey, which was the standard scheme of Yak-11s. After the paint had dried, it was time to take care of the interior. Parts offered in resin were two seats, two control sticks, and two instrument panels. All of the interior bits were painted black and some appropriate instrument panel decals were found to fit. Thanks to a Polish profile on the Yak-11, I was able to determine interior colors and general fitment. One bit that had to be scratched was a combing over both instrument panels and between the seats. Finally, the canopy was carefully cut out, and after multiple fit and trys, was attached using five minute epoxy. The rest of the fittings were attached using superglue or epoxy.
I now had a completed kit, but no markings. Searching through my sources, I came across an old book entitled Air Forces of the World that was written in 1959. There on the page describing the Mongolian Air Force was a lone photo of a Yak-11. I had my subject. It was painted in an overall light grey. The insignia was quite similar to North Korea except that the outer blue ring was missing. I searched through my spare decals until I found a set of North Korean decals that were of the appropriate size, trimmed off the outer ring and voila, a Mongolian A.F. Yak. Final step was application of the aircraft number on the tail, fitment of a radio antenna and the propeller.
The final result is an acceptable Yak-11. The only other kit I know of is a Polish vacuform that looks like it would be an easier build than this resin kit was. Actually, they are both probably equally time-consuming, and the vacuform has instructions! Most resin kits are not so poorly molded as my example, so I would recommend a resin kit to those who have not built one before.