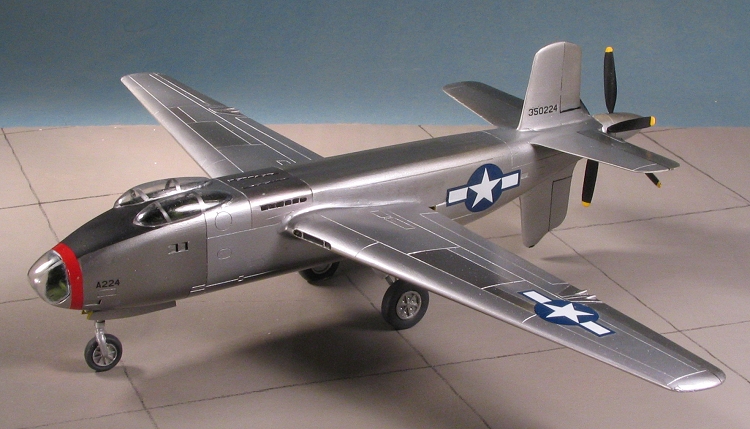
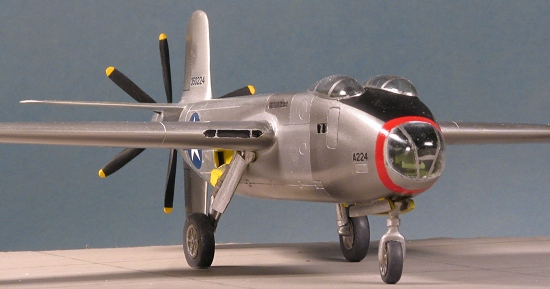
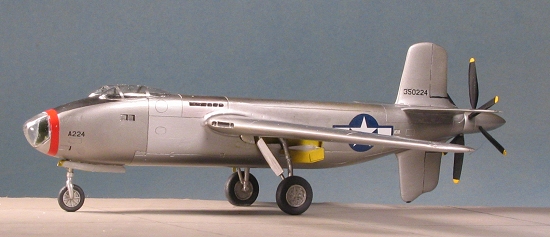
Anigrand Modelworks 1/72 XB-42 'Mixmaster'
| KIT #: | AA-2031 |
| PRICE: | $54.00 |
| DECALS: | One option |
| REVIEWER: | Scott Van Aken |
| NOTES: | Short run resin kit with vac clear parts |
| HISTORY |
For a look at what comes in the box and a brief history of the aircraft, please visit the preview.
| THE KIT |
 There are a number of us in the hobby
for whom a prototype is a magnet. We love them. I'm not really sure just
what it is about them. It can't be the variety of camo and markings schemes
as rarely were they colorful at all. Of course the 'what if' crowd revels
in these types of aircraft and will put them in all sorts of markings, but
the majority of us tend to stick with how the planes actually were
(assuming they really flew).
There are a number of us in the hobby
for whom a prototype is a magnet. We love them. I'm not really sure just
what it is about them. It can't be the variety of camo and markings schemes
as rarely were they colorful at all. Of course the 'what if' crowd revels
in these types of aircraft and will put them in all sorts of markings, but
the majority of us tend to stick with how the planes actually were
(assuming they really flew).
Sort of getting a bit off the beaten track, when it comes to these types of planes, if they flew, I put them in their actual markings. If they were but project planes, well, that opens the doors for all sorts of possibilities as they are fair game for the 'what if' schemes. Right now, I'm about evenly spit when it comes to Anigrand kits. This one will be in prototype markings, boring as they may be.
| CONSTRUCTION |
For those of you who haven't done a lot of resin kits, they generally start out the same way. First step is to thoroughly inspect the parts to see what repair work needs to be done. It is a rare resin kit that does not have something broken, air bubbles, flash, or some other area that needs attention. This one has a bit of everything, except for broken parts.
 The biggest area of work are air
bubbles. Though not as extensive as on some other kits, there are quite a
few of them, ranging from pin holes to quite large. The big ones are easy
to take care of with super glue, followed by accelerator, a dip in water to
remove the accelerator and a quick sand job. These larger ones were mostly
on the ends of things as the bubbles rise through the resin as it is
hardening and tend to collect at the edges. The pin holes are on the
surface and are much more difficult to remove as it requires a rather thin
material to fill them. Super glue does not work well on these. Thin fillers
like Mr. Surfacer 1000 and 500 are much more suited. One simply applies
these to the areas affected and when dry, sands them down. I try not to
sand the filler completely off as sometimes it doesn't penetrate the
pinhole and I have to do a reapply. There is a point of diminishing returns
on these so often the very small ones that don't cooperate are left and it
is hoped that primer will handle them.
The biggest area of work are air
bubbles. Though not as extensive as on some other kits, there are quite a
few of them, ranging from pin holes to quite large. The big ones are easy
to take care of with super glue, followed by accelerator, a dip in water to
remove the accelerator and a quick sand job. These larger ones were mostly
on the ends of things as the bubbles rise through the resin as it is
hardening and tend to collect at the edges. The pin holes are on the
surface and are much more difficult to remove as it requires a rather thin
material to fill them. Super glue does not work well on these. Thin fillers
like Mr. Surfacer 1000 and 500 are much more suited. One simply applies
these to the areas affected and when dry, sands them down. I try not to
sand the filler completely off as sometimes it doesn't penetrate the
pinhole and I have to do a reapply. There is a point of diminishing returns
on these so often the very small ones that don't cooperate are left and it
is hoped that primer will handle them.
 Often,
I'll only treat the parts that will be used first as it keeps the job down
to a manageable level, especially if there are a lot of parts to prep. In
this case, I did the big bits first and then the smaller ones as they were
nearing readiness to add to the kit. The vast majority of the pinholes were
on the wing surfaces with the air bubbles being on the tips of the wings
and the ends of the horizontal and vertical stabilizers. There were also
air bubbles in the base and back of the pilots seat, which I totally blew
off as not worth the effort to fix.
Often,
I'll only treat the parts that will be used first as it keeps the job down
to a manageable level, especially if there are a lot of parts to prep. In
this case, I did the big bits first and then the smaller ones as they were
nearing readiness to add to the kit. The vast majority of the pinholes were
on the wing surfaces with the air bubbles being on the tips of the wings
and the ends of the horizontal and vertical stabilizers. There were also
air bubbles in the base and back of the pilots seat, which I totally blew
off as not worth the effort to fix.
![]() One
thing that I completely missed when doing the preview as a huge defect in
the wing root area of the left fuselage. It looks like someone took a
suction cup to the resin in this area and pulled, creating a huge lump. The
inside of the fuselage is not deformed so I have no clue as to what could
have caused it. I'd be interested in hearing if it is a one-off thing or a
mold defect. Fixing it isn't hard, just time consuming. Grabbing a very
coarse sanding stick, I started sanding away at both the wing mating
surface and the fuselage above it. Needless to say, some detail was lost in
the process, but it was brought back to tolerances with about 20 minutes
work.
One
thing that I completely missed when doing the preview as a huge defect in
the wing root area of the left fuselage. It looks like someone took a
suction cup to the resin in this area and pulled, creating a huge lump. The
inside of the fuselage is not deformed so I have no clue as to what could
have caused it. I'd be interested in hearing if it is a one-off thing or a
mold defect. Fixing it isn't hard, just time consuming. Grabbing a very
coarse sanding stick, I started sanding away at both the wing mating
surface and the fuselage above it. Needless to say, some detail was lost in
the process, but it was brought back to tolerances with about 20 minutes
work.
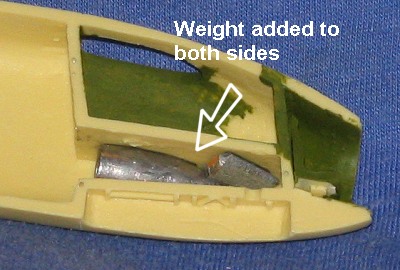 Then I started assembling the
cockpit. You have three seats and a control wheel. The cockpit and
surrounds was painted US Interior Green with the left console and
instrument panel area in Flat Black. There are holes in the floor on both
sides that almost seem to be there for control sticks as there are no parts
to fit into them. I just painted over them as filling them would have been
quite difficult. While the paint was drying, I stuffed weight into the nose
under the cockpit floor. I hope I didn't put in too much as it would strain
the resin nose gear leg, but there is a lot of 'stuff' aft of the main
gear!
Then I started assembling the
cockpit. You have three seats and a control wheel. The cockpit and
surrounds was painted US Interior Green with the left console and
instrument panel area in Flat Black. There are holes in the floor on both
sides that almost seem to be there for control sticks as there are no parts
to fit into them. I just painted over them as filling them would have been
quite difficult. While the paint was drying, I stuffed weight into the nose
under the cockpit floor. I hope I didn't put in too much as it would strain
the resin nose gear leg, but there is a lot of 'stuff' aft of the main
gear!
 Then, I glued together the fuselage
halves. Prior to doing this I had already sanded the mating surfaces to get
rid of any little bumps and imperfections. Fit was quite good. Not perfect,
but the seams were filled with superglue, zapped with accelerator and
quickly sanded as well as could be done. Then I put an application of Mr.
Surfacer 500 on them so that I could see what additional work would be
needed. With that sanded down, I moved on to the control surfaces.
Then, I glued together the fuselage
halves. Prior to doing this I had already sanded the mating surfaces to get
rid of any little bumps and imperfections. Fit was quite good. Not perfect,
but the seams were filled with superglue, zapped with accelerator and
quickly sanded as well as could be done. Then I put an application of Mr.
Surfacer 500 on them so that I could see what additional work would be
needed. With that sanded down, I moved on to the control surfaces.
I started with the vertical fin then added the horizontal stabs and the ventral fin. These were all butt joins with no reinforcement. While I tried to get everything square, I found that the horizontal stabs were not exactly at the same level. They are only off a teeny bit and this isn't noticeable unless you are looking at them square on. I filled the usual pin holes and put more filler at the roots to blend in where the root was wider than the upper or lower fins.
 Once
that was smoothed out, it was on to the wings. I had to enlarge the
mounting holes a bit on the left side. I also found that the left wing was
warped. It was warped at the back giving a d
Once
that was smoothed out, it was on to the wings. I had to enlarge the
mounting holes a bit on the left side. I also found that the left wing was
warped. It was warped at the back giving a d![]() ifferent
cross section from the right wing. No amount of heating was able to correct
this as the resin is just too thick. No choice but to attach it as it was.
Fortunately, it is not something that is readily apparent unless you look
closely and in other respects the wings are fine. I used nothing else
but super glue as filler on the wing roots. This left me with a rather
complete airframe and it was on to the smaller bits.
ifferent
cross section from the right wing. No amount of heating was able to correct
this as the resin is just too thick. No choice but to attach it as it was.
Fortunately, it is not something that is readily apparent unless you look
closely and in other respects the wings are fine. I used nothing else
but super glue as filler on the wing roots. This left me with a rather
complete airframe and it was on to the smaller bits.
I had decided to build my model with the aft gear doors closed as I'd seen in several photos. For this, I cut off the back sections and smoothed the edges, chamfering the insides a bit for better fit. Despite this, the gear door wasn't an exact match for the opening. This was true for both sides. I did some more sanding and got a fairly good fit. They were then super glued in place. This also was a bit of a bonus as the inside of one gear door was full of holes, some of which went all the way through the door. This allowed me to not have these glitches visible and to make it easier to fill the holes that went through to the outside.
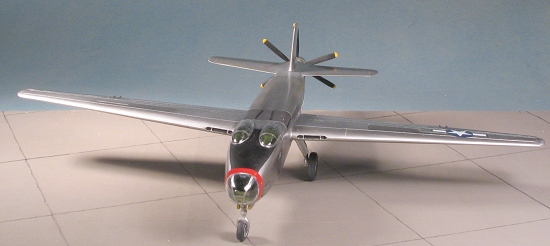
 My next project was the prop. The
main bullet was very nicely molded with only a few resin balls to cut off
at the shaft. The second blade attachment segment had the mold seams
sanded/filled and the few holes present filled in. I use Mr. Surfacer for a
lot of this fine work as it does a better job of getting into the holes
than does regular filler. Then I started cleaning up the prop blades,
starting with a coarse sanding stick and working to finer grades. Not all
the blades are shaped exactly the same with some having a rather unusual
profile in that they are wider and more curved near the root that I would
have thought.
My next project was the prop. The
main bullet was very nicely molded with only a few resin balls to cut off
at the shaft. The second blade attachment segment had the mold seams
sanded/filled and the few holes present filled in. I use Mr. Surfacer for a
lot of this fine work as it does a better job of getting into the holes
than does regular filler. Then I started cleaning up the prop blades,
starting with a coarse sanding stick and working to finer grades. Not all
the blades are shaped exactly the same with some having a rather unusual
profile in that they are wider and more curved near the root that I would
have thought.
After applying some filler to a few of the blades that needed it, I found I also needed to drill out some of the blade attachment holes as they were not all the same depth and some were rather shallow. I then made sure all the blades would fit when the time came. Then I turned my attention to the landing gear. The nose gear doors were glued in place and I just fit in the nose gear leg and it fit rather snugly. I separated the forward gear doors and glued on set in place as I thought it should go. The instructions are very vague on this so I tacked on to the lower lip. Then I tacked in the main landing gear. No way on the doors as the gear leg interferes, so I pulled off the gear door and cleaned up the fuselage and door for a later try.
Having the gear in hand, I decided to permanently attach them. There are indentations in the gear well for the main strut and the smaller attaching one. I had to sand the main strut to get a fair fit and the smaller one would not fit in the designated slot, so I glued it closer to the main strut. On the other side, the gear fit a little better, but was not at the same angle. A short session with a hair dryer took care of that. One thing I can guarantee is that within a relatively short period of time, the gear will sag under the weight of the rest of the model. At least until the lower fit touches!
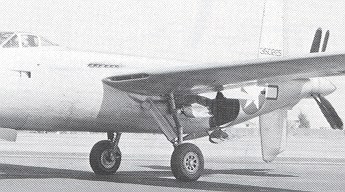
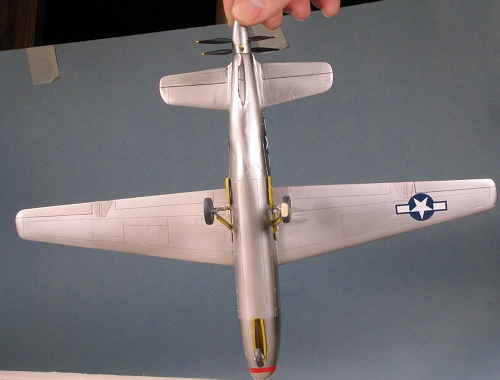
 Snooping through the
reference for some understanding on how exactly the gear doors and struts
interrelate, I found only one image that showed the attachment of the gear
in the wells with any clarity. What it seems is that there is some sort of
fairing missing for the gear (see photo). The shorter strut is supposed to
fit into this fairing and the rest of the doors will close into it or
create it, providing a sort of rectangular box structure under the wing.
There is no such structure to the kit. It also appears that the gear fit
farther forward than what is given. That, of course, would help the door
fit problem. Nothing to really do at this stage but the best that I can and
move ahead.
Snooping through the
reference for some understanding on how exactly the gear doors and struts
interrelate, I found only one image that showed the attachment of the gear
in the wells with any clarity. What it seems is that there is some sort of
fairing missing for the gear (see photo). The shorter strut is supposed to
fit into this fairing and the rest of the doors will close into it or
create it, providing a sort of rectangular box structure under the wing.
There is no such structure to the kit. It also appears that the gear fit
farther forward than what is given. That, of course, would help the door
fit problem. Nothing to really do at this stage but the best that I can and
move ahead.
Next, I decided to get the
transparencies cut and installed. I started with the nose transparency and
cut it just at the outer rim framework. This proved to provide a way too
large transparency. Slowly trimming away at it, I finally got to a stage
where it fit rather well. To do so meant trimming off quite a bit past the
originally done frame lines. When I trimmed t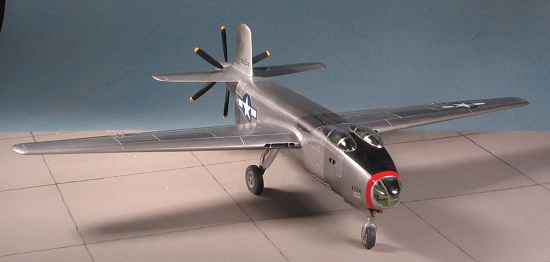 he
main canopies, I found that they, too, were well oversize. I'm thinking
that either they were molded independently of the final kit design, or that
they made the masters the proper size and forgot to take into account that
anything made over the top of them would be larger. Considering how much
larger the transparencies are, I'd bet on the first one. Be careful when
trimming the bubble canopies as they are NOT supposed to be flat on the
bottom. The fuselage curves away quite a bit near the back and I'm thinking
that these may be handed, though there is no real indication in the
instructions about that. I did have to use filler on the nose canopy on the
top as I just couldn't bring myself to trim back any more than I already
had.
he
main canopies, I found that they, too, were well oversize. I'm thinking
that either they were molded independently of the final kit design, or that
they made the masters the proper size and forgot to take into account that
anything made over the top of them would be larger. Considering how much
larger the transparencies are, I'd bet on the first one. Be careful when
trimming the bubble canopies as they are NOT supposed to be flat on the
bottom. The fuselage curves away quite a bit near the back and I'm thinking
that these may be handed, though there is no real indication in the
instructions about that. I did have to use filler on the nose canopy on the
top as I just couldn't bring myself to trim back any more than I already
had.
Once the nose transparency had been attended to, I glued on the upper canopies with super glue and then masked them all, a rather difficult task thanks to the poorly defined framework. I now had something that was ready for paint.
| COLORS & MARKINGS |
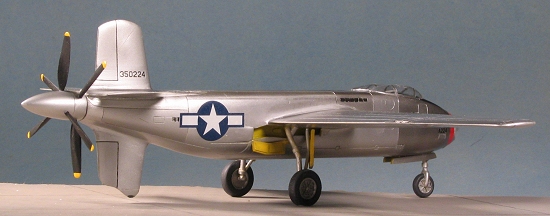
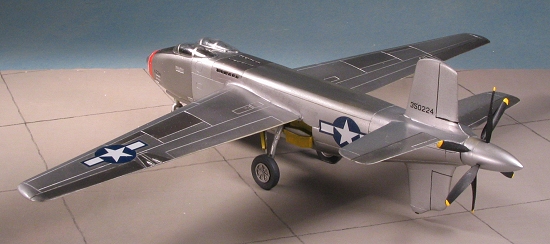
 With prototypes, one is generally
limited in color options and this one is no exception. It is basically
unpainted metal sheeting. Fortunately, I have a lot of Alclad II and so
first gave the model a complete coating of standard aluminum. Then I masked
off a few areas after the paint had dried overnight. These areas were then
painted dark aluminum. When I gently pried up the tape, the paint
underneath it gently pried up as well. Most odd as Alclad II sticks very
well. Despite all my efforts, I had trouble with the paint sticking. The
result is that I do have a completely painted aircraft, but it paint isn't
the smoothest it could be. I can only assume that there was some sort of
problem with oils in the resin as despite getting it as clean as I could,
painting was a problem.
With prototypes, one is generally
limited in color options and this one is no exception. It is basically
unpainted metal sheeting. Fortunately, I have a lot of Alclad II and so
first gave the model a complete coating of standard aluminum. Then I masked
off a few areas after the paint had dried overnight. These areas were then
painted dark aluminum. When I gently pried up the tape, the paint
underneath it gently pried up as well. Most odd as Alclad II sticks very
well. Despite all my efforts, I had trouble with the paint sticking. The
result is that I do have a completely painted aircraft, but it paint isn't
the smoothest it could be. I can only assume that there was some sort of
problem with oils in the resin as despite getting it as clean as I could,
painting was a problem.
Regardless of the situation, I also masked off the nose stripe, first painting it white and then with gloss red. Sometime while the paint was drying, the box it was sitting in got upset and the kit fell to the ground. Fortunately, only one of the main landing gear legs was broken so a quick bit of drilling and the usual paper clip insert took care of that. Fortunately, it broke right at a knuckle so you really can not tell there was any damage. The last part was to mask the nose a bit and paint on the black anti-glare panel.
| FINAL CONSTRUCTION |
With that done, the wheels were
painted and then installed on the main gear and in the nose well. It should
be no surprise that the model does not sit level. I sanded on the bottom of
one of the wheels to try to make things a little less off kilter. I also
installed the prop blades into their respective holes. The i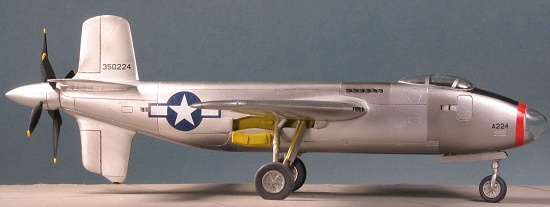 nstructions
were not clear as to which direction which set was supposed to spin, but
they do have the blades designed so that one set turns one way and vice
versa. Don't get them confused as the pitches are different.
nstructions
were not clear as to which direction which set was supposed to spin, but
they do have the blades designed so that one set turns one way and vice
versa. Don't get them confused as the pitches are different.
Setting those aside, I then went to figure what to do about the forward gear doors. Pics showed that obviously I wasn't going to get these to fit properly so I thinned the very forward section of the 'aft' door so that I could get it to fit somewhat close. The forward section had one door with a broken off tip so that tip was glued to the underside of the wing while the rest of the door was attached to the strut. Not real pretty, but few will realize it isn't right. At this time, I put on the decals. They are a bit thicker than you might like, but with Solvaset, they snuggle down nicely and really are not that bad. I then glued the two props in place, making sure that the inner one was not reversed! I removed the masking, was thrilled that I didn't totally hose that portion of things and the kit was now a model!
| CONCLUSIONS |
 It really is hard to be
objective about kits like this. I love them and they frustrate me.
Frustrating because I KNOW that resin can be molded in such a way as to not
have to sweat warped parts and air bubbles. I also think that their
research could be a bit better. Love them because of the excellent subjects
and, after you have the parts ready to go, they do build rather quickly. If
I owned the company, I'd do two things right away. One is to use
pressurization to eliminate air bubbles in the part. The second is to
provide a second set of transparencies. It is fine to have them available
for sale if needed, but it also means waiting the round trip from the US to
Hong Kong. Regardless, if you are to the stage where you can handle the
inevitable when it comes to repairing the resin parts, then you really
should consider these kits as the subjects are great and the price is
actually reasonable for what you get. I can recommend these to those with
the skills.
It really is hard to be
objective about kits like this. I love them and they frustrate me.
Frustrating because I KNOW that resin can be molded in such a way as to not
have to sweat warped parts and air bubbles. I also think that their
research could be a bit better. Love them because of the excellent subjects
and, after you have the parts ready to go, they do build rather quickly. If
I owned the company, I'd do two things right away. One is to use
pressurization to eliminate air bubbles in the part. The second is to
provide a second set of transparencies. It is fine to have them available
for sale if needed, but it also means waiting the round trip from the US to
Hong Kong. Regardless, if you are to the stage where you can handle the
inevitable when it comes to repairing the resin parts, then you really
should consider these kits as the subjects are great and the price is
actually reasonable for what you get. I can recommend these to those with
the skills.
| REFERENCES |
McDonnell Douglas Aircraft since 1920, vol 1, by Rene J. Fancillon, 1988.
March 2005
#1353 in a series
Copyright ModelingMadness.com. All rights reserved.
If you would like your product reviewed fairly and fairly quickly, please contact the editor or see other details in the Note to Contributors.