
| KIT #: | 1267 |
| PRICE: | $14.95 from GreatModels |
| DECALS: | Three options |
| REVIEWER: | Scott Van Aken |
| NOTES: |
| HISTORY |
The H-19's first flight was on November 10, 1949 and it entered operations in 1950. Over 1,000 of the helicopters were manufactured by Sikorsky for the United States. An additional 550 were manufactured by licensees of the helicopter including Westland Aircraft, Sud-Est in France and Mitsubishi in Japan.
 The helicopter was widely exported, used by many other
nations, including Israel, Chile, South Africa, Denmark and Turkey.
The helicopter was widely exported, used by many other
nations, including Israel, Chile, South Africa, Denmark and Turkey.
The H-19 underwent live service tests during the Korean War beginning in 1951 as an unarmed transport helicopter. Undergoing tests such as medical evacuation, tactical control and front-line cargo support, the helicopter succeeded admirably in surpassing the capabilities of the H-5 Dragonfly which had been used throughout the Korean conflict by the Army.
In 1956, the French Air Force experimented with arming the H-19 Chickasaw aka Sikorsky S-55, then being superseded in service by the more capable Piasecki H-21 and Sikorsky H-34 helicopters. The H-19 was originally fitted with a 20-mm cannon, two rocket launchers, plus a 20-mm cannon, two 12.7-mm machine guns, and a 7.5-mm light machine gun firing from the cabin windows, but this load proved far too heavy, and even lightly-armed H-19 gunships fitted with flexible machine guns for self-defense proved underpowered.
The H-19 was also used in the early days of the Vietnam War before being supplanted by the Sikorsky H-34 Choctaw, which was based on the H-19.
| THE KIT |
This is, I believe, the third or so boxing of this kit,
not including those done by Revell. The kit comes on two grey and one clear
sprue. Detail on the parts is quite good and though I did find ejector pin marks
on several, they will be mostly invisible once the kit is built. The main
exception are those on the cabi n
floor, though if you do the door closed, they too will be invisible.
n
floor, though if you do the door closed, they too will be invisible.
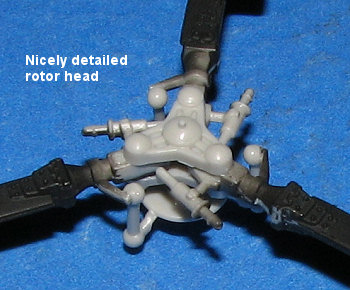
Panel lines are lightly engraved while those for access doors are more heavily done. The tail boom is separate from the rest of the body. This is so that Italeri can do different variants, and there is a large blank space on the sprues where those other bits would go. Rotor head detail is nicely done and sufficiently complex to please most. This aircraft will require some nose weight to keep from tail sitting and the large empty nose will hold whatever is required. I did notice that the underside of the fuselage does not match what is shown in the markings drawings and neither does the side winch.
The clear bits are well done and rather thick. As most have compound curves in them, masking them will require some additional thought.
Instructions are well done and provide paint references in Generic, FS 595 and Italeri Model Master references for both enamel and acrylics. There are three markings options and the instructions show what bits are used with what options. I found it interesting that one part is shown as 'not used' yet the drawings and box art all show in in place.
Markings are for three helicopters. One is the box art aircraft from the HMSC Bonaventure in 1953. Another is an all blue USMC HRS-2 in Korea during 1953 and the final marking is for a French H-19 of ALAT GH2 in Algeria during 1956. Decals are well done and should work just fine.
| CONSTRUCTION |
 Started with
subassemblies, for which this kit really has but three. One is the tail boom and
that was quickly cemented together. It comes with several rather fragile parts
attached to one fuselage half, so care is needed to keep from breaking them off.
The stabilizer fins did not fit as well as I'd hoped, leaving a step and a gap
that needed filled. Thanks to the tight location, getting a clean job of this
will be difficult.
Started with
subassemblies, for which this kit really has but three. One is the tail boom and
that was quickly cemented together. It comes with several rather fragile parts
attached to one fuselage half, so care is needed to keep from breaking them off.
The stabilizer fins did not fit as well as I'd hoped, leaving a step and a gap
that needed filled. Thanks to the tight location, getting a clean job of this
will be difficult.
The other two subassemblies are the cabin and the
cockpit. These had the basic portions built up and then it was painted with FS
36375 (Using some of my still extant Aeromaster acrylic) as suggested with the
upper rotor housing area
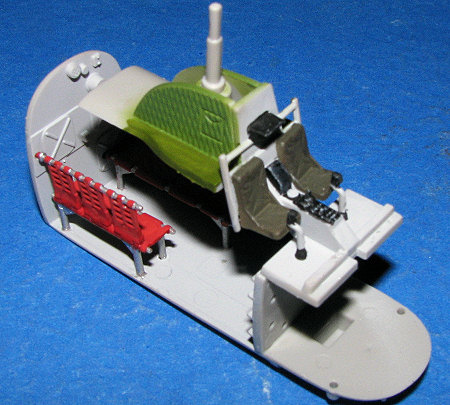 in two shades of green.
For the light green I used RLM 82 (Xtracolor enamel) and the other is standard
Interior Green (Model Master enamel). The front seats were painted OD with the
rear mesh seats done in Insignia Red, both using Model Master enamels. I did the
silver bits with Humbrol #11 and the Black using Floquil's Engine Black. These
were later barely drybrushed with Vallejo Light Grey.
in two shades of green.
For the light green I used RLM 82 (Xtracolor enamel) and the other is standard
Interior Green (Model Master enamel). The front seats were painted OD with the
rear mesh seats done in Insignia Red, both using Model Master enamels. I did the
silver bits with Humbrol #11 and the Black using Floquil's Engine Black. These
were later barely drybrushed with Vallejo Light Grey.
 I'm sure you are all
"colored out" by this time, but it doesn't hurt to be specific as a build review
isn't much good without telling details. A bit of caution when it comes to
installing the cabin seats. I had the rear bulkhead slip a bit while drying,
making the large seat difficult to install. Thankfully, there are holes in the
floor that help keep things properly aligned so a bit of reapplication of cement
got the aft bulkhead to move a bit while things dried more on a level keel.
I'm sure you are all
"colored out" by this time, but it doesn't hurt to be specific as a build review
isn't much good without telling details. A bit of caution when it comes to
installing the cabin seats. I had the rear bulkhead slip a bit while drying,
making the large seat difficult to install. Thankfully, there are holes in the
floor that help keep things properly aligned so a bit of reapplication of cement
got the aft bulkhead to move a bit while things dried more on a level keel.
I then glued the cockpit to the cabin and trapped it in the fuselage halves while it dried to be sure of proper alignment later.
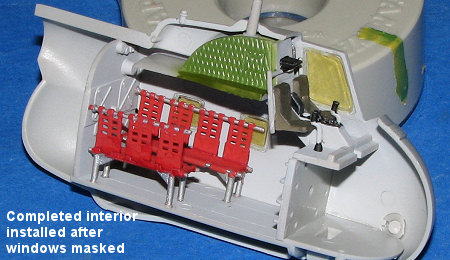
When that was done, I glued in all the clear bits except for the cabin door and the windscreen. Make sure these are in there well as if they fall out later, they will be impossible to put back into place. They were then masked with Tamiya tape. The windows all have rather pronounced frames around them which is probably horribly out of scale, but makes it easy to mask. This extends to the plastic surrounds as well. I'm sure that scale freaks will glue the windows in with super glue then sand the surrounds down level with the fuselage and polish the windows back to clear. Not me, though!
 I then glued in the
interior bits save the instrument panel. This had the decal applied while the
interior was again trapped in between the fuselage halves to dry. During this
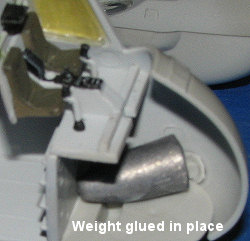
time, I also taped on the tail boom and put in a nose weight to be sure it would
be enough. Originally I put in two of these weights, but it felt too heavy so I
took one out.
I then glued in the
interior bits save the instrument panel. This had the decal applied while the
interior was again trapped in between the fuselage halves to dry. During this
time, I also taped on the tail boom and put in a nose weight to be sure it would
be enough. Originally I put in two of these weights, but it felt too heavy so I
took one out.
 When the interior was
dry, I glued in the weight with super glue after gluing in the exhaust stub.
Then the instrument panel was glued in place and any touch up painting was done
before the other half was glued on and set aside to dry. Don't forget to drill
out the holes for the rescue winch. I was able to sand most of the seams, but a
few needed filler. This was particularly true on the underside where it looks
like something was to fit in the keel bit, but nothing was in the parts box or
indicated. You'll aso note that there is a gap where the cabin floor meets the
fuselage side. In hindsight, I should have glued the interior to the right half
first to eliminate this.
When the interior was
dry, I glued in the weight with super glue after gluing in the exhaust stub.
Then the instrument panel was glued in place and any touch up painting was done
before the other half was glued on and set aside to dry. Don't forget to drill
out the holes for the rescue winch. I was able to sand most of the seams, but a
few needed filler. This was particularly true on the underside where it looks
like something was to fit in the keel bit, but nothing was in the parts box or
indicated. You'll aso note that there is a gap where the cabin floor meets the
fuselage side. In hindsight, I should have glued the interior to the right half
first to eliminate this.
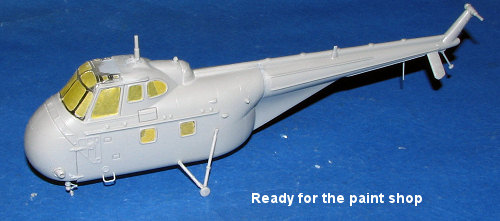
![]() After the usual
sanding, I glued on the tail boom. Fit is fairly good and I had to be rather
careful to be sure it went on straight. More filler was added and I also glued
on the small piece to the bottom of the forward nose. This part is listed as
'not used' but all three drawings and photos I found on the internet all showed
it in place so I attached it.
After the usual
sanding, I glued on the tail boom. Fit is fairly good and I had to be rather
careful to be sure it went on straight. More filler was added and I also glued
on the small piece to the bottom of the forward nose. This part is listed as
'not used' but all three drawings and photos I found on the internet all showed
it in place so I attached it.
 Once all the additional
filler was taken care of, various additional bits on the outside, like landing
gear, radio antennas, foot step and the tail rotor shaft were glued in place. I
then moved on to the rotor blades. These first had the tips painted white,
masked, and the red and yellow bits sprayed on. The rest of the blade was
painted black. I
Once all the additional
filler was taken care of, various additional bits on the outside, like landing
gear, radio antennas, foot step and the tail rotor shaft were glued in place. I
then moved on to the rotor blades. These first had the tips painted white,
masked, and the red and yellow bits sprayed on. The rest of the blade was
painted black. I
 always dread
doing rotor hubs as they can be quite fiddly and getting alignments just right
are often a problem. Well, not with this one there are guides in the upper
and lower 'caps' that trap the blades to prevent this from happening. Once the
blades and 'caps' were in place, the small push rods were glued to the blade
attachment points then to the small piece that fits below them. This was quite
painless and once I pushed all the bits together to ensure a good fit, I slid it
over the main rotor shaft to keep things aligned while it all dried.
always dread
doing rotor hubs as they can be quite fiddly and getting alignments just right
are often a problem. Well, not with this one there are guides in the upper
and lower 'caps' that trap the blades to prevent this from happening. Once the
blades and 'caps' were in place, the small push rods were glued to the blade
attachment points then to the small piece that fits below them. This was quite
painless and once I pushed all the bits together to ensure a good fit, I slid it
over the main rotor shaft to keep things aligned while it all dried.
| COLORS & MARKINGS |
 All the clear bits were masked and one has to cut the
masking a tiny bit oversize for the bulged windows. I stuffed tissue in the open
cabin. The instructions would have me use Blue Angel Blue, but as I didn't have
any (well I had some, but the bottle had solidified), I used Testors Model
Master Gloss Sea Blue with a bit of white added into it. This has the benefit of
being gloss, but like often happens with gloss paints, it remained tacky for a
considerable time. Several coats were needed to get all the crannies and nooks.
When dry enough to handle, though still a bit tacky, I applied the decals. The
Italeri Decals went on beautifully with the help of Microset, even the nose
decal that had to fit compound curves.
All the clear bits were masked and one has to cut the
masking a tiny bit oversize for the bulged windows. I stuffed tissue in the open
cabin. The instructions would have me use Blue Angel Blue, but as I didn't have
any (well I had some, but the bottle had solidified), I used Testors Model
Master Gloss Sea Blue with a bit of white added into it. This has the benefit of
being gloss, but like often happens with gloss paints, it remained tacky for a
considerable time. Several coats were needed to get all the crannies and nooks.
When dry enough to handle, though still a bit tacky, I applied the decals. The
Italeri Decals went on beautifully with the help of Microset, even the nose
decal that had to fit compound curves.
A couple of things of note. One is that the yellow tail band does not go all the way around. Secondly, the US Insignia were off register to the point that there were white bits sneaking out of the edge of the roundel and the red bars were not properly aligned. I used a set of slightly oversize insignia from an Aeromaster 1/48 insignia sheet. I also found the white markings to be nicely opaque so that they didn't allow much of the dark blue to bleed through. They darkened a tiny bit, but did so much better than I've experienced with other kit decals. If I had one comment to make on the decals it seems as if some of them are oversized compared to what is shown in the placement guide in the instructions and on the back of the box. This is particularly true of the serial number marking, which seems twice the size it should be.
| FINAL CONSTRUCTION |
 Decals in place meant more small bits to attach. In
this case it was the tail rotor assembly, which had the inner bits painted in
Gunmetal. Then the wheels were glued in place. I also painted then glued on the
hoist that was provided as well as painting the grille areas with matte black.
Formation lights were painted as well as a few other areas where I'd rubbed off
the blue paint when handling it. I also painted the rotorhead in aluminum as
suggested by the instructions. This was later given a wash of dirty thinner to
add some depth to things.
Decals in place meant more small bits to attach. In
this case it was the tail rotor assembly, which had the inner bits painted in
Gunmetal. Then the wheels were glued in place. I also painted then glued on the
hoist that was provided as well as painting the grille areas with matte black.
Formation lights were painted as well as a few other areas where I'd rubbed off
the blue paint when handling it. I also painted the rotorhead in aluminum as
suggested by the instructions. This was later given a wash of dirty thinner to
add some depth to things.
With all the markings and painting completed, I gave the model an overall coat of semi-matte clear. This turned out a bit more matte than I'd have liked, but at least it showed that I didn't have any problems with decal silvering. A bit more painting after the masking was removed and the main rotor was slipped into place. Naturally, all four wheels don't touch......
| CONCLUSIONS |
This really is a lovely kit. It is one that goes together well, has some great engineering for getting the rotorhead/blades to properly match up, and is one that can be built in a relatively short time. This project took about a week to do, most of it waiting for paint to dry. There is room for additional detail if you wish, but most of us will be pleased with what is right from the box, as is this particular build. I only wish that some of Italeri's fixed wing kits went together so nicely. This is a kit I can recommend to you without any problems.
August 2007
# 1480 in a series.
Copyright ModelingMadness.com. All rights reserved. No reproduction in part or in whole without express permission from the editor.
If you would like your product reviewed fairly and fairly quickly, please contact the editor or see other details in the Note to Contributors.