MPM 1/48 JB-2 'Loon'
| KIT #: | 48054 |
| PRICE: | $13.70 |
| DECALS: | Four options |
| REVIEWER: | Scott Van Aken |
| NOTES: | More of a V-1 than a Loon |
| HISTORY |
In July 1944, three weeks after German V-1 "Buzz Bombs" first struck England on June 12th and 13th, American engineers at Wright Field, fired a working copy of the German V-1 pulse-jet engine, "reverse-engineered" from crashed German V-1s that were flown back to the United States from England for analysis. The reverse engineering provided the design of America's first mass-produced guided missile, the JB-2. The Republic Aviation Corp. was to have built the airframe for the JB-2, but sub-contracted the airframe to Willys-Overland. Ford Motor Co built the engine, which was a copy of the V-1's 900-lb. thrust Argus-Schmidt pulse-jet.
 The JB -2 was the first unmanned guided missile in America's arsenal. The first launch of a JB-2 took place at Eglin Army Air Field in Florida in October 1944. In addition to the Eglin group, a detachment of the Special Weapons Branch, Wright Field, Ohio, arrived at Wendover Field in Utah in 1944 with the mission of evaluating captured & experimental rocket systems, including the JB-2. Testing was from a launch structure just south of Wendover's Technical Site. The launch area is visible on Google Earth. Parts of crashed V-1s and JB-2s are occasionally found by Wendover Airport personnel.
Contracts were let for production of 2,000 weapons, and Republic and Ford built 1,385 JB-2s for the Army and Navy. Production delivery began in January 1945, but the U.S. Army Air Forces cancelled further production when World War II ended. Just before the end of the war, an aircraft carrier en route to the Pacific took on a load of JB-2s for possible use in the planned invasion of the Japanese home islands.
Although never used in combat, after World War II, the JB-2 played a significant role in the development of more advanced surface-to-surface missile systems.
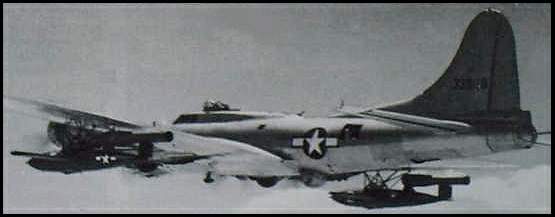 The U.S. Army Air Force continued development of the JB-2 as Project MX-544, with two versions: one with preset internal guidance and another with radar control. Several launch platforms were developed, including permanent and portable ramps, and mobile launching from beneath the wings of Boeing B-17G or Boeing B-29 bombers. Testing continued from 1944 to 1946 at Eglin to improve launch and guidance.
The U.S. Navy developed a submarine-launched version, KUW-1 Loon, later called LTV-N-2, which were carried on the aft deck in watertight containers. The first was the SS-348 Cusk which successfully launched its first Loon on February 12, 1947, off Point Mugu, California.
After the United States Air Force became a fully independent arm of the National Military Establishment (later renamed to the Department of Defense) on September 18, 1947, research continued with the development of unmanned aircraft and pilotless bombers, including the already available JB-2 and the sub-sonic, 500 mile range XSSM-A-1 which had been specified in December of 1945. The contract for developing the XSSM-A-1 was awarded to the Glenn L. Martin Company of Baltimore, Maryland and was known as the MX-771 project. The XSSM-A-1 would become the MGM-1 Matador, the U.S. Air Force's first operational missile.
The USAF Air Materiel Command reactivated the JB-2 as Project EO-727-12 on 23 April 1948, at Holloman AFB, New Mexico, the former Alamogordo Army Air Field. The JB-2 was used for development of missile guidance control and seeker systems, testing of telemetering and optical tracking facilities, and as a target for new surface-to-air and air-to-air missiles. The JB-2 project used the North American Aviation NATIV (North American Test Instrument Vehicle) Blockhouse and two launch ramps at Holloman: a 400-ft, two-rail ramp on a 3 degree earth-filled slope, and a 40-ft trailer ramp.
| THE KIT |
You just cannot get much more simple than this kit. Basically 11 parts. Two for the fuselage and engine halves, four for the wings, two horizontal stabs, two engine intake and a skid. I should also mention that as kitted, this 2003 offering it isn't really a Loon. The biggest area of difference is on the forward engine support. On the Loon, it had a vertical front facing and a long, sloping rear 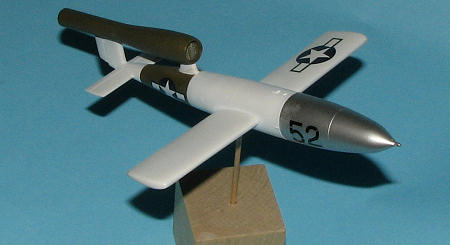 section. Look at the photo above and you'll see what I mean. The kit is more of a Fi-103 (V-1) than a Loon because of this feature. I'm also thinking that the forward part of the engine should be more of a straight cylinder and the kit has it as more conical, tapering back to about half way.
Detailing on the parts is engraved, though there isn't much detail there. I also noticed some molding flaws on the wings and tailplanes in the form of fine cracks. These can be seen when held to the light or a fingernail run across them. I'm not sure if just paint will fill them so the wise modeler will fill them and sand them down. Fixing the motor mount will be a bit more difficult, but some work with sanding sticks and card stock should provide a more believable shape. Not having some sort of handling dolly also makes displaying it a bit more difficult.
Instructions are quite simple and well done. There are markings for four airframes, all basically insignia and in most cases, a number. The difference is in the wide variety of paint schemes. First is the box art scheme in OD with white wings and a red engine intake. Next is an overall OD version with red nose and engine intake. Number three has a red forward section. white center section, wings and tail section with an OD engine and rear central section. Finally, an overall red airframe with a yellow tip to the nose. Decals are very nicely done and should provide no surprises.
| CONSTRUCTION |
 Normally, we'd start with the cockpit, but guess what? There isn't one! Makes masking transparencies incredibly easy as there aren't any of those, either.
As many of us have found over the years, simple does not always equate with a quick build. Many times I have spent months working on a kit with less than two dozen parts, but in this case, things are pretty straight-forward though there is some work that will need to be done.
MPM has thoughtlessly not provided any sort of display stand for this kit so one thing that needs to be done is to put some thought into how to go about doing that.
I started construction by gluing the fuselage halves together and doing the wings as well. Both of these constructs needed filler as there were some stress cracks on the wing surfaces and the fuselage just didn't easily fall together. As this is not a JB-2, some thought has to be done about upgrading it. The easiest is to carve at the existing engine mount to provided the proper shape. 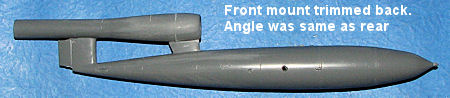 Though it will leave things a bit small, it is the simplest options. However, you'll be cutting away most all of the molded mount on the upper section so I opted to glue the engine front in place
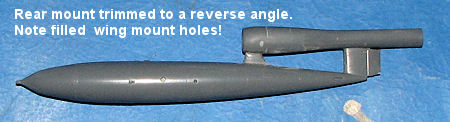 before attempting the carving. Once this was in place, it took about 15 minutes of careful cutting and sanding to go from Fi-103 to JB-2. You'll also notice that I managed to break off the little prop blades on the nose. I had also thought about using epoxy putty to build up the forward engine nacelle, but realized I'd never get it to look right so gave up on that idea.
The wings need to have the mounting holes in the fuselage either opened up or drilled out as the case may be. These were glue on without any trauma, though keeping them straight while the cement dries is not an easy task. I then used filler to fair them in place. I'm not sure how smooth the real join is, but it looks a lot better than the large gap that was there. Tailplanes need to have the mounting tab sanded down to about half the original depth to fit into the shallow slots on the rear fuselage. Last item was the small skid on the bottom.
| COLORS & MARKINGS |
The kit offers four very nice markings options, ranging from pretty much overall OD to overall re with a few others in between. I chose one that had a variety of colors but nothing else in terms of markings aside from insignia.
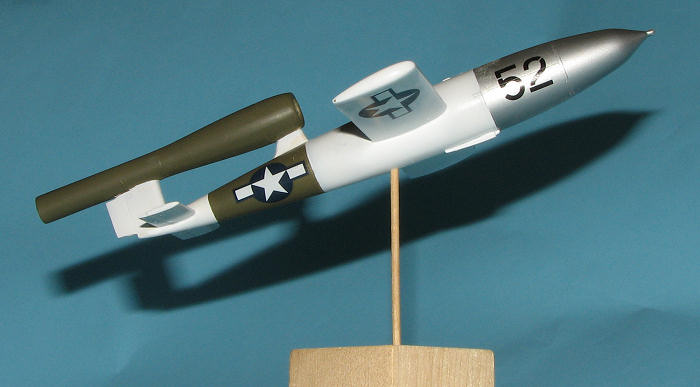
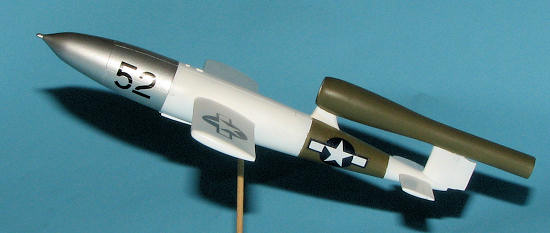
I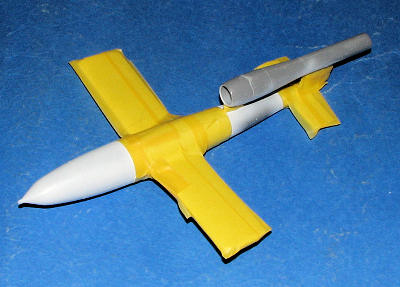 first sprayed most of the airframe with white. I had some white lacquer from Pactra already mixed up so I used that. It went on fairly well and dried in no time flat. Then it was time to mask. Face it, schemes like this require the use of a lot of masking tape. This is especially true if one is trying to keep other colors from a white surface. I had painted the nose white as well in order to provide a light background for the Humbrol #11 Aluminum enamel that was painted on that part. I also sprayed some into the intake to get the colors there. The final color was olive drab and for that I used AeroHobby's acrylics. This paint is pre-mixed for spraying and dries dead matte. It also took a couple of coats for good coverage, but since it dries so quickly, I was able to do both coats within an hour of each other.
I then let it all dry for a day and then applied the decals. The scheme I chose was devoid of anything aside from insignia so I cut some of the others ones on the sheet and applied some nose numbers just to keep it from being too anonymous. I used MicroSol and it seemed to work just fine.
| FINAL CONSTRUCTION |
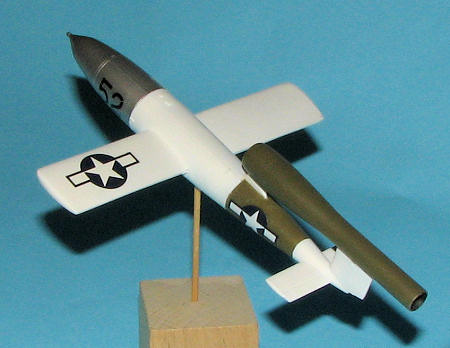
Now for a stand. Being one of the more unimaginative people on the planet. I settled for a simple wooden dowel stuck into a small block of wood. Everything is held in by friction so no need to mess with glues. The hole in the bottom of the Loon was drilled at an angle to add a bit of interest to things. I'm sure that building up a Monogram B-17 and scratchbuilding the pylons to hold this under the wings would have been much more impressive, but then I'd have never finished it! One always has to look at the positive side of things.
| CONCLUSIONS |
 So you know this isn't a proper Loon, but should make into a nice standard V-1. But again, we have what is probably a better V-1 kit that comes with a handling dolly for less money than this one, so I can't see too many flocking to pick up the MPM variant.
March 2008
Copyright ModelingMadness.com. All rights reserved. No reproduction in part or
in whole without express permission from the editor. If you would like your product reviewed fairly and fairly quickly, please contact the editor or see other details in the Note to Contributors.