ProResin 1/72 Bouton Paul P.120
| KIT #: | R72-027 |
| PRICE: | $ |
| DECALS: | One option |
| REVIEWER: | Scott Van Aken |
| NOTES: | Resin with vacuformed canopy. |
| HISTORY |
 The P.120 was a development of the earlier P.111 and
P.111a aircraft and was intended to further the program of basic research into
the delta wing planform. Although it looked like a straight-forward modification
of the earlier airframe, with the provision for a swept fin and rudder and a
horizontal tail surface (added to improve longitudinal and directional
stability), it was a departure from the original design. For one thing, it was
equipped with removable wing tips to explore how the differences in design would
affect flight characteristics.
The P.120 was a development of the earlier P.111 and
P.111a aircraft and was intended to further the program of basic research into
the delta wing planform. Although it looked like a straight-forward modification
of the earlier airframe, with the provision for a swept fin and rudder and a
horizontal tail surface (added to improve longitudinal and directional
stability), it was a departure from the original design. For one thing, it was
equipped with removable wing tips to explore how the differences in design would
affect flight characteristics.
These differences might be thought to have a bearing on the aircraft's early demise, but, as shown during the investigation, had no bearing on the accident that destroyed the aircraft 23 days after its first flight in August of 1952. The first flight was not without incident and immediately showed the very powerful effect of the horizontal tailplane trimmer. Tests continued to open up the flight envelope and investigate the novel control layout when the pilot lost control and subsequently crashed the aircraft. It was the last aircraft to carry the Boulton Paul name.
| THE KIT |
Prior to this, the only kit in this scale of this plane
that I can recall was the Project-X vacuformed kit produced by Maintrack Models.
That was an excellent vacuformed kit, but this resin one is just that much
better. This kit looks very much like the earlier P.111 kit and it is not
surprising as many of the parts from that kit can be used on this one. This
includes the fuselage, intake, exhaust, landing gear, interior; in short the
tail section and wings are different. Molding quality is the same and very well
done. I also found 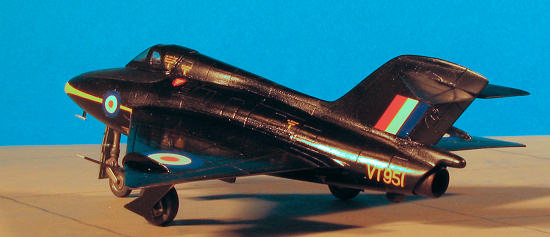 a few pin holes on the wings, fin and tailplane next to the
pour block. Again, only a few and should be easily handled, but one should be
very careful on sanding. I'm sure that removing the block will show a few more
as this has happened on kits before. Primer or a dab or two of Mr. Surfacer 500
should fix those right up. Care needs to be taken when sanding as to not open
new ones or damage the detail.
a few pin holes on the wings, fin and tailplane next to the
pour block. Again, only a few and should be easily handled, but one should be
very careful on sanding. I'm sure that removing the block will show a few more
as this has happened on kits before. Primer or a dab or two of Mr. Surfacer 500
should fix those right up. Care needs to be taken when sanding as to not open
new ones or damage the detail.
Again, I'd rather have a one-piece nose gear strut and fork, but ProResin must find it better to mold as two pieces. A superbly detailed cockpit is given along with the proper bang seat. Both fuselage halves will need to have the mating surfaces carefully sanded down to get a proper fit. There is excellent wheel wheel detail that extends to the wing root as well. This section helping to align the wings. One vacuformed canopy is provided and it is nicely done. The frame lines are not very prominent. Many of us prefer them to stand a bit proud. May not be prototypical, but does make it so much nicer to mask.
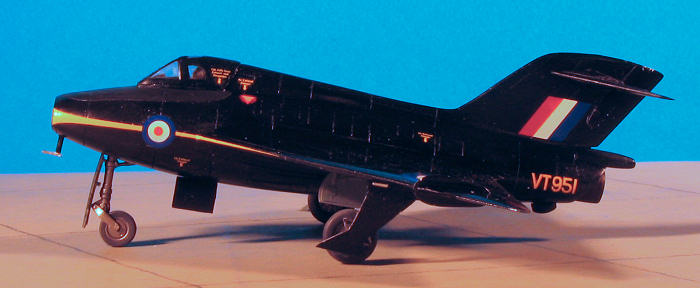
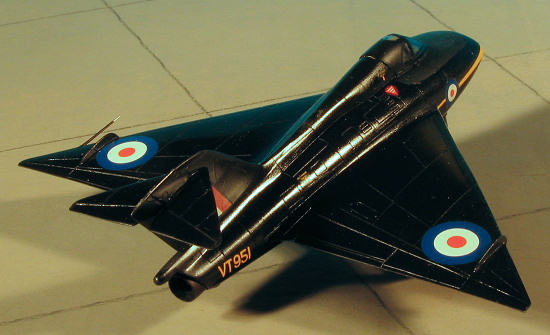
The instructions are very nicely done and provide all you need. There is a history of the type (which I pinched for much of the intro), a parts layout, and five very nicely drawn construction steps. These include some smaller diagrams for parts location. Color information is also given in the build sequence and on the back these colors are referenced to Humbrol, Revell and ModelMaster paints. The aircraft is an overall gloss black with matte black antiglare panel on the nose. Decals are very nicely done and seem to be in perfect register.
| CONSTRUCTION |
 As
with all resin kits, the first thing to do is some parts clean up. This case I
removed all the large pieces from their pour stubs and cleaned up the fuselage
halves. The fuselage has a rim of resin that runs along the bottom that has to
be sanded or trimmed down. I used a scalpel to trim it down and then scraped it
until the seam went away. Then a quick swipe with a sanding stick to be sure.
The flash in the cockpit, intake, exhaust, and
nose well was removed. The cockpit needs to have all material under the head
rest cleaned out or the cockpit tub won't fit.
As
with all resin kits, the first thing to do is some parts clean up. This case I
removed all the large pieces from their pour stubs and cleaned up the fuselage
halves. The fuselage has a rim of resin that runs along the bottom that has to
be sanded or trimmed down. I used a scalpel to trim it down and then scraped it
until the seam went away. Then a quick swipe with a sanding stick to be sure.
The flash in the cockpit, intake, exhaust, and
nose well was removed. The cockpit needs to have all material under the head
rest cleaned out or the cockpit tub won't fit.
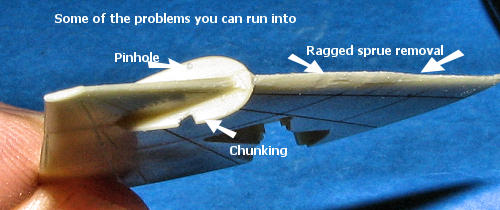 You
may recall that I found some pinholes and chunking in the wing. I also had a
rather ragged leading edge to one wing. These
are all easily taken care of. The ragged edge just needed more sanding and
shaping. The pin hole was filled with super glue and sanded. As for the chunk,
well, first I made it larger and extended down to the wing. Then, I cut a small
section of plastic card that was thicker than the fence and glued it in
You
may recall that I found some pinholes and chunking in the wing. I also had a
rather ragged leading edge to one wing. These
are all easily taken care of. The ragged edge just needed more sanding and
shaping. The pin hole was filled with super glue and sanded. As for the chunk,
well, first I made it larger and extended down to the wing. Then, I cut a small
section of plastic card that was thicker than the fence and glued it in
 place.
It was later filled and sanded down.
place.
It was later filled and sanded down.
While the glue dried, I did some preliminary painting.
The instructions call for the interior, wheel wells and intake to be painted
with a medium grey. In this case the references showed FS 35237, which is a
bluish grey. I had this in the Model Master enamel line and sprayed it on. Then
the seat and instrument panel were painted with a darker grey which referenced
out to FS 36118. Frankly, it isn't much darker than the other grey. I used some
older Aeromaster Acrylic for this shade. Once these
 parts had dried, I then did
some detailed painting of the seat and cockpit pieces as shown in the
instructions. I also cemented the intake into one half of the fuselage and then
taped the other half to it so that I could properly align the intake piece. It
is a teeny bit undersize, but not enough to make any problems. When dry, this
was painted gloss black as indicated in the instructions. I used Vallejo
acrylics for this. This paint HAS to have an enamel or lacquer undercoat or it
will come off rather easily.
parts had dried, I then did
some detailed painting of the seat and cockpit pieces as shown in the
instructions. I also cemented the intake into one half of the fuselage and then
taped the other half to it so that I could properly align the intake piece. It
is a teeny bit undersize, but not enough to make any problems. When dry, this
was painted gloss black as indicated in the instructions. I used Vallejo
acrylics for this. This paint HAS to have an enamel or lacquer undercoat or it
will come off rather easily.
I then decided to install the interior and nose well
piece. First, the control column was carefully removed from the re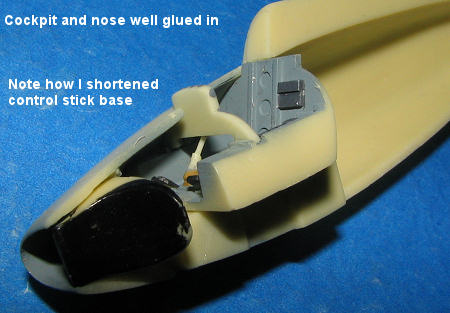 sin
sprue. This was then glued in place and the instrument panel glued on. Something
wasn't right as the column was too long. It is supposed to stick out like the
gear shift on a Citroen DS. In other words, the part that comes to the pilot is
horizontal and not vertical as usual. But it is so long, that when the seat is
put it, it won't fit. I cut about half the thicker base section from it and
tried again. This time the seat fit and I would be able to place it later. It
still looks darn odd and I'm not sure how anyone was able to fly a plane with a
control stick like that.
sin
sprue. This was then glued in place and the instrument panel glued on. Something
wasn't right as the column was too long. It is supposed to stick out like the
gear shift on a Citroen DS. In other words, the part that comes to the pilot is
horizontal and not vertical as usual. But it is so long, that when the seat is
put it, it won't fit. I cut about half the thicker base section from it and
tried again. This time the seat fit and I would be able to place it later. It
still looks darn odd and I'm not sure how anyone was able to fly a plane with a
control stick like that.
Anyway, I glued in the interior, making sure the
instrument panel was as vertical as I could get it. Then I jammed the nose gear
well under the interior section. It was a tight fit, but once it was aligned
with the opening, a few drops of superglue held it all in place. There is scant
room for nose weight atop it so some will undoubtedly have to go to the side of
the well.

The fuselage halves were then glued together. Fit is
pretty good and though some filler was used, it wasn't really that much. I then
glued on the fin/rudder. This isn't a real tight fit and I found the fin to be
broader than the attachment point on the fuselage. Once it was on, several
 applications
of filler over several days were used to match things up. I also attached the
wings. Again, fit is not at all bad, but there is some need for filler on the
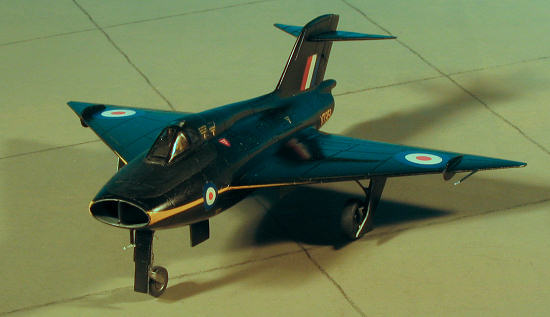
joins to smooth things out. You can see the extent of what was needed from the
two images.
applications
of filler over several days were used to match things up. I also attached the
wings. Again, fit is not at all bad, but there is some need for filler on the
joins to smooth things out. You can see the extent of what was needed from the
two images.
With the fuselage pretty well done, I then attached the anti-glare panel. This was too long, or I didn't mount it far enough aft. There is a small alignment hole for a pin on the lower front of this piece, but I trimmed mine off as I'd filled the hole. I fit the section as far on the instrument panel as I could and glued it. Then, I carefully cut the lone canopy until I had a pretty good fit. It was at this time that I found the anti-glare cover to be too far out in front. I had to sand it down considerably to get the canopy to fit snugly. I then masked it with Tamiya tape. The frame lines were not as well defined as I'd like. At this time, the seat was installed. Though I'd test fit it several times, this time I broke the control stick. Well, I'm only human and thankfully the canopy is somewhat restrictive in what you can see through it. I then attached the canopy with white glue. I held the canopy down with tape until it dried.
Next, I attached the tail planes. The single attachment hole was enlarged and drilled through to help gluing. The tail planes were then glued in place. I also glued the tail bumper at this time.
| COLORS & MARKINGS |
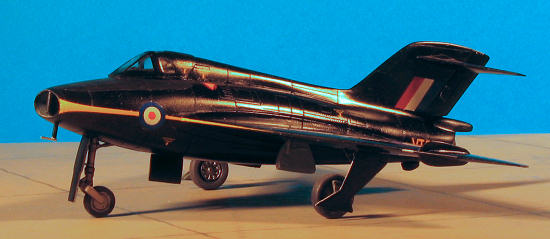
 This will be easy to paint. Gloss Black overall. I used
Floquil Engine Black thinned with lacquer thinner so that it would have maximum
stick on the resin. I put on several light coats. I also painted the outside of
the gear doors at this time and also used this color as an undercoat for the
landing gear and wheels. The gear and wheels were later painted with Alclad II
Steel. The undercoat is a precaution as metallics don't like to stick to raw
resin.
This will be easy to paint. Gloss Black overall. I used
Floquil Engine Black thinned with lacquer thinner so that it would have maximum
stick on the resin. I put on several light coats. I also painted the outside of
the gear doors at this time and also used this color as an undercoat for the
landing gear and wheels. The gear and wheels were later painted with Alclad II
Steel. The undercoat is a precaution as metallics don't like to stick to raw
resin.
The main airframe was then given several coasts of Future clear acrylic gloss in preparation for decals.
Returning to the work bench, I then assembled the
landing gear. The nose gear is in two parts so I carefully removed the bits,
cleaned them up and glued them together. No problem and a fine fit. This was
then cemented into the nose gear well. For the main gear, they protrude forward
at quite an angle and this angle is determined by the main gear doors. As soon
as I glued on a gear, I 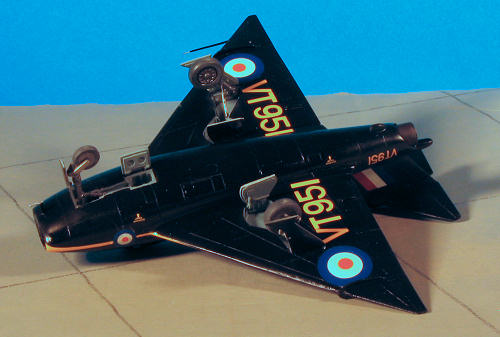 attached a
door to get the proper angle. The mounting hole for the main gear would have the
gear nearly vertical so it is a touchy assembly. I then glued on the main wheels
and prepared for the decals. It is a good thing I packed the nose with weight as
this plane sits nose high.
attached a
door to get the proper angle. The mounting hole for the main gear would have the
gear nearly vertical so it is a touchy assembly. I then glued on the main wheels
and prepared for the decals. It is a good thing I packed the nose with weight as
this plane sits nose high.
The decals are nice and thin. They have more carrier than we are used to with aftermarket and the white is a bit transparent. The yellow for the serials and trim is backed with white and in perfect register. The insignia and serials appear to be oversized when compared to the instructions. While replacing the insignia and fin flash won't be a problem, finding yellow serial numbers will. Surprising to me, the yellow nose/leading edge stripe went on without a lot of hassle but this is quite thin so care needs to be taken when applying. The decals succumbed to Solvaset without any problems. I then applied a coat of clear acrylic gloss (Future/Klear) to seal them in place.
| FINAL BITS |
Back at the bench for the final bits. I glued on the
nose wheel. There are no stub axles for them to attach to so I basically glued
the wheel to the inside of the fork. I then started attaching some of the little
bits that would normally be broken off with handling. This included the nose
gear doors. The smaller door is perfect, but the main door which fits on the
nose gear leg is much longer than shown in the drawings. Of course, trimming it
means it is too short for the opening so that is a choice one has to make. I
left it as it 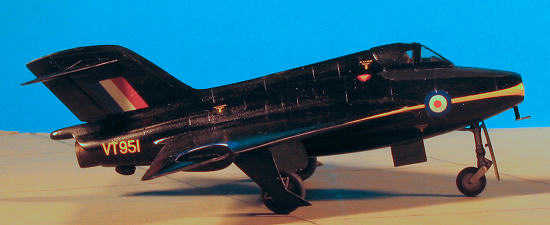 was. The inner main
doors were a perfect fit. The retraction struts for both the nose and main gear
are too long for the attachment holes so one either trims them down or relocates
where they fit.
was. The inner main
doors were a perfect fit. The retraction struts for both the nose and main gear
are too long for the attachment holes so one either trims them down or relocates
where they fit.
I also glued in the exhaust at this time after painting it Burnt Iron using Testors Metallizer. There are four probes, two under the nose and two on the wing leading edge. The wing jobs are thicker than any part of the leading edge of the wing and since I broke one, I only installed the one near the tip. I had to cut a notch in the wing leading edge for it as drilling was out of the question. For the probes under the nose, I could only use one as the other had broken as well. I drilled a hole for it and glued it in place. These items were touched up with gloss black and a silver marker pen.
I removed the masking from the canopy (yup, you can barely tell there is an interior) and brush painted clear matte (Vallejo) for the anti-glare panel. That was it.
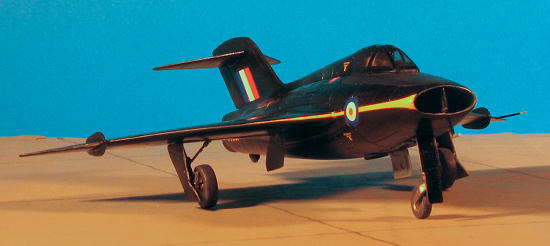
| CONCLUSIONS |
 This
really was a fun kit to build. Sure, it had its moments, they all do, but
nothing the average modeler couldn't cope with. The parts fit reasonably well
and have good detailing. The end result is a very neat aircraft that will fit
right into any collection of experimental aircraft. It is one that I'm sure you
will enjoy building.
This
really was a fun kit to build. Sure, it had its moments, they all do, but
nothing the average modeler couldn't cope with. The parts fit reasonably well
and have good detailing. The end result is a very neat aircraft that will fit
right into any collection of experimental aircraft. It is one that I'm sure you
will enjoy building.
November 2006
#1438 in a series
Copyright ModelingMadness.com. All rights reserved.
If you would like your product reviewed fairly and fairly quickly, please contact the editor or see other details in the Note to Contributors.