Airfix 1/72 Spitfire PR.XIX
| KIT #: | A02017 |
| PRICE: | $7.50 MSRP |
| DECALS: | Two options |
| REVIEWER: | Scott Van Aken |
| NOTES: | Three Pavla update sets used. (1) - (2) - (3) |
| HISTORY |
The Spitfire was not only an excellent short range fighter, but it was also one of the best photo recce aircraft that the RAF operated. This was especially true for tactical reconnaissance where speed was of major importance. Get the pictures and get back! The final version of the aircraft developed for reconnaissance duties was by general consent the best, the Spitfire PR19. This version saw extensive service after the war in a number of theatres. This version built on all the lessons learnt from previous 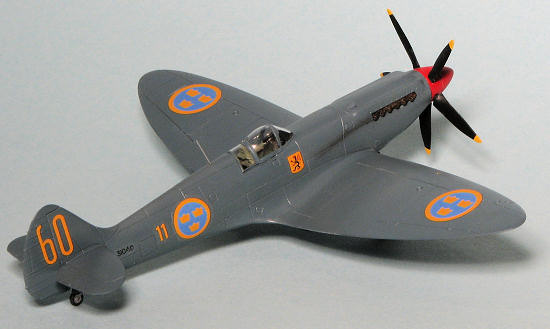 aircraft, combining the wing of the PR 11 containing 66-gallon leading edge fuel tanks and potential camera installation and was powered by the 2000hp Griffon 65 series engine used in the Mk14. The total internal fuel capacity of the PR19 was 252 gallons, although there was the option of also carrying a 90 gal or 170 gal drop tank, the added drag virtually outweighed the benefit and it was rarely carried.
The camera installation was fairly similar to that used for the Mk 11. Within the fuselage were mounted various cameras, either two fanned or a single F52 36in vertical, two fanned F52 20in vertical or two fanned F24 14in vertical and one F24 14in or 8in oblique. The fuselage cameras were heated by warm air ducted from behind the starboard radiator. Additional cameras could also be carried in the wings in place of the inter-spar fuel tanks and these were also heated by warm ducted air. The installation of a full pressure cabin made life much more comfortable for the pilot during freezing high altitude, long endurance reconnaissance sorties that the type was occasionally tasked with performing. The last operational flight made by any RAF Spitfire was flown by a PR 19 over Malaya on 1 Apr 1954. That happens to be the box art plane and one of the markings options in this kit.
| THE KIT |
I like Spitfires. I dare say that there are few who do not. Now while I'm not as obsessive as some, I do like the kits I buy to be as true to the real ones as possible. This new kit from Airfix seems to have done a lot right when it comes to this aircraft. The kit is molded in China (and what isn't nowadays) with engraved panel lines that seem a bit overdone for this scale, but I'm sure that the usual 'coat of paint' will lessen the effect. It has few options, one of those being raised landing gear with a suitable piece for the closed tail wheel doors.
 The kit sports a full cockpitswith fore and aft bulkheads, a correct floor, a seat and control stick. The pilot figure is nicely done with separate arms. Clear inserts are provided for the lower wing and fuselage camera openings. No cameras are provided. The main landing gear legs are molded into the gear doors, providing a very sturdy construct. The one-piece canopy is the correct version for a PR Spit. I should also mention that there is gull under the wing, something many companies have missed over the years. It seems a tad shallow, but then I could easily be wrong about that.
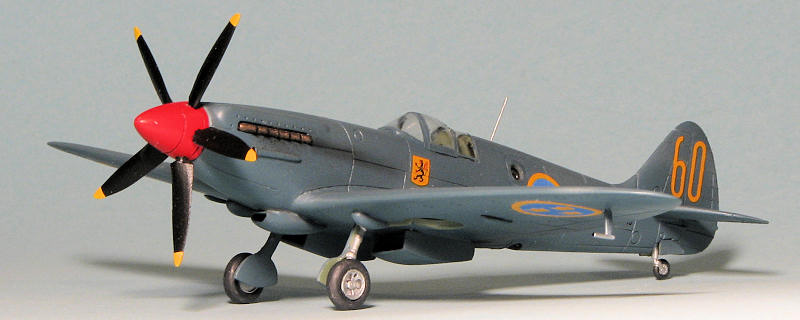
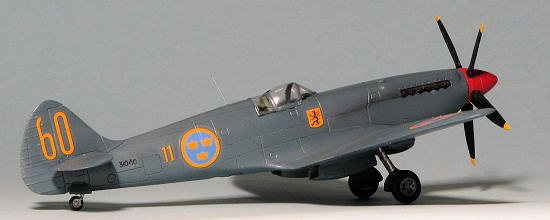
Instructions are huge. In fact, the kit is wrapped up in the large instruction sheet. Usual Humbrol-only paint numbers with no clue as to what the shades actually are. This, to me, is a major bad thing that Airfix and other companies do to modelers. The painting and decal placement guide is an equally large full color sheet with markings for each of the two options on either side of the paper. One is the box art plane from 81 Squadron in Malaya in 1954. This basically anonymous plane is in PRU Blue with upper surfaces in Medium Sea Grey. The other is a Swedish plane from 1955 with Flotilla 11. It is in overall PRU Blue. The small decals sheet is superbly done. It looks as good as any aftermarket sheet and hopefully will be in the vanguard of the end of substandard Airfix decals.
| CONSTRUCTION |
 As I'd decided to make a $50 model from a $7.50 kit, I gathered the three Pavla detail sets that have been done for this kit. Every part that is included with the Pavla sets is an improvement in either detail, shape or both over the kit bits. Not surprising as the Airfix kit is a pretty nice, though basic kit and designed for 'pocket change' and not for the discriminating Spitfire boffin.
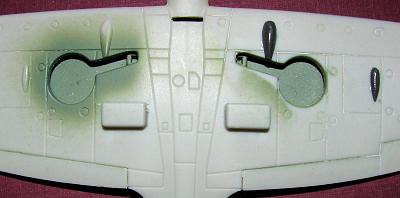
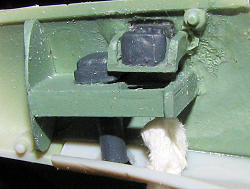
First thing I did was to grind away the interior detailing so that the resin bits would fit properly. Then I glued the upper and lower wing halves together. I needed some filler on the leading edges, about normal for me. The interior bits and wheel wells were painted RAF Interior Green, though frankly, I could have probably done the wells in aluminum. Interestingly, the Pavla instructions show that the interior could also be black. Airfix would have you paint this area Interior Green. I followed Pavla's advice on painting the various bits and pieces.
 Meanwhile, I started removing some exterior bits, beginning with the fairings under the wings. To be sure I got things in the right place, I did one wing half at a time. The large fairings are handed so one has to be aware of this. There are no instructions for the exterior set, so after installing the camera window, long supercharger intake and the small one on the upper right cowling, I was left with another small scoop and a 'lump', with no indication of where these went.
I then cut away all of the parts on the two main sprues that would be used and those that were replaced by Pavla bits. Not much left of the original kit aside from the basic airframe.
 Back at the fuselage, the camera window was installed in place of the kit part. Then the camera bits were test fit to see what could be fit. From how it looks, I can install the smaller upper camera and one of the longer vertical cameras. It is a very tight fit that required a bit of adjustment. Something I did was to cement one fuselage half to the wing assembly so I could be sure to get the cameras to aim out the windows. These cameras mean that one cannot install the clear windows as there is no room.
As tight as the camera installation was it was nothing like trying to get the interior in place. I thought I'd ground away enough stuff to get a good fit, but man, talk about difficulty in getting stuff to properly close up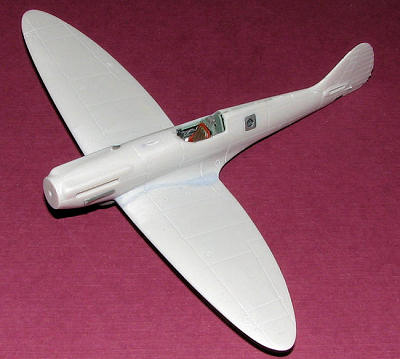 . Eventually, with help from clamps and super glue and tape, I was able everything in there and still seal up the fuselage. Of course, this meant filler was needed and after the usual runs, all was smoothed out. I added more stuff to the underside of the wings, including the radia
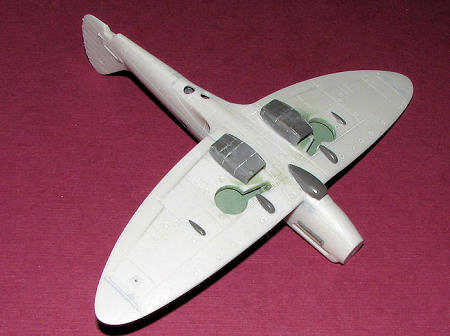 tors and oil cooler scoop. Then the tailplanes were glued in place.
I trimmed the vacuformed canopy and set it on the cockpit opening. It is a bit longer than the kit canopy, but is clearer. I'm not 100% sure the windscreen on the Pavla canopy is correct, but it looks OK. I'm sure the spit-boffins will let me know about its accuracy. This was then attached with clear paint and taped down while the paint dried. It was then masked off and tissue stuffed in the camera ports. Off to the paint shop.
| COLORS & MARKINGS |
I chose the Swedish version as I like PRU Blue. The resin prop hub was painted white then red and set aside to dry. I also painted t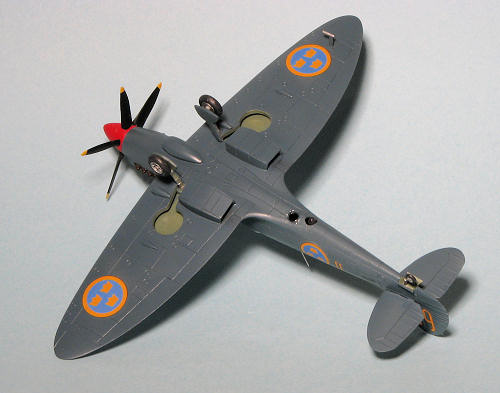 he prop blades at this time, including the yellow tips. For the blue, I used up the last of my Aeromaster acrylic of this shade. Painting was easy as everything got a nice coat or two until the paint ran out. I then brought the plane to the workbench where the landing gear were glued in place. Back to the painting area for a coat or two of Future. I was somewhat taken aback by discovering that the landing gear did not both go the same distance into the gear slots. Too late to fix it now as they were firmly cemented in place.
It was time to apply the decals. They went on with no real trouble but two things to watch for. One is that unless you flood the area with water, they will stick the first place they touch. Second is that they are rather impervious to setting solutions, even the really strong ones so won't snuggle into the crevices as you'd really like. This resulted in a bit of silvering on some of the markings. You can use a toothpick to push the decal into panel lines, but there is no guarantee they will stay there.
Once dry, a coat of semi-matte was applied. These may have actually been gloss as recce planes need all the speed they can get.
| FINAL CONSTRUCTION |
For this it was a matter of attaching the wheels (I used the three spoke ones as they seemed to be the more us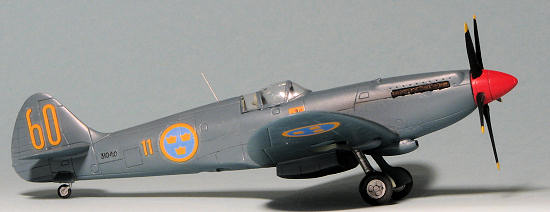 ed on these planes) and the tail wheel strut. I then hooked on the rear gear doors. The prop had the various blades installed. You will need to trim back the blades a bit more than you'd like to get them to fit properly. The pitot tube was the last bit to be attached. Much to my dismay, I found the control stick floating around in the box, so it looks like I forgot something after all. For the cameras, I first filled the 'lens' opening with clear paint to simulate the glass of the lens. Using that same clear paint, I made camera opening glass for two of the three openings. Couldn't do it with the opening with the long camera in it as that camera juts out slightly from the airframe. I glued in the exhaust and put in a section of wire for the whip antenna. After a tad of pastels for the exhaust, that was pretty well it.
| CONCLUSIONS |
Overall, I'd have to say that the end results were worth the effort. The basic kit itself is fine as it is, but adding the Pavla sets just took things up a notch or two higher in terms of detail as the more crisply formed and in some cases, proper size and shape of the Pavla parts makes them worth the effort of installing them.
| REFERENCES |
January 2010
Thanks to me for the kit and Pavla Models![]() for the resin upgrade parts.
for the resin upgrade parts.
If you would like your product reviewed fairly and fairly quickly, please contact the editor or see other details in the Note to Contributors.