| KIT #: | A09182 |
| PRICE: | $44.95 SRP |
| DECALS: | Two options |
| REVIEWER: | Scott Van Aken |
| NOTES: | New Tool Kit |
| HISTORY |
The first viable Allied jet fighter was the Meteor. Such was the ability of
the airframe to accept newer and newer engines that Meteors were flying in the
skies of the world for many years and in cases decades after the initial
aircraft first flew. Much of the success of the Meteor was that it was a basic
aircraft and other t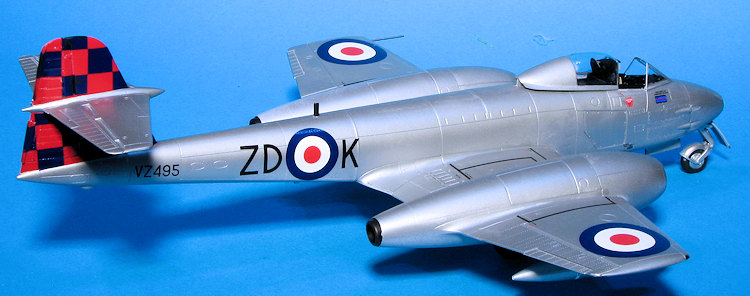 han its power plants, did not break any new ground.
Not only that, but the type was easy to fly and easy to maintain, a trait that put it in good staid with the export market, where it sold well. It was also developed into a viable night fighter and even decades after it was out of front line service, there were Meteors flying in specialty roles such as drones and ejection seat testing. I'm not sure if any are in the hands of war bird enthusiasts, but I would be surprised if there was not at least one.
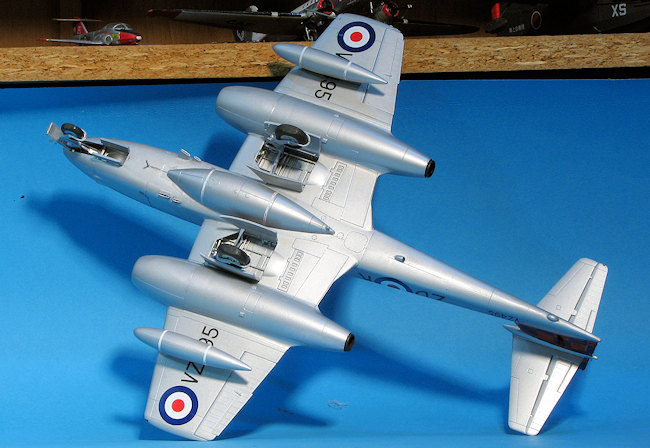
The ultimate fighter version was the F.8. This was the third major production type following the F.3 and F.4. It can be easily identified from the previous variants by the more square tail and longer length, which allowed great fuel capacity.
| THE KIT |
Fans of the type were thrilled to learn that it was being produced in 1/48 scale and there is a hope that this will also find its way into 1/72 for those who prefer that scale. There is already a nice preview of the kit in Modeling Madness so I'll be brief on what's in the box.
The first thing that strikes one is that the box is very large. Same size as for their C-47 and other large kits. Molding is typical of current Airfix offerings, which means it is quite nice. The cockpit is well appointed and while there are no belts, the ejection seat is nicely molded. All the detail in side panels is raised and there is a decal for the instrument panel. Since the cockpit is all black, there will not be a lot to see in there, so keep that in mind.
 The kit has separate gun bay access panels so
there is detail for this section. You can skip 8 construction steps if you
are modeling the panels closed. When building up the wing, there are two
nicely done wing spars, the aft one having circular ends that fit into the
engine nacelles. These are used to attach engine bits. The spars form the
front and rear of the wheel wells with the builder adding in the side panels
and the roof. If one builds the kit gear up, much of this can be left off.
If attaching the wing and center fuselage tanks, then holes will need
opened.
The kit has separate gun bay access panels so
there is detail for this section. You can skip 8 construction steps if you
are modeling the panels closed. When building up the wing, there are two
nicely done wing spars, the aft one having circular ends that fit into the
engine nacelles. These are used to attach engine bits. The spars form the
front and rear of the wheel wells with the builder adding in the side panels
and the roof. If one builds the kit gear up, much of this can be left off.
If attaching the wing and center fuselage tanks, then holes will need
opened.
There are separate flight control surfaces with all of them to be attached in the neutral position. The Meteor did not normally have the flaps bleed down so none are provided. Other options are the ability to have the upper wing engine access covers open, large and small engine intakes, and the ability to have the speed brakes deployed. Again, these latter were normally closed. Two styles of canopy are also included. The nose requires 15 grams of weight and there is room for it. Landing gear is very nicely molded with lots of parts.
Instructions offer only Humbrol paint information and during the build process, only numbers. Markings are for two planes. One is the box art plane in camouflage from 111 Squadron while the other is an overall aluminum lacquer 85 Squadron version. Decals are nicely printed and while I would have thought that more than two options would have been supplied, the aftermarket folks have already taken care of any omissions.
| CONSTRUCTION |
After prepainting a lot of parts, I looked for subassemblies. A normal one was the cockpit which actually built up rather quickly. I was quite pleased with how well the Airfix engineers had designed things to mate into place. As a note some pieces will only fit properly after others have been installed so keep this in mind during the build. I glued the main wheels together and the jet pipes. The holes in the lower wing were opened for the fuel tanks. There are also holes for a stand and for a later boxing with rockets. On both the fuselage and the lower wing are openings for clear lenses.
The wheel wells built up quite nicely with a very long spar at the back of the wing and a shorter one at the front also making up the fore and aft wells. Two side pieces then slip into place. Before attaching the upper wing pieces, I glued in the jet pipes. These are a very positive fit. I found that the long pieces in the kit had some warping issues, but gluing and tape were enough to deal with these. The actual fit of the rear engine nacelles was not good on one side, leaving quite a step that had to be filled.
 Meanwhile, the completed cockpit assembly was glued to
one side. I should mention that there is a decal for the instrument panel and it
matched up well with the instrument faces. The various holes were opened for
antennas, and I added 15 grams of weight under the cockpit as recommended by the
instructions. The fuselage halves were then glued together. Again, these were
warped, but glued well. I found the fit around the cockpit to be very tight and
I had to use superglue to hold the fuselage halves together in this area. For
me, this is not a filler free kit, but thanks to Airfix's rather soft plastic,
sanding is pretty easy and can eliminate much of the filler requirements.
Meanwhile, the completed cockpit assembly was glued to
one side. I should mention that there is a decal for the instrument panel and it
matched up well with the instrument faces. The various holes were opened for
antennas, and I added 15 grams of weight under the cockpit as recommended by the
instructions. The fuselage halves were then glued together. Again, these were
warped, but glued well. I found the fit around the cockpit to be very tight and
I had to use superglue to hold the fuselage halves together in this area. For
me, this is not a filler free kit, but thanks to Airfix's rather soft plastic,
sanding is pretty easy and can eliminate much of the filler requirements.
The tailplanes and wings were the next items attached. The wings have a fillet that needs to go on first. The fit at the front and rear is actually quite good. There is a bit of a gap on the upper wing/fuselage join. This sort of gap is pretty standard on most of the parts as the Airfix kit doesn't have as tight a tolerance as some others. For instance, when I glued on the gun access doors, there is a gap all around these doors that is wider than the rest of the panel lines. One of the tailplane halves was short shot, but easily fixed with a couple of applications of super glue and accelerator. Two applications were all that was needed. The tailplanes are also a rather loose fit and there is a gap that needs filled on the underside where it joins the tail.
All the control surfaces are separate. Some have pins that help align the parts and in some cases make for a very tight fit. Looking at photos of these planes, these surfaces are generally in the neutral position which makes me think that the controls were loaded to the center position. I had originally installed the ailerons the kit recommended, but later found that the other set included are for the very early planes. As I was building an early plane, I thought it best to use those. Though I'd already glued the later ailerons in place, a bit of wiggling induced them to come free.
 Moving to the nose, I installed the nose gear
assembly. Then the nose cap. This piece did not fit at all well. The issue is
that it would not go far enough back to properly mate with the fuselage, giving
me about a 1/16 inch gap. This does not seem like a lot, but it is. I did some
grinding on the forward cockpit bulkhead to try to reduce this and got it down
to about half that much. The rest was dealt with using filler. I can only guess
that I did not have the cockpit assembly back far enough, even though it is a
very tight fit.
Moving to the nose, I installed the nose gear
assembly. Then the nose cap. This piece did not fit at all well. The issue is
that it would not go far enough back to properly mate with the fuselage, giving
me about a 1/16 inch gap. This does not seem like a lot, but it is. I did some
grinding on the forward cockpit bulkhead to try to reduce this and got it down
to about half that much. The rest was dealt with using filler. I can only guess
that I did not have the cockpit assembly back far enough, even though it is a
very tight fit.
I also installed the small engine intakes and put on the engine covers. Those with the IPMS anal probes will quickly see there is no engine, but for normal purposes, you cannot tell it is missing. Those who want to be able to see something past the splitter will want to install the engines. The speed brakes were installed in the closed position, which was the norm for these planes. They do not fit flush.
Then I started assembling the landing gear. It was at this point, after painting the wheels, that I realized I had mis-constructed the main wheels. You see, these are designed to have a key on one side so that the flat spot will be down and the wheels properly installed. I simply cut off all four wheel halves and glued opposite halves together, not realizing this. There was a 50-50 chance to get this right and I got it wrong. One wheel will work great even with the keys on both halves, but the other needed to have the key trimmed down on the inside of one gear half. It also took a bit of effort to remove the seam in the mud guard on all four gear.
Meanwhile, I went back to the cockpit and started installing the upper sections. There is a gun sight that is two clear pieces that needs to be installed. Then an interior section goes into both the windscreen and the canopy. I chose the earlier canopy section to match the early ailerons and small intakes. These were then masked, the windscreen glued on and the canopy tacked into place.
| COLORS & MARKINGS |
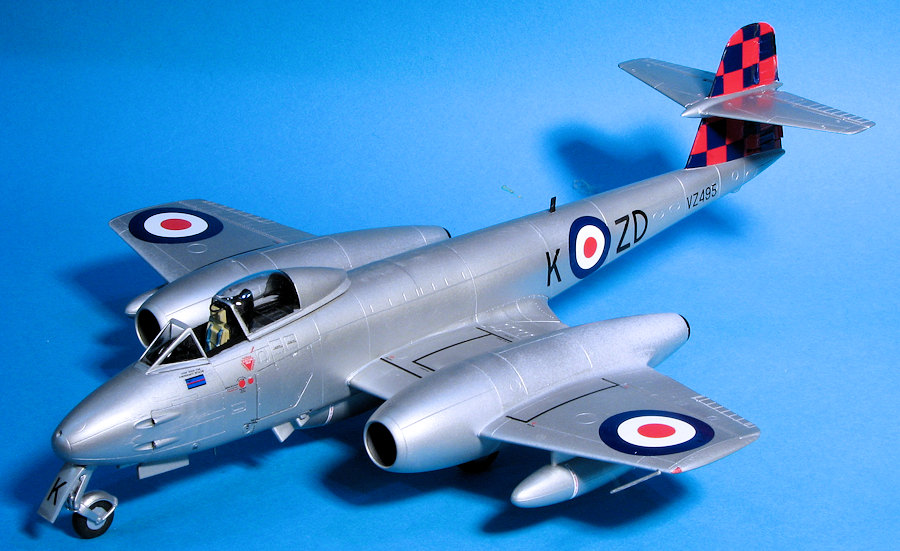
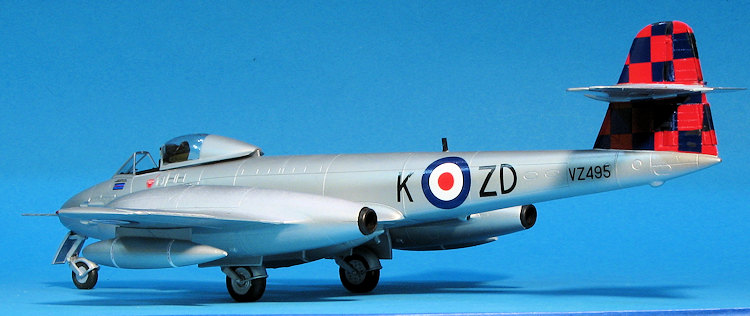
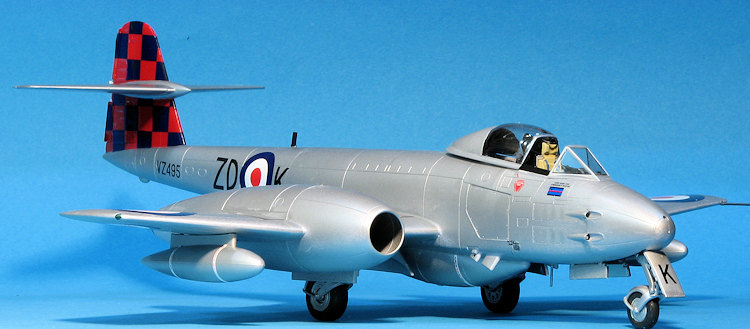
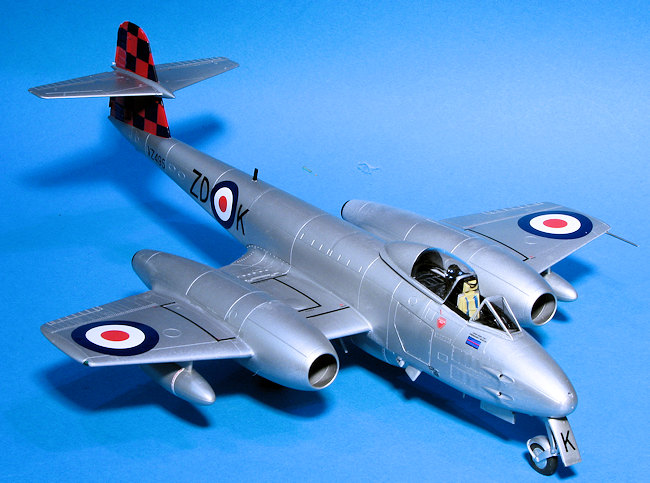
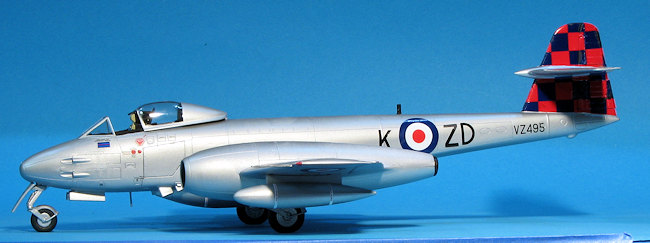
This selection from Xtradecal 48158 is for a 222 squadron commander's plane. It has a red and dark blue checked tail with squadron code letters. I painted the tail white, then red using Tamiya white and Gunze red. The red was then masked off and the rest of the airframe spray painted Tamiya AS-12 from a rattle can. This went on well, but is not a gloss so you need to keep that in mind if using it.
 Once the airframe was painted, I installed the landing
gear. Nose gear is not an issue though one does have to spread out the fork on
which one put the lower section with the wheel. Note that on all gear, once the
wheel is installed, you have to remove the seam from the splash guard and then
repaint that area. Creative masking is required.
Once the airframe was painted, I installed the landing
gear. Nose gear is not an issue though one does have to spread out the fork on
which one put the lower section with the wheel. Note that on all gear, once the
wheel is installed, you have to remove the seam from the splash guard and then
repaint that area. Creative masking is required.
The main gear installation is a bit tricky. First, there is a fuel line or something similar that fits into the forward well. This is a real pain to install. If you can figure a way to get it in place before attaching the wings, or even before gluing on the well roof, you'll be one step ahead. Installing the main gear and the X shaped retraction piece is also one that will take time. The fit is very tight and there will be much cursing and grumbling by the time you get everything installed and aligned.
With the airframe on its gear, it was time for the decals. Xtradecal does not include any stencils so you need to use the kit versions for all that. The kit decals went on well. The Xtradecals are very thin so issues with bits folding over need to be taken into consideration. I also do not think this sheet is designed for this kit. This came to light when puttingon the fin checks. These are in and upper and lower section on each side. The lower section is too tall and the upper section is too short. As the rest of the markings options on the sheet do not have tail decals, you'll not have issues with those, but naturally, I picked the option with the fit issues. After considerable time, I got the markings on. There are easily 150 separate stencils and so I went rather minimalist when it came to these. There are stripes that go on the fuel tanks. These are too long and they don't stick well.
Meanwhile, I attached the gear doors. It would have been nice to have a more positive fit on these such as I recently enjoyed with the GWH T-33, but sometimes things like this take time to filter down. Then the final bits were attached. These were things like aerials, pitot tube, inside of the canopy and such. Some final touch up painting was done, the masking removed from the clear bits, the drop tanks installed, and that was it.
| CONCLUSIONS |
 It is really great that we now have a modern, 1/48
scale Meteor F.8 and I'm sure Airfix has designed the kit so that other versions
will be done using basically the same molds. Though not shown as used in the
instructions, all the bits for the early Meteor in terms of ailerons, canopy and
intakes are provided. The finished product looks great
and it shows just how large an aircraft this really was. I found the fit to be
fairly good, though there are a number of areas that I found either overly
fiddly, or where I ran into fit issues; some of which may have been self
induced. I also discovered that one needs to pay close attention to following
the instructions. Deviating from them can well cause issues even if the build
sequence seems illogical and makes painting more difficult. Overall,
I would recommend this one to those with some experience building models where
the tolerances are tight.
It is really great that we now have a modern, 1/48
scale Meteor F.8 and I'm sure Airfix has designed the kit so that other versions
will be done using basically the same molds. Though not shown as used in the
instructions, all the bits for the early Meteor in terms of ailerons, canopy and
intakes are provided. The finished product looks great
and it shows just how large an aircraft this really was. I found the fit to be
fairly good, though there are a number of areas that I found either overly
fiddly, or where I ran into fit issues; some of which may have been self
induced. I also discovered that one needs to pay close attention to following
the instructions. Deviating from them can well cause issues even if the build
sequence seems illogical and makes painting more difficult. Overall,
I would recommend this one to those with some experience building models where
the tolerances are tight.
24 June 2016
Copyright ModelingMadness.com Thanks to me
for the review kit and decal sheet. If you would like your product reviewed fairly and fairly quickly, please
contact
the editor or see other details in the
Note to
Contributors.