Airfix 1/48 Spitfire 22/24
| KIT #: | 6101 |
| PRICE: | $26.00 MSRP |
| DECALS: | Three options |
| REVIEWER: | Scott Van Aken |
| NOTES: |
| HISTORY |
Ask a Brit about WWII fighters and probably the first thing you'll hear is "Spitfire". This graceful and nimble fighter was developed as a short range defense fighter that could get to the enemy bombers quickly enough to dispatch them before they reached their target. The Spitfire was maneuverable enough to be able to handle any enemy fighters as well.
 During the Battle of Britain, the Hurricanes did the dirty work of going after the bombers while the Spitfires took on the escorts. The Spitfire got all the glory as the press was much more interested in fighter on fighter combat.
Well, the war wore on and the Spitfire was modified more and more to meet the demands and threats from ever-improving enemy planes. It was still pretty much a short range fighter and so was unable to be of much help in deep penetration bombing raids. However, it did make for a credible fighter bomber, despite its liquid cooled engines; first the Merlin than the much more powerful Griffon.
The aircraft near the end of the Spitfire run were immediately recognizable as Spitfires, despite the fact that pretty well no parts were interchangeable between it and the Spitfire I. Such was the reputation of the Spit that hundreds of aircraft of many variants were sold to overseas air arms at the end of the war. Some as surplus and others as new builds. Spitfires served well into the 1950 with many nations.
| THE KIT |
 Molded back about ten years ago, this has to rank as one of Airfix's best designed kits. The quality of the molding is superb; better than that done even today. There are few molding glitches and those that are there are easily fixed. You'll find a well detailed cockpit with raised instrument panel detail and nicely done sidewall detail as well. A decal is provided for the instrument panel should you wish to use it. The clear parts are well done, very transparent and quite thin. There are separate bits for either the Spit 22 or 24 with under wing rockets or bombs available.
Decals are provided for three RAF options and while the decals are a bit think, they are very nicely printed.
| CONSTRUCTION |
 As is my usual way of doing things, I started by looking for subassemblies. Not many to be had and so I started with the cockpit bits. After gluing as many as I could get away with, I started painting the interior and wheel wells with British Interior Green. I found out later than I should have painted the wheel wells and inner gear doors with Aluminum, but that wasn't difficult to fix when the time came.
Once I had the interior bits painted, I did some detail work in black and a few other colors. I used the decal for the instrument panel, but found that the decal did not succumb to any of my various setting solutions the way I would have liked. Still not bad, but not perfect. I used an Eduard harness set to add to the cockpit as none come with the kit. Meanwhile, I glued the wings together and also glued the fuselage halves, as the interior sections can be inserted from below. The lack of required filler was pleasing. I did not open any of the fuselage holes for camera bays as I was doing a Spitfire 22. Nor did I open holes for under wing stores as I wanted a clean airframe.
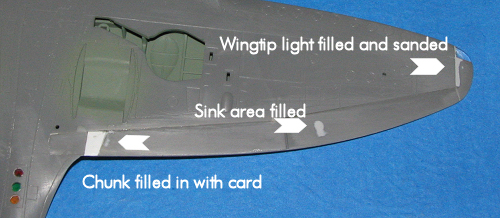 Back at the wings, I decided to mold the flaps up. Spitfires are almost always seen with the flaps retracted as to have them lowered will prevent proper engine cooling through the radiators and squadrons usually gifted the errant pilot who left them down with a nice fine! The flaps don't fit quite as well as one would like in the up position. I also found that one of my flaps had a bit chunk taken out of the end. I can only think that I did this at some time, but sure don't recall when. The only cure was to insert a piece of plastic card and sand things down. I also had a
 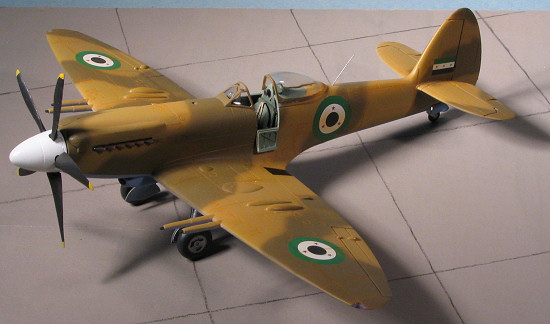 sink area in the underside that needed to be filled. Easily done. I also discovered that the wing tip area needed some filler. I painted the inside of the clear lenses for the wing tips and glued those in place. After the filler dried, I sanded things smooth as these lenses were a bit thick. Polishing returned the clarity. At this time, I glued in the ID lights after painting them the required colors.
Then, I inserted the interior bits, making sure they were snugly in place. A bit of wiggling around was needed to get it all aligned as there are no real guide pins to help. Once the interior bits were in I test fit the wings. Fit is outstanding except in the very back. It seems as if the blanking plate that is used for the inside flap bits interferes with proper fit. I snapped it out as it wasn't really needed in a 'flaps up' model and that took care of the fit situation. I still needed a touch of filler at the back and very front wing roots, but the upper wing/fuselage join was superb and filler free.
With the wing in place, I glued on the rudder, horizontal stabilizers, lower cowling, lower intake, and the engine bulges. Fit of all except the lower rudder piece was superb. This latter bit took some trimming to get a nice fit. I tacked on the entry door, glued on the windscreen, masked the clear bits, tacked on the canopy section and it was time to paint. I used white glue to mask the lower ID lights.
| COLORS & MARKINGS |
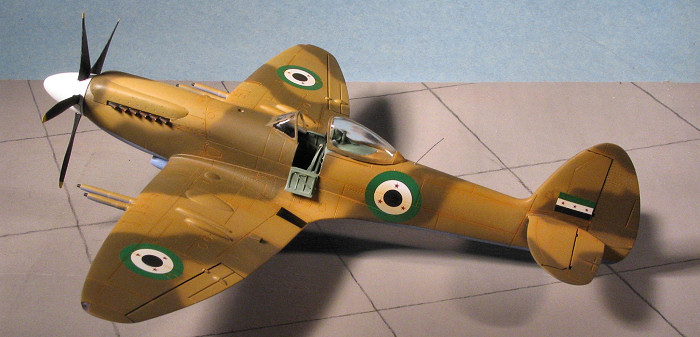
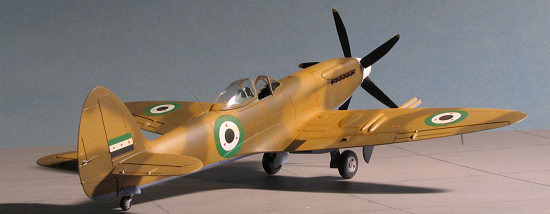
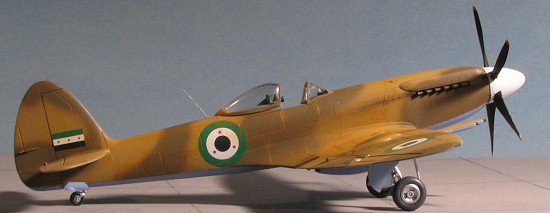
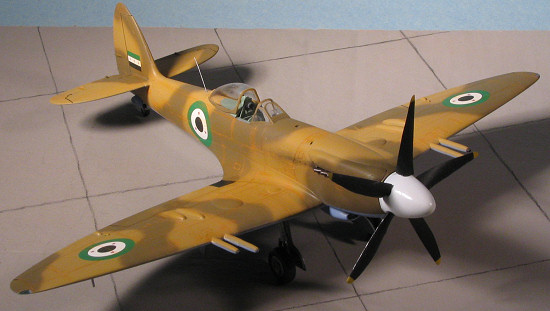 Aaah, desert camo. I really like desert camo as it is generally a rather bright shade and something a bit different from the norm. For this reason, I chose the Syrian AF Spitfire 22 from the relatively newEagle Strike 48-241. This was definitely a case of a decal sheet leading to the purchase of a kit, something that happens to me with some frequency. It also helped that this one would be light on stencils
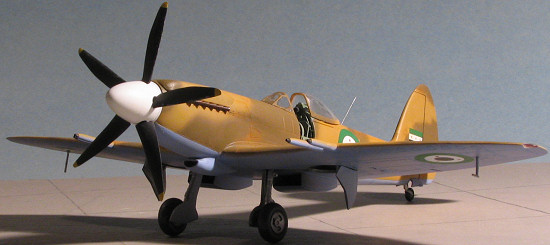
So, I grabbed some of my ancient Aeromaster Azur Blue acrylic, which has been sitting already mixed since the last desert scheme about 8 months ago. It was sprayed on and left to dry. Did the outside of the gear doors as well. This was then masked off (for some reason, most British aircraft have a hard line between upper and lower camo colors, even if the upper surface is free-sprayed) and the Midstone was painted on. Actually it is 'Italian Sand 4' which I also had mixed up. I forget whose acrylic it is, but I'd bet Aeromaster as well. I then mixed up som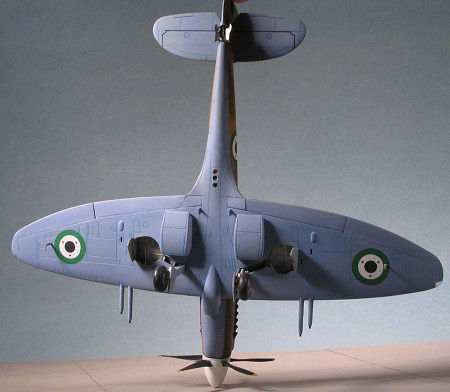 e Testors ModelMaster Dark Earth enamel and sprayed that pattern. There was the usual back and forth to clean up some areas and I did a bit of 600 grit sanding to take care of some runs I had. The prop hub and backing plate were painted Gloss White, again with Testors enamel. It was at this time that I masked the outside of the wheel wells and painted them aluminum over the interior green. Once all had dried, the airframe was given a coat of clear acrylic gloss (Future).
Back at the bench, I attached the landing gear. The main gear were a real pain to get in place. A lot of fiddling and fuming and when finally installed, they had to have more bending and such as they just didn't want to fit well. I don't recall having this situation on the Seafire 46 of many years ago. Yes, the instructions show them being installed after the wings were glued together and attached to the fuselage.
Now I applied all eight decals (6 roundels and 2 fin flashes). Not very comprehensive and not even an aircraft number or serial. About as generic as you can get, but it looks cool. The decals succumbed perfectly to Microsol. I then let the decals sit for a day, wiped them off and applied a matte coat using Gunze flat base mixed with Future.
| FINAL CONSTRUCTION |
Final bits were somewhat involved. I glued the wheels onto the main gear after wrapping the oleos in Chrome Bare Metal Foil and gluing on the oleo scissors. I then attached the main gear doors. Fit is fairly good though I had to trim one of the main gear doors to get it to fit properly. The outer doors are also a bit of a dodgy fit, but I got them to cooperate. Tail wheel doors were an easy installation. I glued the five blades onto the spinner backing plate and then 'oof'd' the spinner on. A tight fit, but perfect alignment.
 After drilling out the kit exhaust, I painted them with Alclad II Jet Exhaust and
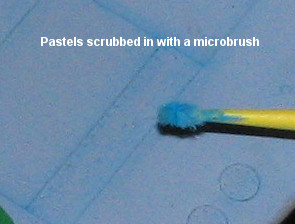
 glued them in place. There were only a few bits left and before that I wanted to do a pastel job on it. For the upper surface, I used a yellow microbrush and orange pastels. I usually choose a shade close to the main color for this and orange seemed to work well. It was scrubbed into the engraved detail then rubbed off with a finger or cloth. On the underside, I used a bit of a darker blue shade and did the same thing. It is interesting, but not something I do all the time. A bit of exhaust pastels were applied as well. I then glued on the pitot and radio mast on the underside of the wing and glued the prop in place.
Masking was removed from the clear bits and any seepage scraped off with a toothpick. I used white glue to temporarily hold the entry door and canopy. While taking that off, it removed some paint as well so some touch up was needed. The last things were to drill a hole for the VHF radio aerial, which was made with stretched sprue and painted steel. And that was it
| CONCLUSIONS |
This was a really nice build. Not perfect, but about as good as an Airfix kit can be. It is a lot nicer than the TSR.2 I'm doing at the moment and I'm so surprised that all new Airfix kits are not like this one. It is a beauty and if you haven't built one, you are in for a very pleasant experience.
April 2006
#1408 in a series
Copyright ModelingMadness.com. All rights reserved.
If you would like your product reviewed fairly and fairly quickly, please
contact the editor or see other details in the