| KIT #: | TA 4804 |
| PRICE: | $69.00 |
| DECALS: | Four options |
| REVIEWER: | Scott Van Aken |
| NOTES: | New tool short run kit |
| HISTORY |
The Saab 91 Safir (Swedish: "sapphire") is a three (91A, B, B-2) or four (91C, D) seater, single engine trainer aircraft. The Safir was built by Saab AB in Linköping, Sweden, (203 aircraft) and by De Schelde in Dordrecht, Netherlands (120 aircraft).
The Safir's first flight on 20 November 1945. The all-metal Safir was designed by Anders J. Andersson, who had previously worked for Bücker, where he designed the all-wood Bücker Bü 181 "Bestmann". The Safir thus shared many conceptual features of its design with the Bestmann.
The Saab 91A is powered by a 125 hp four
cylinder
de Havilland Gipsy Major 2c piston engine, or a 145 hp Gipsy Major 10 piston
engine. The 91B, B-2 and C have a six-cylinder
Lycoming O-435A engine with
 190 hp.
The 91D has a four-cylinder
Lycoming O-360-A1A engine with 180 hp.
190 hp.
The 91D has a four-cylinder
Lycoming O-360-A1A engine with 180 hp.
The "Safir" was later used as a platform to test at low speeds the new swept wing for the Saab 29 and Saab 32 jet fighters.
323 units were built in 5 versions (A, B, B-2, C and D). The Safir was used by the Swedish, Norwegian, Finnish, Austrian, Tunisian and Ethiopean air forces as a trainer aircraft, and a single aircraft was used by the Japan Defense Agency as an STOL test platform.
Major civilian users were Air France, Lufthansa and the Dutch Rijksluchtvaartschool (RLS) on the Groningen Airport Eelde, near Groningen.
During development of the Saab 29, the initial Saab 91 prototype was modified with a scaled down version of the Saab 29's swept wings; this aircraft was designated Saab 201 Experimental Aircraft. This same airframe was later fitted with wings designed for the Saab 32 Lansen; this was designated Saab 202.
A single Saab 91 Safir was modified as the Saab X1G for research in Japan.
| THE KIT |
Tarangus is a short run kit maker in Sweden that specializes in Swedish aircraft that are not produced by others. So far, they have worked in 1/48 and this is their second kit, the first being the J.32 Lansen. Those who have read my build article on the Lansen know that it was not a quick and easy build as is often the case with first kit short run kits. The Safir is not as complex and should prove to be a more straight-forward build.
 Those who are not fans of engraved rivets will be
pleased to know that this kit has none of those. It appears that the kit was
molded on a single sprue, which was cut to allow it to fit into the zip bag one
finds upon opening the end opening box. The two fuselage halves a full length
and include the rudder. The three piece wing (one piece lower and two upper
halves) have separate ailerons and the tail planes are single pieces on each
side. The 'fabric' areas are represented by raised lines where the stringers
would be. This basically represents properly taught fabric.
Those who are not fans of engraved rivets will be
pleased to know that this kit has none of those. It appears that the kit was
molded on a single sprue, which was cut to allow it to fit into the zip bag one
finds upon opening the end opening box. The two fuselage halves a full length
and include the rudder. The three piece wing (one piece lower and two upper
halves) have separate ailerons and the tail planes are single pieces on each
side. The 'fabric' areas are represented by raised lines where the stringers
would be. This basically represents properly taught fabric.
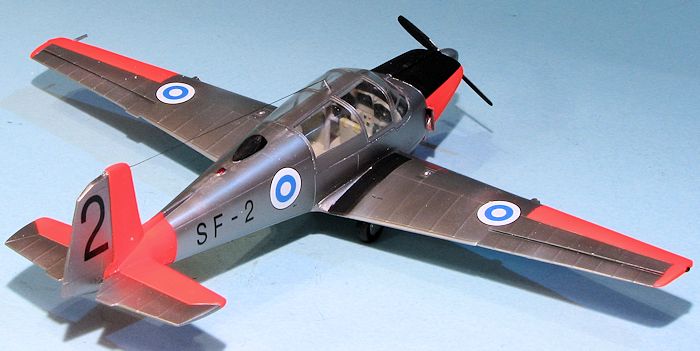
The cockpit is probably the most complex part of the build. There is a nice cockpit floor, which on the underside will house the nose gear well and the main gear wells. Flipping it over, there are two separate front seats with a pair of seats for the back. Some Safirs were three seat planes with the smaller left rear seat removed and a box compartment in its place. This is provided and in fact there are separate build instructions depending on the variant one is modeling.
In the front of the cockpit are a pair of control sticks, a flap handle as well as a nicely done instrument panel with raised detail, two sets of rudder pedals and the instrument panel anti-glare panel. There is a rear bulkhead and there is some detail on the inside of the fuselage. Since this is an air-cooled engine, there is an upper engine detail section you will be able to see through the front cowling piece. This is for the six-cylinder Lycoming engine so it would not be correct for the Finnish version which used the four-cylinder engine. However, most will not spot the difference.
 The kit provided two different propellers depending on
the variant being modeled. The main gear wheels are in two halves with the nose
gear integral with the nose wheel. Additional bits are a DF antenna and a prop
spinner for the Finnish version as well as different exhaust. Obviously Tarangus
has done their research in the different variants. A one-piece canopy covers all
this. The canopy is quite clear so all the interior detail should be easy to
see.
The kit provided two different propellers depending on
the variant being modeled. The main gear wheels are in two halves with the nose
gear integral with the nose wheel. Additional bits are a DF antenna and a prop
spinner for the Finnish version as well as different exhaust. Obviously Tarangus
has done their research in the different variants. A one-piece canopy covers all
this. The canopy is quite clear so all the interior detail should be easy to
see.
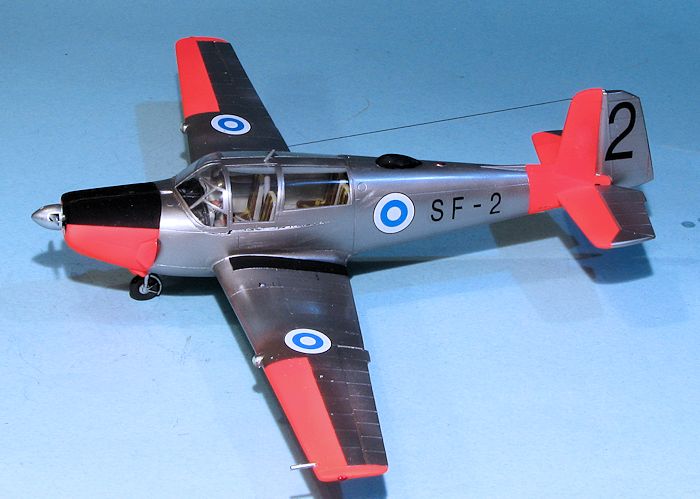
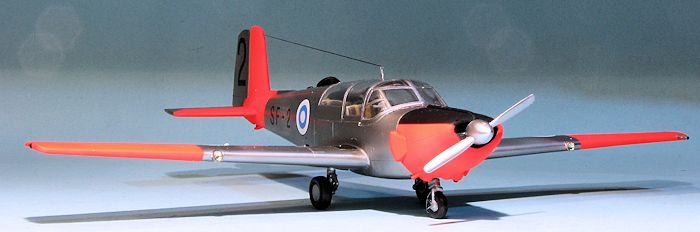
Instructions are well drawn and offer generic color references. There is a large decal sheet that provides markings for three planes. First off is a Swedish Air Force version in overall yellow as shown on the box photo. This is a warbird and if you so with to build your kit as such, the civil registration is included. If doing the military version, simply leave it off. Next is a silver Ethiopian Air Force version followed by a Finnish aircraft with large da-glo sections. These may have been international orange, but I'm betting on the da-glo, judging from period photos. This scheme is also found o a warbird. Apparently Safirs were grabbed up by eager buyers once they left military service. Stencil placement is provided in the instructions while painting and major decal placement is on the back of the box. Decals are quite nicely printed and should work just fine. The black nose anti-glare panel and wing walk areas will need to be painted on all options.
| CONSTRUCTION |
I started the build by getting all the interior bits together. I'll state right from the start that every single piece will need some clean-up before using. Whether it is the mold seam, or the removal of sprue gates that flow onto the part itself, one is best served by having plenty of sand paper and sharp blades. Also be prepared to do a bit of 'adjusting' to get a good fit.
I first glued on all the seats and then attached the rear bulkhead, setting this into the fuselage to let the glue dry the parts in the proper angle. I then glued on the nose gear well. This fits slightly below the level of the floor in the front. You have to have it like that or the lower well walls will not mate up with the lower fuselage well opening. I then installed the control sticks and then took it to the paint shop for a spray of light aircraft grey. The instructions call for 'interior grey', which is a bit vague, but LAG looks appropriate. The insides of the fuselage were also painted this shade.
 While the paint was drying, I assembled the wings. One has to be sure to
remove the ejector towers from the inside of these parts or they will not fit
together well. This also goes for those on the inside of the fin. In addition, I
test fit the horizontal stabilizers. The recess in the fuselage is shallower
than the tabs on the stabs, so the tabs were reduced by over half until they
fit. I also removed the intrusive sprue stubs from the fuselage so they would
not later interfere with assembly.
While the paint was drying, I assembled the wings. One has to be sure to
remove the ejector towers from the inside of these parts or they will not fit
together well. This also goes for those on the inside of the fin. In addition, I
test fit the horizontal stabilizers. The recess in the fuselage is shallower
than the tabs on the stabs, so the tabs were reduced by over half until they
fit. I also removed the intrusive sprue stubs from the fuselage so they would
not later interfere with assembly.
Back at the interior, I did detail painting on the seats with leather and glued the instrument panel to the coaming. The panel fits flush with the coaming and not under it as is often the case. This was then glued to the interior as directed by the instructions. I should mention that I used a lot of super glue during this build to help reinforce the joins on many of the pieces.
Returning to the wings, I did the usual filler on the joins and after
sanding, installed the ailerons. These items were both warped, but thanks to the
soft plastic, you can easily bend them back to shape if you are careful during
the process. It was then time to glue in the interior and the engine bits. This
latter assembly consists of two parts which were
first painted and then washed with AK Interactive's Engine Wash. Note that this
assembly fits atop the alignment runs on the inside. I tacked on the cowling
front to be sure I had it in the proper position. Thankfully, there is plenty of
room for nose weight in the forward fuselage and while the instructions fail to
mention this at all, I installed 14 grams in two 7 gram se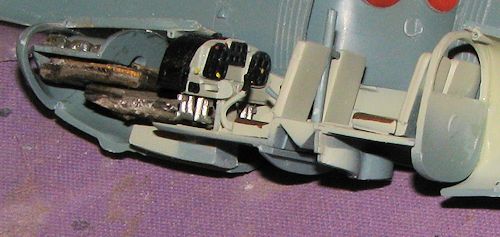 ctions. This turned
out to be a bit much, but better more than not enough.
ctions. This turned
out to be a bit much, but better more than not enough.
When all that had dried, the other fuselage half was glued in place. I started on the bottom and worked my way around. The upper nose section was a particular challenge as the interior is almost too wide. I finally got the two halves together by pressing inward and down to close the gap, using super glue and accelerator to get the job done. The two cooling flaps were also glued on at this time. These do not fit very well as they are too large to fit into the openings yet a bit too small to fit over it.
The wings were then test fit. As feared, the fuselage is too wide and if left as is, will have the wings drooping down on either side. So take this to heart and remove about a millimeter from the inside of the upper wings at the root before gluing them in place. With the wings on and the usual filler applied to the roots, I attached the canopy section. This required a bit of the rear seats on the upper edges to be trimmed away. Fit is quite good except in the middle where the fuselage is too wide. Looking at all the fit issues I've had in this area (such as the wings and upper cowling), it seems to me that perhaps the interior, instrument panel coaming, or something else in there is forcing out the sides of the fuselage. While it is too late for me to do anything about it, I would highly recommend doing a bunch of test fitting and such to see just what could be causing this issue before cementing the fuselage halves together.
I then attached the tear drop housing to the top of the fuselage, the hinges and exhaust to the underside of the cowling, filled the cowling opening with tissue and headed for the paint shop.
| COLORS & MARKINGS |
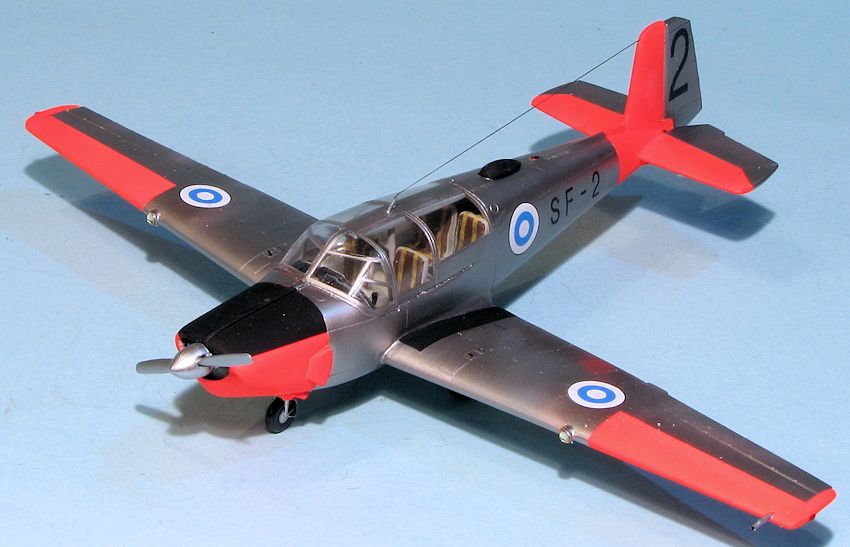
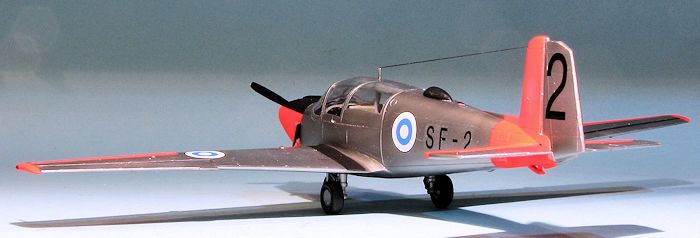
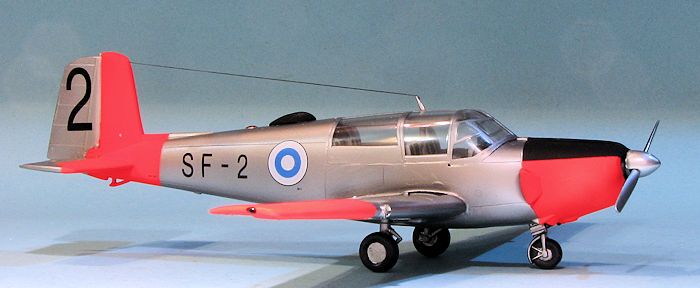
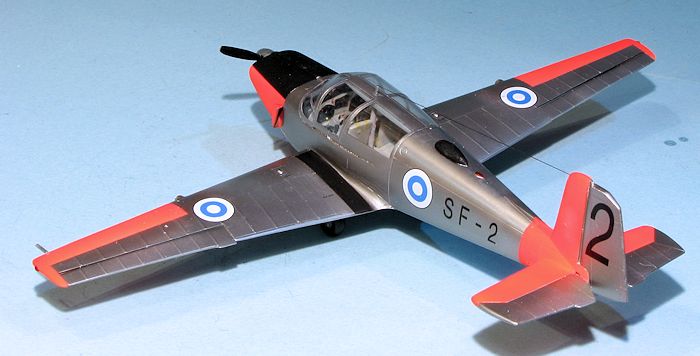
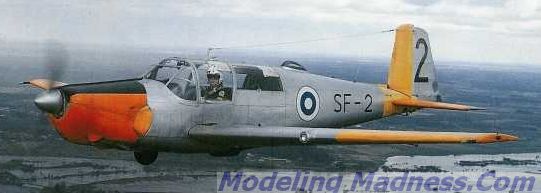 For
the Finnish Air Force, the aircraft was in painted aluminum with da-glo panels
on the nose, wing and tail section. The rear of the box shows these panels at
what appears to be international orange. Since this scheme is one that is
currently flying as a warbird, I'm sure that Tarangus just duplicated that
scheme minus the civil registration letters. That scheme also only has panels on
the fin and horizontal stabs painted when in actuality sections of the rear
fuselage should have also been painted. I found a nice image on the net of an
operational Safir in Finnish service. You can see by this image that it was not
international orange and is da-glo as this shade fades rather badly. It also
shows the rear fuselage being painted. Other images of this plane show the upper
antenna cover in painted metal as well.
For
the Finnish Air Force, the aircraft was in painted aluminum with da-glo panels
on the nose, wing and tail section. The rear of the box shows these panels at
what appears to be international orange. Since this scheme is one that is
currently flying as a warbird, I'm sure that Tarangus just duplicated that
scheme minus the civil registration letters. That scheme also only has panels on
the fin and horizontal stabs painted when in actuality sections of the rear
fuselage should have also been painted. I found a nice image on the net of an
operational Safir in Finnish service. You can see by this image that it was not
international orange and is da-glo as this shade fades rather badly. It also
shows the rear fuselage being painted. Other images of this plane show the upper
antenna cover in painted metal as well.
So I painted the areas getting da-glo with white and
then sprayed Testors da-glo red over those areas. The wing roots and upper
cowling were painted black. Those areas were then masked and during this I
discovered that perhaps I shouldn't have painted the da-glo first. Masking
around the exhaust and hinges on the bottom was a real chore. It would have been
easier to mask the area behind it first then paint the
 white and da-glo. But it
was done and once masked, the rest of the airframe was painted using Alclad II
duralumin, which is darker than the standard aluminum and looks more like it was
painted.
white and da-glo. But it
was done and once masked, the rest of the airframe was painted using Alclad II
duralumin, which is darker than the standard aluminum and looks more like it was
painted.
Once painted, the main and nose gear were attached. The main gear needed the holes in the wheel well enlarged to get the gear to fit while the nose gear had to have super glue used to ensure it dried at the proper angle.
Now that it was on its gear, I started to apply decals. These are extremely thin. Though the insignia went on without issue, I had a real chore with the code decals. These would not even slide off the paper without tangling up. I ended up having to float them off into a bowl of water, snag them on the front side with the decal paper and then press them on the fuselage. Even simply trying to move them around caused problems with them folding up. The decals also were ready to leave the paper within seconds of getting wet. Thought this sounds a bit odd, I would recommend some additional clear coat just so they would be a bit thicker and easier to handle.
 Once all the markings were on, there was little else
to do but add the main wheels, glue on the radio mast and the pitot tube. I
found out that the engine face onto which the prop attached was too far back in
the cowling so I had to drill out the face and the back of the prop. A section
of paper clip was installed so that the prop stuck out far enough. This was
followed by the usual touch up painting and the stringing of the radio wire, for
which I used EZ-line. I then used a #38 drill bit (2.6mm) and drilled out the
landing lights into which I installed a couple of #29 MV Products lenses. These
are great for landing lights in 1/48 and I use them all the time. These were in
lieu of the kit clear bits. There was only a bit of pastel exhaust used, the masking
removed and the kit was done. Oh yes, thanks to the box photo, I seem to have
gotten the pitot tube on the wrong wing for Finnish planes.
Once all the markings were on, there was little else
to do but add the main wheels, glue on the radio mast and the pitot tube. I
found out that the engine face onto which the prop attached was too far back in
the cowling so I had to drill out the face and the back of the prop. A section
of paper clip was installed so that the prop stuck out far enough. This was
followed by the usual touch up painting and the stringing of the radio wire, for
which I used EZ-line. I then used a #38 drill bit (2.6mm) and drilled out the
landing lights into which I installed a couple of #29 MV Products lenses. These
are great for landing lights in 1/48 and I use them all the time. These were in
lieu of the kit clear bits. There was only a bit of pastel exhaust used, the masking
removed and the kit was done. Oh yes, thanks to the box photo, I seem to have
gotten the pitot tube on the wrong wing for Finnish planes.
| CONCLUSIONS |
This one was tons less difficult to build than their Lansen. I would definitely keep in mind the issues I had with the cockpit clear section and be sure that nothing is spreading out the fuselage. It should take care of the problems I had installing the wing as well. This is a very nice addition to my trainers collection and while not inexpensive, is one of those cases where nothing else is available in this scale. Still, it turned out quite well and is a kit I can recommend to those who have had some experience with short run kits.
| REFERENCES |
http://en.wikipedia.org/wiki/Saab_Safir
August 2014 Copyright
ModelingMadness.com. All rights reserved. No reproduction in any form without
express permission from the editor. If you would like your product reviewed fairly and fairly quickly, please
contact
the editor or see other details in the
Note to
Contributors.