
| KIT #: | AA-4002 |
| PRICE: | $83.00 |
| DECALS: | One option |
| REVIEWER: | Scott Van Aken |
| NOTES: | Resin and includes three other aircraft:Ye-152A, Su-15 and La-250 full kits. |
| HISTORY |
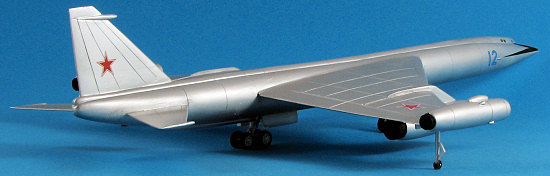
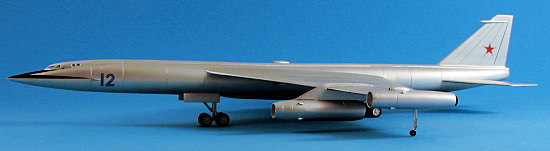
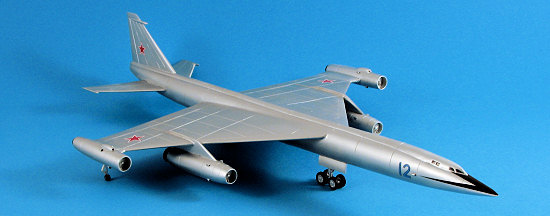
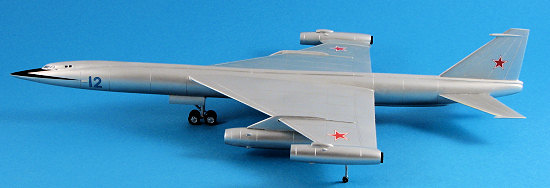
The Myasishchev M-50 (NATO reporting name 'Bounder' and one would like to think that a transport version would have been named 'Cad') was a Soviet prototype four-engine supersonic bomber which never attained service. Only one prototype was built, which was believed to have first flown in 1957. The M-50 was constructed by the Myasishchev design bureau.
 One writer commented on the M-50 that it was 'an
outstanding failure which revealed an embarrassing lack of understanding of the
problems of high-speed flight.' It was a fast jet bomber with four
engines: two Dobrynin VD-7 and two VD-7F turbojets. Two engines were located
under the wing and two on the tips of its shoulder-mounted, truncated delta
wings.
One writer commented on the M-50 that it was 'an
outstanding failure which revealed an embarrassing lack of understanding of the
problems of high-speed flight.' It was a fast jet bomber with four
engines: two Dobrynin VD-7 and two VD-7F turbojets. Two engines were located
under the wing and two on the tips of its shoulder-mounted, truncated delta
wings.
The second M-50 was designated M-52 and carried Zubets 16-17 turbojets, around which the aircraft had been designed. The engine installation was modified, and a second tailplane added to the top of the fin. M-50 participated in a Soviet Aviation Day flyby in 1961. M-52 was completed but was not flight tested. Needless to say, this response to the XB-70 was a dead end and only the single aircraft every flew; and at that, not very often.
| THE KIT |
I'll direct you to the preview to read more about what comes in the box.
| CONSTRUCTION |
 Those of us who build Anigrand kits have come to expect
to put in some work to correct mold flaws. These are mostly in the line of air
pockets, pinholes and places where the sprue gates have broken off, taking a
portion of the part along with it. There are several ways of repairing these
glitches and I've come to realize that the best way to take care of the larger
one (the chips and air pockets) is to clean out or enlarge the areas and then
use plastic card or rod to fill them. These can then be sanded down flush or
have filler added to build them up to match the surrounding area, whichever the
case might be. It would be nice, of course, to not have these faults and I know
from working with other resin kits that it can be done. As popular as Anigrand
kits have become, one would think that there would be some progress made in
eliminating these.
Those of us who build Anigrand kits have come to expect
to put in some work to correct mold flaws. These are mostly in the line of air
pockets, pinholes and places where the sprue gates have broken off, taking a
portion of the part along with it. There are several ways of repairing these
glitches and I've come to realize that the best way to take care of the larger
one (the chips and air pockets) is to clean out or enlarge the areas and then
use plastic card or rod to fill them. These can then be sanded down flush or
have filler added to build them up to match the surrounding area, whichever the
case might be. It would be nice, of course, to not have these faults and I know
from working with other resin kits that it can be done. As popular as Anigrand
kits have become, one would think that there would be some progress made in
eliminating these.
The kit's fuselage was my first project. it comes in
four parts due to its length and after cleaning up the join surfaces, I cemented
them all together. There were some rather large gouges on the bottom where the
sprue gates had been removed and those were filled with successive applications
of
 super
glue. I also used this for most of the seams. T
super
glue. I also used this for most of the seams. T he
fin was then attached with hopes that I got it properly aligned. Then I decided
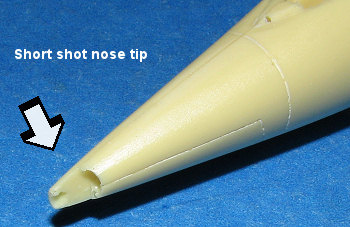
to deal with the mold glitches. The nose was short shot as you can see in the
image. There was also a large air pocket in the tail and the tip of the fin had
a chip in it.
he
fin was then attached with hopes that I got it properly aligned. Then I decided
to deal with the mold glitches. The nose was short shot as you can see in the
image. There was also a large air pocket in the tail and the tip of the fin had
a chip in it.
I started with the bits at the back. First, the hole in
the tail was drilled out a bit to accept a section of plastic rod. This was
glued in place with superglue. I also cut a notch in the fin to accept a piece
of plastic card. This card chunk was glued in place as well. When they had
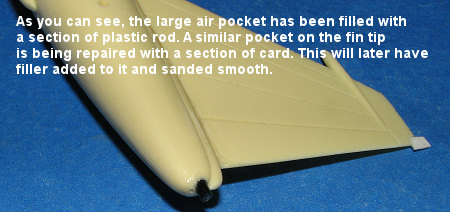 dried,
both of them were sanded smooth. An application of filler just to be
sure I got all the nooks and crannies was applied and it was sanded as well.
This also helped when it came to the smaller air pocket you can see in the
image.
dried,
both of them were sanded smooth. An application of filler just to be
sure I got all the nooks and crannies was applied and it was sanded as well.
This also helped when it came to the smaller air pocket you can see in the
image.
Meanwhile, I worked some on the rest of the gaps that
needed filled on the fuselage and the fin/fuselage join. Next, the wings were
glued in place. These are rather large pieces of resin and the fit was about the
norm with several more applications of filler required. I then started on the
engines. There are two sizes. The large ones are for the wing pylons while the
 smaller ones are for the tips of the wings. It was at this time that I found
that there were only two compressor faces in the kit instead of four. I e-mailed Anigrand and within about three weeks, two more arrived in an envelope. Later I
also discovered that the kit was missing one of the two seats and one of the
large outer engine air scoops, but more on that later.
smaller ones are for the tips of the wings. It was at this time that I found
that there were only two compressor faces in the kit instead of four. I e-mailed Anigrand and within about three weeks, two more arrived in an envelope. Later I
also discovered that the kit was missing one of the two seats and one of the
large outer engine air scoops, but more on that later.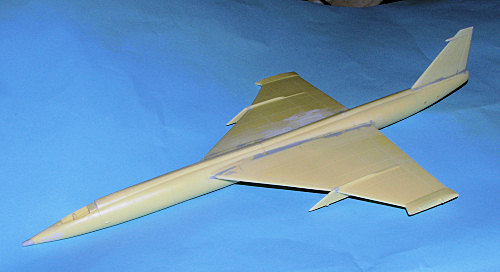
Once the other compressor faces arrived, I got back to work on the kit. The large engine housings were glued together along with the installation of the compressor faces. These required the usual filler and sanding sessions to smooth out. Meanwhile, I attached the pylons to the wings and used epoxy filler to take care of the missing nose bit and to smooth in some other large holes, including the pylon joins.
It was at this time when the missing seat and scoop
became obvious. The seat is not a problem as one can see little in the cockpit
anyway so I just glued in the front seat. The scoop, however, is quite
noticeable. When I was mixing up that epoxy filler, I put a big dollup on one of
the outer engines and rough shaped it with water. When dry, it was shaped to as
close to the other scoop as I could get it. It isn't perfect, but it does look
pretty good. I also found that the outer engines have tip mounting holes on both
nacelle halves and some other holes on the top and bottom that couldn't be
 accounted
for in the photo or drawings that come with the kit. Those were also filled with
epoxy filler, as much due to the size of the holes as to the non-shrinking
qualities of the filler.
accounted
for in the photo or drawings that come with the kit. Those were also filled with
epoxy filler, as much due to the size of the holes as to the non-shrinking
qualities of the filler.
I
then attached the pylon mounted engines and the tail planes. Fit of both of
these was about as expected. I also glued on the main landing gear. The taller
gear goes to the front on this aircraft, even though the mounting positions
would imply the other way around. 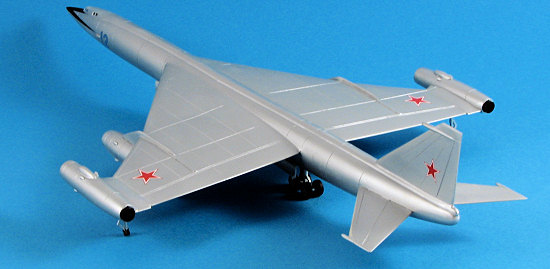
Next to be attached was the canopy. For this, I put some epoxy filler on the back and shoved the canopy into it. This would allow me to smooth things out back there and also provide a firm seat for the canopy. You'll find as did I, that you have to totally remove the portion of the anti-glare panel that sticks up or you'll never get the front of the canopy to sit flat. This is due to the thickness of the resin canopy as much as anything. Once it was in place and dry, I sanded the epoxy filler down and used clear paint followed by several applications of white glue to fill in the rest of the canopy. As I'd already masked the canopy (a really easy job thanks to the somewhat indented clear bits), it was time to do some painting.
| COLORS & MARKINGS |
Typical of Soviet aircraft of the 50's and 60's, it could be any color as long as it was unpainted! Part of the equality of the proletariat or something. Now I've always had trouble with paint sticking to resin. I've tried cleaning the resin with all sorts of toxic compounds only to run into situations where the paint peels up when removing even the most benign tape. So this time, I thought I'd try something different. I primed the kit with Pactra Racing RC paint; white for this one. This is a pure lacquer based paint so one needs a chemical filter in their respirator. Once the aircraft was painted, I sprayed on Humbrol #11 silver.
 This showed up every tiny glitch that there was. Well
as I'd not attached all the bits, I was going to respray portions anyway. I did
blow off many of the pinholes that it showed and worked on the more visible
glitches. Meanwhile, I cut and attached the gear doors and the outriggers. The
instructions are quite indistinct when it comes to where the bits for the
outrigger doors are to be attached so I took a guess. During this time, I sanded
down the main wheels. These suffered from some rather bad mold mismatch so ended
up smaller in diameter than they probably should be. They were painted and it is
hoped that they are not too small!
This showed up every tiny glitch that there was. Well
as I'd not attached all the bits, I was going to respray portions anyway. I did
blow off many of the pinholes that it showed and worked on the more visible
glitches. Meanwhile, I cut and attached the gear doors and the outriggers. The
instructions are quite indistinct when it comes to where the bits for the
outrigger doors are to be attached so I took a guess. During this time, I sanded
down the main wheels. These suffered from some rather bad mold mismatch so ended
up smaller in diameter than they probably should be. They were painted and it is
hoped that they are not too small!
I then took all this back to the paint shop for more white then silver. One thing about using Humbrol #11 is that it is an enamel and can be feathered when sanded. Acrylics and Alclad II inevitably leave a ridge that is impossible to smooth out. One reason why when one gets a paint glitch with those products that one should sand out to a panel line. Anyway, things seemed to work just fine and I'm going to try this again on the next one. The only masking I had to do was when painting the black nose stripes. No problems with paint pulling up when I took off the tape.
This left the decals. Generally, I put them under the box between the lid and the inner box. I lifted the box and no decals! After a rather frantic search (which naturally included looking through the trash to be sure I didn't toss them, no luck. I just couldn't think of where they'd be. The next day it dawned on me that perhaps they'd stuck to the underside of the box. Sure enough, there they were. Well all this aircraft needed were six starts and the nose numbers. These fit well and reacted well to Solvaset
| FINAL CONSTRUCTION |
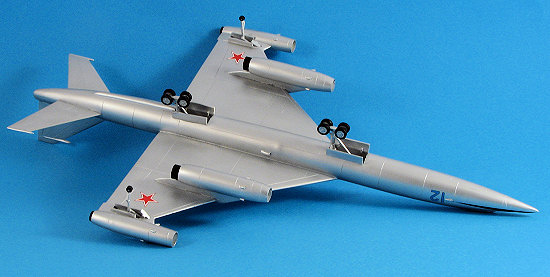
 The last thing to do was to attach the main wheels.
Some of them needed drilling out as the axle holes were filled with resin. I got
them into place, noticing that the rear bogie set wasn't totally straight,
but little I could do about it now. I then placed the model on a flat surface
and wasn't surprised to notice that the outriggers held the rear wheels off the
ground by about an eighth of an inch. I snapped off the outriggers and sanded
them down enough to where the rear wheels sat on the ground. A bit of touch up
painting of the wheels, the masking came off the cockpit (hey, I can't see
anything in there), and I was done
The last thing to do was to attach the main wheels.
Some of them needed drilling out as the axle holes were filled with resin. I got
them into place, noticing that the rear bogie set wasn't totally straight,
but little I could do about it now. I then placed the model on a flat surface
and wasn't surprised to notice that the outriggers held the rear wheels off the
ground by about an eighth of an inch. I snapped off the outriggers and sanded
them down enough to where the rear wheels sat on the ground. A bit of touch up
painting of the wheels, the masking came off the cockpit (hey, I can't see
anything in there), and I was done
| CONCLUSIONS |
 As I've mentioned before, these kits are for the
experienced enthusiast who is willing to put the extra effort into producing the
resulting model. The builder will be rewarded with a nice looking aircraft and
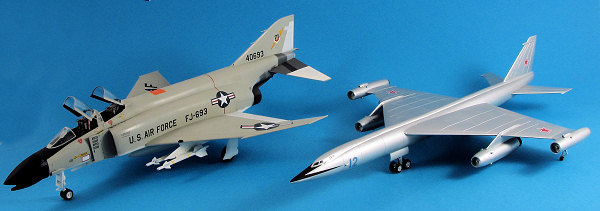
in this case, it is not at all small. I've included a shot of it along with a
1/48 F-4 Phantom II and though the 1/144 M.50 is skinnier, it is also longer and with
a pretty much same wing span. Means you'll need some dedicated shelf space for
it.
As I've mentioned before, these kits are for the
experienced enthusiast who is willing to put the extra effort into producing the
resulting model. The builder will be rewarded with a nice looking aircraft and
in this case, it is not at all small. I've included a shot of it along with a
1/48 F-4 Phantom II and though the 1/144 M.50 is skinnier, it is also longer and with
a pretty much same wing span. Means you'll need some dedicated shelf space for
it.
For those who wish to refresh their memory on the La-250 that comes with this set, here is a link.
July 2007
#1477 in a series
Copyright ModelingMadness.com. All rights reserved. No reproduction in part or in whole without express permission from the editor.
If you would like your product reviewed fairly and fairly quickly, please contact the editor or see other details in the Note to Contributors.