
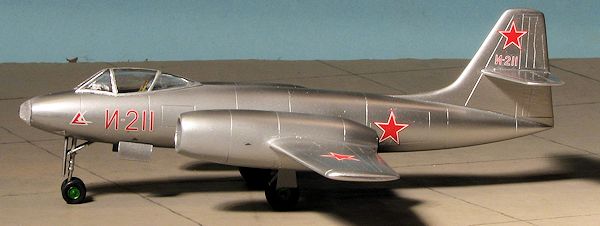
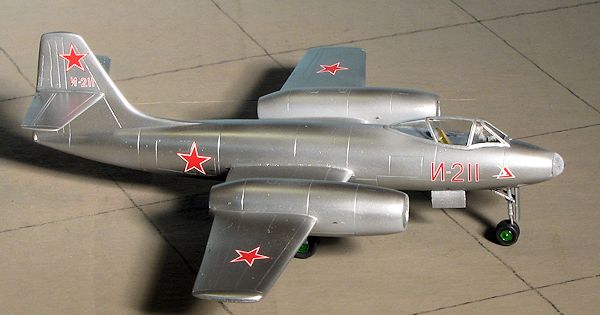
Amodel 1/72 Alekseyev I-211
| KIT #: | 72251 |
| PRICE: | $41.99 SRP |
| DECALS: | One option |
| REVIEWER: | Scott Van Aken |
| NOTES: | Short run |
| HISTORY |
After working as Lavochkin's right hand man during World War II, Semyon Alekseyev was appointed as Chief Designer of OKB-21 at Gor'kiy. The Council of the People's Commissars directed Alekseyev (among others) to develop jet fighters using more powerful engines than the captured German examples and their Soviet-built copies. The result of Alekseyev's efforts was the I-21 (istrebitel, fighter), which was planned to be produced in several variants.
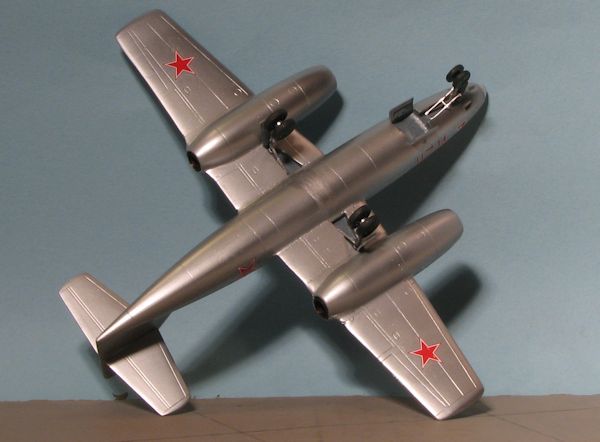
The I-21 was a twin-engined all metal single seat jet fighter, with straight wings, mid-set on a round streamlined fuselage, and engines mounted in front of the wings at about one third span. The slightly swept 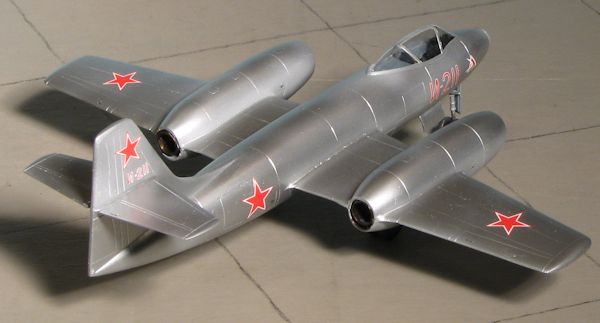 tail unit was cruciform in layout with the tailplane set at approximately half-fin span with slight dihedral. The aircraft's structure was constructed from high strength B-95 aluminium alloy, high strength steel for highly loaded parts and "Elektron" magnesium alloy for cast fittings. A hydraulically retractable tricycle undercarriage was fitted, using twin wheels for nose and main undercarriages. Hydraullically actuated airbrakes were fitted either side of the rear fuselage.
Construction of the first two airframes began at the end of 1946, with extreme pressure from the Ministry of Aircraft Production to complete Initial flight testing by 1 August 1947, to enable the aircraft to take part in the Aviation Day Flypast at Tushino on 18 August 1947. While one of the two airframes initially produced was used for static testing, the other was completed as the I-211 (I-21 version 1) with Lyul'ka TR-1 turbojet engines. (The Lyul'ka TR-2 was the intended powerplant, but was not available). Despite pressure from above, the I-211 was unable to participate in the Tushino display.
Flight testing started in the Autumn of 1947, but only six test flights had been carried out before the I-211 struck a pothole on landing, which collapsed the undercarriage. Repairs were carried out and the opprtunity taken to replace the troublesome TR-1 engines with Rolls-Royce Derwent V engines. The result was the I-215 which had been in development before the first flight of the I-211. Other minor modifications were carried out, the most noticeable being the larger engine nacelles. Despite good results from flight testing the I-215 lost out in production orders to the newer generation of swept winged fighters.
 A third I-21 was built as the I-215D (dooblyor, second prototype), with a bicycle undercarriage, using wider-diameter paired wheels in a bicycle arrangement, retracting into the fuselage, along with small outrigger wheels under the engine nacelles which retracted into fairings. to order from OKB-1. This was used to test this arrangement for "Aircraft 150" and other projects (OKB-1 was supervised by Dr. Brunolf Baade, who later designed the VEB type 152 airliner, in the DDR, as a direct descendent of "Aircraft 150", and indirectly of the I-215D). The main undercarriage of the I-215D also incorporated a kneeling feature which could increase the incidence of the aircraft by 3o to assist take-off. Trials with this undercarriage arrangement proved successful and paved the way for its use in many other Soviet aircraft.
Armament of the I-211 comprised two, three, four, or six cannon in the chin, depending on variant.
| THE KIT |
 consoles, a two piece seat, control stick and instrument panel, which has raised detail on it. The wings are several pieces, thanks to the mid-fuselage position and the engines which are in the middle of the wings. Each side consists of four wing sections as well as the upper and lower engine nacelles. Into the nacelles fits a compressor face section and an exhaust section along with their respective ducting.
| CONSTRUCTION |
Despite how nice the bits looked on the sprues, I had a feeling this would not be a quick build, and events showed that to be quite true.
The first steps were to start assembling the cockpit pieces. The fit is fairly good for a short run kit. I had to open up the hole for the control stick as it was too small. This was all painted Soviet Interior Grey with various other shades used for the instrument panel, seat back and so on. I made up some belts with tape. I then glued the outer lower wing section to the upper wing piece. The fit here is not good as there is a considerable gap around the edges thanks to the wing sections not being totally flat. This was a forerunner of other fit issues I was to run into.
 The engine intake and exhaust sections were next. These also with only fair in terms of fit. During this time, I also glued together the upper wing section with the upper nacelle half. This showed a need to do some trimming on the nacelle bit to get it close to being flush where the small extensions met the wing.
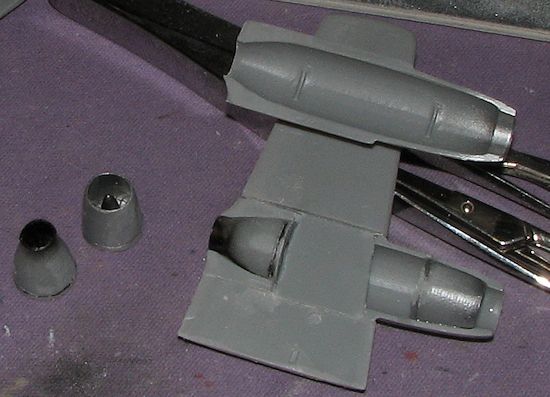
The intake bits are designed to fit into the engine nacelles a bit back from the intake lip as you can see from the image with the exhaust pieces flush with the ends. There are small alignment pieces to help in this area. With those installed, the upper intake section was test fit. It showed that, like the upper piece, it needed work to fit. This also required the bar between the inner and outer upper wing section to be trimmed and sanded down. Even after that, I discovered that the nacelle pieces were too thick where they joined, for the intake and exhaust sections were not completely circular, but a bit on the oval side.
The inner lower wing section is in two pieces as they will eventually make up the wheel well. They fit just as poorly as the rest of the wing parts. Not only that, but when properly installed, hid a portion of the main gear attachment hole.
 While applying the mass of filler to each wing and waiting for it to dry, I turned my attention to the fuselage. This fit as well as the rest of the kit and I had some difficulty getting the interior and the small piece behind the cockpit to properly fit. The latter piece needs to be installed from the underside to fit well. For that reason, I did not attach the nose gear well/lower forward fuselage piece right away. Besides, I may need to have it off to add weight.
It was then time to add the wings. By now, few will be surprised to find that not only was the mating surface not flush on the wing, but the wing rood was broader than the spot on the fuselage to which it would join. This was true of the tailplanes as well. They were glued in place and I then started on a period of several weeks where I applied filler and tried to smooth it out.
Once the wings were on, I started working on how much nose weight I would need, the prime reason I did not attach the lower forward fuselage piece e arlier. It took quite a bit and I was thankful I'd left that piece off. Once I had enough in there, the lower piece was installed. It is smaller than the surrounding fuselage. All the filler needed for this kit makes it an official 'Putty Monster'. You can see by the image what I mean by this. Of course, there wasn't as much showing after it was all sanded off, but enough to be obvious. The image shows the initial application for the lower forward fuselage piece and about the fourth for the lower wing join.
Eventually, I got all the filler done and did some final trim painting for the interior prior to attaching the canopy. I then masked the canopy and glued it in place. With that done, the landing gear were installed. Now you recall I mentioned that the lower wing section blocked a part of the gear mounting slot. Fortunately, the base of the main gear is undersize compared to the hole so it fit well. I had to drill out the nose gear hole and that was cemented in place. Once it had dried, I sat the plane on its gear and it was a borderline tail sitter so I added a bit more weight in the hole in the nose. It was then off to the paint shop.
| COLORS & MARKINGS |
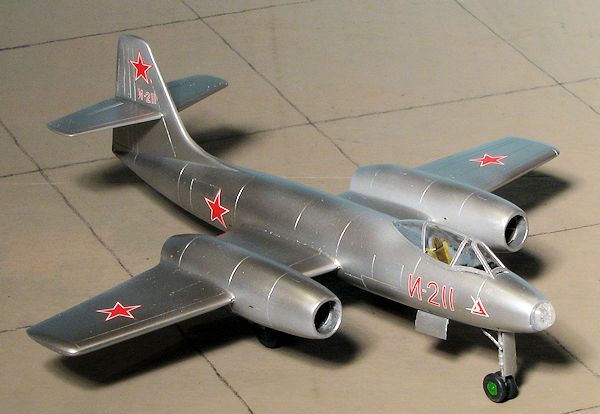
These early Soviet planes are a snap. Overall aluminum so I first sprayed on a coat of Tamiya Primer to check for missed spots. Then a couple of coats of Alclad II Aluminum. I returned to the work bench and painted the gear wells with a Soviet grey. I am not sure if these were painted or not, but I painted mine along with the inner gear doors.
| FINAL CONSTRUCTION |
 Next step was to add the gear retraction struts. The main gear ones fit without any trauma. I installed the nose gear strut in reverse of how it showed in the instructions. This meant the open ends attached to the nose gear strut. It just looks a lot more logical and fit without issue. I then glued on the wheels. I found out that the main gear oleo scissors were too wide to allow the wheels to fit properly so trimmed them back before installing the wheels.
With the wheels in place, I attached the decals. These went on well and despite using setting solution, they were not that eager to settle into the crevices. The markings had no issues with registration. The last step was to attach the clear nose (which promptly fogged after application of Tamiya glue, so I must have used too much). I found the clear bit to be undersize, but I was not surprised. The gear doors were attached, a bit of additional touch-up painting was done, the masking removed from the canopy and that was it.
| CONCLUSIONS |
 I have yet to build an Amodel kit that did not take a lot of work. It is simply the nature of the beast and if you want some of those interesting subjects they do, you'll have to deal with it. I am pleased with the final result as it wasn't a major disaster and it is an interesting looking plane. If you do not mind the additional work, I can suggest it and others like it to you.
| REFERENCES |
http://en.wikipedia.org/wiki/Alekseyev_I-211 April 2013
Copyright ModelingMadness.com. All rights reserved. No reproduction in
part or in whole without express permission from the editor.
If you would like your product reviewed fairly and fairly quickly, please contact the editor or see other details in the