
Anigrand Craftworks 1/144 Myasishchev M-6 Bison C
| KIT #: | AA-4042 |
| PRICE: | $114.00 |
| DECALS: | Two options |
| REVIEWER: | Scott Van Aken |
| NOTES: | Resin kit with three other aircraft kits included |
| HISTORY |
In 1946, the USAF launched a program of the B-52 Stratofortress long-range bomber capable of carrying out the strategic mission. The USSR was therefore prompted to maintain the strategic balance. A requirement for the development of an 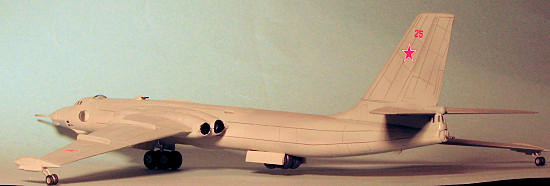 intercontinental bomber with a strike capability inside US-territory was issued to Myasishchev bureau. Myasishchev introduced the M-4 design which initially impressed Soviet officials. The M-4 made its first flight in 1952, it was proved that the bomber would never able to meet expectations because of the inadequacies of the engines available at the time. Specifically it lacked the range required due to the high fuel consumption if its turbojet engines.
The M-4 prototype was first displayed to the public in 1954. It received the NATO codename, Bison. To remedy the insufficient range problem, a modified bomber M-6 / 3M Bison-B was created in 1955, and soon the 3MD Bison-C was developed in 1960. Despite numerous improvements in engines and avionics continuing throughout the 1960s, the Bison still failed to emerge as a superior bomber and was eventually relegated to second-hand combat duties. Production ceased in 1963 after a total of 93 had been built. The last of the bombers were withdrawn from service by the late 1980s.
| THE KIT |
Anigrand certainly wants to be your 'Big planes in 1/144' company and adds to their already impressive collection of big planes with this one of the Bison. Hard to believe that fewer than 100 of these were built as they have certainly left an impression on most of us. The kit is molded in the usual tan resin with the usual molding glitches, though not in excess and generally easy to clean. I did notice a lot more mold shift issues with this one and I also found that most of the very thin axles on the main gear had 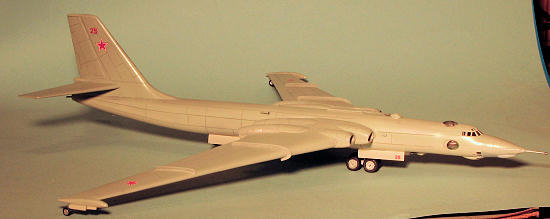 been broken off in shipping. These can be replaced by wire of the proper diameter. The image of the parts you see is from Anigrand so of course, the parts are pristine. It also shows you what you can expect in terms of complexity.
The Bison has the entire upper and half of the lower wing molded as one piece with the rest of the lower wing molded separately. This allows the engine intakes and exhaust to be installed, but does result in a very long intake seam that will be tricky to fill. You notice that the cockpit section is molded in with the fuselage halves. The very large clear piece then goes over this and your nose cone of choice is cemented to the clear bit. Depending on the nose piece you choose, you can do the Bison B or the later Bison C variant. Thanks to the bicycle landing gear, no nose weight should be needed.
Typical of their 1/144 kits, you get three other smaller kits in the mix. One is the Tysbin LL-3 a rocket powered interceptor. Second is the Yak-28-64 which is an upgraded standard Yak-28 with a new fuselage th at incorporates the engines on the fuselage instead of podded under the wings. The third is a rather rare Yak-27K interceptor. All those aircraft with missiles have them molded along with the pylons as one piece. All of these smaller planes are either tail wheel types or have bicycle landing gear making no need for nose weight.
Instructions are the standard two exploded views per aircraft with color markings diagram. These are all either unpainted metal or overall grey. Markings are provided as needed with two each of the decals shown above. Anigrand decals work quite well, though are loathe to succumb to setting solutions so will not snuggle down into the engraved panel lines without a lot of work.
| CONSTRUCTION |
As is the norm with resin kits, the parts were searched for molding glitches. About the only troublesome ones were the poorly formed tail section and what looks to be some major mold mismatch along the fuselage mating surfaces. These proved to be less of a problem to clean up than they looked.
First I assembled the fuselage halves and installed the engine faces and exhaust in the wing. These latter items are keyed to be sure you will get them properly installed. I then cemented the upper and lower wing halves. The seams along the engine intakes and exhausts are not easy ones to fill and I have to say that it took me quite a while to get these done. I then glued the fin onto the fuselage halves after the usual rounds of filler and sanding. The very leading edge of the fin had broken away and was lost so this needed more than the usual filler when getting the seams around the fin smoothed out.
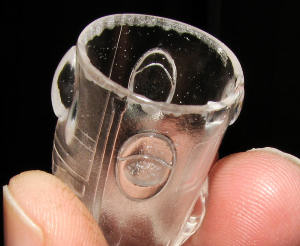
At the front of the fuselage, the interior section had snapped away from both halves during shipment. These were glued together and then glued in place. Once dry, I installed the seats. This was all painted prior to the installation of the clear cockpit section. Anigrand molded this as one circular piece, which ended up being slightly smaller in diameter than the fuselage and nose piece. I also had to grind away a substantial amount of clear resin from the interior of this piece at the join areas to get this part to fit. Same with the nose section. Once glued in place, several applications of filler were needed as well as some sanding to make for a smooth join. I have to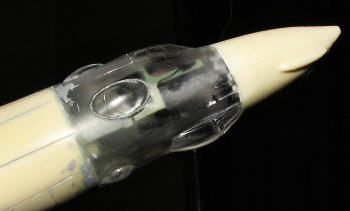 honestly say that doing this severely slowed down construction. Apparently Anigrand anticipated that much filler and sanding would be needed on the clear bits as all the transparent parts are recessed, allowing sanding to be done and not scratch them.
Add to this that the clear rear gunner's transparency did not fit at all well and required shims to fit properly. Once that was done, the tailplanes were cemented in place. Fit was fairly good needing only the usual filler at the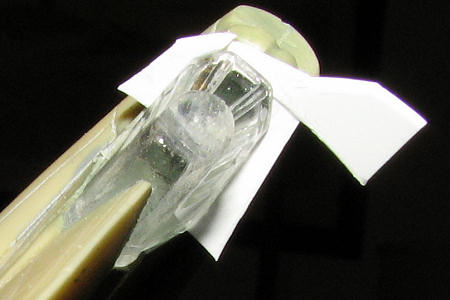 joins. If you are wondering about why all the filler, well, it seems that I do use a lot of it to fill seams on resin kits. I know folks who can build kits almost filler free. I'm not one of those.
Installing the guns was a piece of cake for the front ones. These only needed the access holes opened up a bit. The tail gun, however, was a real mess as the mounting spot was fill of resin blobs. This needed some careful grinding with a motor tool to make a spot good enough to mount the guns. The gun piece was also way too thick and needed trimming back.
At this time, I also decided to mount the nose probe and the main gear doors so I'd have a good join. The doors on this kit are way over-scale and I'm sure that many will want to replace them with plastic card that is much thinner. The outrigger struts and their doors were also glued into place, again, to get a good join.
The next task was to mask the myriad of windows. This took more time than one would think as some of them (the tail gunner's) were difficult to reach. Fortunately, I was able to get all properly masked and it was off to the paint shop.
| COLORS & MARKINGS |
I originally decided to paint this one overall aluminum as I wasn't totally sure of the colors. This took quite a bit of paint as you 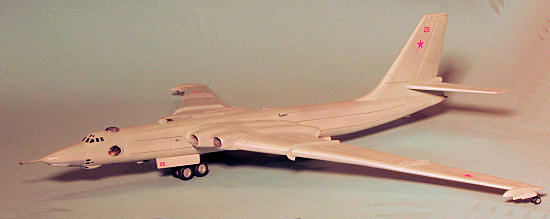 might think, but it was finally finished and ready for decals. I used Alclad II. Once finished I was carrying it upstairs from the basement where I paint when I was attacked by Ninja cats. The result is that the kit went tumbling and broke into many pieces. This is a true Ah Sh*t moment. Nothing to do but break out the glue and filler and repair it.
During this process, I looked at the painting instructions and noticed that it is supposed to be painted in two greys. OK, I can deal with this. No specific colors were listed so I used FLS 36492 for the underside and FS 16473 for the upper surface shade. These are sort of close to each other, but not so similar as to be the same. Both of these shades are Model Master enamels. With those colors dry it was time to install the few decals. These are totally impervious to any of my setting solutions, but they do fit well.
| FINAL CONSTRUCTION |
The last steps are to attach the landing gear. The main gear had already been built up with the wheels attached. I first gl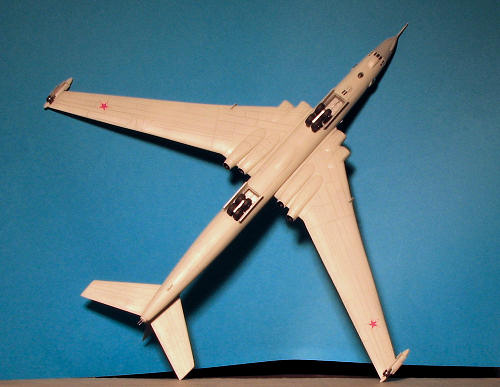 ued on the small outrigger wheels. As a note, there is little in the way of a raised rim on the inside of these wheels, making it impossible for me to get a round wheel shape when painting the tires. I wish more companies would pay attention to this area and provide us a lip or something so we can get these painted properly.
When it came to mounting the main gear, I glued them both in place at the same time so I could get the proper sit. The rear wheels will go too far into the well if glued as is. The model had to be placed on a large flat surface to get the rear gear properly aligned while the glue dried. Even then, it seemed to have crawled back into the gear bay a bit as when it came time to take pictures, the rear gear was not touching the ground. I then gave the whole thing a coat of semi-gloss clear before removing the tape from the transparencies. There was the usual touch-up painting and it was done.
| CONCLUSIONS |
I know that I made a bunch of errors with this one as it seems that every once in a while (like 2 out of 3 for me), a kit will give me fits. I'm sure that others will do much better than I, but even after all the interesting experiences while building the kit, I'm pleased with the outcome. If your interests lie in large bombers, the current range of Anigrand kits in 1/144 is for you.
| REFERENCES |
March 2010
Copyright ModelingMadness.com. All rights reserved. No reproduction in part or in whole without express permission from the editor.
If you would like your product reviewed fairly and fairly quickly, please
contact the editor or see other details in the Note to Contributors.
Back to the Review Index Page 2024