| KIT #: | 14401 |
| PRICE: | $6.01 at www.hobbyshop.cz |
| DECALS: | Five option |
| REVIEWER: | Scott Van Aken |
| NOTES: |
| HISTORY |
 Following the success of the MiG-15,
it was realized that a more powerful aircraft was needed as a replacement.
So, the engineers at MiG decided that the easiest way to do this would be
to add in an afterburner (reheat to some of you). They also made some
modifications to the airframe to increase its fuel capacity as the
afterburner would consume a lot of fuel. Later versions of the MiG-17 would
add in the ability to carry under wing ordnance, but the base MiG-17 was a
pure day fighter with armament the same as carried by the MiG-15.
Following the success of the MiG-15,
it was realized that a more powerful aircraft was needed as a replacement.
So, the engineers at MiG decided that the easiest way to do this would be
to add in an afterburner (reheat to some of you). They also made some
modifications to the airframe to increase its fuel capacity as the
afterburner would consume a lot of fuel. Later versions of the MiG-17 would
add in the ability to carry under wing ordnance, but the base MiG-17 was a
pure day fighter with armament the same as carried by the MiG-15.
While the MiG-15 sold well overseas, the MiG-17 did even better. Countries that couldn't afford or maintain the more complex aircraft found the MiG-17 to be a pretty basic aircraft with a reliable engine, and easily maintained airframe. Not only that, but the aircraft was pretty easy to fly as well, providing a stable gun platform and really good maneuverability. Many of these aircraft survived into the 1990s before being retired. Nowadays, many an air show will feature one of these planes in the hands of a happy jet warbird owner.
| THE KIT |
This is one of several MiG kits from Attack Hobbies/Jach (I guess that both brands are basically the same company). 1/144 is a growing scale for many modelers and this is the first from Attack. The kit is well molded in medium grey plastic with engraved detailing. The engraving is well done and a bit lighter than what you'd find on Sweet kits. I found no flash, sink areas or ejector pin marks anywhere on the kit.
As you can see, there is no interior,
just a depressed area where the canopy is to be placed. The two options for
displaying this are to paint the 'cockpit' area black and then glue the
canopy atop it,
keeping the canopy clear. The other is to paint the
 inside of the canopy a
solid color like black or blue and then to continue as
normal. Of course, those with the time and skill can scratch-build a
cockpit should they wish.
inside of the canopy a
solid color like black or blue and then to continue as
normal. Of course, those with the time and skill can scratch-build a
cockpit should they wish.
Gear doors are molded in one piece in case you should wish to display the model in flight. Otherwise, you'll have to cut them into the proper sections. Of course, they will be grossly over-thick so you may want to consider replacing them with thin card or even sheet brass. A solid nose and exhaust are provided to prevent any 'see-through' and I'd add in a bit of nose weight as suggested in the instructions. Your only options for 'things under wings' are a pair of drop tanks. Their placement is not marked under the wings so care will be needed.
Instructions are well done with color information provided using generic names. Markings are provided for five different aircraft, four of them in unpainted metal. These bare metal aircraft are from Czechoslovakia, Russia, Poland, and East Germany. The camouflaged version is from North Vietnam and is in dark green and dark brown upper surfaces with light blue undersides. Many think that the underside was perhaps in unpainted metal, but your choice on this one. The small decals sheet is superbly printed and the decals appear to be quite thin, so should work quite well.
| CONSTRUCTION |
 The building of this kit is really
very straight-forward. It is about as simple as you can get, however, there
are a few areas to watch for. First, when gluing the fuselage halves
together, you need to add a small amount of nose weight to keep it from
tail sitting. I used a section of lead weight and smushed it into a
somewhat cylindrical shape with a pair of pliers in order to get it to fit
properly. I also found that I had to trim down the exhaust piece rather
severely. This part flares rather a great deal at the back and unless you
sand it down, it won't fit into the fuselage. It really does take quite a
bit of sanding/filing to get this down. Conversely, you could grind out the
fuselage, but even then you'll still have to trim down the exhaust piece.
Once I was sure all these bits would fit, I glued the fuselage halves,
exhaust and nose section together at the same time. Fit was really good,
though I still needed to use some filler.
The building of this kit is really
very straight-forward. It is about as simple as you can get, however, there
are a few areas to watch for. First, when gluing the fuselage halves
together, you need to add a small amount of nose weight to keep it from
tail sitting. I used a section of lead weight and smushed it into a
somewhat cylindrical shape with a pair of pliers in order to get it to fit
properly. I also found that I had to trim down the exhaust piece rather
severely. This part flares rather a great deal at the back and unless you
sand it down, it won't fit into the fuselage. It really does take quite a
bit of sanding/filing to get this down. Conversely, you could grind out the
fuselage, but even then you'll still have to trim down the exhaust piece.
Once I was sure all these bits would fit, I glued the fuselage halves,
exhaust and nose section together at the same time. Fit was really good,
though I still needed to use some filler.
The wings and tail planes are single
pieces and butt fit to the fuselage. The fit at the roots is very good and
you'll find that just a good gluing is all that is needed. Depending on
whether or not you will be camouflaging this kit, you can
 now glue on the landing gear
struts. These are all butt joins as there are no mounting holes. The nose
gear includes the wheel/tire. The kit comes with a pair of drop tanks that
I decided not to use. If you do use them, you'll have to estimate where
they go as there are no placement guides on the plastic. I also attached
the nose cannon. Again, there are no attachment markings on the kit so one
just does it as best as possible. To me, these guns and their fairings look
to be over-scale and closer to 1/72 than 1/144, but in the end one has
little choice if one doesn't want to do some major reshaping. Be sure to
leave enough room for the nose gear doors when attaching these guns.
now glue on the landing gear
struts. These are all butt joins as there are no mounting holes. The nose
gear includes the wheel/tire. The kit comes with a pair of drop tanks that
I decided not to use. If you do use them, you'll have to estimate where
they go as there are no placement guides on the plastic. I also attached
the nose cannon. Again, there are no attachment markings on the kit so one
just does it as best as possible. To me, these guns and their fairings look
to be over-scale and closer to 1/72 than 1/144, but in the end one has
little choice if one doesn't want to do some major reshaping. Be sure to
leave enough room for the nose gear doors when attaching these guns.
Once the gear are in place, if you are doing an unpainted metal version, you can do as did I and prep the kit for painting. First, the 'cockpit' area was painted black. The second thing was to mask the canopy. On something as small as this, standard tapes just won't work quite as well. This is as much due to the small size of the panes as anything else. Bare Metal Foil is perfect for these tiny canopies and that is what I used. It is most important that a brand new blade be installed for this. Most unusually, I had problems with my foil sticking to the plastic. Even after washing the canopy, the BMF still wanted to slide around after being cut. I did the best I could and then glued the canopy to the rest of the airframe. I then slid things into position and headed for the paint shop.
| COLORS & MARKINGS |
This one got an overall spray of
Alclad II Aluminum. It went right on the bare plastic with no undercoat or
primer. Just a few light coats was all that was needed. Thanks to its quick
dr ying properties, I was able
to have this done in just a few hours. I also painted the gear doors at
this time. The main gear wheels were painted in a greenish color that is
quite typical of Russian aircraft even today. Then the rest was brush
painted with tire black from Gunze.
ying properties, I was able
to have this done in just a few hours. I also painted the gear doors at
this time. The main gear wheels were painted in a greenish color that is
quite typical of Russian aircraft even today. Then the rest was brush
painted with tire black from Gunze.
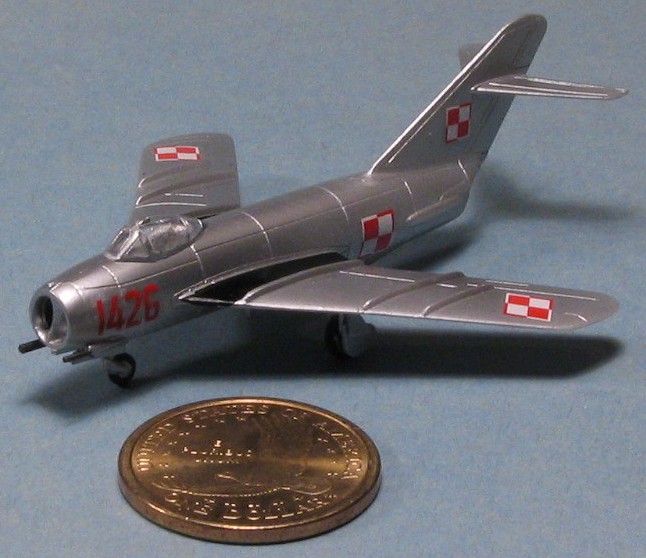
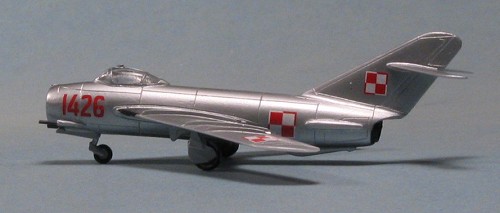
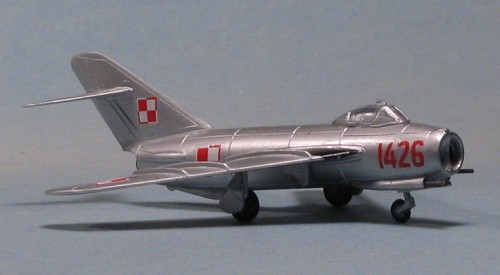
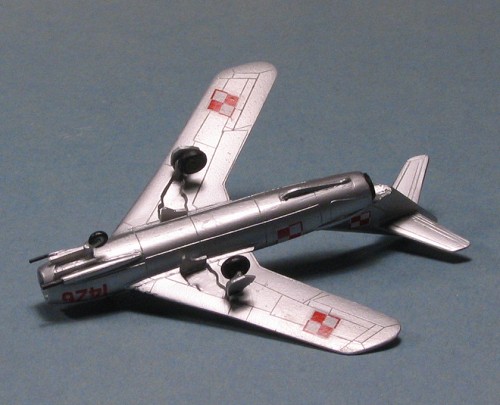
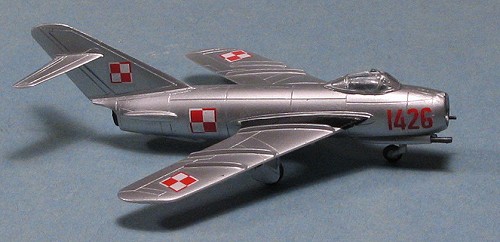
The kit provides markings for five aircraft, four of them unpainted metal. I chose the ones for the Polish AF. Interestingly, the instructions would have you leave off the upper wing insignia, but I've seen photos of these planes with them and the sheet provides them so they were added. The decals went on well, but refused to snuggle down into the engraved panel lines, even with the application of Microsol. Perhaps a stronger solution would have worked better, but things looked fine as they were.
| FINAL CONSTRUCTION |
Once the decals were in place, it was
time to add the gear doors and do some final painting. The gear doors are
molded in one piece so you can build the model as if in flight should you
wish. This means you have to cut them to do a gear down version. I cut mine
on a piece of tape to help keep the bits from flying around. It worked well
and held the bits in place. 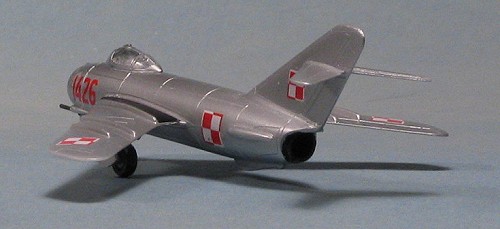 Thanks to the paint being Alclad II, none of it
came off on the tape. The nose gear doors were easy to place, but the outer
main gear doors took a bit of fussing to get on properly. There is no
attachment guide so these are just butt fit where they seem to fit the
best.
Thanks to the paint being Alclad II, none of it
came off on the tape. The nose gear doors were easy to place, but the outer
main gear doors took a bit of fussing to get on properly. There is no
attachment guide so these are just butt fit where they seem to fit the
best.
I then returned to the paint shop and sprayed on a coat or two of Testors Metallizer sealer. This material not only seals in the decals but also has minimal effects on the metallic paint. Be sure to use light coats of this stuff as it will eat into your decals if put on too thick.
The Bare Metal Foil was then removed from the canopy and any residue picked off. I painted the exhaust with Burnt Iron and used my drafting pen to paint the intake. The cannon barrels were painted with Gunmetal. Against the fuselage are large wing walk areas. The instructions suggest painting these, but I used black decal sheet cut to shape instead. This seemed to work quite well and was the last thing I did.
| CONCLUSIONS |
 I have to say that I'm rather
impressed by this kit. Aside from the seemingly inevitable problem with
oversize parts that strikes just about every 1/144 kit I've seen (the real
exception to this being Sweet), it builds into a very nice little model.
What I did not add to the model was a radio mast and the wing pitot tubes.
These are shown on the box art, but not included in the kit or even
mentioned in the instructions. Those that want to make the kit even more
accurate will reduce the size of the guns and the speed brake actuating rod
covers as these are also too large. Thinning down the intake lip will also
help to improve the look of the kit. But really, for most of us, the model
is fine as it is. It is a kit that I can highly recommend to you if you are
into 1/144.
I have to say that I'm rather
impressed by this kit. Aside from the seemingly inevitable problem with
oversize parts that strikes just about every 1/144 kit I've seen (the real
exception to this being Sweet), it builds into a very nice little model.
What I did not add to the model was a radio mast and the wing pitot tubes.
These are shown on the box art, but not included in the kit or even
mentioned in the instructions. Those that want to make the kit even more
accurate will reduce the size of the guns and the speed brake actuating rod
covers as these are also too large. Thinning down the intake lip will also
help to improve the look of the kit. But really, for most of us, the model
is fine as it is. It is a kit that I can highly recommend to you if you are
into 1/144.
PS. I have since removed the upper wing insignia. Thanks to all who wrote in about it.
December 2005
#1390 in a series
Copyright ModelingMadness.com. All rights reserved. No reproduction in part or in whole without express permission from the editor.
If you would like your product reviewed fairly and fairly quickly, please contact the editor or see other details in the Note to Contributors.