HiPM 1/48 P-51H Mustang
|
KIT # |
48008 |
|
PRICE: |
$29.99 |
|
DECALS: |
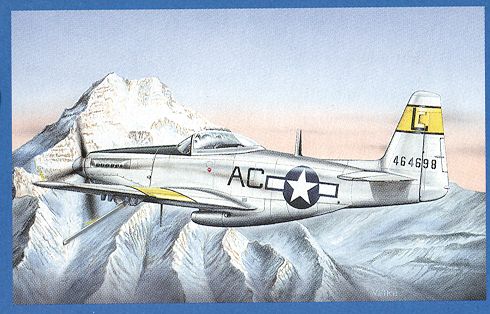
Two Mass ANG and two 57 FG Aircraft |
|
REVIEW: |
|
|
NOTES: |
Includes Etched Brass |
|
HISTORY |
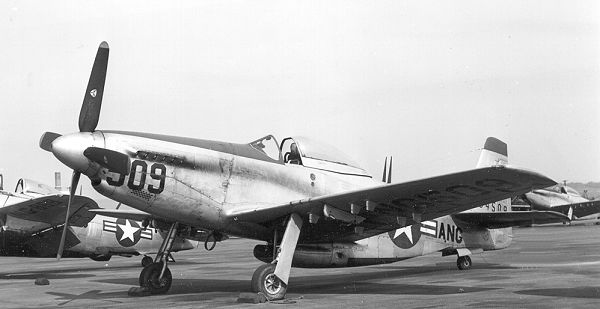 The last Mustang to be used operationally by the USAAF/USAF was the P-51H. Taking lessons from the D model and designed for the Pacific Theater, the H was lighter, faster and had more range than the D. It had a more powerful, but more
temperamental engine than the D and it was this that prevented the H from seeing duty in Korea, where the F-51D was used as the work horse for ground attack in the early and mid-war periods. As jet aircraft became more the norm for the USAF,
the now F-51H was relegated to use by the Air National Guard. After many
years of service the H model was eventually replaced by jets; the last
Mustang being out of the inventory by the mid-1950s.
The last Mustang to be used operationally by the USAAF/USAF was the P-51H. Taking lessons from the D model and designed for the Pacific Theater, the H was lighter, faster and had more range than the D. It had a more powerful, but more
temperamental engine than the D and it was this that prevented the H from seeing duty in Korea, where the F-51D was used as the work horse for ground attack in the early and mid-war periods. As jet aircraft became more the norm for the USAF,
the now F-51H was relegated to use by the Air National Guard. After many
years of service the H model was eventually replaced by jets; the last
Mustang being out of the inventory by the mid-1950s.
|
THE KIT |
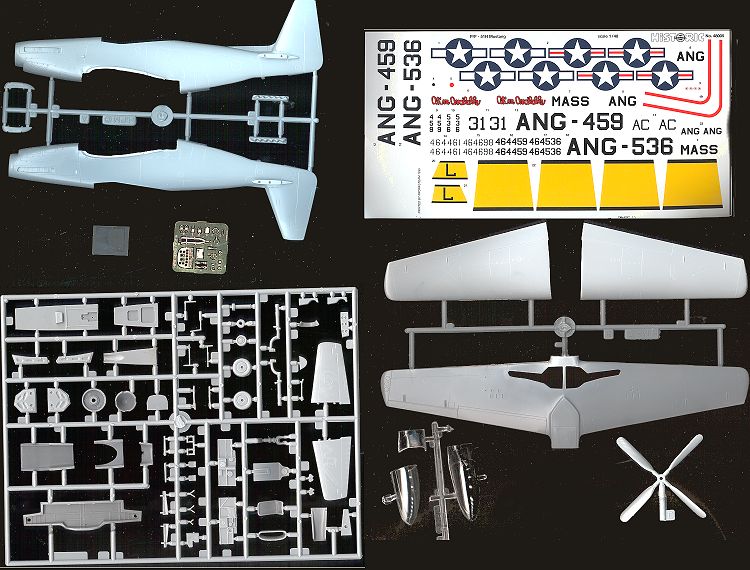 HiPM's new kit coincides with the release of the same aircraft by Classic Airframes. Just like kit makers to ignore an aircraft type for decades and then have two of them release kits virtually on the same day. There are differences, to be sure, between the two kits; both with plusses and minuses. I would have bought both of them for a comparison review, but at $30.00 apiece, I could only afford one. The Classic Airframes kit comes with nice resin parts for the interior and the wheel wells in addition to a couple of vacuform canopies and a great decal sheet. The HiPM kit is all injected plastic with a small brass etched fret and a great sheet of decals. Why then, did I choose the HiPM kit. Two things. One is that if given a choice of vac or injected canopies, I take the injected one every time. Vac canopies are nice, but give me problems with cutting and fitting. HiPM give two injected canopies; one open and one closed. Secondly the CA kit has separate
propeller blades. Again, I prefer the simplicity of having all blades on a common piece. HiPM offers tabs and slots where CA parts are butt fitted. Finally, I felt that the HiPM kit was better molded. This is rather subjective, but it seemed to me that the CA kit wasn't as crisp as the HiPM one. Time will
tell. One other small item. You may notice that the reds in the insignia and the fuselage stripes seem to be a bit brighter than the norm. I tend to replace the insignia. A real nice touch with HiPM is a 12 page instruction booklet that includes a page dedicated to painting of detail parts and one page each for the four decal schemes.
HiPM's new kit coincides with the release of the same aircraft by Classic Airframes. Just like kit makers to ignore an aircraft type for decades and then have two of them release kits virtually on the same day. There are differences, to be sure, between the two kits; both with plusses and minuses. I would have bought both of them for a comparison review, but at $30.00 apiece, I could only afford one. The Classic Airframes kit comes with nice resin parts for the interior and the wheel wells in addition to a couple of vacuform canopies and a great decal sheet. The HiPM kit is all injected plastic with a small brass etched fret and a great sheet of decals. Why then, did I choose the HiPM kit. Two things. One is that if given a choice of vac or injected canopies, I take the injected one every time. Vac canopies are nice, but give me problems with cutting and fitting. HiPM give two injected canopies; one open and one closed. Secondly the CA kit has separate
propeller blades. Again, I prefer the simplicity of having all blades on a common piece. HiPM offers tabs and slots where CA parts are butt fitted. Finally, I felt that the HiPM kit was better molded. This is rather subjective, but it seemed to me that the CA kit wasn't as crisp as the HiPM one. Time will
tell. One other small item. You may notice that the reds in the insignia and the fuselage stripes seem to be a bit brighter than the norm. I tend to replace the insignia. A real nice touch with HiPM is a 12 page instruction booklet that includes a page dedicated to painting of detail parts and one page each for the four decal schemes.
|
CONSTRUCTION |
On to the construction phase. First place is the cockpit. This is where most all the brass etched parts fit. Like many of my kits, the parts that were all painted the same color were installed. In this case it was the instrument panel support, armor plate and control column. The rudder pedal supports are then cut from what looks like an earlier attempt at pedal mounts. The pedals themselves are separate items and are glued to the supports. The instructions are good at showing you just exactly what you must do at this stage. As that was drying the fuselage halves and wings were cut from the sprues. The wheel wells were glued and clamped into the lower wing and the aft ducting and tail wheel well was glued in the right fuselage half. All the parts need a bit of clean up as there is some small amount of flash and the mating surfaces are irregular and need filed smooth prior to gluing.
 The small brass bits were added to the sidewall inserts with superglue. After the floor bits were dry, the seat was glued to the armor plate and the etched seat belts glued in place. Naturally I lost a few bits and had to use Aeromaster replacement parts. While this it was drying, the upper and lower wing halves were glued together. The fit of these near the fuselage isn't very good and filler was used to fill in the gap. This was mainly due to the wheel well being a bit too tall. However, I didn't trim the well or it would have made the wing too thin at this point. The prop was trapped between the two spinner halves and glued at this time as well.
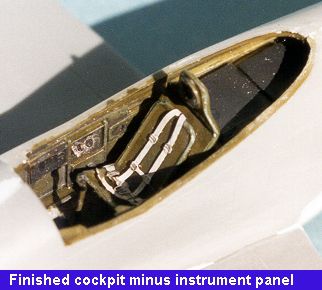
Next the interior and well areas were sprayed with interior green (use your favourite) and the ducting area was sprayed aluminum as were the wheel well doors. You might as well spray other small exterior bits aluminum as well since the aircraft was painted this color overall. Most photos I have seen of this aircraft show them to be painted aluminum and not bare metal. Back in the interior the brass instrument panels were painted black and drybrushed. The instrument film had the back painted white so the dials would show up. These were glued to the back of the instrument panels and the assemblies were then glued to their respective places in the cockpit. Super glue was used for this though you could use 5 minute epoxy as well. The interior parts were then given a dark wash and then a drybrushing.
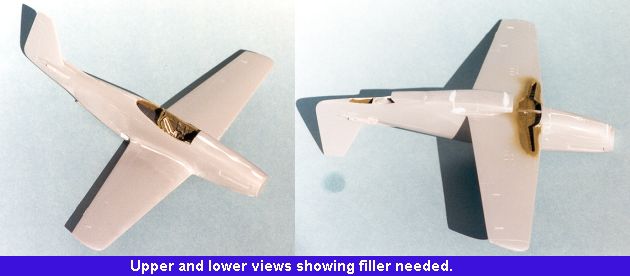
It was now time to install the interior into the fuselage. Well this went OK to a point. As instructed, I filed the sides of the radio insert and glued it in place on the right side. The interior was then glued in as well. Since the glare shield isn't part of the fuselage half, the interior sits back farther than what you would think. I had to reposition my interior and radio insert several times. When it came time to glue in the fuselage halves together, the instrument panel wouldn't fit as the left sidewall insert interfered. It was an easy job to remove it for some fussing and refitting later. Naturally (for me) the fuselage fit wasn't the greatest and clamps were needed to keep things together. I should have been alerted to a problem by this but wasn't.
After the fuselage was glued, filled, and sanded, it was time for the wings. YEOW! The fuselage was way too wide! Maybe I should have narrowed the interior floor or something. The only fix was to file on both the wing and fuselage wing roots until they finally fit. A rather tedious job as a lot of plastic had to go away! Once done the wing was installed and the now mandatory filler was used to smooth things out. Next the underwing radiator (a three part assembly) was glued together, seams filled and then installed. Once the glue for that had dried, there was yet more filler used and then smoothed out. The nose intake piece was also glued, filled and sanded smooth. Looks like this kit is going to be another filler monster for me. Not that it wasn't expected, just that it would have been nice not to have to go through it all.
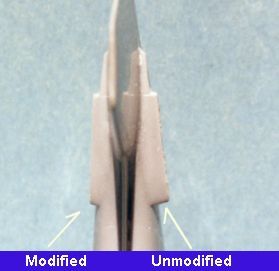
 After all that was done, the tailplanes were attached. WHOA! The darn things are swept back like a jet! Quickly removing them, I waited until the glue had dried and sanded away at the roots, keeping the back part intact and removing a lot of plastic from the front until the tailplanes were positioned the way they should be. The tailplanes were then reattached and looked right this time. What other surprises were in store for me! Well, the next step was to attach a few formers in the wheel well. The three parts were a pretty tight fit and did require the removal of the center brace on the wing to get them to fit. In fact, I managed to snap two of the three parts trying to get a good fit. Grrrr! What made it worse is that I decided not to leave the center gear doors down. Upon looking a quite a few photos of P-51Hs on the ground, I could not find one that had the inner gear doors down. Naturally the doors didn't fit the opening well at all and needed some filing down to finally fit into place. Once in place they were sanded down a bit to smooth things out a bit.
 On to the cockpit area. A small fillet was
installed in the back of the canopy area. Then the instrument panel was reinstalled in the cockpit. Next the glare shield was installed. Naturally, it didn't fit! Grrr! Not only was the instrument panel apparently too high, but the shield appeared to be too narrow. I got the best fit I could and then installed the gunsight. Before any of that had dried, I test fit the closed canopy. The canopy was too narrow for the space it has to fit. Grrrr! As you can tell, the Grrr factor on this kit is rather high. While I don't expect Tamiya like parts fit from limited run kits, I do expect them to be pretty close. Again, I was left wondering if the people who produce these kits actually build them after the molds have been finalized!! Thankfully the canopy is not very clear and is a bit distorted, so it was with this in mind that the closed canopy option was chosen. The canopy was attached with non-fogging superglue and it was time to start filling and filing to get the darn thing to fit!! After three applications of filler, it looked about ready for some paint.
On to the cockpit area. A small fillet was
installed in the back of the canopy area. Then the instrument panel was reinstalled in the cockpit. Next the glare shield was installed. Naturally, it didn't fit! Grrr! Not only was the instrument panel apparently too high, but the shield appeared to be too narrow. I got the best fit I could and then installed the gunsight. Before any of that had dried, I test fit the closed canopy. The canopy was too narrow for the space it has to fit. Grrrr! As you can tell, the Grrr factor on this kit is rather high. While I don't expect Tamiya like parts fit from limited run kits, I do expect them to be pretty close. Again, I was left wondering if the people who produce these kits actually build them after the molds have been finalized!! Thankfully the canopy is not very clear and is a bit distorted, so it was with this in mind that the closed canopy option was chosen. The canopy was attached with non-fogging superglue and it was time to start filling and filing to get the darn thing to fit!! After three applications of filler, it looked about ready for some paint.
|
PAINT & DECALS |
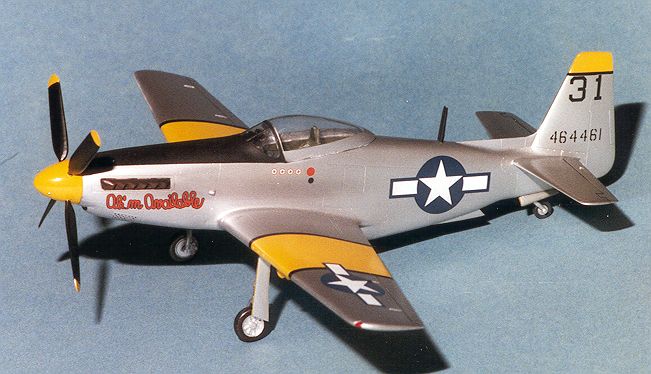
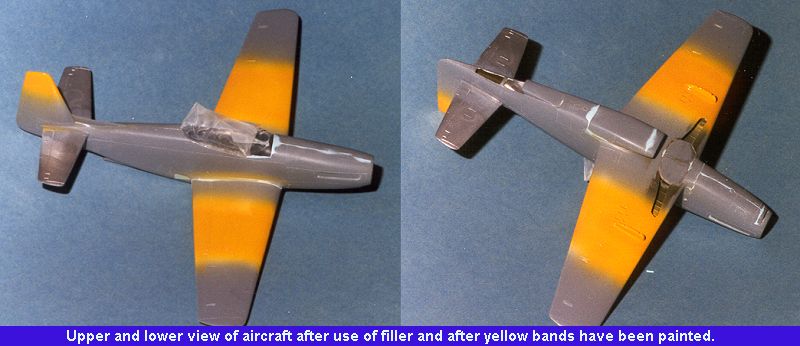
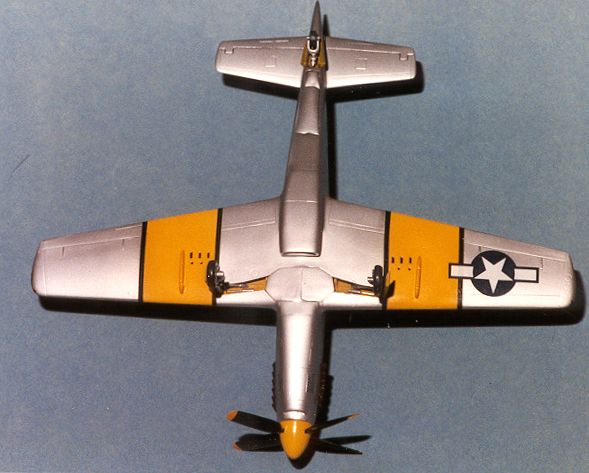
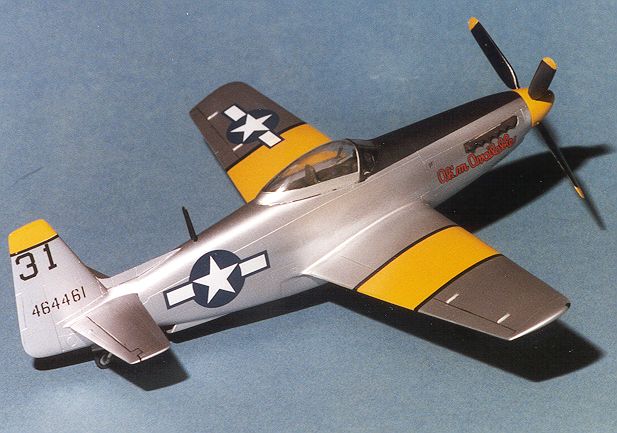
First off, I attached the bomb racks to the bottom of the wing with white glue. Then the tip of the tail and the wings from outboard of the wheel wells to inboard of the ailerons was painted Testors Modelmaster Gloss White. This is because I was going to do a 57 FG aircraft and that area would be painted yellow. I know that the decal sheet has these bands, but I have been warned not to use the decals as they are too small (Thanks, Tom!). Whenever using a translucent paint like yellow, red or light green, it is a good ideal to give it a white undercoat. Once that was dry (and it didn't take long) it was on with the yellow. The prop spinner was also given the white then yellow treatment. Somehow, I put on the yellow a bit too thick and it ran so after it dried, it was sanded down using fine grit sandpaper and repainted. Once the yellow area was masked off, the rest of the airframe was given a thin coat of gloss white in preparation for the silver/aluminum overcoat.
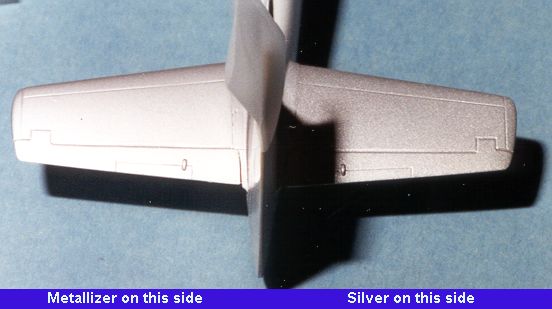 I wasn't really sure if I wanted to use Metallizer aluminum or regular old Testors silver to duplicate the painted aluminum surface. What I did was to do a couple of test bits using the outer wings. One was painted with silver and the other with aluminum. After letting them both dry for a day, I decided to stick with the Metallizer. The Testors silver has too large a 'grain' to be passed off as aluminum paint. Would probably be great for cars, though! Anyway, the canopy was properly masked off with Scotch Magic Tape and the rest of the airframe was painted with aluminum Metallizer. After drying, the anti-glare panel was painted flat black.
Once that was dry, it was time to put it on its gear. But before that, I went back and brush painted all the gear wells and door interiors with yellow zinc chromate. I have learned that a rule of thumb is if people are in it, use the green, if not then yellow. The first thing I did was to install the etched brass scissor links. Once dry the gear was painted Aluminum and then Bare Metal Foil used for the oleo. Then they were superglued into the proper holes in the wheel wells. It is odd to see a Mustang with a full forked tail wheel leg! The next thing added to the main gear were the brake parts, which were painted Magnesium just to off set them from the aluminum wheels. Very odd that they would be separate, but maybe it is because they would be too large to fit on the wheel. The main and tail wheels were then painted and glued into place.
 Now that the kit had something to stand on, it was time to start
decaling. The first items of business, were the wing stripes. Sure, I painted the yellow bands, but they needed to be set off by thinner black bands. Scalemaster provided the needed black bands. What is more, any goofs can be easily repaired with gloss black paint. After those had dried, it was on to the more 'normal' decals. Theese are by Propagteam. As you may know, they are famous for being thin as air and for sticking where they first touch. Well, the second part can be cured by prepping the area for them with good old spit. It is slippery enough to prevent this problem. As for the thinness, just be careful. I managed to mangle both my serial number decals, but was able to cut and paste from another on the sheet. They snuggle down to every nook and cranny using just Microscale solvent. Since they are so thin, it is not a surprise that the white is a bit transparent and the yellow and black wing bands show through the national insignia.
Now that the kit had something to stand on, it was time to start
decaling. The first items of business, were the wing stripes. Sure, I painted the yellow bands, but they needed to be set off by thinner black bands. Scalemaster provided the needed black bands. What is more, any goofs can be easily repaired with gloss black paint. After those had dried, it was on to the more 'normal' decals. Theese are by Propagteam. As you may know, they are famous for being thin as air and for sticking where they first touch. Well, the second part can be cured by prepping the area for them with good old spit. It is slippery enough to prevent this problem. As for the thinness, just be careful. I managed to mangle both my serial number decals, but was able to cut and paste from another on the sheet. They snuggle down to every nook and cranny using just Microscale solvent. Since they are so thin, it is not a surprise that the white is a bit transparent and the yellow and black wing bands show through the national insignia.
Once the decals were on, it was time to finish up with some other bits and pieces. First, the gear doors. Naturally they did not fit into their designated slots, so I cut off the tabs and butt glued them. Then the gear retraction mechanism was somehow glued into the general area. Next the exhaust manifolds, which had been painted burnt iron after trimming to assure a good fit, were glued into place. Lastly the IFF antennas on the spine were glued on and painted flat black. Then all the goofs were painted over and the kit then recoated with Glosskote. Now this is the first time I have used Glosskote in several decades. I got a bottle of it and thinned it with Floquil thinnner (because it is lacquer). It sprayed on well, but was not glossy. It was more a semi-gloss. It was also tacky for days prior to finally being dry. I have since been informed that I needed to shake up the bottle more as the drying agent is as clear as the Glosskote and I probably didn't get a good mix. I'll definitely try that next time! Finally the tape was removed from the canopy and to my horror, there was some sort of fogging on the inside. HMMMM.... Must have been the non-fogging superglue I used! Finally a light dusting of pastels was used for exhaust stains and not much of that. After the war, units actually took care of their aircraft!!
|
CONCLUSIONS |
Well, I wanted a 1/48 P-51H. I chose HiPM over Classic Airframes. Did I make a mistake? Don't know until I build the CA kit. What I do know is that this kit isn't for beginners. Because of it's fit and design flaws, I can only recommend it to those who have built limited run kits before and are wary enough to spot and fix the problems that will arise. Things that I would redo: First of all, I'd either sand down the fuselage sides or use an aftermarket canopy. Then I'd reset the main landing gear for more forward rake as they stick down too straight. This requires removing some material from the lower wing to provide clearance. I'd also shorten the tail wheel as it looks to be a bit too tall. I would also add rocket rails and a df loop antenna to the underside of the fuselage. But these are just things for you to look out for. I only know that I will never build another HiPM P-51H. One is enough!!
|
REFERENCES |
Squadron/Signal # 45 :P-51 Mustang in Action
United States Air National Guard by Rene Francillon, Airtime Publishing, 1993, $29.95
Air Guard: Monograph #2 by Rene Francillon, Aerofax, 1983
August 1999
Copyright ModelingMadness.com. All rights reserved. No reproduction in part or in whole without express permission from the editor.
Back to Reviews Page 2016