
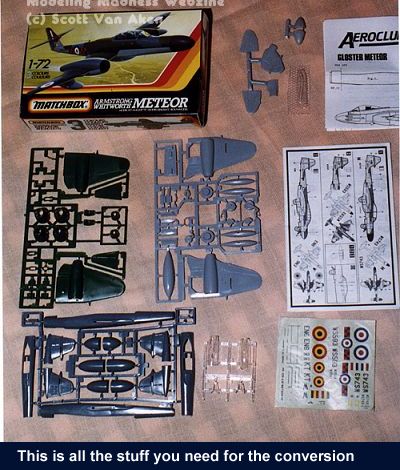
Matchbox 1/72 Meteor T.7
Kit Number: PK 129
Price: $10.00
Decals: Three Versions; NF.11--11Sq Belgian AF; NF.12--84 Sq RAF, NF.14--85 Sq RAF.
Date of Review: 15 October 1998
Review and Photos by: Scott Van Aken
Conversion: Aeroclub; cost approx $5.00
Gloster's Meteor was Britain's first operational jet fighter, entering service around the same time as the Me-262. However, since the British did not want any Meteor's falling into enemy hands, it was mostly used for chasing V-1s and in Spring of 1945 for ground attack from bases in Belgium. What the outcome of a Meteor vs Me-262 battle would have been is one for conjecture. After the war, the Meteor was improved through successive marks. The F.4 and F.8 being very successful fighters, the NF.11/12/14 being equally successful as night fighters, and the subject of this conversion, the T.7 used as a trainer version. Other than the U.16 drones converted from NF.14's, the longest lasting version was the T.7.
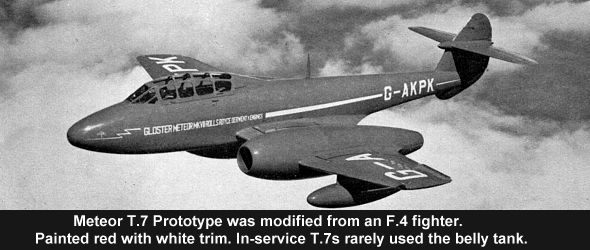
The T.7 is basically an F.4 airframe that was stretched to accommodate an additional seat. T.7s were used by both the RAF and the Royal Navy as well as those air forces who bought the Meteor, including Australia, Israel, Egypt, Syria, Argentina, Belgium, and France, to name a few.
In kit form, the Meteor can be found in 1/72 as an F.3 from Airfix, F.4 from Frog/Novo, F.8 from Merlin and Rareplane, NF.11/12/14 from Matchbox, and NF.14 from Rareplane. There have also been conversion kits to do other marks including a T.7 from Airmodel and Aeroclub's four conversions for the Matchbox kit; F.8, FR.9, FR.10 and the subject of this conversion, the T.7.
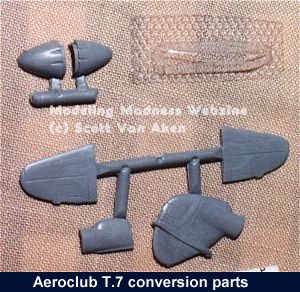
Aeroclub's conversions are really quite straightforward. One is provided with the necessary parts in short run plastic as well as a vacuform canopy. Those parts can be a nose, tail unit, cockpit housing or white metal ejector seat. In most cases it is a combination of parts. For the T.7 you get a new nose, tail unit and canopy. The wings must be shortened in span, and a template is given to help you accomplish that. Other than the wing, the only cutting required is that the nose be cut off the NF.11 fuselage. Aeromaster's plastic parts are thick and a bit crude, requiring careful cleanup and fitting, but are perfect for those with vacuphobia (fear of vacuformed parts).
This conversion topic is built with those who are attempting their first or second conversion and is not a superdetail how-to. The Matchbox kit leaves plenty of room for those that want to go all out. There is a brass etched kit available from Airwaves and new metal landing gear from Aeroclub for those who want to add additional detail. For my part, I used nothing not in the two kits.
Matchbox's kit for the night fighting Meteors is very straightforward. Molded in three colors with raised panel lines and minimal detailing, the sprues show almost no flash but a large number of sink marks. This particular kit was purchased from the first production run in 1985 so the sink marks are endemic with the kit. This is the third of these kits I have built and they are all have similar characteristics. Fit of the parts is pretty good, although you will find yourself using filler on most joins; again, not uncommon with Matchbox kits.
First is the cockpit. The Aeroclub instructions tell you to use the NF.11 fuselage. However, they don't help at all in interior details. I am assuming that the instrument panels in the back seat of the T.7 and NF.11 are different, but no T.7 panel is included. I used the NF.11 one; you may wish to make another. The rear seat should also include a control stick; none is provided by Aeroclub and the night fighters did not have one. The seats themselves are just seats. As you can see, lots of room for improvement, should you desire. The interior is painted black as was the norm in the fifties.
 While the
interior parts were drying, the wings were assembled. Now one needs
to determine if the T.7 being modeled had large or small engine intakes.
Rule of thumb is that if it is a later aircraft that survived into
the sixties, it probably had large intakes when the engines were upgraded.
No specific scheme was in mind at the start, so I opted for the smaller intakes.
You will find sink marks on the intakes that need filled. In
addition, the intakes and exhaust are a bit larger than the wing to which
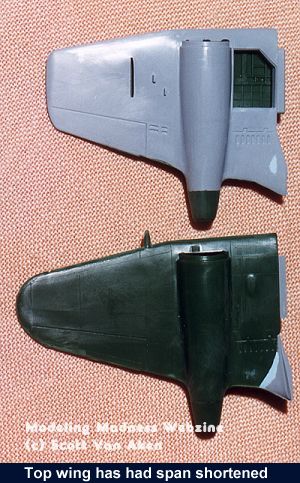
they attach, but can be sanded down to size with no problem. Both the wings
were shortened in span according to the drawing and the tips smoothed and
filled. Then the ailerons were rescribed. At this time, one can
remove the guns from the wings as the T.7 did not carry them.
While the
interior parts were drying, the wings were assembled. Now one needs
to determine if the T.7 being modeled had large or small engine intakes.
Rule of thumb is that if it is a later aircraft that survived into
the sixties, it probably had large intakes when the engines were upgraded.
No specific scheme was in mind at the start, so I opted for the smaller intakes.
You will find sink marks on the intakes that need filled. In
addition, the intakes and exhaust are a bit larger than the wing to which
they attach, but can be sanded down to size with no problem. Both the wings
were shortened in span according to the drawing and the tips smoothed and
filled. Then the ailerons were rescribed. At this time, one can
remove the guns from the wings as the T.7 did not carry them.
Next is the fuselage. The Aeroclub instructions say to use the NF.11 fuselage
and to cut off the nose. First I assembled the fuselage without the
interior. While that was drying, I then hacked off the Aeroclub tail
assembly from the sprues and gave it a dry fit. I noticed that if I
glued the two halves together, that they would be too small for the fuselage.
 So
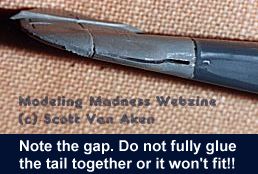
I glued the very aft section together (after first cleaning it up) and left
the front unglued. When the fuselage and tail were dry, I glued the
tail to the aft section of the fuselage. With the sides well mated,
there was an open gap top and bottom where the tail fit. That was filled
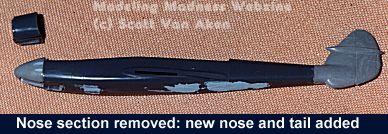
using putty. Next the nose was cut off and the Aeroclub nose was attached
(again, after some cleanup). I cannot stress enough the need to do constant dry fitting when doing any conversion to prevent the
horrendous fit problems that often crop up.
So
I glued the very aft section together (after first cleaning it up) and left
the front unglued. When the fuselage and tail were dry, I glued the
tail to the aft section of the fuselage. With the sides well mated,
there was an open gap top and bottom where the tail fit. That was filled
using putty. Next the nose was cut off and the Aeroclub nose was attached
(again, after some cleanup). I cannot stress enough the need to do constant dry fitting when doing any conversion to prevent the
horrendous fit problems that often crop up.
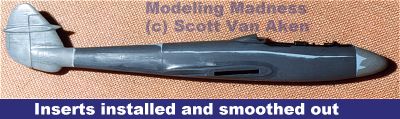 Once
the nose and tail section were joined and dry, filler was put on the joins,
weight crammed into the nose, the interior installed and the upper decking
glued in place. Once all that was dry, the filler was sanded down. The
nose section in particular needed plenty of work to fit the basically circular
nose to the basically square fuselage. When doing filler, put on a number
of thin coats instead of one thick one. This lets the filler properly
dry and prevents sink marks from appearing weeks after the kit has been finished
due to the underlying putty not drying properly. Finally, the tailplanes
were installed. They are a butt fit, but since
Once
the nose and tail section were joined and dry, filler was put on the joins,
weight crammed into the nose, the interior installed and the upper decking
glued in place. Once all that was dry, the filler was sanded down. The
nose section in particular needed plenty of work to fit the basically circular
nose to the basically square fuselage. When doing filler, put on a number
of thin coats instead of one thick one. This lets the filler properly
dry and prevents sink marks from appearing weeks after the kit has been finished
due to the underlying putty not drying properly. Finally, the tailplanes
were installed. They are a butt fit, but since
 the
plastic is nice and soft, the glue does a super job of holding. By
the way, many later Metero T.7s had what is known as the 'high speed' tail
that was basically just the F.8 tail. If your version is using that,
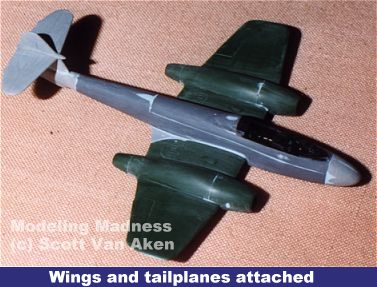
then simply use the NF.11 tail. Next the wings were glued and seams filled.
Now you are going to have a rather tatty looking kit at this point and it
is now that you should decide if you are going to rescribe any panel lines.
I'm not as most panel lines cannot be seen from a normal viewing distance
anyway, but I did rescribe (rather poorly) the ailerons and speedbrakes.
the
plastic is nice and soft, the glue does a super job of holding. By
the way, many later Metero T.7s had what is known as the 'high speed' tail
that was basically just the F.8 tail. If your version is using that,
then simply use the NF.11 tail. Next the wings were glued and seams filled.
Now you are going to have a rather tatty looking kit at this point and it
is now that you should decide if you are going to rescribe any panel lines.
I'm not as most panel lines cannot be seen from a normal viewing distance
anyway, but I did rescribe (rather poorly) the ailerons and speedbrakes.
Next step is finishing up the cockpit with your choice of stuff and attaching the canopy. The Aeroclub canopy is nice and clear, but is nearly same as the NF.11 canopy (the NF.11 windscreen has two panes on the left side whereas the T.7 only has one). Here I took the easy way out and used the kit canopy. Not because it is better, but because I am lazy. If you are doing a superdetailed kit, by all means use the Aeroclub canopy. Once it was installed, I masked it with Scotch Tape in preparation for painting. Those of you who are observant will notice that if I did a T.7 with a high speed tail and used the kit canopy, then all I would really need to do this conversion is a new nose. This is true and a short letter to Aeroclub will get you a price list for just the nose. But I digress.
 The
kit landing gear doors are not bad at all compared to earlier Matchbox kits.
The landing gear themselves have the wheels as part of the gear assembly.
While many would prefer them to be separate, it does make for a sturdy
assembly, though it makes painting the tire more difficult. However, the
biggest problem with the landing gear is placement. There really isn't
any positive locating pins or anything for them so you just have to be creative
in their placement. Fortunately, the soft plastic means that will easily
stick where ever you put them. They were installed prior to painting as the
airframe was to be painted overall silver and since that is the color of
the gear and wheel wells, why not do it all at once!
The
kit landing gear doors are not bad at all compared to earlier Matchbox kits.
The landing gear themselves have the wheels as part of the gear assembly.
While many would prefer them to be separate, it does make for a sturdy
assembly, though it makes painting the tire more difficult. However, the
biggest problem with the landing gear is placement. There really isn't
any positive locating pins or anything for them so you just have to be creative
in their placement. Fortunately, the soft plastic means that will easily
stick where ever you put them. They were installed prior to painting as the
airframe was to be painted overall silver and since that is the color of
the gear and wheel wells, why not do it all at once!
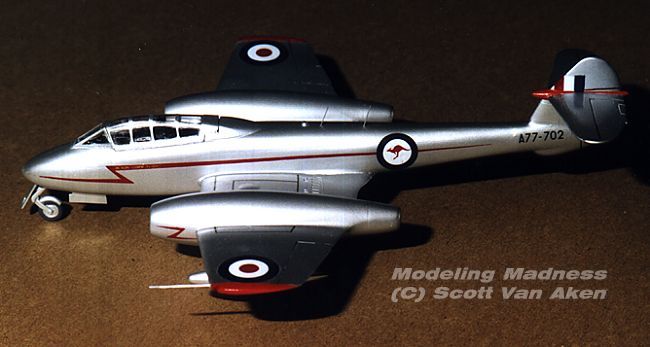
Next the wing pylons were glued on as were the nose gear doors and the various antenna. This aircraft was to be done as a hack with an Australian squadron. That meant a scheme of overall silver paint and not bare metal, the clear overcoating of Testors Metallizer Aluminum would give the right color. However, there are a few bits of red on the scheme that require those parts to be undercoated with white so a part of the tail and wing tips were first painted white and then red. When dry, they were masked off and the rest of the airframe painted aluminum. Finally the aluminum airframe was sprayed with Future to dull it and make it look like aluminum paint.
Next the tires were painted grey and the kit was ready for decals. From a good friend, Ken Bowes, came Tasman Decals sheet #V7207 which includes a Meteor T.7 from 38 Sq Communications flight, RAAF. It does not have the RAF-type yellow trainer bands, but does have a very nice red flash that runs the length of the fuselage.
I must confess to being a bit gun shy about Tasman and Ventura decals as I have found earlier releases to be a bit brittle. These were not as bad as I had feared although they were a bit brittle, especially the long fuselage flashes. The printing also was not as crisp as I have come to expect from modern decals. Again, the fuselage flashes had rather jagged edges on the tapered sections. However, they did work rather well with all setting solutions. Before you say that the engine flashes are on upside down, that is the way the instructions would have you do it. To prevent possible misregistration problems, the multi-colored decals were separate. There was a lot of excess carrier on the decals that had to be trimmed. Once on, the results were quite satisfactory and make for an interesting scheme. Kit decals were used for the wing walk areas. Besure to cut out all the carrier from the inside of these decals or the fit will be horrible.
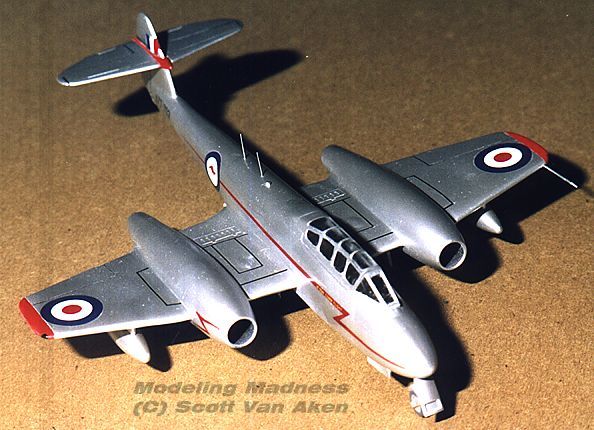
Finally the airframe was resprayed with Future to seal the decals, then the masking was removed from the canopy and the thin spine antennas added. Overall a rather easy conversion and one that can be recommended to a beginning builder.
Reference:
'The Gloster Meteor' by Edward Shacklady, 1962
Copyright ModelingMadness.com. All rights reserved. No reproduction without
express permission from the editor.
Back to Reviews Page 2016