| KIT #: | 2600 |
| PRICE: | $57.00 from Cooper's Models |
| DECALS: | One option |
| REVIEWER: | Scott Van Aken |
| NOTES: | Short run resin kit with vacuform canopy |
| HISTORY |
 The
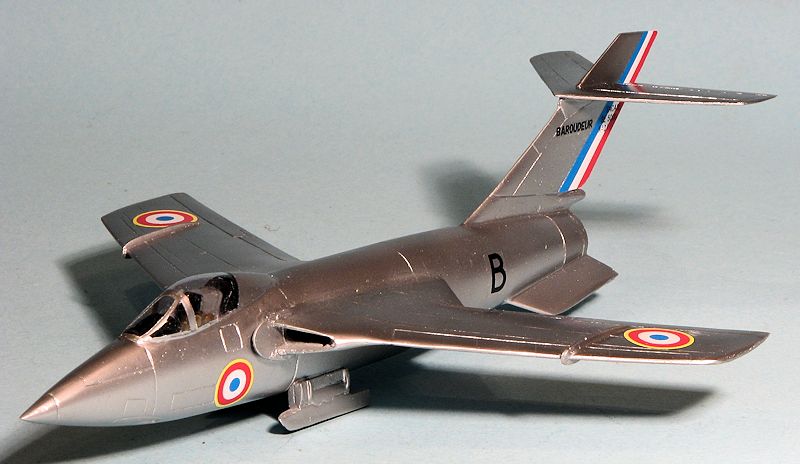
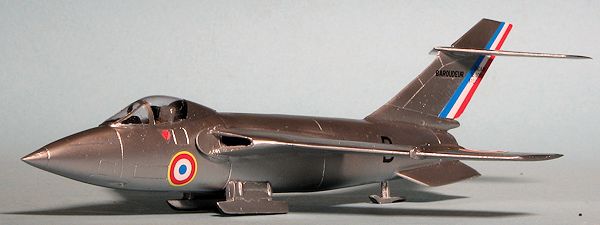
SNCASE S.E.5000
Baroudeur was a
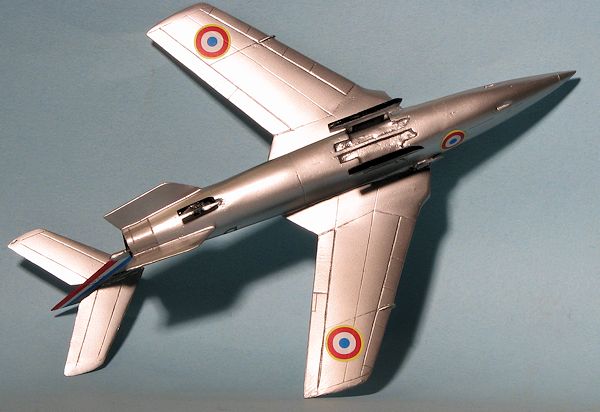
lightweight fighter, designed to operate from grass airfields. It used a
wheeled trolley that could be used for take off from grass, and three
retractable skids, the third at the tail for landing and for take off
from snow or ice-covered surfaces. The three wheeled trolley had
provision to use rockets (two or four according to terrain plus two
back-up) if needed to assist. Apart from the landing gear the aircraft
was a conventional shoulder-wing monoplane with a 38 degree swept wing
and tail surfaces and powered by a SNECMA Atar 101C turbojet with
wing-root intakes. The first of two prototypes flew on the 1 August
1953. Three pre-production aircraft designated the
S.E.5003
were also built with Atar 101D turbojet engines but the type was not
ordered into production.
The
SNCASE S.E.5000
Baroudeur was a
lightweight fighter, designed to operate from grass airfields. It used a
wheeled trolley that could be used for take off from grass, and three
retractable skids, the third at the tail for landing and for take off
from snow or ice-covered surfaces. The three wheeled trolley had
provision to use rockets (two or four according to terrain plus two
back-up) if needed to assist. Apart from the landing gear the aircraft
was a conventional shoulder-wing monoplane with a 38 degree swept wing
and tail surfaces and powered by a SNECMA Atar 101C turbojet with
wing-root intakes. The first of two prototypes flew on the 1 August
1953. Three pre-production aircraft designated the
S.E.5003
were also built with Atar 101D turbojet engines but the type was not
ordered into production.
| THE KIT |
This
is a short run resin kit straight from the old school of garage kits. This
means that the parts are fairly well molded, though they have air pockets in
various spots and there is a goodly amount of resin flash to take care of.
Many of the parts are in resin wafers. I have not shown all the parts in the
photo as most of them came loose from their sprues/wafers and were in with a
mass of shavings in the bag. However, these images are pretty typical of how
the pieces look.
 It means that this kit is not for the beginner, but for those who have had
experience building resin kits. And that is just fine. Modelers who are
attracted to things like this are fully aware that additional and in some
cases considerable work will need to be done to produce a finished model to
acceptable standards.
It means that this kit is not for the beginner, but for those who have had
experience building resin kits. And that is just fine. Modelers who are
attracted to things like this are fully aware that additional and in some
cases considerable work will need to be done to produce a finished model to
acceptable standards.
There are about 20 parts to this kit, several of them making up the
launching and handling trolley. The fuselage is in three parts; two main
fuselage halves and a complete tail section. Test fitting of the forward
halves shows the fit to be good and the panel lines match from side to side.
The horizontal stab slots into the fin. Wings are of tab and slot, though
Akatombo recommends a wire stub reinforcement. The cockpit is quite basic
consisting of a seat and instrument panel/combing. No control stick, rudder
pedals or other interior embellishments. The instructions recommends
"Complete cockpit details by adding if desired". Five grams of nose weight
is suggested and there is room in the hollowed out fuselage for that. A
single vacuformed canopy is provided as is a mold for making more if you
need to do so. This is a nice addition, though I would have rather had a
ready to go spare canopy.
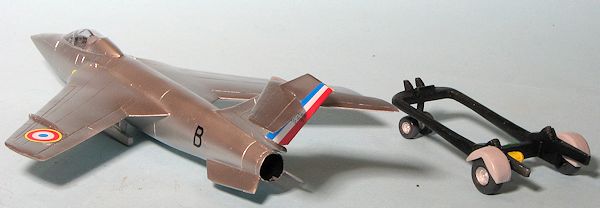
 The
trolley takes up a goodly number of parts with a frame, main wheels, nose
'strut' with dual wheels and fenders. There is supposed to be a wire mesh
tray covering most of the underside, but this will have to be scratch built.
The
trolley takes up a goodly number of parts with a frame, main wheels, nose
'strut' with dual wheels and fenders. There is supposed to be a wire mesh
tray covering most of the underside, but this will have to be scratch built.
Instructions are basically a list of suggestions and an exploded view of all
the parts. Pinched from Wings of Fame or Air International is a nicely drawn
cut away. Another sheet includes 1/72 plans and there is a glossy sheet with
well over a dozen nicely done photographs of the real aircraft to provide
assistance. This includes several close up images of the skids and the
trolley. A decal sheet is provided for the kit. The decals are nicel
printed, quite flat and do not seem to have any carrier. However, Atakombo
provides more than are needed so one can use one to experiment. One could
use aftermarket for the roundels if needed. No markings diagram is given,
though one has the box art and photos that can be used for this purpose.
From what I recall reading one of the references provided on the sheet
several years back, the aircraft was unpainted metal.
| CONSTRUCTION |
Typical of these sorts of kits, one spends a considerable amount of time cleaning things up. This included sanding all the mating surfaces as flat as one can and removing the flash from the edges of all the parts. I generally wet sand these things to keep dust down to a minimum or wear a dust mask.
 This kit had quite a few air pockets and on some
parts, some pinholes that needed filling. This was particularly the case with
the aft fuselage section. I normally use thin super glue for this. Fortunately,
these pinholes were not rampant and even after some considerable sanding on a
few parts, no new ones appeared.
This kit had quite a few air pockets and on some
parts, some pinholes that needed filling. This was particularly the case with
the aft fuselage section. I normally use thin super glue for this. Fortunately,
these pinholes were not rampant and even after some considerable sanding on a
few parts, no new ones appeared.
Once the fuselage halves were cleaned up, they were joined. Though there were the expected seams, the fit of these parts is generally quite good as they were keyed. I particularly liked that the nose cone was molded into one half as a complete unit. After much work, the tail section was attached. Not unexpectedly, this did not match the fuselage, being wider in some parts. This left a goodly step that needed considerable sanding to remove. Fortunately, there is not a ton of engraved detail, so replacing what was sanded away was not an issue.
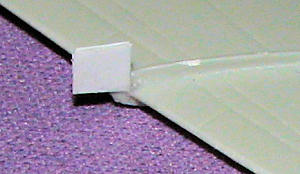 I then turned to the wings. The
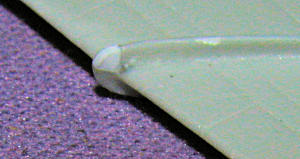 se have the usual air
pockets and a few voids as well. I found one on the wing fence and so cut a
notch in it and installed a small section of plastic card that was later sanded
down. Meanwhile, clean-up continued with the launch/handling trailer. For some
reason, I got two sets of wheels and front axles for this. They all look the
same so I am not sure what the deal is on this. This piece suffers from a bit of
mold mismatch. Sanding it down and getting everything in the nooks and crannies
required the use of files and a lot of patience. There were also some voids,
though some went untreated due to where they were. In case you have not guessed,
there were no parts that did not require some sort of remedial work to bring them up to
acceptable standards.
se have the usual air
pockets and a few voids as well. I found one on the wing fence and so cut a
notch in it and installed a small section of plastic card that was later sanded
down. Meanwhile, clean-up continued with the launch/handling trailer. For some
reason, I got two sets of wheels and front axles for this. They all look the
same so I am not sure what the deal is on this. This piece suffers from a bit of
mold mismatch. Sanding it down and getting everything in the nooks and crannies
required the use of files and a lot of patience. There were also some voids,
though some went untreated due to where they were. In case you have not guessed,
there were no parts that did not require some sort of remedial work to bring them up to
acceptable standards.
I also worked on the wings some more. The other wing had a chip on the trailing edge of the wing at the fuselage join and at the lower intake. These were handled just like the wing fence with plastic card, super glue and sanding down.
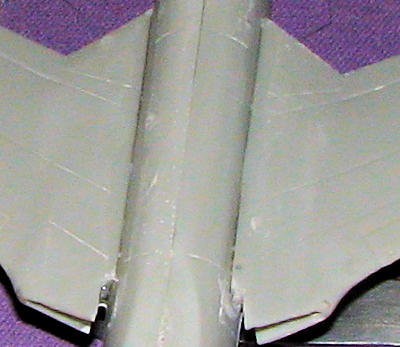 The
next step was to attach the wings. These are not really molded to fit well. Even
after lots of trimming of the attachment holes and wing root itself to try to
conform to the curve of the fuselage, I was left with very large gaps. Super
glue was used to fill these once I got the wings somewhat even with each other.
Use the engraved attachment lines on the fuselage as a general guide as they do
not seem to match up from side to side. In this photo you can see the darker
line of the gap after the first super glue application. The second one is
visible and has not yet been sanded down. You can also see the small triangles
of plastic card on the lower intake and aft wing installed to replace voids.
The
next step was to attach the wings. These are not really molded to fit well. Even
after lots of trimming of the attachment holes and wing root itself to try to
conform to the curve of the fuselage, I was left with very large gaps. Super
glue was used to fill these once I got the wings somewhat even with each other.
Use the engraved attachment lines on the fuselage as a general guide as they do
not seem to match up from side to side. In this photo you can see the darker
line of the gap after the first super glue application. The second one is
visible and has not yet been sanded down. You can also see the small triangles
of plastic card on the lower intake and aft wing installed to replace voids.
Once that was done, the splitter plates were installed and the fit here left a great deal to be desired as well. Once those were installed and the first round of filler was sanded down, I lost interest in the kit and it sat for a couple of years.
Deciding that I really needed to finish up some of the many 'started but abandon' kits in my collection, I pulled this one out of the pile, blew the dust from the box and got back into it. The first thing I did was to see how much I had to go. For this purpose, a coat of primer was sprayed on the airframe so I could see what needed to be done. It wasn't pretty. I was less than jazzed about all the pinholes that had appeared on the underside of the fuselage so I applied more filler to this and several other parts. Once that was sanded down, I installed the tailplanes and the instrument panel section. Another coat of primer was applied followed by some aluminum.
 Boy, did that show up a myriad of glitches. The biggest of which was a very
rough surface. I broke out the 600 grit sandpaper and sanded the airframe as
smooth as I could without overdoing it. I also took this time to attach the
landing skids. The kit allows you to do these extended or retracted and has
separate bits for the main skids. After test fitting the airframe on the
trolley, I discovered that there was no way the aircraft would sit on it
properly. The kit maker provides no hold downs of any sort and it is sort of
like sitting a tube atop two tubes going crossways. Attaching the skids was a
bit tricky as well as the instructions are not very clear on how they go on,
even with the photos. The tail skid needs to be attached aft of the skid well.
There is an indentation on the front of the well for a much resined over pin to
fit, but if you do that you'll find it is too far forward.
Boy, did that show up a myriad of glitches. The biggest of which was a very
rough surface. I broke out the 600 grit sandpaper and sanded the airframe as
smooth as I could without overdoing it. I also took this time to attach the
landing skids. The kit allows you to do these extended or retracted and has
separate bits for the main skids. After test fitting the airframe on the
trolley, I discovered that there was no way the aircraft would sit on it
properly. The kit maker provides no hold downs of any sort and it is sort of
like sitting a tube atop two tubes going crossways. Attaching the skids was a
bit tricky as well as the instructions are not very clear on how they go on,
even with the photos. The tail skid needs to be attached aft of the skid well.
There is an indentation on the front of the well for a much resined over pin to
fit, but if you do that you'll find it is too far forward.
Meanwhile, I cut the lone canopy from its backing. It is nice that a form is provided for this as it makes cutting the canopy so much easier. It also allows you to make another if that is required. Since the framelines are so faint, I kept the canopy on the form to help me mask it. Test fitting it showed that it actually seems to fit rather well. I also painted up the bang seat. Two are provided, but both have air holes that are visible so I chose the one that was the least messed up.
I then applied yet another coat of primer to see how things looked. While not pretty, I was pretty fed up with filling air bubbles and voids so I went ahead and returned to the bench to add the seat and instrument panel decal. I also took the opportunity to finish building the handling trolley, even though I wasn't going to put the aircraft on it. The kit provides additional nose and main wheels along with additional front axles. This is so you can pick the best of the bunch, though none are without fault. All the wheels needed the axle holes drilled out.
| COLORS & MARKINGS |
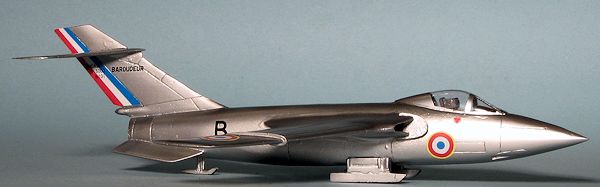
After installing the instrument panel decal and the bang seat, to which I added some tape belts, the canopy was attached with clear gloss paint and the airframe was again painted, but this time with Alclad II Dark Aluminum. This seems to give better coverage than the standard stuff for some reason. It was then repainted with regular Aluminum except for the area around the exhaust.
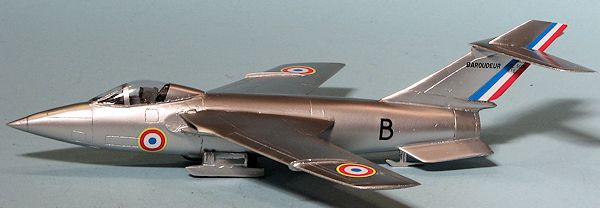 With that done, the decals were cut from the sheet and applied.
Their stick is fair, but to keep them in place, you do need to apply setting
solution as I had a few I thought were completely dry simply fall off when
handled. Fortunately, some extra roundels and plane names are provided. What is
missing is the script name for the nose and the fuselage letters. The photo
sheet shows that the planes were labeled B,T, and V. Though the font is not
exact, I picked a 20 inch B from a Modeldecal sheet for mine.
With that done, the decals were cut from the sheet and applied.
Their stick is fair, but to keep them in place, you do need to apply setting
solution as I had a few I thought were completely dry simply fall off when
handled. Fortunately, some extra roundels and plane names are provided. What is
missing is the script name for the nose and the fuselage letters. The photo
sheet shows that the planes were labeled B,T, and V. Though the font is not
exact, I picked a 20 inch B from a Modeldecal sheet for mine.
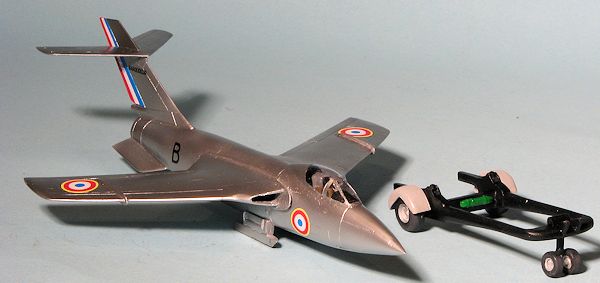
The handling trolley was built anyway, despite the fact that the aircraft will not rest on it properly. As with the rest of the kit the casting is not good with lots of air bubbles and pinholes and blobs of resin that had to be removed. As I was not planning on putting any real effort into this, I simply got it down to adequate. The kit provided multiple front wheels, rear wheels and front axle assemblies, none of which were particularly well done so I just chose the best of the lot. The wheels need to have the axle holes drilled. I painted the frame black with a green and yellow pressure bottle. The wheels were silver with the rest in Floquil's Weathered Black. I painted the fenders a light grey just to have some contrast.
| CONCLUSIONS |
 It
is not often that I cannot recommend a kit and I am afraid that this one will
fit into that category for most modelers. It isn't that it cannot be built, as
you can see I managed to do so, it is just that it is so rife with molding
glitches as to make it as much an exercise in frustration as anything. It is
obvious that this kit is made by a guy in his home workshop. More modern resin
kits are allowed to cure in a pressure chamber that pretty well eliminates resin
bubbles and blobs from the parts. Every single part of this kit had molding
glitches and it almost resulted in the kit not being finished. In fact, had I
not given up on fixing the pin holes and air voids, it would still be in the
box. I can only recommend this to those who must have the subject in their
collection and have the skills and patience to make it look nice.
It
is not often that I cannot recommend a kit and I am afraid that this one will
fit into that category for most modelers. It isn't that it cannot be built, as
you can see I managed to do so, it is just that it is so rife with molding
glitches as to make it as much an exercise in frustration as anything. It is
obvious that this kit is made by a guy in his home workshop. More modern resin
kits are allowed to cure in a pressure chamber that pretty well eliminates resin
bubbles and blobs from the parts. Every single part of this kit had molding
glitches and it almost resulted in the kit not being finished. In fact, had I
not given up on fixing the pin holes and air voids, it would still be in the
box. I can only recommend this to those who must have the subject in their
collection and have the skills and patience to make it look nice.
| REFERENCES |
http://en.wikipedia.org/wiki/SNCASE_Baroudeur
May 2013
If you would like your product reviewed fairly and fairly quickly, please contact the editor or see other details in the Note to Contributors.