Azur/Fromm 1/72 Mystere IVa: India
| KIT #: | FR022 |
| PRICE: | $25.00 from www.westcoasthobbys.com |
| DECALS: | Three options |
| REVIEWER: | Scott Van Aken |
| NOTES: | Short run kit with resin and photo etch parts |
| HISTORY |
 Hispano-Suiza Verdon 350 version of that
engine.
Hispano-Suiza Verdon 350 version of that
engine.India procured 104 of aircraft in 1957 and it was used extensively in the Indo-Pakistani War of 1965. On 16 Sept 65 a Mystere IVA shot down a Pakistani L-19. On 7 September 1965 an Indian Mystere shot down a Pakistani Lockheed F-104 Starfighter in a raid over Sargoda. The Mystere pilot Devayya was later awarded the Maha Vir Chakra posthumously 23 years after the battle. During the campaign Mystère IVs also destroyed Pakistani aircraft on the ground including four F-86F, three F-104 and 2 Lockheed C-130 Hercules transports.
The phasing out of the aircraft as a fighter started soon after the 1965 Indo-Pakistani War; though it saw further action as a ground attack aircraft in the Indo-Pakistani War of 1971. It was completely phased out of the Indian Air Force by 1973.
| THE KIT |
One of the MPM/Special Hobby/Azur family of kits, this is one of three different and I would suspect nearly identical boxings of the Mystere IVa that have recently been released. This one concentrates on the Indian aircraft with the others leaning towards the French and Israeli aircraft. As such, I would expect there to be little that is different aside from decals.
 As this is a multi-media kit, there is a small etched
fret and a small bag of resin bits. The plastic itself is very nicely detailed
and has a sort of rough feel to it, like fine sandpaper. This is not unusual for
short run kits and does not detract from the building or painting of the model.
There are a few parts not used in this kit, the main ones being a separate set
of horizontal stabs without elevators, used on those aircraft with a 'flying
tail'. The Indian version uses the ones with the elevators.
As this is a multi-media kit, there is a small etched
fret and a small bag of resin bits. The plastic itself is very nicely detailed
and has a sort of rough feel to it, like fine sandpaper. This is not unusual for
short run kits and does not detract from the building or painting of the model.
There are a few parts not used in this kit, the main ones being a separate set
of horizontal stabs without elevators, used on those aircraft with a 'flying
tail'. The Indian version uses the ones with the elevators.
The basic kit is relatively simple as these kits go. The cockpit is built up of a floor, side walls and fore and aft bulkheads. Much of the interior is where one uses some of the resin (the bang seat) and a goodly amount of the photo etch (instrument panel, harness, rudder pedals, control knobs). The rest of the photo etch is used for oleo scissors and a radio mast.
Regarding the rest of the resin parts, they are used for the exhaust, wheels, and for a couple of bits on the rear. Specifically a tail bumper that is only used for one option and the braking parachute housing used on the other two. A gun sight and a few other small bits complete the resin. The clear pieces are well done and consist of a landing light as well as a separate windscreen and canopy. The canopy is shown as being built closed as there is no mechanism included in the kit.
 I found it interesting that there are intake ducts
that are included in the kit to be capped by the splitter. Of course, doing this
way really limits where you can put nose weight as, though not shown, I am
pretty sure this one will need some. The nose gear well is incorporated with the
cockpit assembly while the center part of the main well is built up of four
sections and installed prior to closing the fuselage halves. The wings are a
single piece on each side. Gear is well detailed with center doors shown closed
as they
should be.
I found it interesting that there are intake ducts
that are included in the kit to be capped by the splitter. Of course, doing this
way really limits where you can put nose weight as, though not shown, I am
pretty sure this one will need some. The nose gear well is incorporated with the
cockpit assembly while the center part of the main well is built up of four
sections and installed prior to closing the fuselage halves. The wings are a
single piece on each side. Gear is well detailed with center doors shown closed
as they
should be.
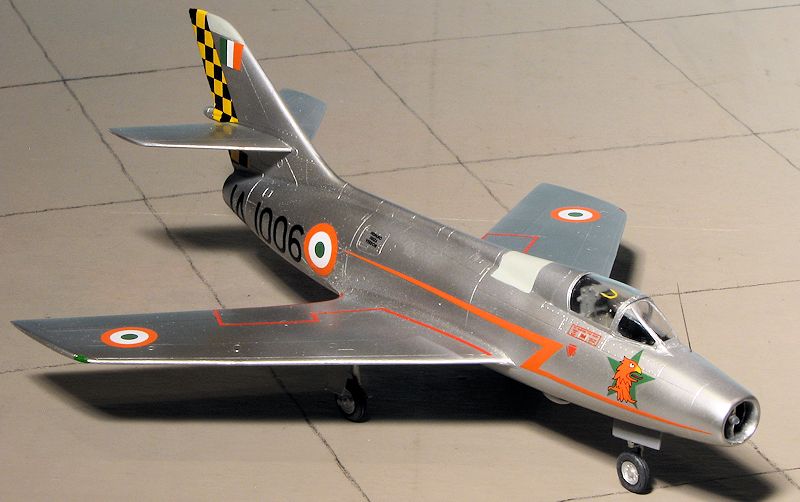
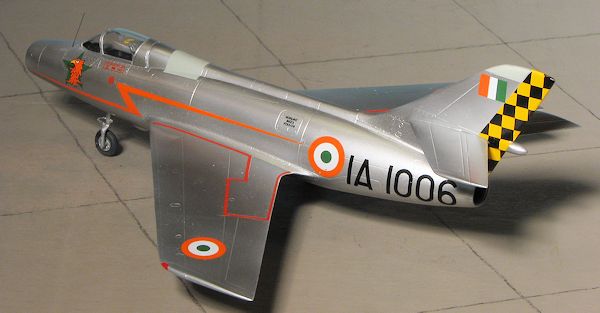
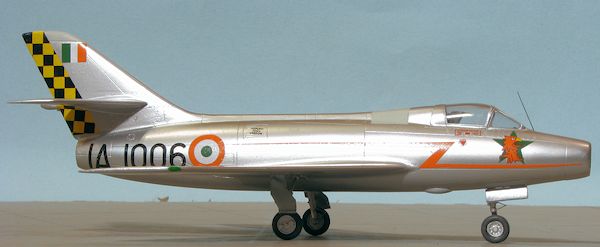
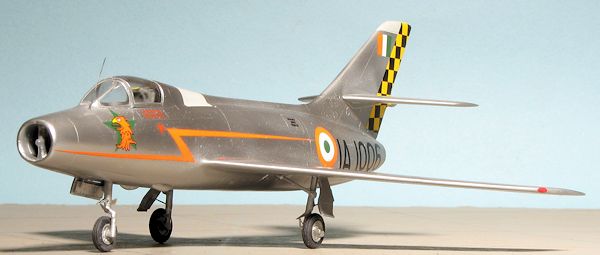
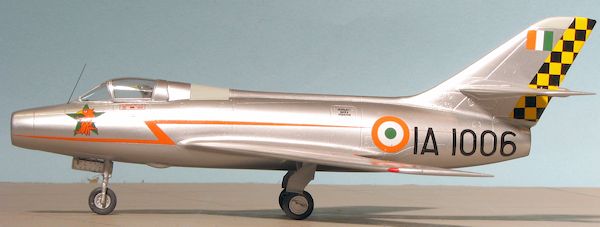
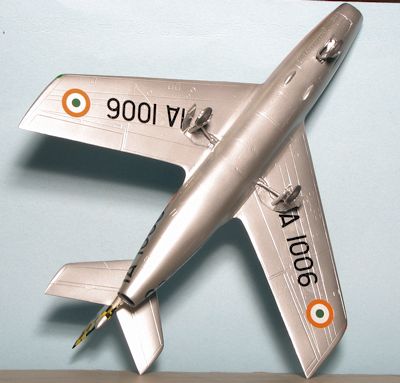
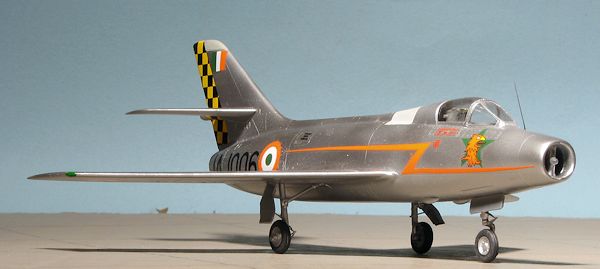
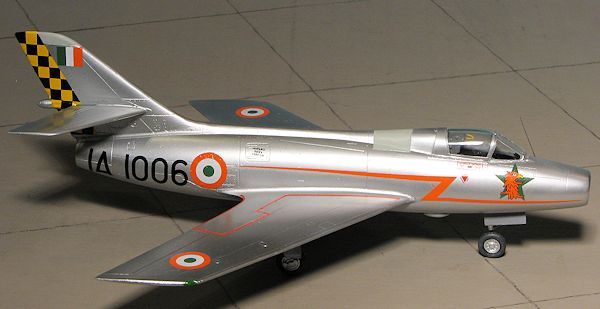
Markings are for three planes. One is the box art plane with 8 Squadron in 1965. The second is the one retained in France for weapons trials so has no unique markings. This plane has no braking chute housing and has the tail bumper. The third has a large tiger's head and was assigned to 1 Squadron in 1965. This unit took part in the 1965 war and was the first Mystere IV unit to attack a PAF airfield. All planes are unpainted metal. The decals are very well printed and are probably quite thin. Those seeking aftermarket will find some, but they are few and far between. Instructions are well done with the usual Gunze paint references.
| CONSTRUCTION |
Having built the Mystere IVa twice before, once in 1/48 and once with the Matchbox kit, I was eager to see how this one would build. First thing one has to realize is that Azur kits are short run kits. Nice short run kits, but short run nonetheless. This means that you have to approach things a bit differently. First is to test fit and test fit again to be sure you will get it all to fit. Second is that there are no alignment pins and often there are ejector towers, albeit small ones, that often need removed to get optimum fit.
For this one, I started with the cockpit and the main
gear well. After cleaning up the bits, I assembled the
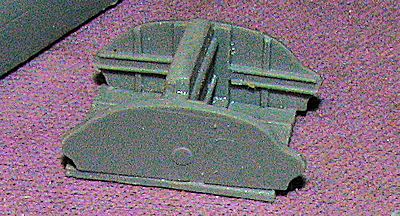 four
pieces that make up the gear well. Even though I used the alignment slots
provided on the kit parts, as you can see, things did not line up well at all.
Eventually, I removed the two bulkhead pieces before the glue fully set and
sanded down the long tabs on the center piece before reassembling the well in
proper alignment. This was then glued into one fuselage half and the other was
taped in place while it dried.
four
pieces that make up the gear well. Even though I used the alignment slots
provided on the kit parts, as you can see, things did not line up well at all.
Eventually, I removed the two bulkhead pieces before the glue fully set and
sanded down the long tabs on the center piece before reassembling the well in
proper alignment. This was then glued into one fuselage half and the other was
taped in place while it dried.
The cockpit tub consists of two sidewalls, a floor and fore and aft bulkhead. The underside of the tub is the nose gear well. First thing I did was to glue one sidewall to the floor. Then the control stick was cemented in place. Next, the various photo etch controls were glued on. Fortunately, Azure gives you plenty of extras as these things tend to go flying off with great regularity when being held with tweezers. I also glued the acetate instrument sheet to the back of the etched panel after painting the panel black. This was attached using clear gloss paint. When dried, it was glued to the injected plastic backing and set aside while the rest of the cockpit was built up.
 Next, the fore and aft bulkheads were then glued on. This
and the other sidewall were then painted matte black using Tamiya XF-1. The
instructions give no color information for the cockpit, but there are photos on
the net that show it basically black, which was very much the norm for European
fighters of the time. Once all the bulkheads were attached, I glued a weight to
the back of the assembly after fitting all the bits on with tape to be sure I
had enough.
Next, the fore and aft bulkheads were then glued on. This
and the other sidewall were then painted matte black using Tamiya XF-1. The
instructions give no color information for the cockpit, but there are photos on
the net that show it basically black, which was very much the norm for European
fighters of the time. Once all the bulkheads were attached, I glued a weight to
the back of the assembly after fitting all the bits on with tape to be sure I
had enough.
The kit comes with separate intakes, which is a nice addition, but leaves one to have to use the back of the cockpit for weight. The two side intakes are made of two pieces which are to be glued together and then glued to the inside of the nose just behind the intake ring. For those who want to remove the seam between the ring and the intake, I would suggest gluing just the outer portion of the intake, taking care of the seam, then gluing on the inner intake section.
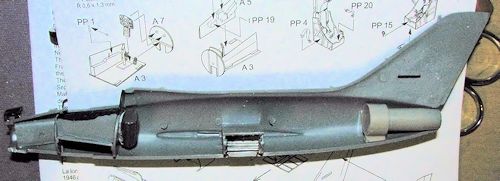 Then I
attached the aft exhaust piece which is resin, after painting the inside black.
I left on the pour stub as it has a nice 'foot' which helps to place the
tailpipe. Then the interior was glued in place after painting the front of the
forward bulkhead black. The fit of the cockpit was quite good for a short run
kit. You can see hwo all the bits fit from the wide angle image shown. I then
carefully drybrushed what little detail was in the cockpit and glued in the
instrument panel assembly before cementing the fuselage halves together. I
should mention that I ground down any ejector stubs before attaching fuselage
parts and even ground down the area around the tailpipe a bit aft it came to
pass that the halves would not close completely in the back without doing so.
Then I
attached the aft exhaust piece which is resin, after painting the inside black.
I left on the pour stub as it has a nice 'foot' which helps to place the
tailpipe. Then the interior was glued in place after painting the front of the
forward bulkhead black. The fit of the cockpit was quite good for a short run
kit. You can see hwo all the bits fit from the wide angle image shown. I then
carefully drybrushed what little detail was in the cockpit and glued in the
instrument panel assembly before cementing the fuselage halves together. I
should mention that I ground down any ejector stubs before attaching fuselage
parts and even ground down the area around the tailpipe a bit aft it came to
pass that the halves would not close completely in the back without doing so.
During this time, I slowly added all the various photo etch bits to the bang seat. The kit comes with a seat adjustment handle on the right side, but if you want the seat to fit, it will need to be left off.
 Back at
the fuselage, I did the usual filling and sanding where needed. The resin
'bullet' fairing was glued in place on the fin and I attached the forward part
of the intake splitter. This is too narrow either because I did not install the
intake trunks properly or because the part is too narrow. I eventually put a dab
of filler on one side as the back plastic is really thin and I scraped the rest
of it to get a smoother transition.
Back at
the fuselage, I did the usual filling and sanding where needed. The resin
'bullet' fairing was glued in place on the fin and I attached the forward part
of the intake splitter. This is too narrow either because I did not install the
intake trunks properly or because the part is too narrow. I eventually put a dab
of filler on one side as the back plastic is really thin and I scraped the rest
of it to get a smoother transition.
Wings and tailplanes were next. Both of them required
some filler to fit well. Note that the Indian Air Force versions did not have
the powered horizontal stabs and used regular elevators (at least according to
the instructions) so be sure to use the correct ones. Since this was going to be
all aluminum, I decided to attach the landing gear at this time. These are
generally butt fit though there are very shallow
 depressions for the main gear
in the wings. Note that Azur drilled the hole for the nose gear landing light on
the wrong side so do not let that confuse you into attaching the nose gear 180
out. You also need to attach the retraction strut on the nose leg before gluing
the leg into the well. The small bar you attached between the intakes is where
the other end of the strut attaches. The main gear retraction struts fit well on
one side but were too short on the other. Matters little as the inner gear doors
were normally closed and you will not see the attachment point anyway.
depressions for the main gear
in the wings. Note that Azur drilled the hole for the nose gear landing light on
the wrong side so do not let that confuse you into attaching the nose gear 180
out. You also need to attach the retraction strut on the nose leg before gluing
the leg into the well. The small bar you attached between the intakes is where
the other end of the strut attaches. The main gear retraction struts fit well on
one side but were too short on the other. Matters little as the inner gear doors
were normally closed and you will not see the attachment point anyway.
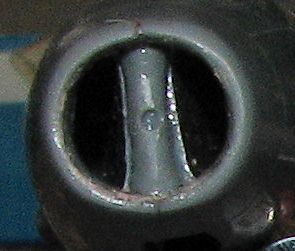
Speaking of which, I managed to get the center bit of
the main gear well a bit off to one side. This will affect the fitting of the
inner gear doors with one being a bit too short to breach the gap. Looking over
a lot of Mystere IVa period photos, only one or two showed the plane with the
inner doors open so I went about fixing things. It turned out that the
retraction struts were the biggest hurdle as they block the ability of the inner
doors to be closed. This will undoubtedly result in many of these models being
done with the doors o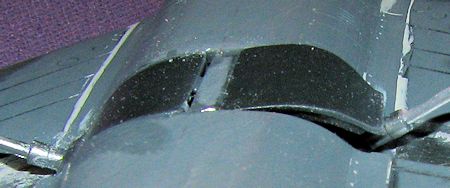 pen. The
easiest way to fix this is to grind a notch in the retraction strut. One just
removes a little each time until the door is able to be relatively flush with
the fuselage. You can see from the photo how much needs to be trimmed to allow
this to happen. Left side is done while the right side has yet to be modified.
Once the doors were in place, the gaps were filled in with superglue, followed
by a coating of standard putty to smooth out the underside.
pen. The
easiest way to fix this is to grind a notch in the retraction strut. One just
removes a little each time until the door is able to be relatively flush with
the fuselage. You can see from the photo how much needs to be trimmed to allow
this to happen. Left side is done while the right side has yet to be modified.
Once the doors were in place, the gaps were filled in with superglue, followed
by a coating of standard putty to smooth out the underside.
With that done, I finished detailing the seat and
installing all the photo etch on it. Then I went to attach the gun sight but
found it had disappeared over the weeks of construction. The clear parts were a
real disaster. Both the windscreen and the canopy were too long and too high to
fit. To make matters worse, the indented area of
 the rear cockpit was only
indented at the bottom of the rear section. At the top it was flush. I knew this
was not correct so had to use my motor tool to grind an indentation. After much
test fitting and sanding of the clear bits, they were glued in place and masked.
the rear cockpit was only
indented at the bottom of the rear section. At the top it was flush. I knew this
was not correct so had to use my motor tool to grind an indentation. After much
test fitting and sanding of the clear bits, they were glued in place and masked.
It was at this time that I discovered I had attached the main gear struts 180 out. Nothing to do but to cut the retraction struts free, cut the gear legs off and install them on the other sides in the proper manner (axles out, not in). Naturally, they did not line up quite as nicely as before, but it was getting to where I was spending way too much time on the kit and was fearing that it might end up on the shelf of doom so I soldiered on.
Figuring now would be as good a time as any, I headed for the paint shop.
| COLORS & MARKINGS |
 f
around them and used some Aircraft Grey that I already had mixed up. This
was later flattened with Vallejo matte clear using a paint brush.
f
around them and used some Aircraft Grey that I already had mixed up. This
was later flattened with Vallejo matte clear using a paint brush. | FINAL CONSTRUCTION |
 Not all
that much left, really, The wheels needed to be drilled out to fit the axles
and in this case a #53 drill bit did the trick. The remaining gear doors
were attached and I found it rather tricky to attach the main gear door
struts, but they did get installed OK. There is also a thin antenna that
fits just forward of the canopy. Though it wouldn't be the right taper, I
think a section of wire would be easier to install. The last item to be put
on was the nose light. This hole needed a #50 drill bit to get to the right
size to accept the piece. I did not bother with the nose strut landing light
(as you may recall, the mounting hole was drilled on the wrong side) as
drilling a hole for that may well have weakened the strut. No weathering of
any kind as I am not good at it and generally like clean subjects.
Not all
that much left, really, The wheels needed to be drilled out to fit the axles
and in this case a #53 drill bit did the trick. The remaining gear doors
were attached and I found it rather tricky to attach the main gear door
struts, but they did get installed OK. There is also a thin antenna that
fits just forward of the canopy. Though it wouldn't be the right taper, I
think a section of wire would be easier to install. The last item to be put
on was the nose light. This hole needed a #50 drill bit to get to the right
size to accept the piece. I did not bother with the nose strut landing light
(as you may recall, the mounting hole was drilled on the wrong side) as
drilling a hole for that may well have weakened the strut. No weathering of
any kind as I am not good at it and generally like clean subjects.
| CONCLUSIONS |
If French fighters of the fifties are something you like, then this is one for you. It is reasonably priced and a lot more detailed than what has come before it (Matchbox). Azur does three boxings so if you want a French or Israeli version, you can have those.
Overall I found it to be a fairly nice kit and if one is not as clumsy as I, will have a much nicer model in the end.
| REFERENCES |
http://en.wikipedia.org/wiki/Mystere_IV
March 2013
Copyright ModelingMadness.com. All rights reserved. No reproduction in part or in whole without express permission from the editor.
If you would like your product reviewed fairly and fairly quickly, please contact the editor or see other details in the Note to Contributors.