| KIT # | 48003 |
| PRICE: | $17.98 MSRP |
| DECALS: | For both aircraft |
| REVIEW: | |
| NOTES: | Limited run, multi-media kit |
| HISTORY |
During WW2, one of the concerns of the USAAF was that of escorting it's bomber fleet to the target and back. While this problem was allayed in Europe by the Mustang, it was in the Pacific theater where the huge distances were a real problem for fighter escort. Not until very late in the war and the taking of Iwo Jima, was it possible to escort the B-29s to their target.
 Post war and the distances to the new enemy,
the Soviet Union, being even greater, the problem was magnified. The superbomber, the B-36, had tremendous range, however, except for the F-82 Twin Mustang,
there was little that was able to effectively escort the huge aircraft.
Post war and the distances to the new enemy,
the Soviet Union, being even greater, the problem was magnified. The superbomber, the B-36, had tremendous range, however, except for the F-82 Twin Mustang,
there was little that was able to effectively escort the huge aircraft.
With the changeover to jet aircraft, the F-82would have been hopelessly outclassed and there was no way the fuel-thirsty jets of the time could have been able to escort the B-36 on any missions. It is in this climate, that the thought of a parasite fighter was tried.
This concept wasn't new, in fact, the Russians themselves had successfully used a TB-2 bomber carrying I-16 fighters on several missions in the Crimea during WW2. However those were bombing missions by theI-16s with the TB-2 carrying them close to their targets and not true escorts, though that is how the whole program was initially conceived.
In the US, the problem was one of having the aircraft small enough to fit into the bomb bay of the B-36. Then, when attacking fighters approached, the escort would be air launched to fend them off and then return to the B-36 for refueling and rearming for another mission.
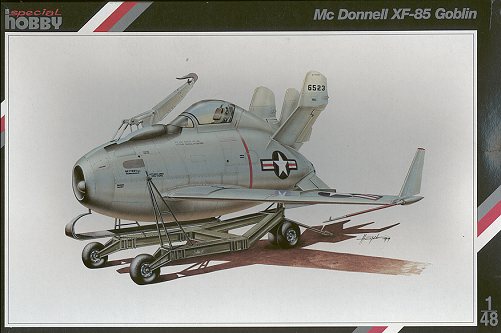
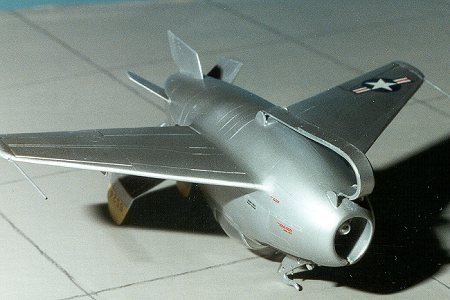
 The result of this concept was the diminutiveXF-85 'Goblin'. The aircraft was basically built around the size of the
engine and had to fit in a B-36 bomb bay. Despite these challenges, two
prototype aircraft were built. The were short, a bit tall, and had folding wings to
fit into the bomb bay. Not having to land, no landing gear were needed. A large
hook was developed for the aircraft to grab a 'trapeze' hung from the mother
ship. This is similar to the successful F9C Sparrowhawk fighters that were used
for the Navy's airships Akron and Macon in the '30s.
The result of this concept was the diminutiveXF-85 'Goblin'. The aircraft was basically built around the size of the
engine and had to fit in a B-36 bomb bay. Despite these challenges, two
prototype aircraft were built. The were short, a bit tall, and had folding wings to
fit into the bomb bay. Not having to land, no landing gear were needed. A large
hook was developed for the aircraft to grab a 'trapeze' hung from the mother
ship. This is similar to the successful F9C Sparrowhawk fighters that were used
for the Navy's airships Akron and Macon in the '30s.
Using a B-29 mothership, the two prototypes underwent flight testing in mid-1948. Despite several successful releases and engagements, as well as some that were potentially fatal, the program was not deemed a success and was terminated in early 1949. Even using the most skilled pilots, the aircraft hookup procedure was quite difficult and it was realized that the average USAF pilot would not have the skills needed.
The two XF-85s flew a total of 2 hours 19minutes. Both are still extant. One at the USAF Museum in Dayton, Ohio and the other at the Strategic Air Command Museum just southwest of Omaha, Nebraska on I-80.
| THE KIT |
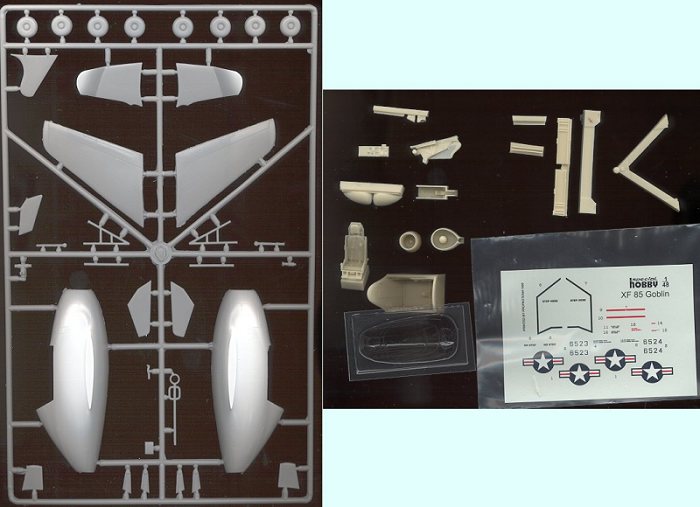
 Special Hobby's XF-85 is typical of what we
have come to expect from Czech short run kits. There is one large sprue of light grey plastic containing the styrene parts of the kit. In a bag are the resin
parts and in another is a decal sheet. The canopy is thick vacuformed plastic.
Special Hobby's XF-85 is typical of what we
have come to expect from Czech short run kits. There is one large sprue of light grey plastic containing the styrene parts of the kit. In a bag are the resin
parts and in another is a decal sheet. The canopy is thick vacuformed plastic.
Molding on the styrene parts is good, though the edges of almost all the parts are quite ragged and will require a swipe with sandpaper before using. There are only four ejector pin marks and they are on the inside of the fuselage halves. Detailing is typically superb, with fine engraved panel lines. You may want to rescribe them a bit deeper before construction as any filling and sanding will undoubtedly make them disappear.
The resin parts are equally well detailed and appear to be totally free of air bubbles. Most of the resin bits are for the interior, the hook well, intake, exhaust, and the main frame of the ground handling trolley. There is also a very well done ejector seat for this aircraft. All parts have some sort of block that needs sanded off, but this is typical of resin parts and should be no problem for most builders.
 The decal sheet is very well done,
includes serials for both aircraft, and spot on in terms of registration. Typically it
is by Propagteam so much care is needed when applying them as they are tissue
thin and will stick like limpets. All the small placards are very well done and
can easily be read. A very clear and properly thick vacuform canopy is also
included. Again, I put forward my plea to add a second canopy for those of us
who invariably screw one up. It cannot be that expensive to produce.
The decal sheet is very well done,
includes serials for both aircraft, and spot on in terms of registration. Typically it
is by Propagteam so much care is needed when applying them as they are tissue
thin and will stick like limpets. All the small placards are very well done and
can easily be read. A very clear and properly thick vacuform canopy is also
included. Again, I put forward my plea to add a second canopy for those of us
who invariably screw one up. It cannot be that expensive to produce.
Instructions are an 8 page affair in black and white. The first page is a small history in four languages. The second a parts breakdown and explanation of the various colors and warnings. The next four pages are a six step construction sequence. After reading, it becomes obvious that there is great deal more scratchbuilding to do with this kit than many others. The pitot tubes, the smaller trolley braces, and all the underfuselageskids must be made by the builder. The size of these items are given (in millimeters) and does not appear to be too difficult, though one does need some plastic card to properly do the skids. The final two pages are for decal placement and painting. Other than serial numbers, the schemes are the same.Both are natural metal with yellow fin tips and black anti-glare panel.
| CONSTRUCTION |
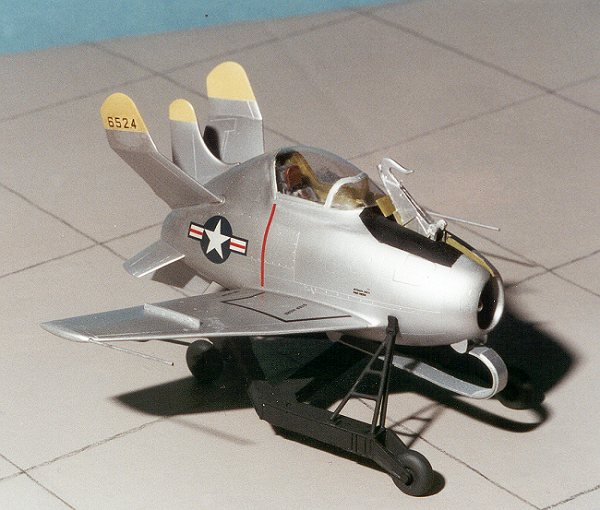
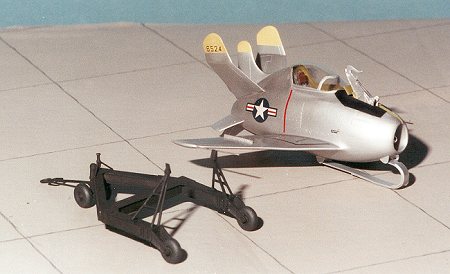
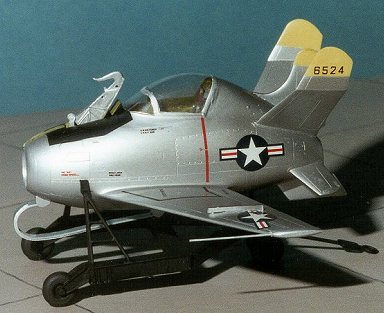
You can build any of the variations that this aircraft went through from what is supplied in the kit. I chose the second prototype that was used in the initial flight phases before both aircraft were taken back to McDonnell and modified with the winglets and the airflow humps around the hook assembly. If you have seen movies of this plane crashing into the skyhook, then you have seen this configuration.
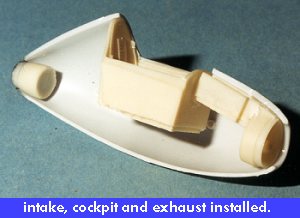
 First step is to see how well some of the bits fit
together. This means removing the fuselage from the sprue, cleaning up the edges
and openings and test fitting the halves. Not too bad at all. Next it was time
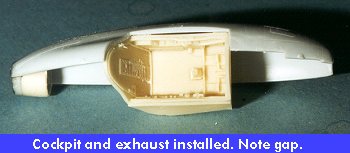
to fit the resin cockpit. After a bit of trimming on the fuselage, and multiple
test fittings with both halves, the cockpit was superglued into place in the
left side. After a similar procedure, the exhaust cone was also glued into the
left side.
First step is to see how well some of the bits fit
together. This means removing the fuselage from the sprue, cleaning up the edges
and openings and test fitting the halves. Not too bad at all. Next it was time
to fit the resin cockpit. After a bit of trimming on the fuselage, and multiple
test fittings with both halves, the cockpit was superglued into place in the
left side. After a similar procedure, the exhaust cone was also glued into the
left side.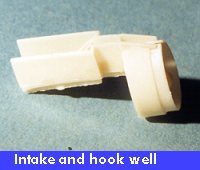
Next the nose intake and hook well were cleaned up and superglued together. Don't forget to remove the little bulkhead on the hook well. After many attempts to get this combo into the nose, I realized that the intake was at a rather large down angle. This wouldn't do. Using superglue remover, I separated the two pieces. Then the nose intake was repeatedly test fit into the nose until it looked pretty good and then it was superglued into place. Naturally, the hook well no longer fit and needed to be trimmed back on the short end until a reasonable fit was attained.
 Despite all my attempts at getting a super fit, this just
wasn't possible and my best efforts will still leave a lot of gaps that need to
be filled. This brings from me a common lament regarding these short run kits.
Doesn't anyone actually build these things prior to putting them on the market? If they did, they would see the horrible fit problems. It is
one thing to have super detailing and nice resin bits, but it is all for naught
if the parts don't fit properly.
Despite all my attempts at getting a super fit, this just
wasn't possible and my best efforts will still leave a lot of gaps that need to
be filled. This brings from me a common lament regarding these short run kits.
Doesn't anyone actually build these things prior to putting them on the market? If they did, they would see the horrible fit problems. It is
one thing to have super detailing and nice resin bits, but it is all for naught
if the parts don't fit properly.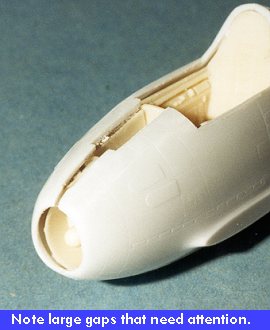
The fuselage gluing was then started at the very front. I knewthis was going to have to be done in stages to get any sort of good fit and theintake was the worst fit.
I then removed the wings from the sprue to start cleaning them
up. WHOA!!! These puppies are not even straight! One is so badly warped that the
root isn't straight. This will be a toughie to repair. Both of them were
subsequently subjected to the hot water treatment in an effort to straighten
them out. Having succeeded at getting them much straighter, they were returned
to the box while 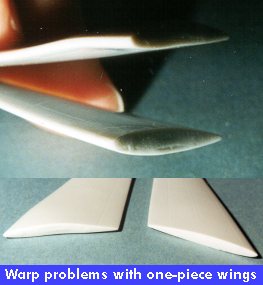 more attention was paid to the fuselage.
Using a combination of regular glue and superglue, the
fuselage was finally cemented together. There were a LOT of gaps in the nose section
and hook well area that were initially filled with superglue. Once that was dry,
the seams were sanded down and the gaps filled with putty. This took several
applications over several days to get it to looking decent. During this
time, the interior was painted US Interior green. The instructions say grey, but
this doesn't sound typical for the era. Photos do show a lighter color than
black for the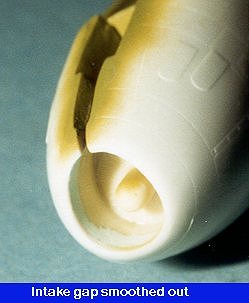 cockpit, but since most aircraft of that generation were in
interior green, that is what I chose to paint it, using Aeromaster AN1049 InteriorGreen Enamel.
cockpit, but since most aircraft of that generation were in
interior green, that is what I chose to paint it, using Aeromaster AN1049 InteriorGreen Enamel.
While all this was going on, I removed the ejection seat from the resin block, sanded the bottom flat and painted it grey using Testor's ModelMaster FS36231. Then the various bits and pieces were painted in accordance withthe kit painting instructions. Meanwhile, it was time to add on some 'protuberances' to this little egg. First on was the single upper fin. While that was drying, a good hour was spent carefully trimming the vacuform canopy so that it would fit properly. Then when the fin was good and dry, some filler was added at the rootto take care of gaps. All the flight surfaces were butt joined and all of them had gaps of varying sized that needed filled and sanded smooth. Each surface was about a day in getting done as I firmly believe in letting each coat of filler dry for a day before sanding.
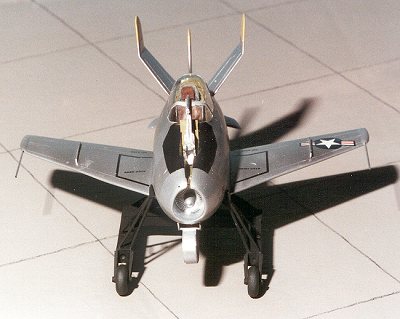
Once the central fin was in place and dry, I had a centerline on which to base the rest of the flight surfaces. The next ones were the wings. If you recall, these had to be straightened out and it looks like I was successful in that operation. Once they were firmly in place, the set of control surfaces outside the central fin were added. The upper fins on these need to be straight up and down when they have finally dried, so keep that in mind while gluing. While waiting for the filler on these to dry, the interior had some of the items in it painted flat black or aluminum. Then it was given a black wash and finally drybrushed with aluminum or light grey. There would have been little wear in these prototype aircraft.
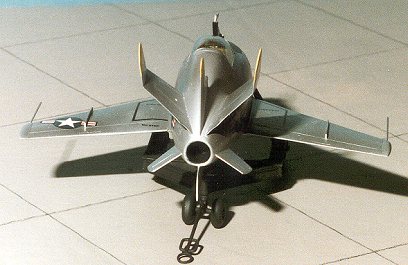
 Over the course of several days, the remaining fins were
glued in place. It looks very busy back there when all are properly installed. It
was at this time that I cut out the vacuform canopy and carefully trimmed it
back until it fit properly. Thankfully, the plastic is nice and thick, making it
a relatively painless, though slow, procedure.
Over the course of several days, the remaining fins were
glued in place. It looks very busy back there when all are properly installed. It
was at this time that I cut out the vacuform canopy and carefully trimmed it
back until it fit properly. Thankfully, the plastic is nice and thick, making it
a relatively painless, though slow, procedure. 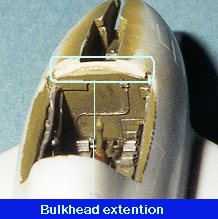
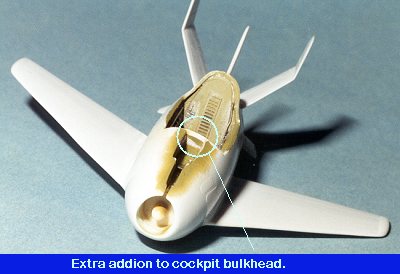
It was then that I noticed that the front bulkhead did not meet the bottom of the canopy. Probably a glitch caused when I installed the cockpit, but something that had to be fixed. Using several layers of Evergreen .030 sprue and a file, the bulkhead was built up to the proper height. Then the area was cleaned up and repainted in preparation for finishing the cockpit.
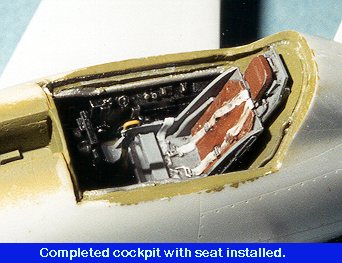 Next
the control column was glued in place. The instrument panel was painted flat
black and the instrument faces in white. Then Reheat instrument decals were cut
and put in the appropriate holes. The references give great instrument panel pics for this step. Once that was done, the panel was glued in place.
Finally the seat was glued in place as was the vacuform canopy, and the cockpit was
done. The canopy needed a bit of filler in a few areas and after that it was
masked. The canopy was painted interior green in preparation for having the
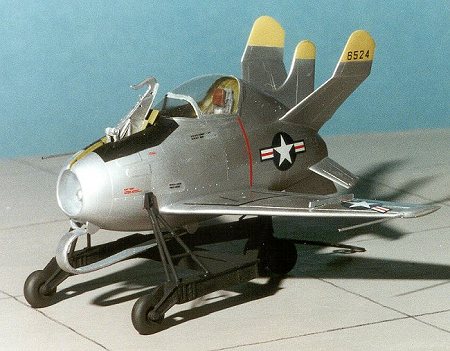
exterior color put on. But first, the landing skid assembly had to be built.
Next
the control column was glued in place. The instrument panel was painted flat
black and the instrument faces in white. Then Reheat instrument decals were cut
and put in the appropriate holes. The references give great instrument panel pics for this step. Once that was done, the panel was glued in place.
Finally the seat was glued in place as was the vacuform canopy, and the cockpit was
done. The canopy needed a bit of filler in a few areas and after that it was
masked. The canopy was painted interior green in preparation for having the
exterior color put on. But first, the landing skid assembly had to be built.
It was at this time where I generally was not ready to start any scratchbuilding. This kit had been a bit tough so I set it aside 'for a few days' to work on something else. Well, that few days turned into a few weeks. It was when I had begun doing a similar scratchbuilding job with another Special Hobby kit that I decided to do the skid on this one.
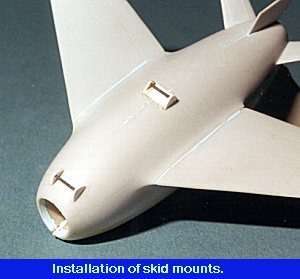 First thing I did was to get a nice ruler that had
millimeters on it. The skid is supported by two fixtures; one just under the nose and
the other about the center of gravity. Each of these consists of two semi-circular
plates with a rod between them. The aft fixture also has an additional
reinforcement plate. These bits were cut out of .030 sheet styrene and shaped as
needed. The rod was made from stretched sprue. It isn't very thick, so you need
to be aware of that. Actually, the whole deal with the fixtures took about 40minutes.
First thing I did was to get a nice ruler that had
millimeters on it. The skid is supported by two fixtures; one just under the nose and
the other about the center of gravity. Each of these consists of two semi-circular
plates with a rod between them. The aft fixture also has an additional
reinforcement plate. These bits were cut out of .030 sheet styrene and shaped as
needed. The rod was made from stretched sprue. It isn't very thick, so you need
to be aware of that. Actually, the whole deal with the fixtures took about 40minutes.
Then it was on to the skid itself. This is made from two strips,one 4mm and the other 5mm wide. The 5mm one is the longest of the two and needs to have a huge curve in it. Easier said than done. I tried the boiling water thing, but was unable to get a permanent curve as the plastic is so thin that it either dissipates the heat too fast, or deforms into a useless lump. What I ended up doing was rolling it around an Xacto knife handle a LOT of times until the plastic was more pliable. Then the very front part was glued to the forward fixture. The instructions are not clear just how this fits; either under, over,or right on the support rod. I fit it to the outside and glued it in place. Onceit had fully dried, the aft bit was glued in place. This gave a convincing curveto it.
Then the small resin wing fences were attached and it was on to the paint shop.
| PAINT & DECALS |
 All of my metallic paint schemes get an overspray of gloss
white or light grey. This does two things. First, it fills in those tiny
scratches that inevitably show up. Secondly, it makes all the surface a constant
smoothness, something that metallic paint schemes need. First step was to paint
the tail tips a very light yellow color. Period color photos of the aircraft
show these fiberglass panels to be this shade. Later, when they were put in
museums, a more striking red was painted on those pieces, but it never flew with
the tail tips in red. Those were masked and the entire airframe sprayed with Floquil Old Silver over the course of two days. This paint is great, and
while dry enough to gently handle in a few hours, takes 5-9 days to fully cure!
Once cured several panels were masked off and painted in Testors Aluminum Metallizer to give it a bit of character. Last item to be painted was the anti-glare
panel. The area around it was masked off and it was painted black. I know you have
seen kits with this in OD, but according to the color photos in the references,
this was black.
All of my metallic paint schemes get an overspray of gloss
white or light grey. This does two things. First, it fills in those tiny
scratches that inevitably show up. Secondly, it makes all the surface a constant
smoothness, something that metallic paint schemes need. First step was to paint
the tail tips a very light yellow color. Period color photos of the aircraft
show these fiberglass panels to be this shade. Later, when they were put in
museums, a more striking red was painted on those pieces, but it never flew with
the tail tips in red. Those were masked and the entire airframe sprayed with Floquil Old Silver over the course of two days. This paint is great, and
while dry enough to gently handle in a few hours, takes 5-9 days to fully cure!
Once cured several panels were masked off and painted in Testors Aluminum Metallizer to give it a bit of character. Last item to be painted was the anti-glare
panel. The area around it was masked off and it was painted black. I know you have
seen kits with this in OD, but according to the color photos in the references,
this was black.
 Decals were next and being Propagteam, they were very thin
and in registration. I applied them with little difficulty using saliva as a
wetting agent. Then I put a drop of Champ on each to ensure they snuggled down.
Big mistake. The Champ ate away a bit at the Floquil paint underneath it. No
amount of coverup will fix it barring a repaint. Then I'd need to find another sheet
of decals. So I oversprayed the entire kit with a bit of thinned Tamiya Smoke
which helped a bit and made it look less shiny. Live and learn!
Decals were next and being Propagteam, they were very thin
and in registration. I applied them with little difficulty using saliva as a
wetting agent. Then I put a drop of Champ on each to ensure they snuggled down.
Big mistake. The Champ ate away a bit at the Floquil paint underneath it. No
amount of coverup will fix it barring a repaint. Then I'd need to find another sheet
of decals. So I oversprayed the entire kit with a bit of thinned Tamiya Smoke
which helped a bit and made it look less shiny. Live and learn!
Final assembly consisted of drilling holes in the wing tips for the tip mounted pitot tubes and installing the hook assembly. The hook firmly fits into a recess in the nose piece. After it is firmly in place, the two actuating arms are glued on using superglue. These pieces need to be trimmed shorter to fit. Finally the aft nose cover was glued in place after proper painting.
| THE TRAILER |
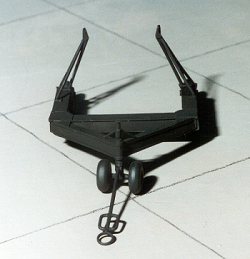 The
parts were cut from their resin blocks. These are 'I' beams, but frankly, I found
it impossible to remove the resin blocks without damaging the bottom of the
beams so there are no lips on the bottom of the trolley beams. After gluing on
the front yoke to the cross-beam, I then started attaching the two smaller aft
beams. These did not fit well so they and the cross-beam had small holes drilledin them and pins made from paper clip sections installed to facilitate fit.
The
parts were cut from their resin blocks. These are 'I' beams, but frankly, I found
it impossible to remove the resin blocks without damaging the bottom of the
beams so there are no lips on the bottom of the trolley beams. After gluing on
the front yoke to the cross-beam, I then started attaching the two smaller aft
beams. These did not fit well so they and the cross-beam had small holes drilledin them and pins made from paper clip sections installed to facilitate fit.
| CONCLUSIONS |
 Frankly it wasn't the easiest kit I have ever built.
It challenged most of my modeling skills and I still didn't get the canopy
properly faired in as I would have liked. However, now that it is done, I am very
glad that I built it. The really nice thing about this kit is that you can build theaircraft in any of its various forms.
Frankly it wasn't the easiest kit I have ever built.
It challenged most of my modeling skills and I still didn't get the canopy
properly faired in as I would have liked. However, now that it is done, I am very
glad that I built it. The really nice thing about this kit is that you can build theaircraft in any of its various forms.
I recommend this kit with reservations. One needs to have some of the more advanced building skills under one's belt before tackling a kit of this type. The benefit of a successful build is that you will be ready to handle the greater challenges that lie ahead!
| REFERENCES |
Airpower magazine, January 1985
Air Enthusiast #52, Winter 1993
Wings of Fame, Vol 7
Copyright ModelingMadness.com. All rights reserved. No reproduction in part or in whole without express permission.