|
Sheet: |
FCM 48-18 Fokker D.VII |
| Units: | See review |
|
Price |
$ |
|
Reviewer: |
This is the first of the new FCM decals that I've reviewed so this review will be a bit more than just what's on the sheet. FCM have come up with a most interesting way of applying decals. In some ways, it is reminiscent of a dry transfer, but without the rubbing. When one first sees the decals, the thought is that "gee, the clear coat on these is very thick". Well, that is not the case. You see, what you do to these is to wet the decal as you normally do (don't trim them), then once in place, press down on the decal to remove any air bubbles. No setting solution aside from Microset (the weak one) should be used as even Microsol (in the red bottle) will cause problems. Once the decal is in place, the instructions state waiting for a full 24 hours for the decal to dry. Then pull up on the clear cover, gently remove any glue and there you have it.
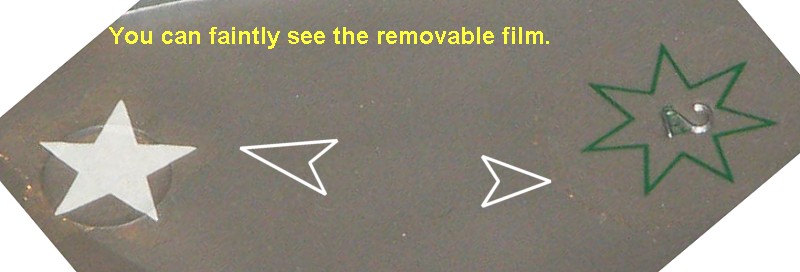
FCM gives you several 'test' decals so that you can get things down before moving on to applying these to your model. I decided to give them a try on three different surfaces. One was a drop tank with multiple curves in it. The other was the inside of the fin of the Monogram B-29. In there is a raised surface with the part number and a depressed surface where there was an ejector pin mark. I followed the instructions by applying the decal, pressing it down to remove air bubbles, waiting 24 hours and then gently prying off the outer cover. The results are mixed. The one on the drop tank didn't stick well to the compound curves and I pulled a little bit of it up with the clear covering. I tried to 'fix' it by applying Microsol (even though the instructions said not to) and that just made the decal wrinkle. I tossed it before photographing it.
 The
other two I did manage to photograph
The
other two I did manage to photograph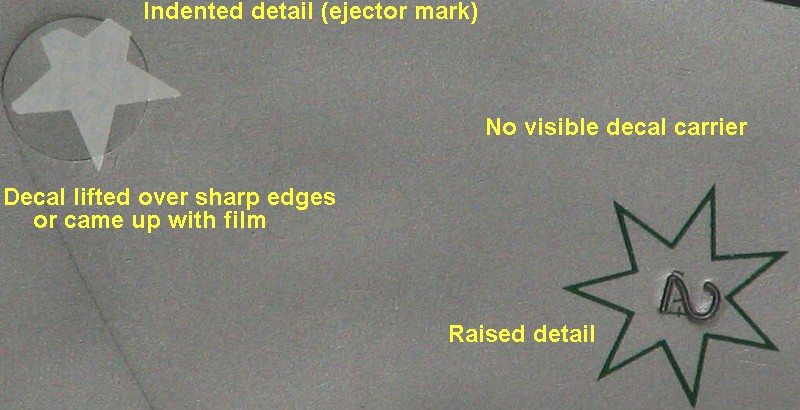 .
As you can see, the white star went into the ejector pin depression. By
pressing down on it, I undoubtedly cut the decal on the edges and when I
pulled up the clear part, it took with it some of the points. This was not
a problem with the green decal. It seemed to hug the raised detail
with no problems. Even better, once the clear film was removed and the
excess glue washed off, you could not see any decal carrier at all. It was
like a dry transfer. It is obvious that one has to take some care with
these decals, but it is also obvious that you get a superior marking when
everything goes well with it. It will be most interesting to see how it all
works out when I get to using these on a model with all its lumps, bumps
and depressions.
.
As you can see, the white star went into the ejector pin depression. By
pressing down on it, I undoubtedly cut the decal on the edges and when I
pulled up the clear part, it took with it some of the points. This was not
a problem with the green decal. It seemed to hug the raised detail
with no problems. Even better, once the clear film was removed and the
excess glue washed off, you could not see any decal carrier at all. It was
like a dry transfer. It is obvious that one has to take some care with
these decals, but it is also obvious that you get a superior marking when
everything goes well with it. It will be most interesting to see how it all
works out when I get to using these on a model with all its lumps, bumps
and depressions.
 Back to
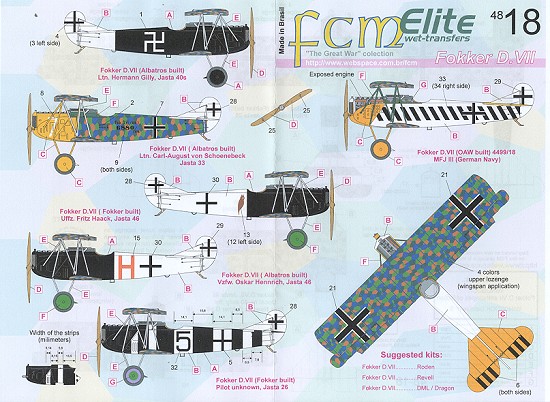
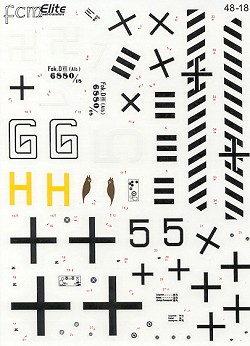
the sheet in question. This one is for six very colorful Fokker D.VIIs, at
least it is if you like black and white. All these markings have lozenge
covered wings unless noted. Lozenge decals are not included with the FCM
sheet.
Back to
the sheet in question. This one is for six very colorful Fokker D.VIIs, at
least it is if you like black and white. All these markings have lozenge
covered wings unless noted. Lozenge decals are not included with the FCM
sheet.
First up is Herman Gilly's Jasta 40 machine with a black fuselage and a white tail section. It has a large swastika on the fuselage.
Next is Carl-August von Schoenbeck's Jasta 33 D.VII. It has a white fin and horizontal stab with the metal nose panels and wheels in yellow.
Two very similar Jasta 46 aircraft are next with the upper plane flown by Fritz Haack and carrying a figure on the fuselage. The other is Oskar Hennrich's plane with a big yellow H on the fuselage.
In black and white bands is a Jasta 26 aircraft whose pilot is unknown.
Finally in a white fuselage with yellow horizontal empennage and forward fuselage and wheels, is an MFJ III aircraft. The black stripe decals are part of the decal sheet and should make for a most unusual looking aircraft.
The kit's instructions are first rate in terms of decal placement and other bits and pieces. Kits for this can be found by Revell-Monogram, Dragon/DML, or the newer Roden kit. FCM and others offer lozenge decals for this and other German WWI aircraft.
Thanks to FCM for providing the review decals.
If you would like your product reviewed fairly and quickly by a site that has nearly 300,000 visits a month, please contact me or see other details in the Note to Contributors.