
| KIT #: | 721000 |
| PRICE: | 30 Euros |
| DECALS: | One option |
| REVIEWER: | Scott Van Aken |
| NOTES: | Resin kit with vacuform canopy |
| HISTORY |
AThe original airplane was built to the design of Keith Rider as the R-3
during 1933 and 1934. In 1936 is was purchased by Hal Marcoux, who was
employed at Douglas Aircraft. He and Jack Bromberg, also from Douglas,
carried out major modifications. In 1936, with pilot Earl Ortman, the plane
qualified for the Thompson Trophy Race at 258.9 mph, with one
 lap at 278 mph,
and took second place in the race at an average speed of 248 mph. It also
took second place at the Thompson race in 1937, and 1938, and third in 1939.
In 1936 it won the Golden Gate Trophy and in 1937 took second in the Bendix
Transcontinental, making it one of the most consistently successful air
racers of the 1930s. It was powered successively by Pratt & Whitney Wasp
Jr., Wasp and finally a Twin Wasp Jr. Special. The aircraft was also
featured in the Clark Gable movie, "Test Pilot." Fans of 1930s racers will
be pleased to know that the aircraft is still extant and is an exhibit at
the New England Air Museum.
lap at 278 mph,
and took second place in the race at an average speed of 248 mph. It also
took second place at the Thompson race in 1937, and 1938, and third in 1939.
In 1936 it won the Golden Gate Trophy and in 1937 took second in the Bendix
Transcontinental, making it one of the most consistently successful air
racers of the 1930s. It was powered successively by Pratt & Whitney Wasp
Jr., Wasp and finally a Twin Wasp Jr. Special. The aircraft was also
featured in the Clark Gable movie, "Test Pilot." Fans of 1930s racers will
be pleased to know that the aircraft is still extant and is an exhibit at
the New England Air Museum.
| THE KIT |
Molded in a fetching blue resin, the kit is superbly packaged in a compartmentalized poly-bag as you see. Only the prop blades were separate and in the box. The box itself is rather neat being like an old fashioned matchbox where the parts tray slides into a cover. The resin itself is superbly done. I saw no air bubbles or voids in any of the parts, just a bit of roughness around the edges that will be easily cleaned up.
 The fuselage has framework detail on the inside and
the interior provides the basics; seat, instrument panel, control stick and
rudder pedals. The wing is a single piece and fits under the fuselage. Rudder
and tail planes are butt join pieces. There is a separate exhaust collector that
fits on the rear of the nicely done engine. Over this fits a one-piece cowling
with long carb and oil cooler intakes. I noticed that the upper intake is offset
to the left. Landing gear are basic and well done with the very fine retraction
struts molded into a resin pour block. A tail skid is provided for the rear. The
prop has a hub and separate blades that slot into holes in the hub. That pretty
well cover it. It is a racing plane so is understandably a bare bones aircraft.
Two vacuformed canopies are included.
The fuselage has framework detail on the inside and
the interior provides the basics; seat, instrument panel, control stick and
rudder pedals. The wing is a single piece and fits under the fuselage. Rudder
and tail planes are butt join pieces. There is a separate exhaust collector that
fits on the rear of the nicely done engine. Over this fits a one-piece cowling
with long carb and oil cooler intakes. I noticed that the upper intake is offset
to the left. Landing gear are basic and well done with the very fine retraction
struts molded into a resin pour block. A tail skid is provided for the rear. The
prop has a hub and separate blades that slot into holes in the hub. That pretty
well cover it. It is a racing plane so is understandably a bare bones aircraft.
Two vacuformed canopies are included.
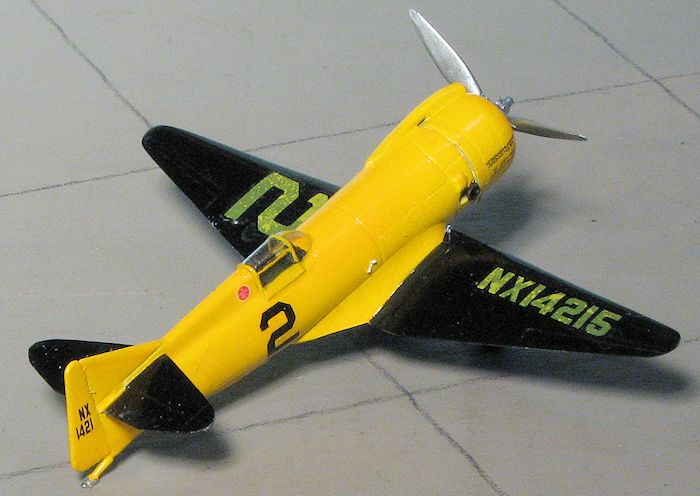
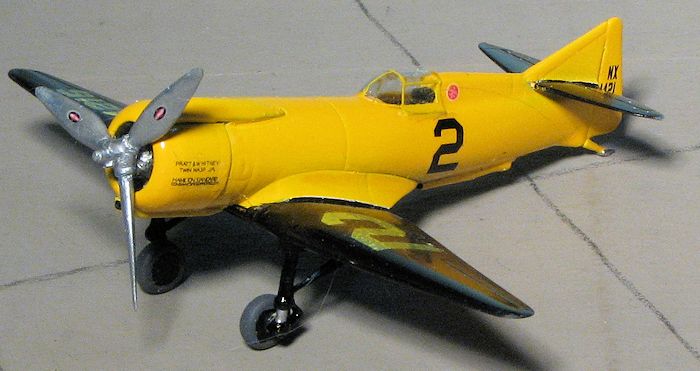
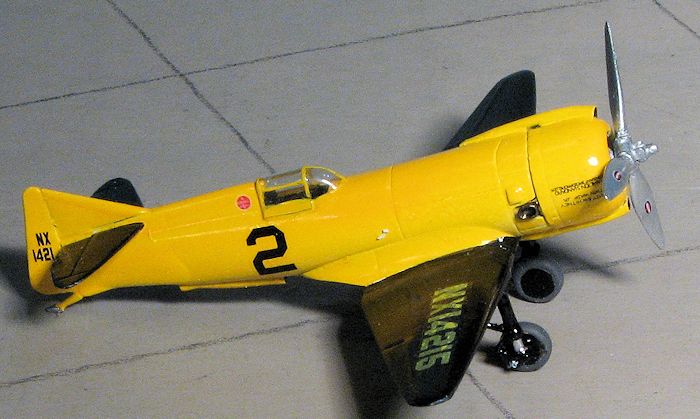
The instructions are well done with five well drawn construction steps that include color information. The aircraft itself is what I'd call Canary Yellow with black wings and horizontal stabilizers. There is a small decal sheet that includes all of the registration and racing numbers applied to the plane.
| CONSTRUCTION |
First step was to remove most of the parts from their pour stubs and clean them up. For the fuselage, this meant sanding the mating surfaces until they fit well with minimal gaps. I found the exhaust collector to be quite difficult to clean, thanks to all the small pipes. Speaking of small, this is not at all a big model, with a wingspan of only slightly over four inches.
 The interior was first painted chromate green IAW the
instructions. I also painted the instrument panel, control stick and seat in
matte black, painting the seat belts in buff. The rudder pedals broke when
removing them from the pour stub and painted aluminum. When dry, these
components were carefully installed. The kit has no flat cockpit floor so
fitting in the seat and stick were a bit of a trial though I had no issues with
the rudder pedals, despite the connecting rod between them being broken.
However, not much will be seen through the small opening so no need to do a lot
of detail work unless you want to.
The interior was first painted chromate green IAW the
instructions. I also painted the instrument panel, control stick and seat in
matte black, painting the seat belts in buff. The rudder pedals broke when
removing them from the pour stub and painted aluminum. When dry, these
components were carefully installed. The kit has no flat cockpit floor so
fitting in the seat and stick were a bit of a trial though I had no issues with
the rudder pedals, despite the connecting rod between them being broken.
However, not much will be seen through the small opening so no need to do a lot
of detail work unless you want to.
The fuselage halves were then closed and super glue was used to fill the seams. Meanwhile, I test fit the engine into the cowling. The engine is too large so I had to sand down the rocker covers. Not a major issue as again, it will not be that easily seen. With the fuselage done, the wing was glued in place, followed by the rudder and horizontal stabs. I then attached the exhaust collector. Again, it was too big for the cowling to fit well so was sanded down until the cowling fit. I then installed the engine and glued the cowling to the front of the airframe. The upper and lower scoops needed some adjustment to get to fit into the recesses provided as did the one on the bottom of the airframe.
| COLORS & MARKINGS |
 Almost ready to paint. First step was to mask the
cockpit and engine. I then painted it all with Tamiya primer. When dry, I
sprayed the wings and tailplanes in Tamiya black. Allowing a couple of days to
be cured, the black bits were masked and the rest of the airframe re-primed.
Then it was painted chrome yellow. I had a few issues with coverage on this one,
but was able to fix most of the areas of interest with some brush painting
later.
Almost ready to paint. First step was to mask the
cockpit and engine. I then painted it all with Tamiya primer. When dry, I
sprayed the wings and tailplanes in Tamiya black. Allowing a couple of days to
be cured, the black bits were masked and the rest of the airframe re-primed.
Then it was painted chrome yellow. I had a few issues with coverage on this one,
but was able to fix most of the areas of interest with some brush painting
later.
| FINAL BITS |
With the airframe dry, I proceeded to assemble the
prop. The individual blades fit into the hub sockets without any drama, though I
did have to be quite careful when sanding the stubs off the tips of the props.
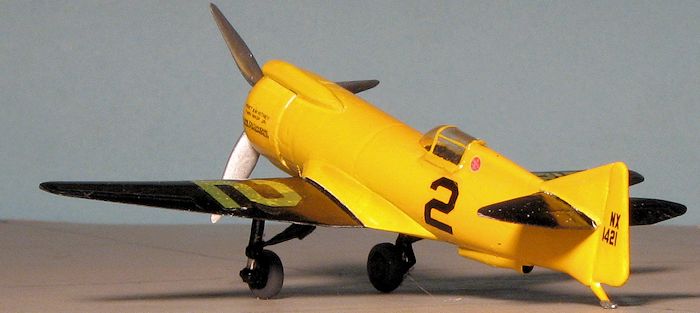 This was later painted silver. Cutting out the canopy section was something that
took a lot of care and as usual, I did not get it just right, but with some help
from clear paint, got it installed. Masking this would have been impossible for
me so I used a fine brush to try to get the framework done.
This was later painted silver. Cutting out the canopy section was something that
took a lot of care and as usual, I did not get it just right, but with some help
from clear paint, got it installed. Masking this would have been impossible for
me so I used a fine brush to try to get the framework done.
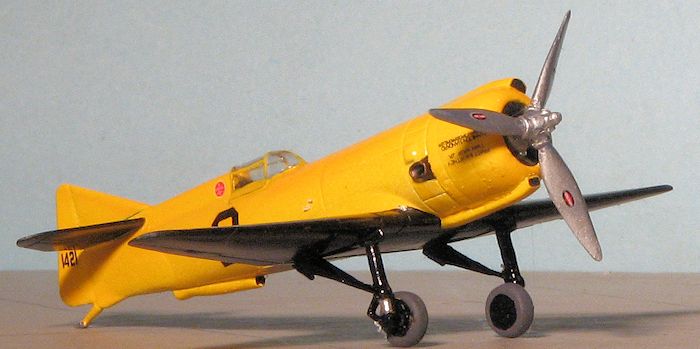
On the underside, the tail skid was installed as were the main landing gear. I found the gear to be too wide for the openings into which they are to fit so trimmed them down a bit. I also found it to be impossible (for me) to remove the excess resin from the inside of the retraction struts, breaking each one several times in the attempt. I ended up simply leaving them as they were. Since the gear is black, it is hoped it won't be too noticeable. These would be great item to do in photo etch. I guess I could have replaced them with plastic rod, but I wanted to build the kit with what came in the box and nothing else.
 With most of the parts installed, I went for the
decals. The decals are nicely printed but the yellow is not opaque enough,
nearly disappearing against the black paint and looking splotchy as they did not
fully attach to the paint, despite being put over gloss paint and several
applications of Solvaset. I would recommend double printing
the yellow or at least applying a white background to the markings. Most kit
decals do that with no problem and these should be as vibrant as the rest of the
airframe. No problem with the rest of them as they are going on a light
background.
With most of the parts installed, I went for the
decals. The decals are nicely printed but the yellow is not opaque enough,
nearly disappearing against the black paint and looking splotchy as they did not
fully attach to the paint, despite being put over gloss paint and several
applications of Solvaset. I would recommend double printing
the yellow or at least applying a white background to the markings. Most kit
decals do that with no problem and these should be as vibrant as the rest of the
airframe. No problem with the rest of them as they are going on a light
background.
The final steps were to glue on the wheels, do a bit of touchup painting and install the prop.
| CONCLUSIONS |
 I have a
fondness for 1930s racing planes and this is a good one. The kit is well thought
out and worth the effort of building. Were I to make suggestions (and I am), I'd
suggest more opaque decals and having some of the really fine stuff (like the
gear retraction struts) done in photo etch. Despite these areas, it is a nice
kit and turns into a very nice model when done.
I have a
fondness for 1930s racing planes and this is a good one. The kit is well thought
out and worth the effort of building. Were I to make suggestions (and I am), I'd
suggest more opaque decals and having some of the really fine stuff (like the
gear retraction struts) done in photo etch. Despite these areas, it is a nice
kit and turns into a very nice model when done.
February 2014
Thanks to
Dekno Models
for the review kit. You can buy yours direct by visiting the link.
If you would like your product reviewed fairly and fairly
quickly, please
contact
the editor
or see other details in the
Note to
Contributors.