CMR 1/144 JRM-3 'Mars' Fire Bomber
| KIT #: | CMM 12 |
| PRICE: | $90.00 from www.westcoasthobbys.com |
| DECALS: | Three options |
| REVIEWER: | Scott Van Aken |
| NOTES: | Resin kit with beaching gear |
| HISTORY |
The Martin Company effectively scaled up their successful PBM Mariner patrol bomber design to produce the prototype XPB2M-1 Mars. After flight tests with the XPB2M between 1941 and 1943, she was passed on to the Navy. The original patrol bomber concept was considered obsolete by this time, and the Mars was converted into a transport aircraft designated the XPB2M-1R. The Navy was satisfied with the performance, and ordered 20 of the modified JRM-1 Mars. The first, named Hawaii Mars, was delivered in June 1945, but the with the end of World War II the Navy scaled back their order to just 5 more boats. Though the original Hawaii Mars was lost in an accident on Chesapeake Bay, the other 5 Mars were built with the last delivered in 1947.
 Named the
Marianas Mars,
Philippine Mars,
Marshall Mars,
Caroline Mars, and a second
Hawaii Mars, the 5
production Mars aircraft entered service ferrying cargo to Hawaii and the
Pacific Islands. The last production airplane (the Caroline Mars) was designated
JRM-2, powered by 3,000 HP Pratt & Whitney R-4360 engines, and featured a higher
maximum weight and other improvements. On April 5, 1950, the
Marshall Mars was lost near
Hawaii when an engine fire consumed the airplane after her crew had evacuated.
The remaining "Big Four" flew record amounts of cargo on the San
Francisco-Honolulu route efficiently until 1956, when they were parked at NAS
Alameda.
Named the
Marianas Mars,
Philippine Mars,
Marshall Mars,
Caroline Mars, and a second
Hawaii Mars, the 5
production Mars aircraft entered service ferrying cargo to Hawaii and the
Pacific Islands. The last production airplane (the Caroline Mars) was designated
JRM-2, powered by 3,000 HP Pratt & Whitney R-4360 engines, and featured a higher
maximum weight and other improvements. On April 5, 1950, the
Marshall Mars was lost near
Hawaii when an engine fire consumed the airplane after her crew had evacuated.
The remaining "Big Four" flew record amounts of cargo on the San
Francisco-Honolulu route efficiently until 1956, when they were parked at NAS
Alameda.
In 1959, the remaining Mars were sold for scrap. Dan McIvor, who represented a consortium of British Columbia lumber companies, recognized their potential value as water bombers and had them converted. A company called Flying Tankers Inc. was formed, and purchased the "Big Four" for aerial firefighting. The Marianas Mars crashed near Northwest Bay, British Columbia on June 23, 1961 during firefighting operations; all four crewmembers were lost. Just over a year later, on October 12, 1962, the Caroline Mars was destroyed by Typhoon Freda while parked onshore. The remaining Hawaii Mars and Philippine Mars had their conversions to water bombers accelerated and entered service in 1963.
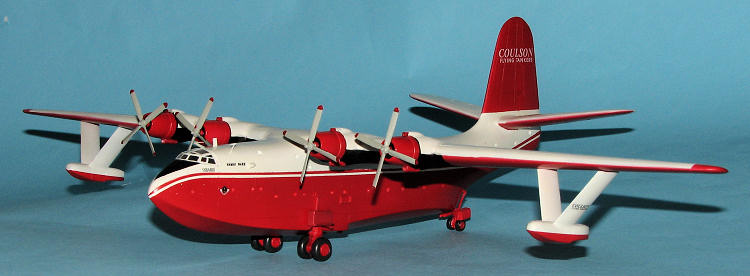
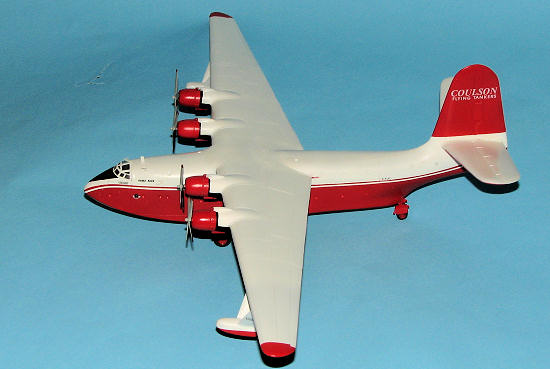
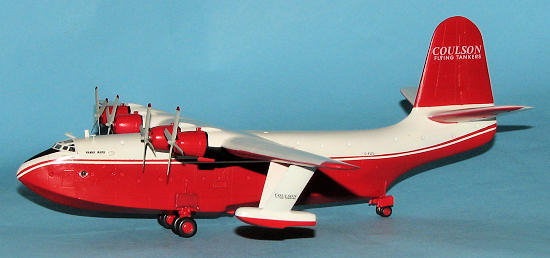
 The two surviving tankers are now operated by the
Coulson Group, based at Sproat Lake near Port Alberni, British Columbia. When
converted, the original powerplants were replaced with four Wright R-3350-24WA
Cyclone engines of 2500 hp (1860 kW) each. The aircraft can carry up to 7,200 US
gal (27,250 litres) of water, enough to cover an area of 4 acres (16,000 m²).
They are used to fight fires along the coast of British Columbia, and even
sometimes in the interior. They also make appearances at local airshows,
demonstrating their water-dropping ability. Flying Tankers Inc. also flies the
water bombers to other hotspots around the world if a need develops, such as in
August of 2003 when a large forest fire threatened the city of Kelowna, British
Columbia.
The two surviving tankers are now operated by the
Coulson Group, based at Sproat Lake near Port Alberni, British Columbia. When
converted, the original powerplants were replaced with four Wright R-3350-24WA
Cyclone engines of 2500 hp (1860 kW) each. The aircraft can carry up to 7,200 US
gal (27,250 litres) of water, enough to cover an area of 4 acres (16,000 m²).
They are used to fight fires along the coast of British Columbia, and even
sometimes in the interior. They also make appearances at local airshows,
demonstrating their water-dropping ability. Flying Tankers Inc. also flies the
water bombers to other hotspots around the world if a need develops, such as in
August of 2003 when a large forest fire threatened the city of Kelowna, British
Columbia.
On November 10, 2006, TimberWest Forest Ltd. announced that they were looking for buyers of the Mars. A condition of this sale is that the purchasers will donate one back to Port Alberni when they are retired as a historical attraction. The Maryland Aviation Museum and British Columbia Aviation Council have initiated a joint effort to preserve the aircraft, one in Maryland and the other at their current location in Canada. On April 13, 2007, TimberWest has announced the sale of both Martin Mars aircraft to Coulson Forest Products, a local forestry company in Port Alberni. The Mars will remain in the Alberni Valley operating from their base at Sproat Lake. On October 25, 2007, Hawaii Mars ("Redtail") arrived at Lake Elsinore in Southern California, negotiated through a private contract, to assist with the firefighting efforts containing the California wildfires of October 2007.
| THE KIT |
The
only way any of us would see this big fire bomber would be in 1/144 scale. Even
in this smaller size, it will be a somewhat large model. The molding is first
rate, as you'd expect from CMR. Detailing is excellent and the kit comes with a
nice cockpit and seats, which should be quite visible through the clear cockpit
canopy piece. Like most resin kits, it is not perfect as I found a couple of
pieces, notably one side of the fin and one side of one wing with a lot of tiny
pinholes. Most resin molding processes
 cannot eliminate these entirely, so they
are to be expected. Often times little more than a thick coat of primer is
needed to fill these. I also noticed that there will be a gap between the
forward or aft section of the wing center section and the fuselage. Some plastic
card will take care of that.
cannot eliminate these entirely, so they
are to be expected. Often times little more than a thick coat of primer is
needed to fill these. I also noticed that there will be a gap between the
forward or aft section of the wing center section and the fuselage. Some plastic
card will take care of that.
The kit will not be one of these fussy builds that many resin kit builders dread. There is no photoetch, for instance. The addition of this feature easily doubles the build time for me, so I'm please that there isn't any. Each flight surface is a single casting, making construction even more simple. None of these pieces showed any sign of warpage. There are four single casting engine cowlings that once cleaned up, will simply glue right on the nacelles. No engine detail, but in this scale it is hardly needed.
The propellers and the beaching wheels/gear are short run injected plastic. They are very nicely molded and one would think they were resin if one didn't know. Like some resin parts, they are going to need to be cut from pour stubs and have the flash removed. As mentioned, the cockpit canopy and two 'bubble' windows for the very aft are provided. All the rest of the recessed window areas will need to be filled with something appropriate, like white glue or perhaps Krystal Klear.
Instructions are two grey-shade sheets of folded paper. One side has
an exploded view with detail drawings of the kit parts for the construction
steps. They are quite unambiguous and provide detail painting colors. Two of the
other sheet sides are devoted to painting and decals. There are three very
similar
options, all for the Hawaii Mars. Yes, the Philippine Mars registration and
 unique markings are on the decal sheet, but not shown in the instructions. The
main difference in color between the two is that the Philippine Mars has an all white fin
and rudder. The other is that the Philippine Mars has different water release
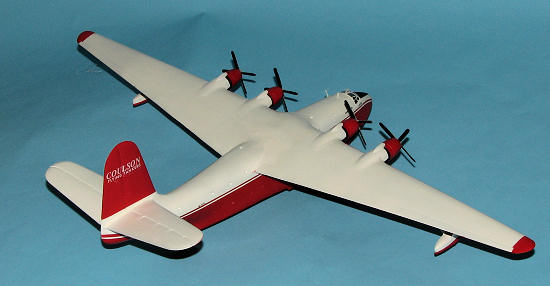
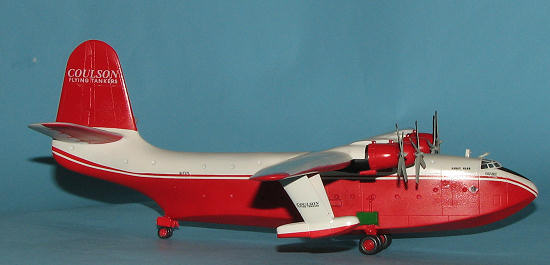
areas from what is molded on this kit. Markings are from the 1985, 2003 and 2007 seasons, showing the
differences in what amounts to fin and outer float strut logos. The aircraft are
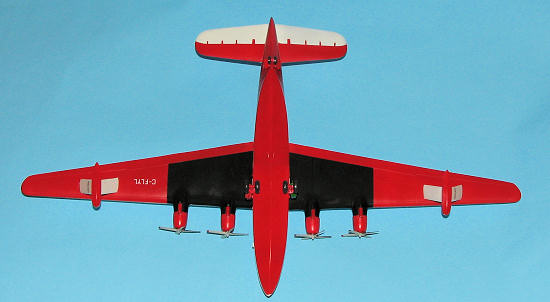
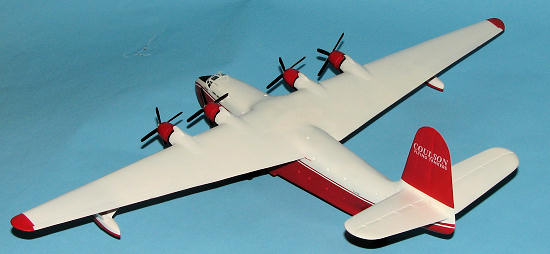
basically white when looking from above and red when looking from below. The red
is 'Sunfire Red' with an FS number of 21400. The 2003 and 2007 schemes have an
additional red cheat line. All these and the anti-glare shield on the nose will
have to be painted by the builder. I can foresee many 1985 schemes being done
thanks to that additional cheat line! Should also mention that the lower wing
area behind the engines is painted black. Decals are well printed and I hope
that the white is opaque enough to deal with the red on which it will be placed.
Were I CMR, I would add an additional sheet to this kit just to be sure.
unique markings are on the decal sheet, but not shown in the instructions. The
main difference in color between the two is that the Philippine Mars has an all white fin
and rudder. The other is that the Philippine Mars has different water release
areas from what is molded on this kit. Markings are from the 1985, 2003 and 2007 seasons, showing the
differences in what amounts to fin and outer float strut logos. The aircraft are
basically white when looking from above and red when looking from below. The red
is 'Sunfire Red' with an FS number of 21400. The 2003 and 2007 schemes have an
additional red cheat line. All these and the anti-glare shield on the nose will
have to be painted by the builder. I can foresee many 1985 schemes being done
thanks to that additional cheat line! Should also mention that the lower wing
area behind the engines is painted black. Decals are well printed and I hope
that the white is opaque enough to deal with the red on which it will be placed.
Were I CMR, I would add an additional sheet to this kit just to be sure.
| CONSTRUCTION |
CMR have done a very nice job on this kit, so initial construction
goes rather quickly. Basically, the cockpit was built up,
w the kit instructions so the
floor was painted red with grey bulkheads and seats. The seat cushion areas were
painted using Vallejo 'leather'. I waited to install the seats until after most
of the airframe was complete and just before gluing on the canopy. With the
cockpit section installed, I then glued the fuselage halves together. This was
done in sections so that I could get things to line up well. Tak ing
care at this juncture will reduce the amount of sanding that you'll have to do.
Actually, things fit quite well. Next I removed the fin from its pour stub and
cleaned it up. It proved to be a bit too large for the adjoining area on the
fuselage and the angle of the attachment point was quite different. Nothing that
super glue, filler and sanding can't cure, so I attached the fin with superglue
first. I did not pin any of the flight surfaces, though it may not be a bad idea
to do so.
ing
care at this juncture will reduce the amount of sanding that you'll have to do.
Actually, things fit quite well. Next I removed the fin from its pour stub and
cleaned it up. It proved to be a bit too large for the adjoining area on the
fuselage and the angle of the attachment point was quite different. Nothing that
super glue, filler and sanding can't cure, so I attached the fin with superglue
first. I did not pin any of the flight surfaces, though it may not be a bad idea
to do so.
With the fin in place and several sanding sessions
done, I attached the wings. These are one piece moldings and thankfully were
nice and straight. The fit is fairly good, though you will need to do a bit of
sanding and test fitting prior to actually applying the super glue.
 There were
some rather wide gaps that needed to be filled, and since they were somewhat
wide, the best start was to use plastic card or strip. I have a stash of various
thicknesses and widths of Evergreen strip plastic that work great at times like
this. Simply insert the card, pour in the super glue and when dry, cut and sand
things down. I don't usually use accelerator for superglue as it makes a join a
bit brittle, but you'll need to use it to be sure the wings are properly
aligned.
There were
some rather wide gaps that needed to be filled, and since they were somewhat
wide, the best start was to use plastic card or strip. I have a stash of various
thicknesses and widths of Evergreen strip plastic that work great at times like
this. Simply insert the card, pour in the super glue and when dry, cut and sand
things down. I don't usually use accelerator for superglue as it makes a join a
bit brittle, but you'll need to use it to be sure the wings are properly
aligned.
With the wings in place and several filler sessions later, the tail planes were attached. These are also not shaped exactly the same at the root as the root on the fuselage. Again, much sanding was needed then they were glued in place and several filler sessions were needed to clean things up. I should point out that this kit suffered from air pockets on the fuselage at the top wing/fuselage join. Even after multiple attempts to fill them all, one just would not cooperate. As I was on a bit of a tight schedule to finish this kit as promised, I just left it. Thanks to its location, it is something I can deal with at my leisure at a later date.
The last thing I did prior to painting was to install the seats and then attach the canopy. This was then masked and it was on to the spray area.
| COLORS & MARKINGS |
 No
better place to start with this one than to paint it overall white. I used
Floquil Reefer White as both the base coat and as a primer. Some glitches were
found and cleared up thanks to this. Once it was all on (and I have to tell you,
this took quite some time), I applied several coats of clear acrylic gloss. Then
the masking began. With any model, if you don't want overspray, cover it. It was
also an excellent time to try out the
Jammydog Micro Masking tape. For this one I used his white and blue paper
tape. The blue is considered low tack, but I found it stuck a bit better than
the white and provided less bleed-under. However, both types are quite good and
something that was a life-saver when doing this kit. None of the JammyDog tape
pulled up any paint, though the Tamiya tape I used did in a few spots.
No
better place to start with this one than to paint it overall white. I used
Floquil Reefer White as both the base coat and as a primer. Some glitches were
found and cleared up thanks to this. Once it was all on (and I have to tell you,
this took quite some time), I applied several coats of clear acrylic gloss. Then
the masking began. With any model, if you don't want overspray, cover it. It was
also an excellent time to try out the
Jammydog Micro Masking tape. For this one I used his white and blue paper
tape. The blue is considered low tack, but I found it stuck a bit better than
the white and provided less bleed-under. However, both types are quite good and
something that was a life-saver when doing this kit. None of the JammyDog tape
pulled up any paint, though the Tamiya tape I used did in a few spots.
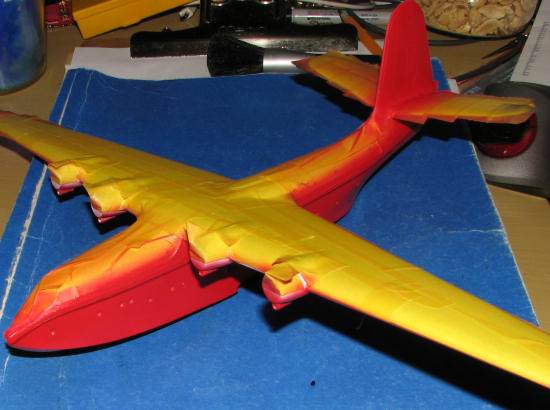 So
I masked everything I did not want red. Now I used Gunze Red Madder acrylic
paint and to be honest, it isn't as orange as it needs to be. Were I to do this
again, I'd use Testors Italian Red in the Model Master enamel range. So I
sprayed on the red areas. This occurred over several days. In fact, I'd say that
over half the time it took to build this kit was spent on painting. This is as
much to fixing glitches as anything for there was lots
So
I masked everything I did not want red. Now I used Gunze Red Madder acrylic
paint and to be honest, it isn't as orange as it needs to be. Were I to do this
again, I'd use Testors Italian Red in the Model Master enamel range. So I
sprayed on the red areas. This occurred over several days. In fact, I'd say that
over half the time it took to build this kit was spent on painting. This is as
much to fixing glitches as anything for there was lots
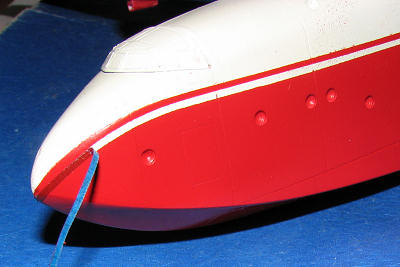 of
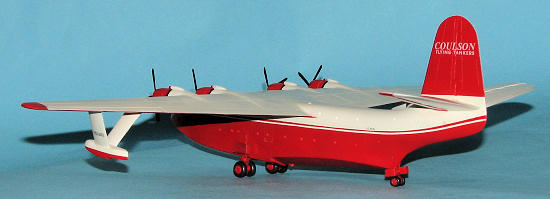
back and forth. As you can see from the image, the red is rather transparent, so
it is imperative that you use white under it. You can also see that the blue
tape provided the cleanest line as the white had a bit of seepage. This latter
deal was fixed by gently scraping with a very sharp scalpel blade. Thanks to the
several coats of clear, I was able to successfully do this without harming the
underlying white paint.
of
back and forth. As you can see from the image, the red is rather transparent, so
it is imperative that you use white under it. You can also see that the blue
tape provided the cleanest line as the white had a bit of seepage. This latter
deal was fixed by gently scraping with a very sharp scalpel blade. Thanks to the
several coats of clear, I was able to successfully do this without harming the
underlying white paint.
Other areas that needed painting were the underside of the wings behind the engines. A large area here was painted matte black as was the nose anti-glare panel. This black goes over the engines to some degree, but I stupidly decided to hand paint those areas. (Note to self: don't EVER do that again)
With the paint on, I put on the decals. As feared, the very thin CMR decals are not opaque enough to prevent the underlying red from bleeding through.CMR needs to consider things like this on their kits and either double ink the white or provide two complete sheets. Fortunately, there are not any transitions from red to white under any decals so the effect is somewhat muted, and photos do not show this as clearly as in person. CMR decals are super thin so one must be extremely careful when applying them. I used Mr Mark Softener on them, a rather mild solution, and it seemed to work fairly well.
| FINAL CONSTRUCTION |
 While fussing
with the decals, I also started working on the engine nacelles. Two of these
needed to have the prop shaft hole drilled out as they were filled to the edge.
Note when you do yours that the larger opening between cowl flaps goes to the
bottom. These were painted red and the insides blacked out.
While fussing
with the decals, I also started working on the engine nacelles. Two of these
needed to have the prop shaft hole drilled out as they were filled to the edge.
Note when you do yours that the larger opening between cowl flaps goes to the
bottom. These were painted red and the insides blacked out.
CMR has decided to mold the beaching gear in injected styrene. This is great as the styrene is not as elastic as resin and should hold up well. However, CMR needs to put more effort into providing good styrene castings. These had more molding glitches than most resin. There were large lumps of plastic between a couple of the main wheels that couldn't be cut free. There were also several holes in parts like props and wheels as well as mold seams that just could not be reached to be cleaned up. I would highly recommend to CMR that they cast the gear and wheels separately. Even better, do the gear in metal and they can still use resin wheels. It would make things a great deal easier. Plus side to these lumps of plastic is that they stiffen up the somewhat flimsy axles.
Floatation bags are attached to these constructs. These bags are resin and while the instructions are mum on colors, looking at the photos indicates that the struts may well be red. I also painted the rear floatation bags red as well as the one on the port side. The starboard bag was painted green as per an e-mail from West Coast Hobbies that pointed this out. Attaching these was pretty much hit and miss, though again, the photos accompanying the instructions were a huge help.
 I also
attached the wing floats. There are small slits on the underside of the wing to
show where the outer strut attaches. I guess I needed to test fit one a bit
better as one strut stands a bit proud of the wing. Again, time constraints
prevented me from fixing this properly.
I also
attached the wing floats. There are small slits on the underside of the wing to
show where the outer strut attaches. I guess I needed to test fit one a bit
better as one strut stands a bit proud of the wing. Again, time constraints
prevented me from fixing this properly.
Next were the props. These are injected plastic and all need considerable work to the tips, to fill holes and to simply sand down. The prop shafts were half OK and half too flat and thick. More trimming before painting the faces light grey, the backs black and the tips in red. These were then glued to the engines as straight as I could before the engines were pushed onto the nacelles (the fit is very tight).
The last building things were antennas and a small scoop. I must have been missing a small sprue as I was unable to find one scoop and one of the long pitot tubes. The very last things to glue on were the small water scoops. The instructions are not clear on just exactly where these fit, but from what I can deduce, they fit to the two small outlet looking things on the underside of the fuselage. As the photos provided clearly show that these are not deployed when on the beaching gear, I left them off and did not fill the holes (apparently they drop straight down, leaving a small curved section in the openings when retracted). Masking was removed and the model photographed.
| CONCLUSIONS |
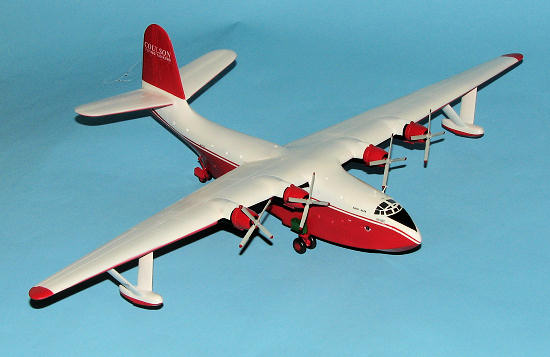
 While the
build sounds as if it were fraught with problems, the truth is that this is
pretty much the norm with most resin kits. This one did not provide any more
trouble than I had expected going into the build and the end result is certainly
worth the time and effort put into it. With a wingspan of over 16 inches, it is
not a small model. If your skills are at the level where
you'd like to give one of these a go, then this one would be as good a
place to start as any.
While the
build sounds as if it were fraught with problems, the truth is that this is
pretty much the norm with most resin kits. This one did not provide any more
trouble than I had expected going into the build and the end result is certainly
worth the time and effort put into it. With a wingspan of over 16 inches, it is
not a small model. If your skills are at the level where
you'd like to give one of these a go, then this one would be as good a
place to start as any.
P.S. I just noticed in the pictures a bit too late that I'd bumped one of the engines out of alignment. Trust me, they are just press fitted and can easily be realigned.
| REFERENCES |
June 2008
Copyright ModelingMadness.com. All rights reserved.
My thanks to the North American importer of CMR kits, www.westcoasthobbys.com for providing the review kit. Order yours direct from the hyperlink and see what else is available from CMR.
If you would like your product reviewed fairly and quickly, please
contact
the editor or see other details in the
Note to
Contributors.
Back to the Review
Index Page 2021