Minicraft/Hasegawa 1/200 Lockheed L.1011
| KIT #: | ? |
| PRICE: | $6.00 at a swap meet |
| DECALS: | One option, TWA |
| REVIEWER: | Scott Van Aken |
| NOTES: | No stand included, but I have spares! |
| HISTORY |
The L-1011 TriStar was the last
Lockheed airliner to be developed and was launched in March 1968 in
response to an American Airlines requirement (that also resulted in the
DC-10) for a large capacity medium range airliner. Lockheed initially
studied a twin engined layout, but it was decided that three engines would
be necessary to ensure it could takeoff at max weights from existing
runways. 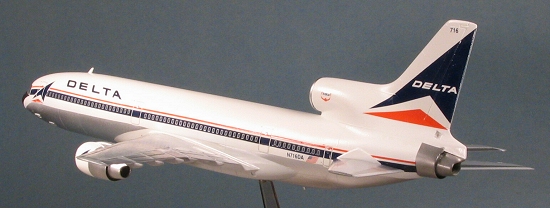
Work on the L-1011 prototype began early in 1969, resulting in a November 16 1970 first flight. The engine choice of Rolls-Royce's advanced three shaft design RB211 however dogged the TriStar's early career. Rolls-Royce went bankrupt in February 1970 largely due to higher than estimated RB211 development costs, severely harming both Lockheed and the TriStar sales program. The problems were able to be resolved after the British government nationalised Rolls-Royce, guaranteeing the supply of production engines. Despite the initial problems the RB211 proved to be extremely reliable and efficient in service and grew into a family of variants.
The first L-1011 model that entered service with Eastern and TWA in April 1972 was the initial domestic L-1011-1 (which was built in greater numbers than any other TriStar variant). Subsequent models to be developed were the -100 with more fuel and higher weights, the -200 with higher thrust engines, and the long range shorter fuselage -500, described separately.
Production ceased in 1983, when 250 had been built. The prototype was sold to be broken up for spares in 1986.
Thanks to www.airliners.net for the historical background.
| THE KIT |
 If you have built any of
Hasegawa's 1/200 kits, you know that you can expect to get a well detailed
example of whatever is on the box. A large number of the older airliners
(such as this one) were done in the days of the raised panel lines so this
one has them. Many airline modelers will sand this detail off as well as
fill in the windows so this really is not an issue. This happens to be a
Minicraft boxing, but everything inside is pure Hasegawa. That includes the
TWA decals, which are a bit thick and the red is a bit too dark. These
models are designed to be displayed with the wheels down and so there are
nicely detailed (though a bit thick for the scale) landing gear. A weight
is provided for the nose in the form of thick plastic bulkheads that is
more than enough to keep it on its wheels. No cabin or cockpit detail is
provided and a clear windscreen is part of the kit. With the Minicraft
boxing, no display stand is given, which is too bad as I like to display
some of my airliners on stands. Instructions are clear and well done,
having been redone by Minicraft so we can read them!
If you have built any of
Hasegawa's 1/200 kits, you know that you can expect to get a well detailed
example of whatever is on the box. A large number of the older airliners
(such as this one) were done in the days of the raised panel lines so this
one has them. Many airline modelers will sand this detail off as well as
fill in the windows so this really is not an issue. This happens to be a
Minicraft boxing, but everything inside is pure Hasegawa. That includes the
TWA decals, which are a bit thick and the red is a bit too dark. These
models are designed to be displayed with the wheels down and so there are
nicely detailed (though a bit thick for the scale) landing gear. A weight
is provided for the nose in the form of thick plastic bulkheads that is
more than enough to keep it on its wheels. No cabin or cockpit detail is
provided and a clear windscreen is part of the kit. With the Minicraft
boxing, no display stand is given, which is too bad as I like to display
some of my airliners on stands. Instructions are clear and well done,
having been redone by Minicraft so we can read them!
| CONSTRUCTION |
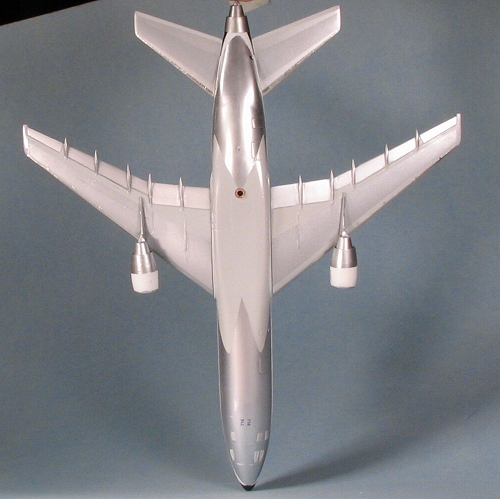
Since I like to start things off by doing subassemblies, I looked through the instructions to see what was available. I'd built this kit a long time ago and remember it being a pretty painless exercise. However, I was going to add a bit of pain in this one by building it wheels up. Now you may well know that these kits are not designed to be displayed in that fashion so some cutting and filling was going to be needed.
Anyway, I started by placing the bulkhead in one fuselage half and then gluing the other half to it. It took a bit of fiddling to get things to line up properly as these long, tube-like fuselages are not the easiest things to do. I also glued the fan blades into the engine nacelles and glued those halves together. Since I was 'halving' things, I did the same to the upper and lower wings.
 The next few days were spent getting
things nice and smooth, via several applications of various fillers. There
are seams in the lower flaps and in the right side of the rudder that need
filled. I also cut off the nose gear doors and after a bit of trimming,
glued those in the closed position. I did the same with the main landing
gear doors, but the fit on these was poor. One reason is that the outer and
inner doors are molded atop each other as they are when normally down. This
meant a very large hole to fill in each main gear well. For big holes, I
use epoxy filler and my filler of choice is Apoxie-Sculpt. I surprised
myself by not mixing too much and it was 'squared off' by using my scalpel
handle.
The next few days were spent getting
things nice and smooth, via several applications of various fillers. There
are seams in the lower flaps and in the right side of the rudder that need
filled. I also cut off the nose gear doors and after a bit of trimming,
glued those in the closed position. I did the same with the main landing
gear doors, but the fit on these was poor. One reason is that the outer and
inner doors are molded atop each other as they are when normally down. This
meant a very large hole to fill in each main gear well. For big holes, I
use epoxy filler and my filler of choice is Apoxie-Sculpt. I surprised
myself by not mixing too much and it was 'squared off' by using my scalpel
handle.
Again, we are talking several applications of filler to close as many of the little holes as possible. This took repeated applications and then sanding with various grades of sandpaper. Just to give an idea of what this involves, here is the standard sequence. I'm sure it is one you use as well, but perhaps some don't and will pick something up from this.
First off, I use a 'hot' glue that actually melts the plastic it touches. I squeeze together the plastic and allow this melted plastic to ooze from the seam. If it needs it (like fuselage halves) then are held together with clamps, tape or rubber bands until dry. Then the oozed plastic is sanded off. If there is a small 'step' between the halves, this is sanded down with a coarse sanding stick, taking care not to sand a flat spot. It is followed by a finer grade sanding stick. If no filler is needed. I go over the area with 320 paper, followed by 400, 600 and 1200. If filler is needed, then it is applied, allowed to dry and then sanded with those four grades. Frequently multiple applications of filler are needed. For a general filler I use 3-M Acryl Blue glazing putty, part # 051144-05964. Many have asked about this as it usually needs to be special ordered from an auto parts place that handles 3M products. I comes in a 21 oz (595gm) tube.
 I also use Mr. Surfacer 500, which is
basically just very thin filler. Great for those small cracks and holes.
Standard filler usually leaves these behind so I follow the first
application of Acryl Blue with Mr. Surfacer. After sanding this, I can see
if there are any more areas that need filler and keep applying it until I'm
satisfied. Several modelers use superglue. You can zap it with accelerator
and after washing the part, sand it right away. Up side is that there is
really no drying time. Down side is that this stuff is generally harder
than the plastic around it so you need a killer sanding stick to get things
down to the level you like. Even then, there can be holes in it that will
need filled with either more super glue or with standard fillers. I use it
mostly for resin kits, parts that need to be tacked in place (like gear
doors) and not as an everyday thing.
I also use Mr. Surfacer 500, which is
basically just very thin filler. Great for those small cracks and holes.
Standard filler usually leaves these behind so I follow the first
application of Acryl Blue with Mr. Surfacer. After sanding this, I can see
if there are any more areas that need filler and keep applying it until I'm
satisfied. Several modelers use superglue. You can zap it with accelerator
and after washing the part, sand it right away. Up side is that there is
really no drying time. Down side is that this stuff is generally harder
than the plastic around it so you need a killer sanding stick to get things
down to the level you like. Even then, there can be holes in it that will
need filled with either more super glue or with standard fillers. I use it
mostly for resin kits, parts that need to be tacked in place (like gear
doors) and not as an everyday thing.
OK, now the fuselage, engines and wings are prepped. Typical of me, I start hunting around for optional schemes. There are times when I buy a decal sheet then a kit to go with them, and then there are times when I start building the kit and then hunt up a scheme for them. This is one of those latter times. I do this to see what may be needed in the way of special handling when it comes time to paint. I also want to know if it comes with a windscreen decal so I can glue in and fair in the kit windscreen or not.
Several weeks pass
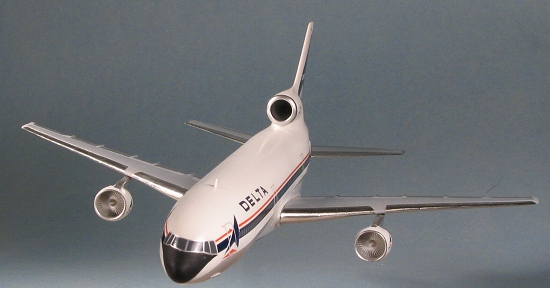
Well, the sheet arrived. It does come with a windscreen decal so the kits windscreen is puttied in place. The sheet also shows that the engines in this kit are not correct for a Delta Airlines L.1011. Apparently, Delta opted for Rolls Royce engines in place of whatever it is that comes with the TWA kit. Now for the quandary. Do I go ahead and use what are wrong engines or look for resin replacements. I found resin replacements offered by BRAZ Models, so forking over $8 plus $3.95 s&h, I again ordered the engines.
Several more weeks pass.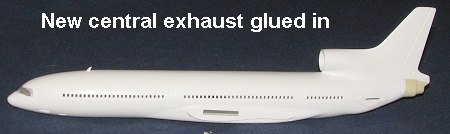
Finally the engines arrive. The main engines are two part with the intake separate and include the pylons so they are a simple swap. The rear engine exhaust section fits right in place where the old one went. Just a bit of filler used to smooth things in and then it was time to do some painting. This is where I generally screw up airliners.
| COLORS & MARKINGS |
 First color I sprayed was the
aluminum. I knew that Alclad II would be impervious to my usual
ministrations so that seemed like the logical choice. I sprayed the
underside of the fuselage, the engines, and the leading & trailing edges of
the wings with Aluminum. I then sprayed Polished Aluminum over that which
was on the fuselage. Masking that off as well as the area on the wings, I
sprayed Voodoo Grey enamel on the center section and the wings as it is a
very close approximation of the grey that is used. Then the lower section
was masked off and the upper fuselage was painted Floquil's Reefer White.
When dry, it was sprayed with gloss acrylic clear (Future). I pulled off
the masking and was greeted with the usual glitches caused by my poor
masking. The aft section was painted with Alclad II Steel to give a dark
shade. I'd also masked and painted the engines and pylons at this time.
First color I sprayed was the
aluminum. I knew that Alclad II would be impervious to my usual
ministrations so that seemed like the logical choice. I sprayed the
underside of the fuselage, the engines, and the leading & trailing edges of
the wings with Aluminum. I then sprayed Polished Aluminum over that which
was on the fuselage. Masking that off as well as the area on the wings, I
sprayed Voodoo Grey enamel on the center section and the wings as it is a
very close approximation of the grey that is used. Then the lower section
was masked off and the upper fuselage was painted Floquil's Reefer White.
When dry, it was sprayed with gloss acrylic clear (Future). I pulled off
the masking and was greeted with the usual glitches caused by my poor
masking. The aft section was painted with Alclad II Steel to give a dark
shade. I'd also masked and painted the engines and pylons at this time.
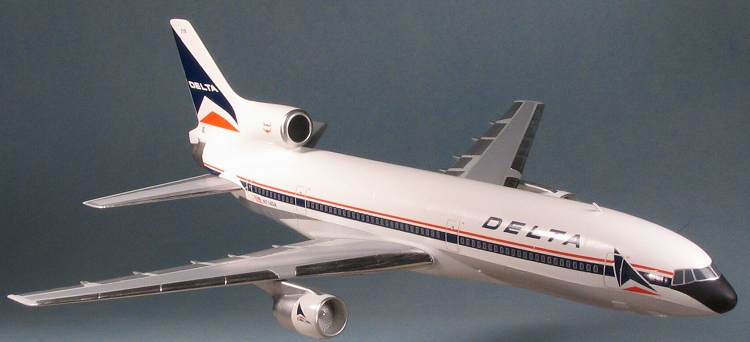
With no real additional construction in the way of landing gear and doors, I moved ahead by using Bare Metal Foil's Chrome to do the leading edge of the wings and tail planes. Care had to be used on the underside as the raised panel lines are not that easy to locate. Probably because of the number of times the mold has been used. I then started putting on the Liveries Unlimited Corroguard panels that are designed just for this kit. I found the panels for the tail planes to be undersize. They don't fit the entire area shown in the diagrams that accompany the aftermarket decals I bought (also by Liveries Unlimited). I found this to be the case with the ones I used on my 767 and MD-11 as well. I'd think that these are supposed to butt right up against the fuselage and extend to just inside the tip panel.
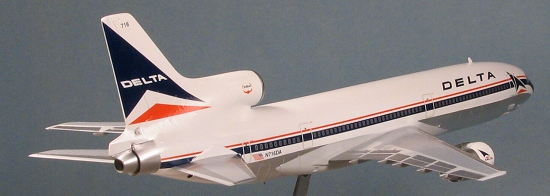
 I then proceeded to apply
the decals to the rest of the fuselage. These were also by Liveries
Unlimited and were substituted for a set that I had ordered from another
company. Not a problem as what I wanted was a Delta L.1011. The first
mistake I made with these was to apply the windshield decal first. This was
an error on two fronts. One is that the nose needs to be painted black and
to do that before applying the decal would be wiser. Secondly, the front of
the long fuselage stripe decal 'dips' down a bit and so it didn't properly
meet with my windshield. You have been warned!
I then proceeded to apply
the decals to the rest of the fuselage. These were also by Liveries
Unlimited and were substituted for a set that I had ordered from another
company. Not a problem as what I wanted was a Delta L.1011. The first
mistake I made with these was to apply the windshield decal first. This was
an error on two fronts. One is that the nose needs to be painted black and
to do that before applying the decal would be wiser. Secondly, the front of
the long fuselage stripe decal 'dips' down a bit and so it didn't properly
meet with my windshield. You have been warned!
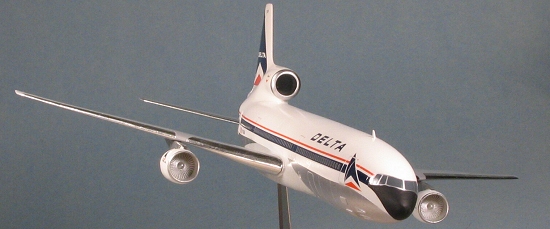
The rest of the decals went on well. I did have some problems with them being brittle and breaking rather easily. I think they were stored in a warm place as the carrier had started to yellow a bit. The decals were done in the late 1990s so should not have started to show deterioration already if properly stored. Fortunately, an extra section of fuselage stripe was provided so I could do some patch work. Since the stripe covers the windows, if doing a Delta L.1011, it would have been a good idea to fill those in. I didn't and as a result the depressions show through the decal quite well. Fortunately, the window decals match up with the depressions.
| FINAL CONSTRUCTION |
 Not much to this part.
Basically, I glued the new engine pods to the lower wing. Fit here is not
good as they don't slot in where the old engines go. It is a butt join and
the pylons don't match the curvature of the lower wing. I also managed to
lose the small insert for the lower fuselage where the stand attaches.
Rummaging through a container of brass, copper and aluminum tubing bits
that I bought 25 years ago, I found a section of brass tubing that fit the
stand and the hole in the bottom of the fuselage. A bit of super glue and
all was well with the world again. The wings and tail planes fit so tightly
that they are just snapped in place. And that was it.
Not much to this part.
Basically, I glued the new engine pods to the lower wing. Fit here is not
good as they don't slot in where the old engines go. It is a butt join and
the pylons don't match the curvature of the lower wing. I also managed to
lose the small insert for the lower fuselage where the stand attaches.
Rummaging through a container of brass, copper and aluminum tubing bits
that I bought 25 years ago, I found a section of brass tubing that fit the
stand and the hole in the bottom of the fuselage. A bit of super glue and
all was well with the world again. The wings and tail planes fit so tightly
that they are just snapped in place. And that was it.
| CONCLUSIONS |
I have to admit that some of the situations I ran into when building this were faults of my own. I just don't build enough airliners to get 'into the groove' of doing them. They are not like military aircraft in the way they are finished and that is where I ran into some trouble. The Hasegawa airliner kits if done right from the box are really excellent kits. It is when one starts to do modifications that one runs into some difficulty. Regardless, it looks nice and will make a fine addition to the few 1/200 aircraft already on display.
March 2005
# 1354 in a series
Copyright ModelingMadness.com. All rights reserved.
Kit courtesy of me.
If you would like your product reviewed fairly and fairly quickly, please contact the editor or see other details in the Note to Contributors.