F-RSIN 1/144 DC-7C 'BOAC'
The DC-7 was the last of the Douglas
propeller-powered transports. Introduced in May 1953, it entered service with
American Airlines in November 1953. It was the first commercial transport able
to fly nonstop westbound across the United States against
 the prevailing winds.
The DC-7C, or the "Seven Seas," lived up to its name
because it could fly 110 passengers anywhere in the world. It was a direct
competitor to the Lockheed L.1069 Super Constellation. The DC-7C entered service
with Pan Am a year earlier (June 1956) than the Lockheed plane with TWA and was
faster. Only the Super Connie and DC-7C had the range to fly non-stop both
directions across the Atlantic; the only propliners capable of that feat. The
DC-7B and standard Connie could fly nonstop eastward (thanks to the west to east
winds), but had to stop on the way back in Iceland or Newfoundland to refuel.
121 DC-7C aircraft were built
Douglas built 338 DC-7s and delivered the last in
1958. Most DC-7s were modified as freighters or scrapped. Some were kept for air
racing, aerial firefighting and satellite tracking.
I
have heard of F-RSIN and they do make some very interesting kits. Most are, as
the name implies, cast in resin. However, they have recently started producing
kits using injected styrene. These are not Tamiya or Hasegawa quality kits, but
they are not bad.
The kit itself is on a single, large sprue. There are
no clear parts with decals being provided for windows. Personally, this is just
fine as I tend to blend in and paint over clear bits when building airliners.
The overall feel of the plastic is a bit on the rough side, a norm for many
short run manufacturers. The greyish plastic looks to be very mottled, but this
is probably some sort of mold release agent as the mottling will wash off with
plain soap and water. The 'inside' of most large parts have large ejector towers
 that will need to be removed by the modeler. I noticed that the inside trailing
edge of one wing appears to be slightly short shot and there are depressions on
both sides of both horizontal stabs and on on one upper wing engine nacelle that
will require filling. Most edges are a bit rough and will need sanding down.
None of this is unusual for short run kits and those of us who build a lot of
these will take this into stride.
that will need to be removed by the modeler. I noticed that the inside trailing
edge of one wing appears to be slightly short shot and there are depressions on
both sides of both horizontal stabs and on on one upper wing engine nacelle that
will require filling. Most edges are a bit rough and will need sanding down.
None of this is unusual for short run kits and those of us who build a lot of
these will take this into stride.
The general detail level of the kit is good with
engraved panel lines as one expects. The lines themselves are a
bit on the 'soft' side in the the edges are more rounded than on high pressure
injection molded kits you get from Hasegawa or Revell. The plastic is a bit on
the brittle side as one area where the fuselage has broken away from the sprue
has splintered a bit. Again. no problem repairing it, but one should use a razor
saw to remove parts.
There are only so many ways to engineer a DC-6/7 and
this one looks very much like the Minicraft kits in that regard. Nacelles are
molded left and right halves with reasonable engine discs trapped in between
them. In this kit, the prop blades are all in one assembly instead of separate.
This kit also has the lower fuselage intake as a separate piece. Though there is
no interior, there is a section to be installed there so that there is an upper
wheel well. Sections are also supplied for the main gear well. Landing gear
will, like all the parts, require some cleanup before use. Wheels and gear doors
are all provided without any sink areas. I'm not sure how well this will build
wheels up as the gear doors all have tabs. Were I to build this 'in flight', I
think I'd just fill the wells with epoxy filler and sand the area smooth.
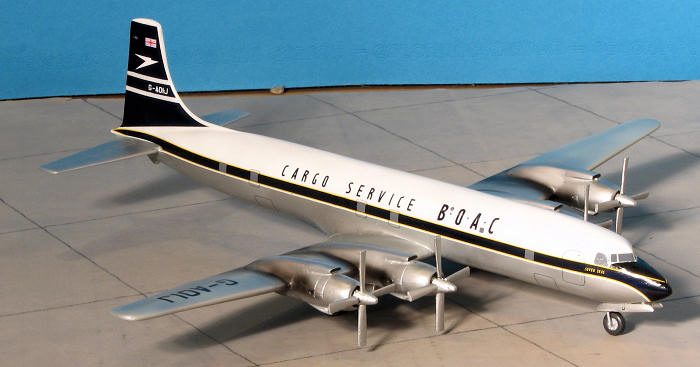
 This is
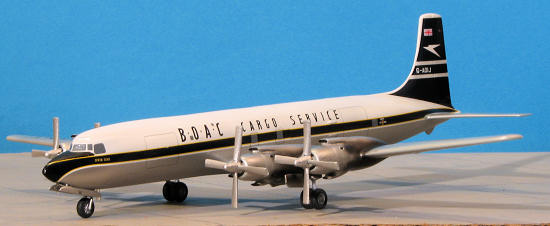
one of at least three boxings of this kit and it comes with BOAC decals. The
decal sheet is well printed and provides several airliner options plus a pair of
cargo conversions. The kit has cargo doors and hinges molded in place so I
believe that some filler and sanding will be required for an all passenger
plane. The kit's decal sheet is well printed and there is an addendum sheet for
the cargo doors should you wish to build one of those. One can do either the
blue tail version that was in vogue starting in 1962 or the white tail version
which was the livery with which the DC-7C entered BOAC service. Both schemes are
overall unpainted aluminum with white upper fuselage. Instructions are basically
an exploded view, which is fine for a kit like this. A nice addition is a sheet
of window and door arrangements. Airliner fans know that rarely will a full
production run of an aircraft have the same window and door placements, so
F-RSIN provided some welcome guidance. The color and markings placement guide is
in full color and has lots of helpful notes. I should mention that all the
instructions are in both French and English.
This is
one of at least three boxings of this kit and it comes with BOAC decals. The
decal sheet is well printed and provides several airliner options plus a pair of
cargo conversions. The kit has cargo doors and hinges molded in place so I
believe that some filler and sanding will be required for an all passenger
plane. The kit's decal sheet is well printed and there is an addendum sheet for
the cargo doors should you wish to build one of those. One can do either the
blue tail version that was in vogue starting in 1962 or the white tail version
which was the livery with which the DC-7C entered BOAC service. Both schemes are
overall unpainted aluminum with white upper fuselage. Instructions are basically
an exploded view, which is fine for a kit like this. A nice addition is a sheet
of window and door arrangements. Airliner fans know that rarely will a full
production run of an aircraft have the same window and door placements, so
F-RSIN provided some welcome guidance. The color and markings placement guide is
in full color and has lots of helpful notes. I should mention that all the
instructions are in both French and English.
The first step was to cut the major parts from the sprues. Attachment points
are large and a razor saw is recommended to keep from possibly chipping the
parts when cutting them loose. Then all the stubs were sanded down as were the
mating surfaces. Basically, I removed the main airframe parts for the first go.
The instructions state a half ounce of nose weight is needed so I got a
sufficiently heavy piece of lead and glued that to the inside of the nose after
first gluing in the nose gear well piece. Typical of a short run kit, there are
not really any alignment guides for parts so one has to fiddle around a bit to
get things properly in place. Usually this means taping the other fuselage half
while the glue dries once one is happy with how the parts are aligned.
 With that done, the fuselage halves were glued together. There are ejector
towers on these pieces and while the interior ones were not an issue, the ones
on the fin need to be sanded flush to ensure a good mating surface. When dry,
the seams were filled with super glue and the first of several sanding
operations commenced. It seems to me that the nose is too sharp so that was
rounded off.
With that done, the fuselage halves were glued together. There are ejector
towers on these pieces and while the interior ones were not an issue, the ones
on the fin need to be sanded flush to ensure a good mating surface. When dry,
the seams were filled with super glue and the first of several sanding
operations commenced. It seems to me that the nose is too sharp so that was
rounded off.
At the wings, I also removed and sanded down ejector towers and glued in
place the main gear wells. All of the parts have some level of flash that needs
to be cleaned up prior to use. Not doing so will result in some fit problems.
Once the wells were properly dry, the wing halves were joined. As mentioned in
the preview, the aft wing near the root is a bit short shot on one side. Test
fitting once the wing had dried showed that it will be a relatively
straight-forward fix.
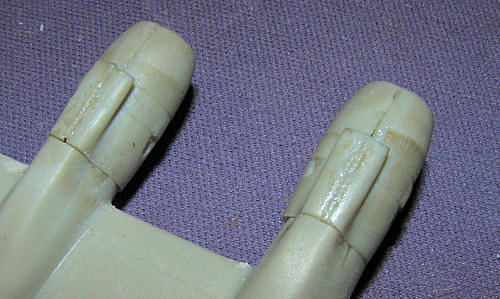
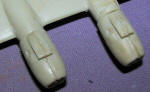
While the wings were drying and going through their sanding cycles, I
assembled the engine cowlings. In hindsight, I should have sanded the mating
surfaces down a bit as they ended up being too wide for the nacelle attachment
points. You can see what I mean from the two images I've supplied of their
rather poor fit. Be sure that the magneto part of the engine face is up. The
curved intake is the bottom of the cowling. This is not really made clear in the
instructions, so it is easy to install the engines upside down if one isn't
careful.
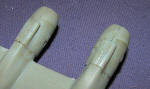 Once
those were dry, they were glued onto the nacelles. As mentioned, the fit is
really poor thanks to to the too large engine cowling assemblies. This meant
that there was much work needed. To be honest, I used a grinding bit on a motor
tool to take the cowling area down to something close to the nacelles before
what was really a considerable amount of work getting this area properly blended
in with both super glue and Tamiya putty.
Once
those were dry, they were glued onto the nacelles. As mentioned, the fit is
really poor thanks to to the too large engine cowling assemblies. This meant
that there was much work needed. To be honest, I used a grinding bit on a motor
tool to take the cowling area down to something close to the nacelles before
what was really a considerable amount of work getting this area properly blended
in with both super glue and Tamiya putty.
 Back
at the fuselage, the tail planes were installed. These fit fairly well, thou
Back
at the fuselage, the tail planes were installed. These fit fairly well, thou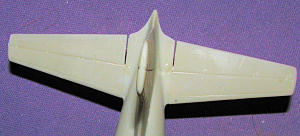 gh
either the root areas need to be more flush or the tail planes need to have the
elevators jut out more towards the fuselage as there is a gap between the
elevators and the airframe that I don't think are present on the real aircraft.
There are also sink areas on the fuselage side of the tail plane roots and on
the tail planes themselves that need attention.
gh
either the root areas need to be more flush or the tail planes need to have the
elevators jut out more towards the fuselage as there is a gap between the
elevators and the airframe that I don't think are present on the real aircraft.
There are also sink areas on the fuselage side of the tail plane roots and on
the tail planes themselves that need attention.
S everal rounds of filler and a
few weeks later, I had the wings/engine cowlings somewhat normal. The cowlings
are really more oval than round so I recommend sanding the mating surfaces of
each cowling half quite a bit prior to cementing them together. With that sort
of OK, I glued the wings to the fuselage. Fit is as to be expected. I ended up
with a large gap on the upper right wing root and another on the lower left that
were filled with super glue. I got these gaps to match up the wings as much as I
could with the tail planes. No one said short run French kits were easy and this
one was proving that point. At least I was making headway.
everal rounds of filler and a
few weeks later, I had the wings/engine cowlings somewhat normal. The cowlings
are really more oval than round so I recommend sanding the mating surfaces of
each cowling half quite a bit prior to cementing them together. With that sort
of OK, I glued the wings to the fuselage. Fit is as to be expected. I ended up
with a large gap on the upper right wing root and another on the lower left that
were filled with super glue. I got these gaps to match up the wings as much as I
could with the tail planes. No one said short run French kits were easy and this
one was proving that point. At least I was making headway.
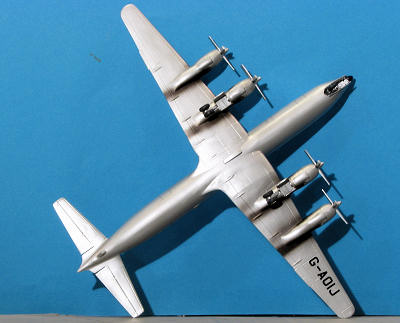
I also took the time to clean up the props and some of the other pieces I'd
be using later on. One thing for sure, all of the BOAC markings options have
unpainted metal lower surfaces for the wings and the lower fuselage. In some
ways, this is a good thing as it means I can assemble the landing gear prior to
painting the model. This has the plus of enabling the painting in progress to
move a bit more swiftly. As a brief note, F-RSIN pretty well copied the landing
gear from the Minicraft DC-6 kit. This means that they did the same screw up in
terms of not mirroring some of the main gear doors, requiring the builder to do
some judicious reshaping. I also found that, except for the nose gear retraction
strut, the blobs that come with the kit are vastly inferior to the Minicraft
offerings. Fortunately, I built my Minicraft DC-6A in flight so had these pieces
at my disposal and I used them. The nose gear is too short and would I ever do
another of these, I'd lengthen it.
 Step one was to paint the entire airframe with
aluminum from Alclad II to see how my puttying went. Not perfect, but you know,
there comes a time when one just wants to get on with things and so that is how
this was. The upper fuselage and tail were painted white using Testors enamel.
After curing for several days, it was masked off and the rest of the airframe
repainted in aluminum. I forgot the grey areas around the engines on the upper
wing, so painted that section with ADC grey as I had a bunch of it already
mixed. When cured, the areas were masked and the rest painted aluminum once
again. I also glued on the nose gear doors prior to painting so I could get
those done.
Step one was to paint the entire airframe with
aluminum from Alclad II to see how my puttying went. Not perfect, but you know,
there comes a time when one just wants to get on with things and so that is how
this was. The upper fuselage and tail were painted white using Testors enamel.
After curing for several days, it was masked off and the rest of the airframe
repainted in aluminum. I forgot the grey areas around the engines on the upper
wing, so painted that section with ADC grey as I had a bunch of it already
mixed. When cured, the areas were masked and the rest painted aluminum once
again. I also glued on the nose gear doors prior to painting so I could get
those done.
Now for the decals. These are superbly printed and
very thin. Perhaps the best part of the kit. However their thinness works
against them as I managed to rip one of the tail decals when sliding the
registration number into place.
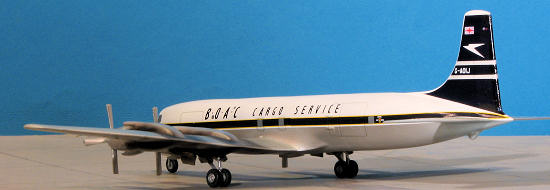
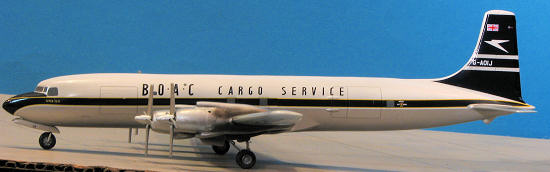
 The tail decal
seems too small. It doesn't go down far
enough to meet the fuselage and the back section does not reach the trailing
edge of the rudder as shown in the markings diagram. One could, of course,
simply leave larger areas of white at the top and front of the fin. Wing registration numbers are also too small if one goes by
the markings instructions. For the side cheat lines, we are provided with a front and a
rear section. These are long enough to overlap and are quite opaque. The nose
section is a bit short in terms of the anti-glare panel meeting on the top. It
also impedes into the nose gear well in the front. In the rear it is not the
best fit, but it isn't bad.
The tail decal
seems too small. It doesn't go down far
enough to meet the fuselage and the back section does not reach the trailing
edge of the rudder as shown in the markings diagram. One could, of course,
simply leave larger areas of white at the top and front of the fin. Wing registration numbers are also too small if one goes by
the markings instructions. For the side cheat lines, we are provided with a front and a
rear section. These are long enough to overlap and are quite opaque. The nose
section is a bit short in terms of the anti-glare panel meeting on the top. It
also impedes into the nose gear well in the front. In the rear it is not the
best fit, but it isn't bad.
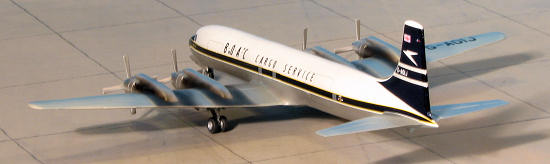
As the kit is pretty much molded as the cargo
version, and I didn't want to fill in all those bits, I went with the cargo
version as well. When one looks at the cargo logo, one assumes that the BOAC in
front of it goes with that logo. Wrong. It is too large and designed for the
passenger variant. Use the smaller set that are elsewhere on the sheet.
Eventually, all the decals were put on and I have to say that it very much looks
the part. To match the blue, I went with Mr.Color #5 blue. It seems to be pretty
close and after a clear coat, it should blend in more. I simply brush painted
some flat black to fill in the nose anti-glare panel.
 For this, there wasn't much. I glued on the main
wheels from the Minicraft kit and thought about replacing the nose gear strut,
but left it as it was; too short. The kit instructions mention nothing about
radio equipment so I didn't install any antennas. Instructions were equally
silent regarding the prop colors, so those were left in aluminum. The prop hubs
are badly formed and do not fit over the props very well at all. The prop shaft
holes in the engine faces had to be drilled out using a #55 drill bit as they
were far too small. I also sprayed on some exhaust stains, using Alclad II.
Perhaps it is a bit overboard, but I'm sure these planes were not kept as
pristine as the passenger versions. and instead of drilling out the engine
intakes, simply painted them matte black. By this time, I was ready to
finish things up and move on. I know that some will chastise me for being
slovenly, but there it is. This kit will sit on my airliner shelf to be seen by
few.
For this, there wasn't much. I glued on the main
wheels from the Minicraft kit and thought about replacing the nose gear strut,
but left it as it was; too short. The kit instructions mention nothing about
radio equipment so I didn't install any antennas. Instructions were equally
silent regarding the prop colors, so those were left in aluminum. The prop hubs
are badly formed and do not fit over the props very well at all. The prop shaft
holes in the engine faces had to be drilled out using a #55 drill bit as they
were far too small. I also sprayed on some exhaust stains, using Alclad II.
Perhaps it is a bit overboard, but I'm sure these planes were not kept as
pristine as the passenger versions. and instead of drilling out the engine
intakes, simply painted them matte black. By this time, I was ready to
finish things up and move on. I know that some will chastise me for being
slovenly, but there it is. This kit will sit on my airliner shelf to be seen by
few.
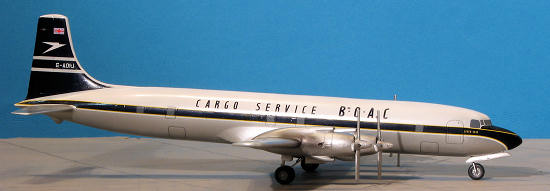
To be quite honest, this is not a kit I'd recommend
to most; especially with the newly released Roden kit on the market. However, it
isn't impossible and I know quite a few modelers who thoroughly enjoy a
challenge. This one definitely fits that description and F-RSIN does offer a
number of very nice liveries.
www.boeing.com
Kit instructions
May 2011
Thanks to
www.coopersmodels.com
for the review kit. This and a bunch of other neat stuff is available there, so
check it out
.
If you would like your product reviewed fairly and quickly, please
contact
me or see other details in the Note to
Contributors.
Back to the Main Page
Back to the Review
Index Page