Heller Concorde
| KIT #: | L0003 |
| PRICE: | $3.00 in a bag |
| DECALS: | One option |
| REVIEWER: | Scott Van Aken |
| NOTES: |
| HISTORY |
Aérospatiale-BAC Concorde was a turbojet-powered supersonic passenger airliner, a supersonic transport (SST). It was a product of an Anglo-French government treaty, combining the manufacturing efforts of Aérospatiale and the British Aircraft Corporation. First flown in 1969, Concorde entered service in 1976 and continued commercial flights for 27 years.
 Among other destinations, Concorde flew regular transatlantic
flights from London Heathrow (British Airways) and Paris-Charles de Gaulle
Airport (Air France) to New York JFK, profitably flying these routes at record
speeds, in less than half the time of other airliners.
Among other destinations, Concorde flew regular transatlantic
flights from London Heathrow (British Airways) and Paris-Charles de Gaulle
Airport (Air France) to New York JFK, profitably flying these routes at record
speeds, in less than half the time of other airliners.
With only 20 aircraft built, their development represented a substantial economic loss, in addition to which Air France and British Airways were subsidised by their governments to buy them. As a result of the type’s only crash on 25 July 2000 and other factors, its retirement flight was on 26 November 2003.
Concorde's name reflects the development agreement between the United Kingdom and France. In the UK, any or all of the type—unusual for an aircraft—are known simply as "Concorde", sans article. The aircraft is regarded by many as an aviation icon and an engineering marvel.
| THE KIT |
 Rummaging through the bagged kits at the LHS, I ran across
this one. It is one of the Heller 'Cadet' series of minimal detail and minimal
parts kits that fits into the smallest box that Heller produced. As such, no
scale is provided. However, it seems like it is about 1/400 or so with a kit
length of 7 1/8 inches (82mm).
Rummaging through the bagged kits at the LHS, I ran across
this one. It is one of the Heller 'Cadet' series of minimal detail and minimal
parts kits that fits into the smallest box that Heller produced. As such, no
scale is provided. However, it seems like it is about 1/400 or so with a kit
length of 7 1/8 inches (82mm).
The kit has no clear parts, a one-piece wing and a fuselage that is broken into four sections with the area just in front of the wing being separate. The jet nozzles are made up of pairs of what look like pipe that one glues together. There is full landing gear and gear doors but the wheel wells are open. The kit also shows some flash. Detailing is, of course, of the raised variety. A set of badly yellowed decals for an Air France scheme never used is included. One can assume that this kit is based on the prototype and may have been developed before the plane actually flew.
| CONSTRUCTION |
You would think that few pieces means an easy build. Well, now days that is probably true. In the late 60s that was not necessarily the case. First step was to glue the nose and after fuselage halves. There are no alignment pins on this kit. There is a spreader bar for the aft fuselage section which will be needed. I added some nose weight just in case.
 I also glued the aft fuselage to the wing before the fuselage
glue set. Good thing as otherwise there would have been issues. I used superglue
to get a decent wing/fuselage join. I then attached the nose section. Fit is not
good anywhere on the kit, so be ready to man the filler. Despite my best
efforts, the nose section is a bit off center. To quote a phrase scratched on
the center section of a Joe Walsh LP "That's no banana; that's my nose!"
I also glued the aft fuselage to the wing before the fuselage
glue set. Good thing as otherwise there would have been issues. I used superglue
to get a decent wing/fuselage join. I then attached the nose section. Fit is not
good anywhere on the kit, so be ready to man the filler. Despite my best
efforts, the nose section is a bit off center. To quote a phrase scratched on
the center section of a Joe Walsh LP "That's no banana; that's my nose!"
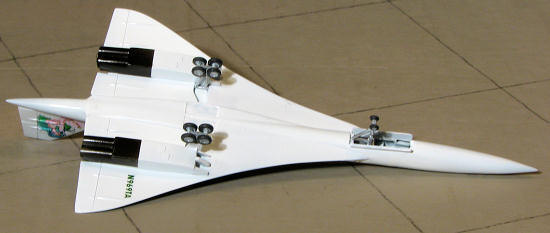
During the filler sessions, I assembled the jet exhaust pipes and glued those into the engine nacelles. These are not handed, despite one side of the inlets being thinner than the other. Once together, these were glued in place. There are raised lines on the wing underside showing where these fit.
Next step was to put on some paint. Thanks to the lack of clear bits, no masking was needed.
| COLORS & MARKINGS |
It is pretty much white. An initial spray or two of Tamiya white primer was followed by several coats of Floquil White lacquer. Then the aft engine section was masked around and this area painted Jet Exhaust using Alclad II.
| FINAL CONSTRUCTION |
 Back at the workbench, the inner main gear doors were glued
closed. Then the long nose gear doors were glued in position. In reality, only a
very small section of door around the nose gear is normally open when the gear
is down. But this kit was produced before the plane actually flew so this is
just one more glitch. Then the gear legs were glued in place. These are all butt
fit.
Back at the workbench, the inner main gear doors were glued
closed. Then the long nose gear doors were glued in position. In reality, only a
very small section of door around the nose gear is normally open when the gear
is down. But this kit was produced before the plane actually flew so this is
just one more glitch. Then the gear legs were glued in place. These are all butt
fit.
The thought of painting teensy tires did not really grab me so I decided to glue them in place first. At least I would have something to hold them. This worked out fairly well as things go. After all, this isn't going to be a contest model, just something interesting.
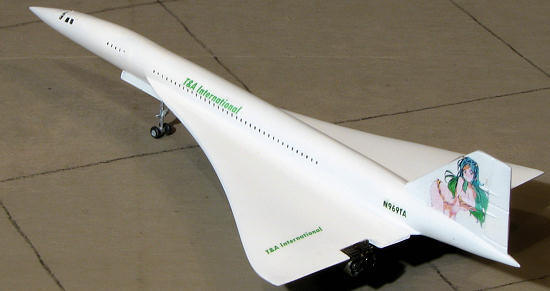
 I tried
out the decals that came in the kit, but not only did they sort of fall apart,
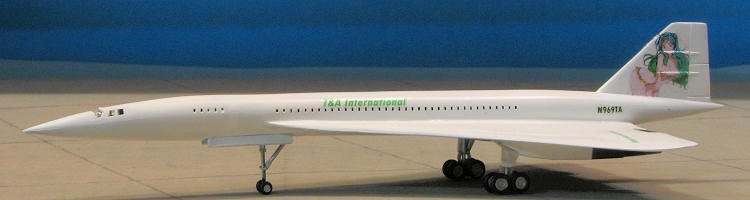
but they were badly yellowed. So instead I made some fantasy livery markings for
it for my favorite airline, Tucker and Andrews International. These went on
rather well without any real problems, though I think I put on the Metalizer
Sealer clear coat too thick.
I tried
out the decals that came in the kit, but not only did they sort of fall apart,
but they were badly yellowed. So instead I made some fantasy livery markings for
it for my favorite airline, Tucker and Andrews International. These went on
rather well without any real problems, though I think I put on the Metalizer
Sealer clear coat too thick.
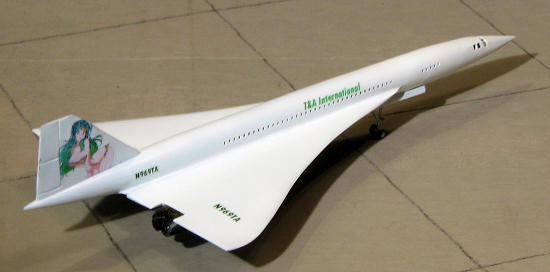
I was concerned about the lack of a windscreen and did not want to leave it blank. So I took some clear gloss paint on a toothpick and smeared it across the opening. When dry, I painted frames on it. It is not all that great looking, but a lot nicer than nothing.
| CONCLUSIONS |
 When it
comes down to it, those who only know something about the Concorde will think it
looks OK. In reality, it is more of a caricature of the aircraft than a scale
replica. That is what happens when a company bases a kit on what have to be
preliminary drawings. It also is not what I would call a slap together kit. It
has fit issues on nearly every step and I am sure that most of you would have
tossed it before completion. However, I thought it would make for an interesting
diversion and while not what you would call a show stopper, it made for an
interesting model that cost very little.
When it
comes down to it, those who only know something about the Concorde will think it
looks OK. In reality, it is more of a caricature of the aircraft than a scale
replica. That is what happens when a company bases a kit on what have to be
preliminary drawings. It also is not what I would call a slap together kit. It
has fit issues on nearly every step and I am sure that most of you would have
tossed it before completion. However, I thought it would make for an interesting
diversion and while not what you would call a show stopper, it made for an
interesting model that cost very little.
| REFERENCES |
http://en.wikipedia.org/wiki/Concorde
December 2011 Copyright ModelingMadness.com. All rights reserved. Thanks to my keen eye for a cheap kit for this one. If you would like your product reviewed fairly and fairly quickly, please contact the editor or see other details in the
Note to
Contributors.