Hasegawa 1/200 Boeing 737-400 'Skynet Airways'
| KIT #: | 10694 |
| PRICE: | 960 yen on sale from Hobby Link Japan (3200 yen SRP) |
| DECALS: | Two options |
| REVIEWER: | Scott Van Aken |
| NOTES: | Two complete kits |
| HISTORY |
First envisioned in 1964, the 737 entered service in 1968. Forty years later it has become the most ordered and produced commercial passenger jet in the world. It is Boeing's last surviving narrow-body airliner, sometimes serving markets previously filled by 707, 727, 757, DC-9 and MD-80/90 airliners. Continuously manufactured by Boeing since 1967 with over 8,000 ordered and over 5,800 delivered as of 2008, there are over 1,250 737s airborne at any given time. On average, a 737 departs or lands somewhere every five seconds.
After the success of the Boeing 737-200
Advanced, Boeing wanted to increase capacity and range, incorporating
improvements to upgrade the plane to modern specifications, while also retaining
 commonality with previous 737 variants. Development began in 1979, and in 1980
preliminary aircraft specifications were released at the Farnborough Airshow.
In March 1981 USAir and Southwest Airlines each ordered 10 aircraft, with an
option for 20 more.
commonality with previous 737 variants. Development began in 1979, and in 1980
preliminary aircraft specifications were released at the Farnborough Airshow.
In March 1981 USAir and Southwest Airlines each ordered 10 aircraft, with an
option for 20 more.
The new series featured CFM56 turbofan engines, which yielded significant gains in fuel economy and a reduction in noise, but also posed an engineering challenge given the low ground clearance of the 737. Boeing and engine supplier CFMI solved the problem by placing the engine ahead of (rather than below) the wing, and by moving engine accessories to the sides (rather than the bottom) of the engine pod, giving the 737 a distinctive non-circular air intake.
The wing incorporated a number of changes for improved aerodynamics. The wing tip was extended 9 in (23 cm). The leading-edge slots and trailing-edge flaps were adjusted. The flight deck was improved with the optional EFIS (Electronic Flight Instrumentation System), and the passenger cabin incorporated improvements similar to those on the Boeing 757.
The 737-400 was launched in 1985 as a stretched 737-300, primarily for use by charter airlines. Piedmont Airlines was the launch customer with an order for 25 aircraft in 1986. The first 400 entered service in 1988 with Piedmont. The 486th and last delivery of the -400 occurred on February 25, 2000 to CSA Czech Airlines.
 The 737-400F was not a model delivered by Boeing but a
converted 737-400 to an all cargo aircraft. Alaska Airlines was the first to
convert one of its -400s from regular service to an aircraft with the ability to
handle 10 pallets. The airline has also converted five more into fixed "combi"
aircraft for half passenger and freight. These 737-400 Combi aircraft are now in
service.
The 737-400F was not a model delivered by Boeing but a
converted 737-400 to an all cargo aircraft. Alaska Airlines was the first to
convert one of its -400s from regular service to an aircraft with the ability to
handle 10 pallets. The airline has also converted five more into fixed "combi"
aircraft for half passenger and freight. These 737-400 Combi aircraft are now in
service.
The 737-300/400/500 aircraft are all considered the '737 Classic' series and have since been replaced by newer variants on the production line.
| THE KIT |
Hasegawa first issued its 'Loveliner' series of 1/200 airliners back in the late 1970s. At the time, the aircraft had raised panel detail, open cabin windows, and landing gear that could only be modeled in the 'down' position. This latter feature required the modeler to expend considerable effort to do a wheels up display, as often times main gear doors folded into each other when the gear was down. As cabin window configuration was not always the same, it would require the modeler to fill in those not needed. However, this was not a problem for a number of modelers who liked this feature.
This latest in the series has no cabin windows,
no cockpit window,
optional 'wheels up' landing gear door parts, and fully engraved detailing.
Things that are not changed are the inclusion of a display stand and a hefty weight for those building the kit with wheels down. In fact, the kit is designed
to be put on the stand
 as there is a large hole in the bottom of the fuselage
for the attachment point. For display on the ground, this will need to be filled
in. The main gear legs have the doors molded as part of the assembly. I also
like that this particular boxing has one piece engine/pylon combinations. No
need to be concerned
about filling an intake seam. The front fan pieces simply plug in as the exhaust
is molded in with the engine.
as there is a large hole in the bottom of the fuselage
for the attachment point. For display on the ground, this will need to be filled
in. The main gear legs have the doors molded as part of the assembly. I also
like that this particular boxing has one piece engine/pylon combinations. No
need to be concerned
about filling an intake seam. The front fan pieces simply plug in as the exhaust
is molded in with the engine.
Tail planes are one piece as are the wings on this version because they are so short. Thanks to the option for wheels up, one can build this in flight, something that many airliner fans can appreciate. Probably the biggest difference from 'standard' airliner kits is that this one has the fuselage split horizontally. Not sure how much that will change things, but it does move the seam to where it will be under the window and cheat-line decals.
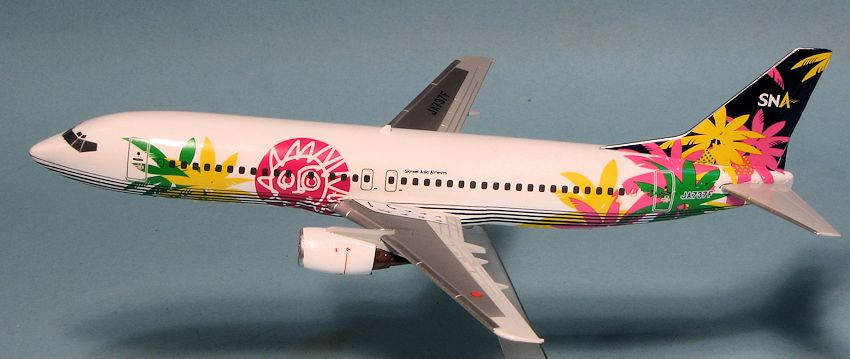
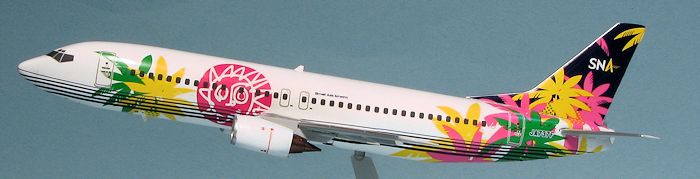
Instructions are standard Hasegawa and use Gunze paint references. The planes are basically overall white with medium grey wings, tailplanes and engines. The decals are very nicely printed and allow two different schemes with Solaseed Air. Each option has two registration numbers available. You will have to mix the green on the engine cowlings of one of the two options, but the other shades are white and light gull grey with unpainted leading edges to the flying surfaces and engine inlets. Of course, cabin and cockpit windows are included. The decals are the latest new wave type and should react favorably to setting solutions. The simple livery would make this an ideal first airliner for someone
| CONSTRUCTION |
I really like to build airliners. I am also not very
good at it and generally end up making a ton of mistakes, no matter how simple
the kit might be. The first step in building one of these is to cut away
the large ejector towers on the inside of the fuselage halves. Once this is
done, the builder needs to determine if the finished model will be on a display
stand or on its wheels. This one was to be a stand model so no weight
 was
installed and the stand mount was installed in the hole in the bottom of the
fuselage. This is not formed so filler was used for that and the nose gear door
insert as the latter goes a bit deep into the recess.
was
installed and the stand mount was installed in the hole in the bottom of the
fuselage. This is not formed so filler was used for that and the nose gear door
insert as the latter goes a bit deep into the recess.
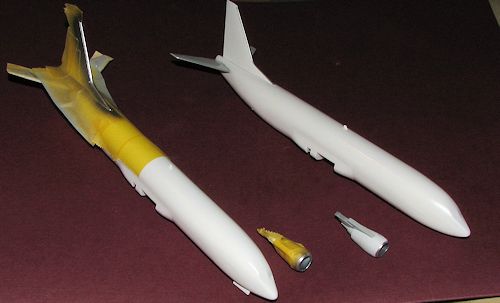
The fuselage halves fit together horizontally rather than vertically as in most airline kits. The fit is fair and one will need to use filler along the seam to ensure a smooth fuselage. When all that is done, I installed the horizontal stabilizer piece and the fin. The stab slots through the body and is held in place by the fin. Once the fin is installed, you'll need to wiggle it around to get it properly aligned, I know I did. Then apply some cement to the stab. Now is a good time to glue in the nose gear door piece as it will ensure it is the same color as the rest of the lower fuselage.
| COLORS & MARKINGS |
What I did after all the filler stuff was done was to
primer the fuselage assembly as well as the main wings, engines and other bits.
The wings and horizontal stabs are Boeing Grey and a good substitute for that is
Model Master Voodoo Grey. The kit recommends Light Gull Grey, but I think that
is a bit too light. For the wings, the center insert is a darker grey so
find something that looks nice to use. Instructions recommend
 Aircraft Grey. The
fuselage on this one is overall white. I know it seems a tad early to do
painting, but with some airliners, it is much better to paint these bits ahead
of time as it is easier to mask if that is required.
Aircraft Grey. The
fuselage on this one is overall white. I know it seems a tad early to do
painting, but with some airliners, it is much better to paint these bits ahead
of time as it is easier to mask if that is required.
So that is what I did. I first gave all the bits a coating of Tamiya white primer. Then painted the Voodoo Grey bits and when dry, masked the upper wing for the darker grey. I may have gone a bit too dark, but it looks OK. More masking was needed to do the aluminum leading edges and this took a while. A typical 'half hour of masking for 15 seconds of painting. The engines and pylons also had to be painted and masked.
With that done, I thought it would be a good time to
start putting on decals. This kit required the wings to be in place for the
decals as the lower stripes needed to go over the lower wing insert piece. This
meant installing the main gear sections (wheels up version) as well. I have had mixed results with
Hasegawa airliner decals. Mainly the big bits that don't slide around too well
and tend to tear quite easily. They also
 don't fit perfectly and getting them on
wrinkle free seems to be impossible. Such was the case with this one. I'm sure
there is a secret, but I've not learned it. I started at the back and had the
foresight to realize that I'd have to cut one to clear the horizontal stab.
The rest of the large decals were equally challenging to put on. Though the
instructions do not mention it, the big fuselage decals need to be on and dry
before attaching the lower fuselage stripes.
don't fit perfectly and getting them on
wrinkle free seems to be impossible. Such was the case with this one. I'm sure
there is a secret, but I've not learned it. I started at the back and had the
foresight to realize that I'd have to cut one to clear the horizontal stab.
The rest of the large decals were equally challenging to put on. Though the
instructions do not mention it, the big fuselage decals need to be on and dry
before attaching the lower fuselage stripes.
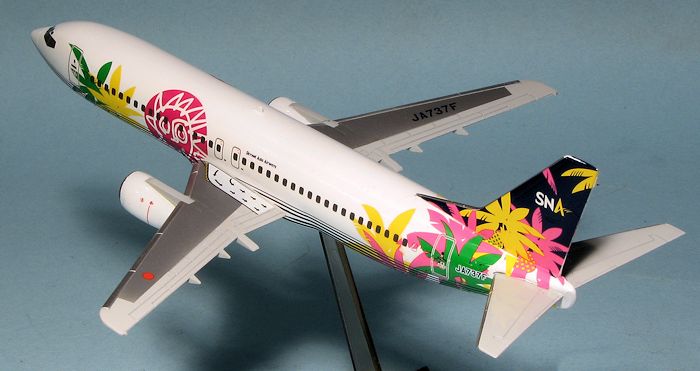
Naturally, I did a terrible job on the big decals. It is cross I have to bear and so I deal with it best I can. It almost seemed as if the big fuselage decals were too large as there was a lot of lower overlap. I also couldn't get the stripes to meet properly. The little ones were not an issue. We won't dwell on my inability to get the window decals straight.
| FINAL CONSTRUCTION |
 Finally all the decal were on and while not to my
usual standards, will look ok from a few feet away. Not much else to add other
than the fans to the engines, the engines to the lower wing and the completed
model to the stand. Though the engines are supposed to be snap fit, the only
snapping I did was to one of the pylons! I did spray a clear coat over the
decals, though I probably did not need to do that. I also washed the model prior
to applying the clear to remove as much glue and setting solution as I could.
Finally all the decal were on and while not to my
usual standards, will look ok from a few feet away. Not much else to add other
than the fans to the engines, the engines to the lower wing and the completed
model to the stand. Though the engines are supposed to be snap fit, the only
snapping I did was to one of the pylons! I did spray a clear coat over the
decals, though I probably did not need to do that. I also washed the model prior
to applying the clear to remove as much glue and setting solution as I could.
| CONCLUSIONS |
Despite the problems that I had with the kit (and I should add that they were my problems, not the design of the kit), it still turned out fairly well. It adds to what is already on my shelf in terms of 1/200 airliners and is well worth seeking if you are into this aspect of the hobby.
| REFERENCES |
July 2014
My thanks to Hobby Link Japan for the review kit. At the time of this review, the kit is on deep discount at this link. Get yours today.
If you would like your product reviewed fairly and fairly quickly, please contact the editor or see other details in the Note to Contributors.