Airfix 1/144 Boeing 737-200
| KIT #: | 03175 |
| PRICE: | $ |
| DECALS: | One option |
| REVIEWER: | Scott Van Aken |
| NOTES: | Kit was bought started |
| HISTORY |
The Boeing 737 is a short- to medium-range twin-engine narrow-body jet airliner. Originally developed as a shorter, lower-cost twin-engine airliner derived from Boeing's 707 and 727, the 737 has developed into a family of nine passenger models with a capacity of 85 to 215 passengers. The 737 is Boeing's only narrow-body airliner in production, with the -600, -700, -800, and -900ER variants currently being built. A re-engined and redesigned version, the 737 MAX, is set to debut in 2017.
The 737-200 is a 737-100 (of which only 30 were built) with an extended
fuselage, launched by an order from United Airlines in 1965. The -200 was rolled
out on June 29, 1967, and entered service in 1968. The 737-200 Advanced is an
improved version of the -200, introduced into service by All Nippon Airways on
May 20, 1971. The -200 Advanced has improved aerodynamics, automatic wheel
brakes, more powerful engines, more fuel capacity, and longer range than the
-200. Boeing also provided the 737-200C (Convertible), which allowed for
 conversion between passenger and cargo use and the 737-200QC (Quick Change),
which facilitated a rapid conversion between roles. The 1,095th and last
delivery of a -200 series aircraft was in August 1988 to Xiamen Airlines. A
large number of 737-200s are still in service, mostly with "second and third
tier" airlines, as well as those of developing nations. In many cases they are
being phased out due to fuel efficiency, noise emissions (despite the vast
majority having had their JT8Ds fitted with hush kits), and higher maintenance
costs than their newer cousins.
conversion between passenger and cargo use and the 737-200QC (Quick Change),
which facilitated a rapid conversion between roles. The 1,095th and last
delivery of a -200 series aircraft was in August 1988 to Xiamen Airlines. A
large number of 737-200s are still in service, mostly with "second and third
tier" airlines, as well as those of developing nations. In many cases they are
being phased out due to fuel efficiency, noise emissions (despite the vast
majority having had their JT8Ds fitted with hush kits), and higher maintenance
costs than their newer cousins.
With a gravelkit modification the 737-200 can use unimproved or unpaved landing strips, such as gravel runways, that other similarly-sized jet aircraft cannot. Gravel-kitted 737-200 Combis are currently used by Canadian North, First Air, Air Inuit and Air North in northern Canada. For many years, Alaska Airlines made use of gravel-kitted 737-200s to serve Alaska's many unimproved runways across the state.
Nineteen 737-200s were used to train aircraft navigators for the U.S. Air Force, designated T-43. Some were modified into CT-43s, which are used to transport passengers, and one was modified as the NT-43A Radar Test Bed. The first was delivered on July 31, 1973 and the last on July 19, 1974. The Indonesian Air Force ordered three modified 737-200s, designated Boeing 737-2x9 Surveiller. They were used as Maritime reconnaissance (MPA)/transport aircraft, fitted with SLAMMAR (Side-looking Multi-mission Airborne Radar). The aircraft were delivered between May 1982 and October 1983.
After 40 years the final 737-200 aircraft in the United States flying scheduled passenger service were phased out on March 31, 2008, with the last flights of Aloha Airlines (Aloha continues to fly its interisland cargo flights as Aloha Air Cargo). The aircraft had been eliminated from regular-scheduled service in the continental United States in 2006, when Delta Air Lines withdrew the type, but still sees regular service through North American charter operators such as Sierra Pacific, SkyKing, and possibly a few others. The variant was in use by Bahamasair in the Bahamas for 36 years before being replaced by a 737-500 in 2012.
| THE KIT |
Few airliner fans have not built this kit. It is a venerable kit with raised
panel lines where one has to glue in the various cabin doors and the baggage
doors. Not sure why these were not molded directly to the fuselage
 as there is
nothing to be seen inside either the cockpit or the cabin. Airfix provides
windows for the side. Many modelers will choose to fill these in and use decals,
yet there are a goodly number of modelers who like this feature so both have a
choice they can use.
as there is
nothing to be seen inside either the cockpit or the cabin. Airfix provides
windows for the side. Many modelers will choose to fill these in and use decals,
yet there are a goodly number of modelers who like this feature so both have a
choice they can use.
The wings are upper and lower pieces with the flap tracks and engines being glued to the underside. Engine nacelles are split vertically providing a seam that will be difficult to repair. A compressor face is provided for the intake section. Landing gear legs are nicely done for the scale and the kit has separate tires/wheels for all the struts. The kit can be modeled with the gear up if that is the wish and half wheels are provided for this purpose.
Instructions are well done and the kit provided a single markings option; in this case it was Lufthansa, which was the only airline to order the shorter 737-100. Kits of this age came with a display stand, though my second hand kit did not have this.
| CONSTRUCTION |
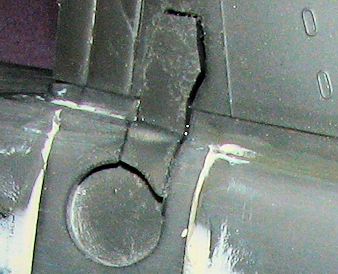
Actually, 'deconstruction' would be a better lead title. I bought this kit 'used' many, many years ago for a couple of dollars. The previous owner had already started it by gluing together the wings and the fuselage. A large weight had also been attached using white glue (bad choice) and it had come loose. I order to remove it, I cut open the fuselage to release this weight. I fully planned on building this one as a stand model using a Zvezda stand as the kit one was gone.
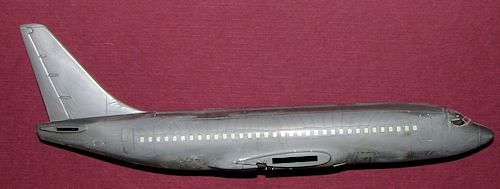
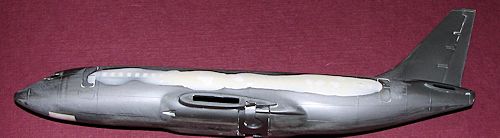 Once the weight was out, I patched up the hole in the fuselage and filled all
the cabin windows from the outside using epoxy filler. As usual, I applied too
much and spent a considerable amount of time sanding it smooth. You can see one
side with about half the filler removed and the other side with all of it gone.
You can see I did the same thing to the nose well. Were
Once the weight was out, I patched up the hole in the fuselage and filled all
the cabin windows from the outside using epoxy filler. As usual, I applied too
much and spent a considerable amount of time sanding it smooth. You can see one
side with about half the filler removed and the other side with all of it gone.
You can see I did the same thing to the nose well. Were
 the 737 not
an airplane with visible wheels when they were retracted, I would have done the
same thing for the main wells. I also took this opportunity to remove all of the
raised panel line detail on the fuselage and fill in the lower wheel well insert and the doors.
the 737 not
an airplane with visible wheels when they were retracted, I would have done the
same thing for the main wells. I also took this opportunity to remove all of the
raised panel line detail on the fuselage and fill in the lower wheel well insert and the doors.
I then moved on to the engines. These are four pieces with fairly nice compressor inserts. For these, I also removed most of the raised detail. I did scribe in a few lines, but looking at photos of this plane, there is not much that can be seen from normal viewing distances. I also had to do a bit of trimming around the exhaust as the sides were not well matched. Those that want to put the effort into filling the seams on the inside of the intake and exhaust can do so, I did not. Not sure if there are one-piece resin replacement engines for this kit, but if so, they may well be worth the expenditure.
The wings were cleaned up and filler applied where needed. Then they were glued onto the fuselage. I do one side at a time on these, letting the one side get pretty well dried before attaching the other. Must confess that I have issues with getting all the flying surfaces properly aligned so do this to try to keep goofs to a minimum.
 While
putting on the wings, I also installed the main gear doors. Airfix provides a
set for use when doing wheels up. They do not fit well and will need the usual
mass of filler to smooth in place. This is fairly typical of older kits when
doing them in flight. More modern airliner kits have done a lot more in terms of
having the wheels up option fit well. Naturally, all of this simply adds more
time to the build. It is also a good reason to not install the engine and flap
brackets until all this is taken care of.
While
putting on the wings, I also installed the main gear doors. Airfix provides a
set for use when doing wheels up. They do not fit well and will need the usual
mass of filler to smooth in place. This is fairly typical of older kits when
doing them in flight. More modern airliner kits have done a lot more in terms of
having the wheels up option fit well. Naturally, all of this simply adds more
time to the build. It is also a good reason to not install the engine and flap
brackets until all this is taken care of.
Once the gear doors were sanded down, I installed the flap actuator fairings. There have very small pins and very large holes so there is quite a bit of slop involved. These also have some flash around an ejector pin mark that needs to be removed to get them to fit flush. The horizontal stabilizors were the next to be installed. The one on the left sits a bit far back so the tab on it needs to be trimmed a couple of mm's on the front for a proper fit. I did not install the engines at this time, preferring to wait until things were painted. With the installation of the stabs, it was time to look at painting.
| COLORS & MARKINGS |
For this build, I decided to choose a simple scheme. This was a Frontier Airlines plane which basically has a white fuselage with metal painted wings and stabs. The first task was to give it a full primer coat to see if I missed anything. Tamiya extra fine primer was used for this. Since the fuselage is to be white, I used their white primer. I then sprayed the wings and tailplanes with Alclad II Aluminum, using several coats. Much to my dismay, I found a few areas that needed repaired that the white primer did not find. Those were then given the proper filler then primer treatment and the area repainted.
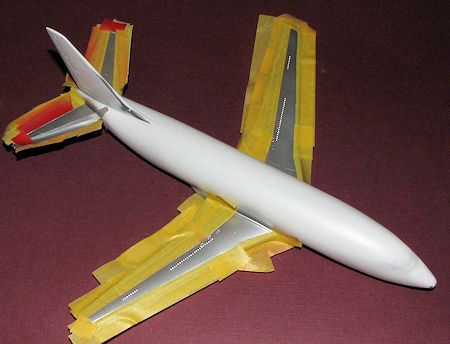 I was unable
to find any wing decals for the darker areas on the wings and tailplanes so had
no choice but to mask and paint. These are many different shades and the one
that seemed best to me was the grey of Tamiya Grey Primer. It also had the
benefit of being matte. The upside of paint is that you don't need to worry
about it fitting. The downside is it takes a lot of masking.
I was unable
to find any wing decals for the darker areas on the wings and tailplanes so had
no choice but to mask and paint. These are many different shades and the one
that seemed best to me was the grey of Tamiya Grey Primer. It also had the
benefit of being matte. The upside of paint is that you don't need to worry
about it fitting. The downside is it takes a lot of masking.
I painted the engines with Polished Aluminum so it would be different from the wing. Once the inner wing/tailplane surfaces were painted, they were masked and the fuselage was given more white to cover the overspray.
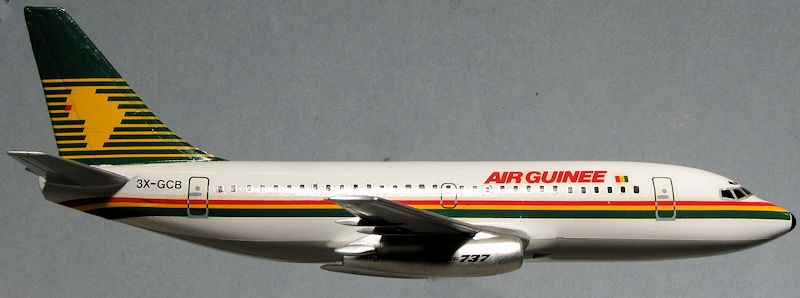
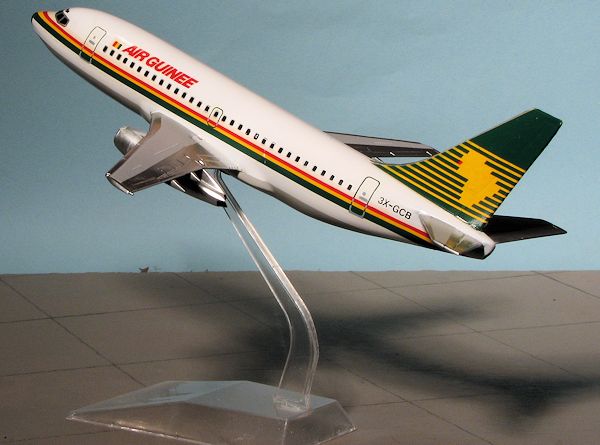
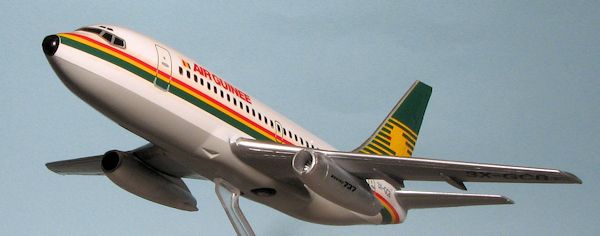
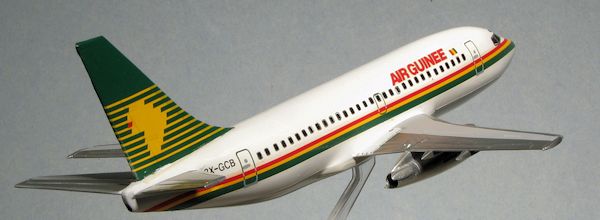
I then grabbed the sheet I was going to use, but when placing it next to the kit, something did not look right. Measuring the distance between the front and rear doors, it came to me that this was a 1/200 sheet as it looked too small. This meant I have to dig up another sheet for an all white fuselage or do some additional painting. After looking over what I had available, the only scheme for a 737-200 I could find that would not require a total repaint, was an Air Guinee version. That would need to have the underside painted Boeing Grey. After dutifully masking off the majority of the airframe to prevent issues with overspray, I went in search of something that was close, and hit on some Testors Voodoo Grey.
No landing gear for this one so it was right on to decal
application. I used an old Rareliners sheet that has to be at least 15 years old
if not more. This presented some issues. For one thing, the decals were sort of
brittle and needed careful handling. For another, there was some slight bleeding
of the red into the clear carrier that
I did not notice until after the fuselage stripes had been applied and it was
too late to go back
 and trim the decals closer. This set also did not come with
cabin window decals, something that is pretty standard today. For those, I used
an equally old ATP window decal set. These worked fairly well, but are two layer
decals that require one set to be installed and the other to be placed over
them. These decals tended to break so instead of one nice, long set of windows,
I had several 'chunks' of two or three windows to line up.
and trim the decals closer. This set also did not come with
cabin window decals, something that is pretty standard today. For those, I used
an equally old ATP window decal set. These worked fairly well, but are two layer
decals that require one set to be installed and the other to be placed over
them. These decals tended to break so instead of one nice, long set of windows,
I had several 'chunks' of two or three windows to line up.
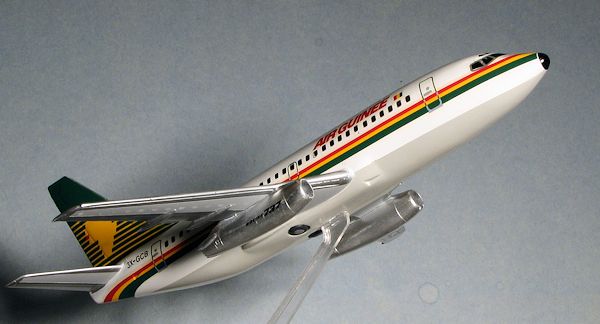
With the base windows and stripes installed, the door decals were placed. Most of these were two piece with one piece in green and the lower piece with handle in grey. All this, plus my innate ability to not get things like this straight and level, made for a rather long decal application. When it was done, I fully realized why I do not do more airliners. I have definite issues with straight lines. However, the markings were on and despite the slight red bleed into the carrier, things do not look all that bad.
There really was not much more to do. The wheels were painted and cemented in place. I also attached the engines and placed the logos on the side of them. For a final task, the entire model was given a wash in warm, soapy water to remove any decal glue or setting solution.
| CONCLUSIONS |
 This is at least the fourth Airfix B.737 I have built and
they have all turned out fairly well. I do wish the initial decals I chose had
been in 1/144, but such is the way things go. The end result is still a very
nice model and while it takes more than the usual amount of work to do one of
these with slick fuselage and the gear up for a stand model, it turned out quite
well.
This is at least the fourth Airfix B.737 I have built and
they have all turned out fairly well. I do wish the initial decals I chose had
been in 1/144, but such is the way things go. The end result is still a very
nice model and while it takes more than the usual amount of work to do one of
these with slick fuselage and the gear up for a stand model, it turned out quite
well.
| REFERENCES |
http://en.wikipedia.org/wiki/Boeing_737-200#737-200
April 2013
Thanks to me for this one.
If you would like your product reviewed fairly and fairly quickly, please contact the editor or see other details in the Note to Contributors.