CMK 1/35 Volkswagen Type 82E
|
KIT # |
T35104 |
|
PRICE: |
$12.98 |
|
DECALS: |
One German Army and the other Japanese Embassy |
|
REVIEW: |
|
|
NOTES: |
Curbside |
|
HISTORY |

When one thinks of VW Beetles, one doesn't necessarily think of the German Army. I know that I owned one that was green and took me through the era of Flower Power with much grace and savings of gasoline. I knew that this car was designed in the late 1930's but had not realized that many were built until after the end of the war. The running gear was used in the famed Kubelwagen that was prevalent on all fronts.
A total of nearly 700 of these Type 82 (basically a two door sedan) VW's was built during the war. As their later brethren, they were very bare bones transportation. I doubt if it was much different from my VW of the '60s. While the instructions give precious little information it, I imagine that the engine was around 1200cc or less. It is unknown if any war production split window VWs still exist, though I would hope that one would be preserved somewhere.
|
THE KIT |
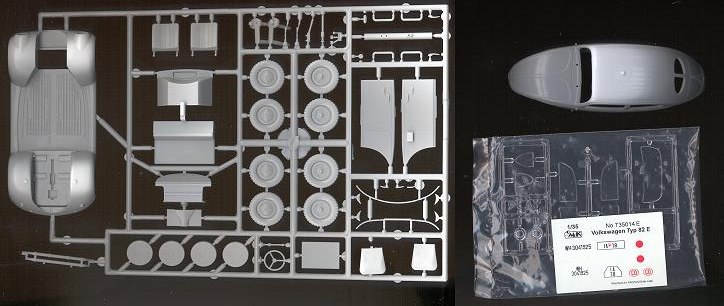
This is the first kit from CMK that I have bought. I was mightily impressed with the size of the box, but when opening it, was equally surprised by the extra room there was in there. Apparently, it is a standardized box size as the VW kit rattles around in there quite a bit! There are over 50 injected parts and 13 clear bits. Some of them will not be used depending on if you do a military or civilian version. The parts look very nicely molded and there is very little flash at all. The ejector pin marks are mostly hidden though there are a few that will need some work, such on the backs of the front seats and a huge one on the roof of the body.
The instruction sheet is very nice. It is six pages with the first page giving a short history in four languages. Page 2 is a parts breakdown as well as version guide. This page lists that there is a full interior and engine kit available. Undoubtedly at twice the price of the kit! The next three pages give 7 discrete steps in building the kit, noting what different parts go with which version. The last page is a painting guide for the two versions.
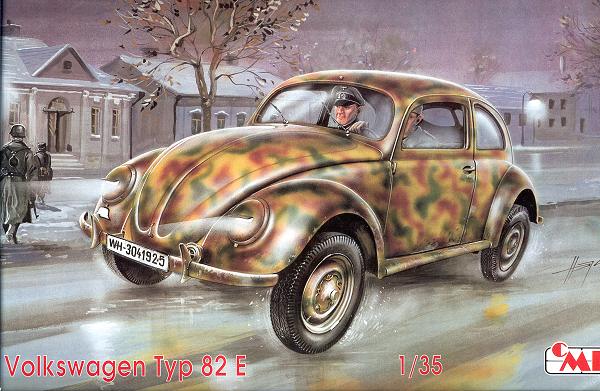
The decals are for two different vehicles. One is a camouflaged version for the Army as depicted on the box top. The other is for the Japanese Embassy. This one has hubcaps. It is painted the standard VW Beetle color of many years……Black!
There are other VW kits that have been done, including one by Airfix in 1/32 scale. It would be interesting to compare the kits and see how much the state of the art has come along.
|
CONSTRUCTION |

Since I'm basically an aircraft modeler, it is hard to get out of the habit, so we'll start with the cockpit… errr….interior. It is always handy to paint as much of something the same color at the same time as possible. To keep things nice and even with out a lot of repainting, it is also nice to glue together as many bits before painting as you can. With that in mind, and because I still wasn't sure at this stage which one to do, I started looking over the instructions. Then I looked over the parts. Yikes! Ejector pin marks where they will be seen!!
These were on the back of the front and rear seats as well as some on the chassis pan, and one on one of the rear suspension pieces. There also was that huge zit of a thing on the roof! These were filled and filed. Twice. Next, there was some gluing to be done. First the rear deck and flooring were glued on the chassis pan. Then the cover piece for the front suspension was glued in place. Then the steering column was glued to the underside of the cowl section. Next the foot pedals and 'tunnel' were glued in place and the gear shift and parking brake glued onto the tunnel. I think the parking brake is molded in the 'on' position.
While that was drying, attention was turned to cleaning up the body. Other than that huge pip on the roof, there was some rough surfaces in the window openings and along the edges of the body that needed cleaned with a file and xacto knife. The mold line also needed cleaned off. The rest of the parts are very clean needing only minor scraping to get off the tiny mold lines.
The body was then dryfitted to the chassis. It fits very well except in the very front. There is a gap there that will need filled, so unlike what the instructions suggest, I'll leave the bumpers off until last. I was warned about that problem when I bought the kit, so apparently it is endemic to the mold.
Turning over the chassis, the front and rear suspension parts were then glued into place. Then the inside wheel hubs were pressed into place and it was off to the paint shop.
|
PAINT & DECALS |

Having decided to do the 'civil' version, the instructions indicated that the interior was to be painted grey. Well I have lots of greys so picked a neutral one and sprayed the interior, inside of the body shell, and lower part of the rear bench seat with this shade. Since it was a flat color, I had to add a bit of gloss to it with Future.
The upper surface is a gloss black. Testor's Model Master enamel was used for this. The underside of the chassis pan was also painted this color. The painting was done in several steps to give me a place to hold onto the parts. At this time, the wheel hubs, steering wheel, wiper blades and bumper parts were also painted gloss black. The seats were painted using Testors Leather enamel with some red added to give it more auburn hue.
Once all this was done, it was back to the workbench to start putting some of these bits together. The rear seat fit just fine. The front seats had the backs glued to them and then the hinge and floor supports were painted gloss black. When that was dry they were glued to the pan. The steering wheel was also installed at this time. The instruments were painted flat black and drybrushed to bring out details. That is basically it for the inside of the floor pan.
Now for the body shell. The only real part that was done at this time was the installation of the windows. This could have been left until the final stage, but I felt it would be easier to install them and mask them than to fill the interior with tissue or something to prevent overspray when the overall car was painted. The transparencies are designed to fit from the outside. They were cemented in place using non-fogging superglue. A bit of a problem is that the transparencies are not exactly the same size as the openings. They are a touch undersize. Fortunately the openings and windows are beveled which helps installation, but you do need to be careful. Once the glue was dry, the rear view mirror was installed as are the interior side panels.
The body shell was then glued to the floor pan section. There is a gap in the very front that will have to be filled before final painting. That was done using superglue and accelerator. The area was then cleaned up, and the windows masked. Then the headlights were installed and masked as was the license plate light and it was off for more painting.
Once that evolution was complete, the car then had the bumpers installed along with the override bars and once more it was back to the paint shop for touchups. After that was done, it was time for decals. The Propagteam decals are very nice but mine were slightly off register. Not much except the license plates and tire pressure indicators. There is a Japanese flag that was put onto a piece of plastic card. This was then glued to a post that was made of stretched sprue and glued into a hole drilled in the right front fender. The car was given an overall gloss coat. I don't know how car guys do it as my car finishes always look less than perfect. Ah well, it is a wartime car after all so probably wasn't in that great a shape. Anyhow, once that dried, all the transparencies were unmasked and the final bits, handles and taillights were added. The tires were painted up and then just snapped into place.
|
CONCLUSIONS |
A very nice kit of this car that I can recommend to just about anyone. It is quite easy to build and basically a no-brainer of a model. Except for the small gap at the front, it fits together very well. Probably the only problem with the kit is what category to put it in when entering it in a contest. Is it to be put in the armor or auto section????? If this is the quality of CMK kits, I can see that there will be more of them on my modeling table in the future.
1996
Copyright ModelingMadness.com. All rights reserved.
Back to Reviews Page 2019