Attack Hobbies 1/72 Tatra T-97
| KIT #: | 72811 |
| PRICE: | $11.00 |
| DECALS: | Two options |
| REVIEWER: | Scott Van Aken |
| NOTES: | Short run and just a tad over 2 inches in length |
| HISTORY |
Tatra is a vehicle manufacturer in Kopřivnice, Czech Republic. The company was founded in 1850 as Nesselsdorfer Wagenbau-Fabriksgesellschaft, a wagon and carriage manufacturer, and produced the first motor car in central Europe in 1897, the Präsident. In 1919 it changed its name to Tatra after the Tatra mountains. Tatra is the "third oldest car maker in the world after Daimler Mercedes-Benz and Peugeot". Production of Tatra cars ceased in 1999 but the company still produces a successful range of primarily all-wheel-drive 4x4, 6x6, 8x8 10x10 and 12x12 trucks.
 After the 1938 invasion of Czechoslovakia by Nazi
Germany, Tatras continued in production, largely because Germans liked the cars.
Liked them too well, in fact; many German officers met their deaths when pushing
heavy, rear-engined Tatras faster around corners than they could handle. In
fact, the Tatra became known as the Czech Secret Weapon for the scores of
officers who died behind the wheel; at one point, it seems, official orders had
to be issued forbidding German officers from driving Tatras.
After the 1938 invasion of Czechoslovakia by Nazi
Germany, Tatras continued in production, largely because Germans liked the cars.
Liked them too well, in fact; many German officers met their deaths when pushing
heavy, rear-engined Tatras faster around corners than they could handle. In
fact, the Tatra became known as the Czech Secret Weapon for the scores of
officers who died behind the wheel; at one point, it seems, official orders had
to be issued forbidding German officers from driving Tatras.
In 1936 Tatra built a prototype of a small mid-sized aerodynamic car with an air-cooled engine in the rear. This car was a sort of a small version of the bigger T87, incorporating aerodynamic design with an air-cooled rear-mounted V8. The T97 however had a flat four-cylinder engine with a capacity of 1761 cc in it's tail. The body was smaller then that of the T87, recognizable by two side screens, rear windows, a flat single-piece windscreen and just two headlamps (instead of the T77a's and T87's three). The T97's 1761 cc engine was the world's first air-cooled flat four-cylinder engine with a chain-driven single overhead camshaft per cylinder bank. With a bore x stroke of 75 x 99 mm and a compression ratio of 5,9:1 it developed 29,4 kW (40 HP).
When the T97 was introduced in 1936 it was perhaps the most advanced small car in the world. But Porsche was still working on the development of the VW KdF-Wagen under an enormous time pressure from Adolf Hitler, who wanted to use the car for his promotion purposes. Hitler however considered the T97 to be too similar to his KdF-Wagen which was to be produced at the new Volkswagen factory in Wolfsburg, Germany, even though the T97 was listed at more than five and a half times the KdF-Wagen's target selling price. In 1939 Hitler ordered the removal of the T97 and the popular T57 from the Berlin Autosalon because of their close resemblance to the KdF-Wagen which was introduced at the 1939 Autosalon.
| THE KIT |
To me, Attack Hobbies means a very small kit in a box
several times the size it needs to be and so it is with this one. Four tiny sprues have the parts to make
this 2 1/4 inch long car. Regardless of its small size, the parts of the kit are
well molded, though a tad soft and several parts are overscale, but I'll accept
that as it means they won't disintegrate when I take them off the sprue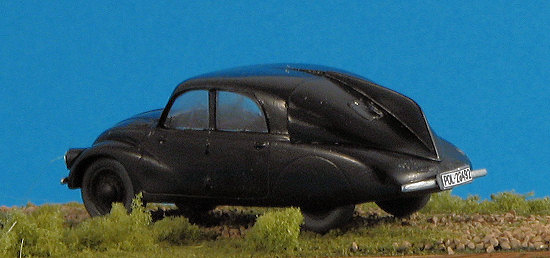 s.
s.
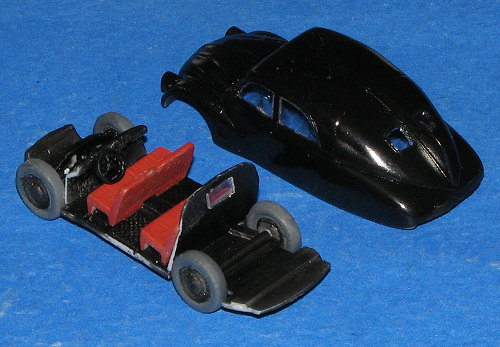
The body is split down the center which means there will be a seam to fill. Why this could not have been molded in one piece is a mystery as most car kits are done that way. However, it is not all difficult as the bonnet and boot are a single piece. The interior is sufficient for the scale and consists of two bench seats, a front and rear bulkhead and stick shift. The steering wheel mounts to the front bulkhead and this rather shallow bulkhead has the foot pedals molded in place. Of course, the mounting hole for the steering shaft will need to be drilled out prior to installation. Suspension is a fixed rear axle with transverse leaf springs in the front. The single piece wheels are fairly well done and slip on the ends. Bumpers are provided though the sprue attachment points are quite large so care needs to be done when removing them and most of the other bits as well. The clear bits are actually quite clear and you should be able to see into the interior without any problems.
Instructions are a sheet of newsprint-like paper with a history and parts diagram along with painting guide on one side and 8 well drawn construction steps on the other. It seems that Humbrol, Agama and Tamiya are the paints of choice and generic colors are provided. Brown is the main shade for the interior with the exterior in either Panzer Grey for one option and a variegated color scheme for the other. Both are military vehicles and the small decal sheet provides license plates and unit markings. I would imagine that the white markings would be a bit transparent as they are quite difficult to see on the sheet. Color profiles of both options are shown on the back of the box.
| CONSTRUCTION |
 So you'd think that with so few pieces, this would be a
breeze. Well, grasshopper, that would be a misunderstanding on your part. You
see, when it comes to semi-short run kits like this, few pieces does not equate
to quick build. I have learned this many many times in my life and so do not
always fall for that trap.
So you'd think that with so few pieces, this would be a
breeze. Well, grasshopper, that would be a misunderstanding on your part. You
see, when it comes to semi-short run kits like this, few pieces does not equate
to quick build. I have learned this many many times in my life and so do not
always fall for that trap.
Step one is to look at what I've got. I removed the larger, more sturdy parts from the sprue and cleaned them up as best I could. The bumpers were left on the sprues as the gates are large and the parts are thin. First order of business was to see just what I had in terms of subassemblies. Basically a chassis and a body.
First, the body halves had to be glued together and the bonnet/boot pieces glued on. Normally I'd wait to attach these bits until after the body dried and was sanded, but the body is rather thin in the front and back so adding these bits made things sturdier. The boot (which is in the front) fit fairly well. I needed some filler on the edges near the front, but nothing major. The bonnet (in the back), was not such a good fit. Much fussing was needed to get a decent fit and filler was in evidence (as it was on the entire top of the car body itself.
With those pieces glued and filler drying, I moved to
the chassis. The front and rear axle assemblies were cleaned up and glued in
place. As was the case with most of the kit, attachment information and points
were a bit vague, however, one can persevere with some test fitting. Wheels were
cleaned up of their mold seam (and tread). I also cleaned up the seats and
painted them with a reddish brown to simulate leather. This is no real need to
spend a lot of time gussying up the interior as little will be visible through
the thick and stressed clear bits. I painted the entire chassis matte black and
that included the rear section behind the back seat and the dash section. Then I
glued in the seats and when dry, attached the rear piece. Test fitting was done
with the body to be sure I had everything properly done. Naturally, I snapped
the steering column in half trying to remove it from the sprue, but this worked
out fine as it would have been far too long. I had to drill a hole to place the
column, but one it and t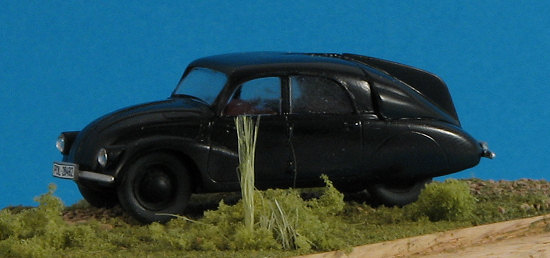 he wheel
were in place, the stick shift was glued in and that was it.
he wheel
were in place, the stick shift was glued in and that was it.
 With
the interior in good shape, the wheels were glued in place and left to dry. When
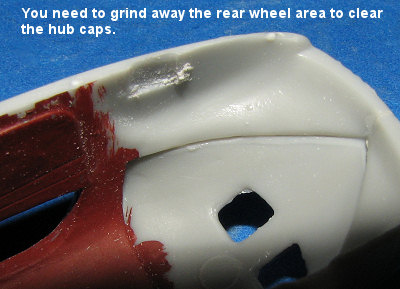
I went to test fit the body again, I noticed that I couldn't get the rear wheels
to fit. This was due to the hub caps hitting the body. Rather than sand down the
hub caps, I used my grinder and ground away enough space inside the body to get
the clearance I needed. I also glued on the headlight housings, slightly
drilling them out once they were on and dry.
With
the interior in good shape, the wheels were glued in place and left to dry. When
I went to test fit the body again, I noticed that I couldn't get the rear wheels
to fit. This was due to the hub caps hitting the body. Rather than sand down the
hub caps, I used my grinder and ground away enough space inside the body to get
the clearance I needed. I also glued on the headlight housings, slightly
drilling them out once they were on and dry.
Then it was time for some paint.
| COLORS & MARKINGS |
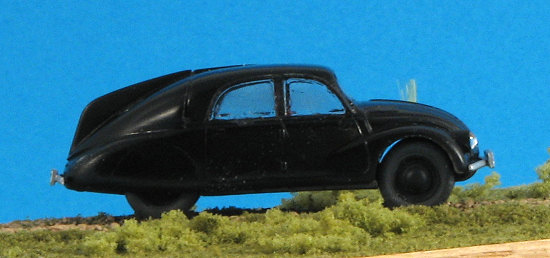
No need to mask this one. I decided to go easy and sprayed the entire body with Gunze gloss black lacquer. It went on beautifully and dried in no time at all. Were I to have done the military version, I'd have painted that one by hand as the scheme is complex and expecting an air brush to do it would have been asking a lot.
| FINAL CONSTRUCTION |
Next was the installation of the clear bit. These required some careful trimming to fit. Especially the side windows. They are joined by a thin section of plastic as if they are to be installed as one piece. Won't work. I cut the attachment and installed the windows separately. They took some 'oof' to get into place, but better tight than sloppy loose as it makes it so much easier. I used clear gloss paint to hold them in place. Thanks to their Coke bottle like thickness, any interior work disappears into an amorphous blob of different colors.
 With
the body pretty well complete and the chassis done, I did some more painting so
that no naked plastic would be seen through the wheel wells and such. I was also
pretty surprised at how level the chassis was. Not perfect, but a lot better
than usual. It was then time to attach the body and chassis together. I used
regular cement for this with a tack of super glue to hold the pieces in place
while the glue dried. For that job I used Agama's cement as it is thicker than
the normal glues and allows quite a bit of fudging around before it dries. The
other more liquid glues seem to dry a bit faster and don't provide that extra
time.
With
the body pretty well complete and the chassis done, I did some more painting so
that no naked plastic would be seen through the wheel wells and such. I was also
pretty surprised at how level the chassis was. Not perfect, but a lot better
than usual. It was then time to attach the body and chassis together. I used
regular cement for this with a tack of super glue to hold the pieces in place
while the glue dried. For that job I used Agama's cement as it is thicker than
the normal glues and allows quite a bit of fudging around before it dries. The
other more liquid glues seem to dry a bit faster and don't provide that extra
time.
With the body in place, all that was really left were
the headlights and the bumpers. Typical of short run kits, the bumpers are quite
thin and attached to very thick sprue gates. Despite all my care, I broke one of
them in half. Repair was made using standard cement and the body attachment
points were sanded down considerably as they are HUGE on the sprue. There is no
indication of which one goes where and they are both different sizes. I used the
shorter one on the rear and to the bumper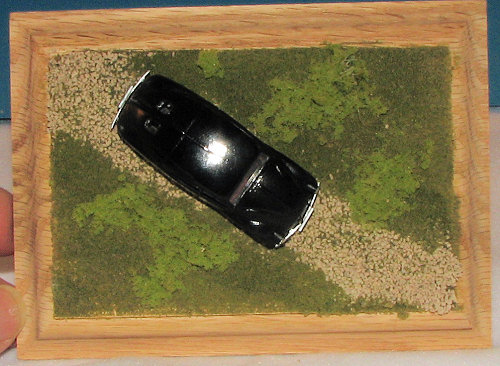 s
I added the license plate brackets. These were both brush painted with Humbrol
Aluminum and left to dry. The headlights were replaced with MV Lenses. I used MV
# 29 for this. If you get no other size of lens, a #29 is by far the most useful
as they are just the right size for 1/48 aircraft landing lights and 1/72
car/truck headlights.
s
I added the license plate brackets. These were both brush painted with Humbrol
Aluminum and left to dry. The headlights were replaced with MV Lenses. I used MV
# 29 for this. If you get no other size of lens, a #29 is by far the most useful
as they are just the right size for 1/48 aircraft landing lights and 1/72
car/truck headlights.
So that was almost it.
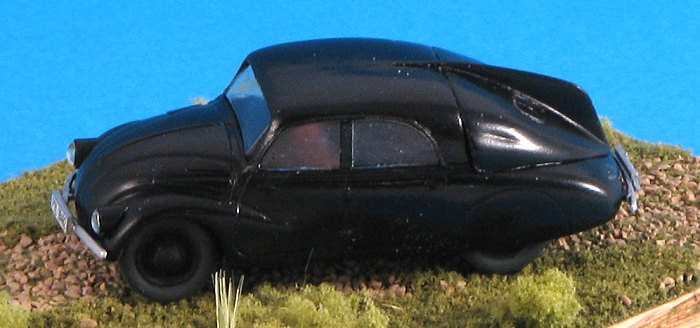
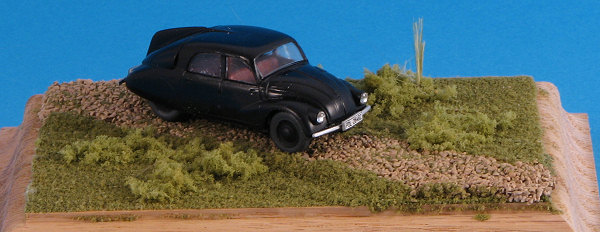
These little kits cry out for some sort of display stand and generally I try to do one for all of my 1/72 vehicles. A nice, inexpensive wooden 3x5 base was found in what is a growing base collection. I smothered the top with white glue and covered it with Woodland Scenics grass. Then a road was created through the middle of it ( and I should have made it wider) using standard N gauge train ballast. Then some clumpier foliage was added as well as a sprig of taller grass. Nothing really fancy and all done in a day or so, but it sure beats having the model sit there by itself. Makes it easier to handle as well. I then positioned the car on it and attached it using more white glue.
| CONCLUSIONS |
So there you are. Another interesting and very small model from Attack Hobbies. Though not a breeze to build and it did have its moments where modeling skills are required, it is something that I found a refreshing change and I know you will as well. Perfect for those lacking a lot of display space.
Thanks to me for buying this one for you.
June 2007
#1471 in a series.
Copyright ModelingMadness.com. All rights reserved.
If you would like your product reviewed fairly and fairly quickly, please contact the editor or see other details in the Note to Contributors.