Penelope Pit Lane 1/32 1960 Scarab F.1 Car
| KIT #: | Isn't one, built up from components |
| PRICE: | £45.40 including shipping which converted to $68.20 thanks to the weak dollar and stronger pound sterling |
| DECALS: | Multiple options |
| REVIEWER: | Scott Van Aken |
| NOTES: | Slot car with resin body. |
| HISTORY |
Scarab was an all-American open-wheel race car
and sports car constructor from the USA featuring cars designed and built by
Tom Barnes and Dick Troutman for Reventlow Automobiles Inc, owned by Lance
Reventlow. The Chevrolet engines were built by Traco Engineering (Jim Travers
and Frank Coons). Nicknamed "The Rich Kids", builders of the famous
consecutive winning Indianapolis 500 race cars driven by famed driver Bill
Vukovich. and the highly publicized winning Ford T-birds at Daytona in the
late fifties. Troutman and Barnes were most successful building sports cars
for amateur road racing in the USA in the 1950s. Chuck Daigh drove the
Scarab sports car to victory in the 1958 Riverside International Grand Prix,
beating a field of international factory teams including famous race car
driver Phil Hill and the Ferrari Team. Carroll Shelby drove the Scarab
sports car to
 victory at the Continental Divide raceway in Castle Rock
Colorado setting a new course record.
victory at the Continental Divide raceway in Castle Rock
Colorado setting a new course record.
Scarab made an ill-fated entry into Formula One during the 1960 season with front-engine cars, which by then, were nearly obsolete. The engines in these front engine cars were 4 cylinder units similar in layout to the Offenhauser, but entirely of Scarab's own design. They featured Desmodromic valve gear similar in design to that found on the Mercedes engine of the period and were built and maintained by Chuck Daigh. The engines were the Achilles heel of the team as the Desmo gear could not cope with the large amount of movement in the engine block and would reliably pull the valves closed too far resulting in failure. Scarab participated in five Grands Prix, entering a total of nine cars. Reventlow was joined by his engineer Chuck Daigh in piloting the blue and white liveried cars. Both Scarabs were entered in the Grands Prix of Monaco, Holland, Belgium, and France, while only Daigh's car was entered in the American Grand Prix. It should be noted that Daigh, while entered in the Dutch Grand Prix, did not race due to payment issues. The two cars only combined to five actual starts (there were several 'did not qualify) and only one time did a car finish, that in 10th during its final race.
The following year Chuck Daigh went on to pilot one of the Scarabs in International Formula racing in Europe where he finished eighth, at Goodwood vying for the Lavant Cup, and finished seventh in a bid for the International Trophy. A rear-engine single-seater car was built, but never raced in a Formula One event, it ran once in Formula Libre race at Sandown Park in Australia with a Buick V8 engine.
| THE KIT |
 As
indicated in the stats box, this isn't a kit per se, the folks at Penelope
Pitlane offer all the parts needed to build a car from what they offer, but
they do not offer complete kits. Instead, they tell you which of their parts
are necessary to build one depending on the body that you are buying.
Doesn't seem like a good way to do things, but really, it is as you may
already have some of the parts needed and no need to spend money on
something you won't need.
As
indicated in the stats box, this isn't a kit per se, the folks at Penelope
Pitlane offer all the parts needed to build a car from what they offer, but
they do not offer complete kits. Instead, they tell you which of their parts
are necessary to build one depending on the body that you are buying.
Doesn't seem like a good way to do things, but really, it is as you may
already have some of the parts needed and no need to spend money on
something you won't need.
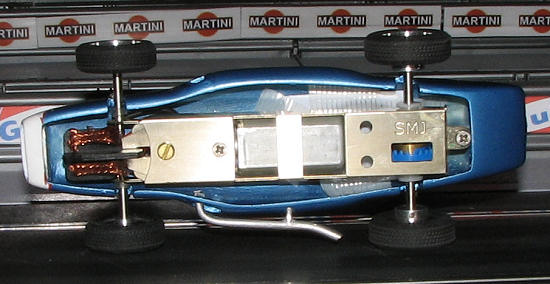
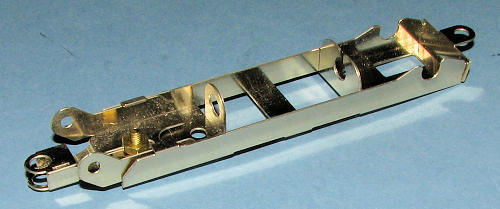
Anyway, the parts I got for this project are the RB 3 resin body, CK1
chassis pack (which included the SMJ nickle plated, you-bend-it chassis as
well as a FF-050 motor, Slot.it guide and gear and axles), FW1 front wheels
and tires, RW1 Rear wheels and tires, and finally, INS 3 Scarab F.1 wheel
inserts.
The body part of all this is superbly molded and free of any air voids,
pinholes or other molding glitches. It comes with a vacuformed windscreen
and decals to cover all the different numbers it wore when it raced. A vac
driver body and resin head are provided with the roll bar, mirrors, radiator
and exhaust made in cast metal. All this was packaged in a sturdy box and
arrived in perfect condition.
| CONSTRUCTION |
 Actual
construction is painless and pretty quick. The etched chassis was removed from
its frets and all the nubs were sanded down. This is pretty thick stuff, but the
attachment areas are not any thicker than many standard PE frets we buy for our
models. I used a pair of scissors to cut them free and an old sanding stick to
smooth out the edges. To ensure proper stiffness, I soldered the tabs closed.
With this nickel plated material, that was a very easy thing
Actual
construction is painless and pretty quick. The etched chassis was removed from
its frets and all the nubs were sanded down. This is pretty thick stuff, but the
attachment areas are not any thicker than many standard PE frets we buy for our
models. I used a pair of scissors to cut them free and an old sanding stick to
smooth out the edges. To ensure proper stiffness, I soldered the tabs closed.
With this nickel plated material, that was a very easy thing
 to do as it has
great heat transfer.
to do as it has
great heat transfer.
Installing the motor and rear axle bits was quite
easy. I found the rear bearings to be a bit oversized, but for this car, it is
good enough as this won't be raced so speed isn't really a factor. The small can
motor is perfect for these cars and give good performance without being too
fast. In the front, there are no set screws for the wheels. These are to
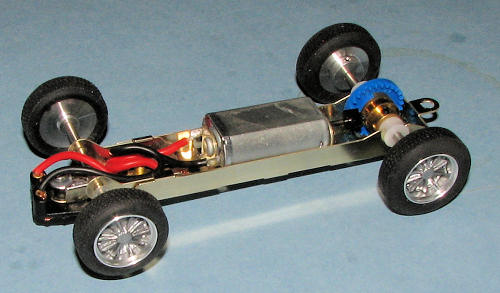 be
glued in place and I eventually used super glue. To hold the axle in the center
pieces of what look like surgical tubing are cut and pressed onto the axle.
These will then hold things in place. A rather ingenious solution, though one
could just as well use brass or aluminum tubing spacers in its place. The tires
are well formed and slip on the wheels with no troubles. I painted the cast
metal inserts a steel color and attached them with super glue as well. They look
very nice. A Slot.it guide is provided and fits well. If there is a downside, it
is that the guide rides up higher than the norm and isn't near flush with the
track. Again, this isn't really that much of an issue with these cars as they
are not that fast and there is no worry of a lot of de-slotting due to the
shallow guide penetration.
be
glued in place and I eventually used super glue. To hold the axle in the center
pieces of what look like surgical tubing are cut and pressed onto the axle.
These will then hold things in place. A rather ingenious solution, though one
could just as well use brass or aluminum tubing spacers in its place. The tires
are well formed and slip on the wheels with no troubles. I painted the cast
metal inserts a steel color and attached them with super glue as well. They look
very nice. A Slot.it guide is provided and fits well. If there is a downside, it
is that the guide rides up higher than the norm and isn't near flush with the
track. Again, this isn't really that much of an issue with these cars as they
are not that fast and there is no worry of a lot of de-slotting due to the
shallow guide penetration.
| COLORS & MARKINGS |
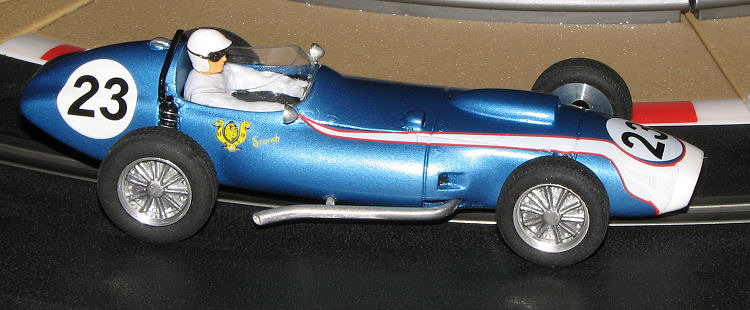
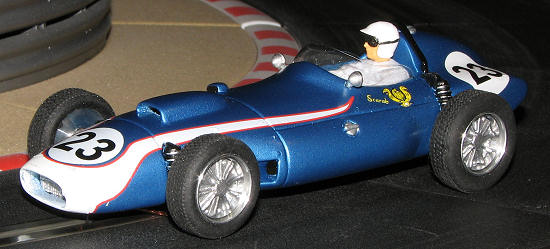
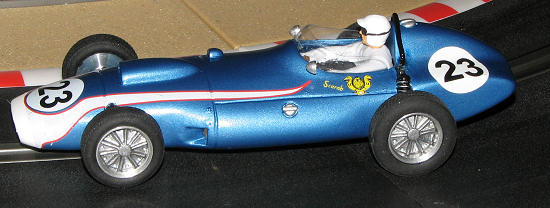
Where most of the work occured was with assembling the body. Painting as a matter of fact. The car looks to be a lightish metallic blue. I tried mixing paints, using paints off the shelf and even had a company mix some paint based on a photo I gave them. All were too dark, even the 'custom' mix. I finally settled on the lightest of the shades, and after minimal clean-up of the body and an overall light sanding, sprayed it on.
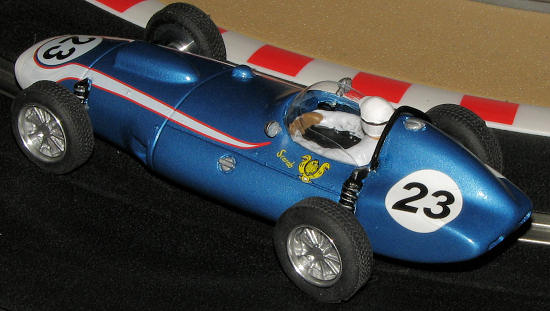
 I then went to attach the nose marking decals. The
truth is that they are not well designed and will not fit as shown on the photo
at Penelope Pit Lane's web site. I showed the result to the owner who stated
that one has to use a lot of Solvaset and just shove things around until it
fits. Well, these decals are ultra thin and any Solvaset shoving will cause a
real mess. He was kind enough to send another decal and after painting the very
nose white, I cut this piece into sections for application. The result still is
not perfect, but it is better than before, despite having to use many little
sections of decal to fill in the gaps. Not the best solution, but one I can live
with and you really don't see the patchwork when the car is on the track anyway.
The rest of the decals went on without a hitch and I was able to double up on
the rear roundels to make them less transparent. I then gave the body a couple
of coats of Testors One Step Clear Lacquer. While one coat would have sufficed
in most instances, I like giving slot cars two for added protection, especially
when they have resin bodies. The body kit decals include enough numbers so that
you can build any of the appearances the car made during its short career. The
instructions include a chart that shows which car and which driver had what
number during what race. I chose the #23 Chuck Daigh car that finished 10th in
the United States Grand Prix at Watkins Glen in 1960, the only event these cars
actually finished. He came in 10th.
I then went to attach the nose marking decals. The
truth is that they are not well designed and will not fit as shown on the photo
at Penelope Pit Lane's web site. I showed the result to the owner who stated
that one has to use a lot of Solvaset and just shove things around until it
fits. Well, these decals are ultra thin and any Solvaset shoving will cause a
real mess. He was kind enough to send another decal and after painting the very
nose white, I cut this piece into sections for application. The result still is
not perfect, but it is better than before, despite having to use many little
sections of decal to fill in the gaps. Not the best solution, but one I can live
with and you really don't see the patchwork when the car is on the track anyway.
The rest of the decals went on without a hitch and I was able to double up on
the rear roundels to make them less transparent. I then gave the body a couple
of coats of Testors One Step Clear Lacquer. While one coat would have sufficed
in most instances, I like giving slot cars two for added protection, especially
when they have resin bodies. The body kit decals include enough numbers so that
you can build any of the appearances the car made during its short career. The
instructions include a chart that shows which car and which driver had what
number during what race. I chose the #23 Chuck Daigh car that finished 10th in
the United States Grand Prix at Watkins Glen in 1960, the only event these cars
actually finished. He came in 10th.
| FINAL CONSTRUCTION |
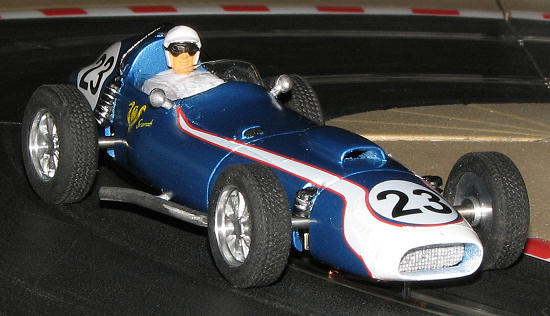
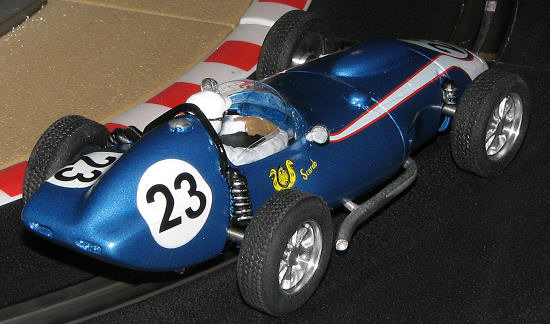
 For this,
it was mostly adding on the extra bits. The clear windscreen was cut out and
after much fussing, I was able to get it glued in place with super glue. The
holes for the two mirrors were drilled out a bit more and the mirrors installed.
On the lower right of the body, the exhaust was glued in and again after much
fiddling, the nose radiator was glued in place. I then drilled out the resin
mounting posts to accept a pair of screws. One has to be extremely careful when
installing screws in resin to keep the area from cracking. The roll bar was also
a bit of a pain. It isn't really mounted in the correct place as photos show it
inside the cockpit, but there isn't anywhere solid to mount it so I did as in
the photo on the web site and mounted it high over the back. It is actually a
teeny bit too short so if
For this,
it was mostly adding on the extra bits. The clear windscreen was cut out and
after much fussing, I was able to get it glued in place with super glue. The
holes for the two mirrors were drilled out a bit more and the mirrors installed.
On the lower right of the body, the exhaust was glued in and again after much
fiddling, the nose radiator was glued in place. I then drilled out the resin
mounting posts to accept a pair of screws. One has to be extremely careful when
installing screws in resin to keep the area from cracking. The roll bar was also
a bit of a pain. It isn't really mounted in the correct place as photos show it
inside the cockpit, but there isn't anywhere solid to mount it so I did as in
the photo on the web site and mounted it high over the back. It is actually a
teeny bit too short so if
 you are contemplating this build, you may want to
substitute wire for the cast metal roll bar.
you are contemplating this build, you may want to
substitute wire for the cast metal roll bar.
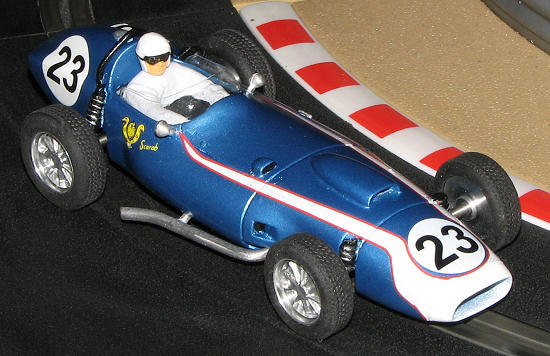
More painting was done on the shocks and towers to add some interest. The vac driver was cut to size and painted. Penelope Pit Lane provides a resin driver's head for this car that is fashioned with a helmet as was worn in the 1950s. The drivers of the Scarab wore the later early Bell helmet with the hard sides over the ears. I had a set of driver's heads from Maxi Models that included this later version so that was used in place of the earlier head (which should come in useful for future projects). Once painted and glued in place, this assembly was taped in place.
Then the car was put on the track to see how it runs. I have to say, that while it isn't the fastest car I have, even on the rubber tires supplied, it moves along at a pretty good clip. The only issue I have to work out is how to get the front wheels to be more free turning. It looks like the front axle is rubbing on the motor lead wires. I've tried routing them over and under the axle, but in both cases they rub. I'll come up with something, but for now, it is a bit of a poser.
| CONCLUSIONS |
 You may not believe it, but this car took well over
two months to finish, part of that time fussing with the body color and part of
that time concerned with the decals. The end result is a car that I'm glad I
took the time to build up. None of the usual RTR (Ready to Run) companies would
expend the money in an unsuccessful one-off like this so going the resin body
route was really the only way to do it. If these sorts of things pique your
interest, perhaps you might want to give it a try.
You may not believe it, but this car took well over
two months to finish, part of that time fussing with the body color and part of
that time concerned with the decals. The end result is a car that I'm glad I
took the time to build up. None of the usual RTR (Ready to Run) companies would
expend the money in an unsuccessful one-off like this so going the resin body
route was really the only way to do it. If these sorts of things pique your
interest, perhaps you might want to give it a try.
| REFERENCES |
http://en.wikipedia.org/wiki/Scarab_(constructor)
July 2009
Copyright ModelingMadness.com. All rights reserved.
If you would like your product reviewed fairly and quickly, please contact the editor or see other details in the Note to Contributors.
Back to the Review Index Page 2019
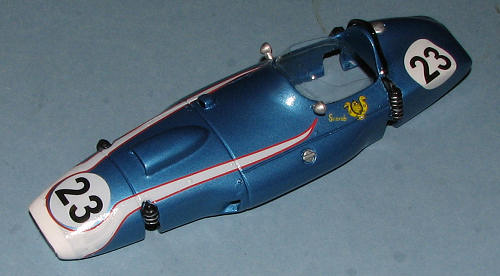
Here's a shot for those of you who want to see the seamy underside.....;0)