| KIT #: | ? |
| PRICE: | $35.00 for the body |
| DECALS: | None included |
| REVIEWER: | Scott Van Aken |
| NOTES: | Resin with vac windscreen metal injector stacks |
| HISTORY |
To auto racing enthusiasts, the name McLaren is very well
known. One of the great New Zealand racers of the 1960s, his cars came to
dominate the Can Am for several years before being ousted by the onslaught of
Porsche and its seemingly bottomless source of funding. Though Bruce McLaren was
killed in a testing accident at Goodwood in the UK during mid 1970, his cars
went 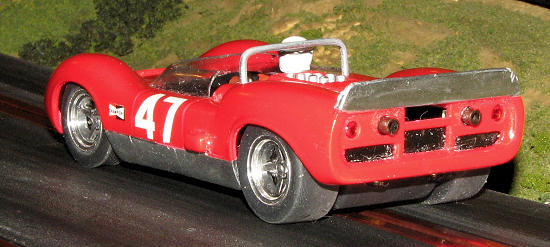 on to win races in a myriad of different racing series and today his name
still goes on in Forumula One.
on to win races in a myriad of different racing series and today his name
still goes on in Forumula One.
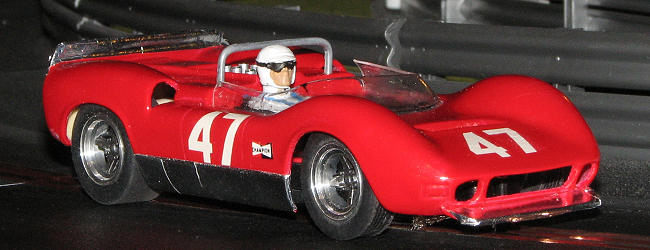
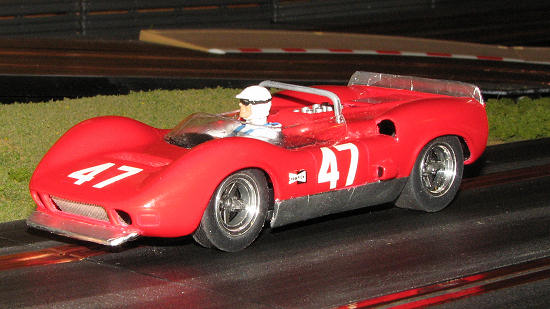
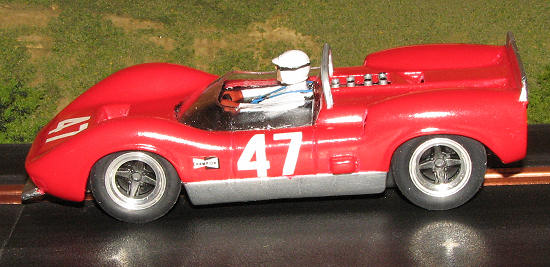
However, it is back in the mid 1960s that his cars were starting to be well known. His first purpose made sports racer was the M1A, powered by a small block Oldsmobile engine. It was fairly successful and many copies were sold to other racers. His M1B, and subject of this article, was an aerodynamic improvement over the M1A in that it was a bit more blunt, a bit wider and was able to handle the aero devices that were just coming into play. This particular car is one of the early one and is in the markings used in the 1965 Nassau Speed Weeks events. In the main race, the 25 lap, 181km Governer's Trophy, Bruce McLaren defeated Hap Sharp's Chapparal 2A and 48 other entries in a hard-fought event.
| THE KIT |
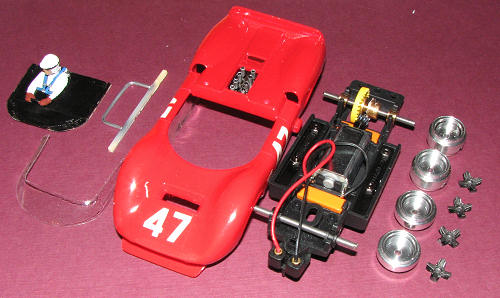
Once again, this isn't really a standard kit. What the deal is with this as with many aftermarket slot car bodies is the company provides a body and suggests the chassis and decals. It is then up to the builder to bring together all the pieces needed to get a running slot car. If one has been at it long enough, some of these pieces will already be on hand. If not, there will be a number of places where various bits can be found.
| CONSTRUCTION |
First thing to do is to prepare the body. This one is just like any aircraft/ship/armor resin body in that there is flash to remove, mold lines to sand down and the chassis mounting holes to drill out.
With the body prepped, it was set aside for painting.
 I then gathered the parts for the chassis. The chassis
recommended is the 'Sebring' chassis that fits under several Monogram and MRRC
cars. These cars are easy to find and I had bought (at a considerable discount)
several Monogram Ferrari kits just to rob the chassis, motor and guide flag. I
was fortunate to be able to sell off the body and other bits I didn't use to
help recoup some of my money. In order to get the chassis to fit, I had to
resize it (the length is adjustable) down to as short as it would get.
I then gathered the parts for the chassis. The chassis
recommended is the 'Sebring' chassis that fits under several Monogram and MRRC
cars. These cars are easy to find and I had bought (at a considerable discount)
several Monogram Ferrari kits just to rob the chassis, motor and guide flag. I
was fortunate to be able to sell off the body and other bits I didn't use to
help recoup some of my money. In order to get the chassis to fit, I had to
resize it (the length is adjustable) down to as short as it would get.
I installed the two weights supplied in the kit in place of the magnets as I don't like magnet racing. I then cut a couple of sections of 3/32 piano wire to use for axles. This stuff is great as you get 6 feet of it for about $3. Enough for several dozen axles. For wheels, I used the very nice BWA ones. These come in a variety of sizes and I've used them for years. BWA also does a number of resin inserts and has the ones that are correct for this car. For gears, I used one of the many Slot.it crown gears that I have, choosing one that would actually fit in place. For rear tires, I used some Indy Grips that fit the wheels and on the front, some spare rubber ones from the growing parts bin. This pretty much completed the chassis and it was run for several laps to be sure it all worked properly. As I'd drilled the holes already, I only had to wait on the body being done to hook it all together. One thing one has to be very careful with is that the mounting posts are resin so seating the body mount screws takes some careful work to keep from either stripping the holes or splitting the mounting posts. It is a problem with resin, but most of us are able to deal with it one way or another.
| COLORS & MARKINGS |
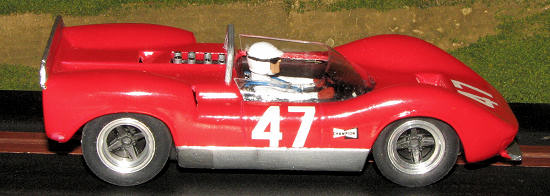
During much of this, I worked on the body. I chose Tamiya Red in a spray can and so painted the bodyI always have trouble with red and with spray cans so the finish isn't great, but good enough.
 Meanwhile I started cleaning up and painting the interior,
driver, rear body piece and the engine piece. We are talking mostly black,
white and metallics for this using a variety of paints. All of this was done at
a rather leisurely pace as I did slot car stuff in between other builds and
work.
Meanwhile I started cleaning up and painting the interior,
driver, rear body piece and the engine piece. We are talking mostly black,
white and metallics for this using a variety of paints. All of this was done at
a rather leisurely pace as I did slot car stuff in between other builds and
work.
For decals, I had some white numbers that were the right font, but a little large. No problem as they went right on. I also used Bare Metal Foil for the lower body, front and rear spoiler. This is actually too bright and were I to do another (that is WHEN I do another, I'll see about painting on the aluminum.
With the decals dry, did the detail painting. Then I gave the body a good coat of Testors clear gloss lacquer paint to seal everything in and add protection. I also painted the very back of the wheels with matte black before gluing in the inserts (which had been painted steel).
| FINAL CONSTRUCTION |
 Now it was time to bring a bunch of bits together. I glued the driver in the
interior after attaching the steering wheel. I also glued the upper engine piece to the body. I
also glued the back section to the body. There is a notch to help align
things and this required me to thin down the attachment point a bit.
Now it was time to bring a bunch of bits together. I glued the driver in the
interior after attaching the steering wheel. I also glued the upper engine piece to the body. I
also glued the back section to the body. There is a notch to help align
things and this required me to thin down the attachment point a bit. 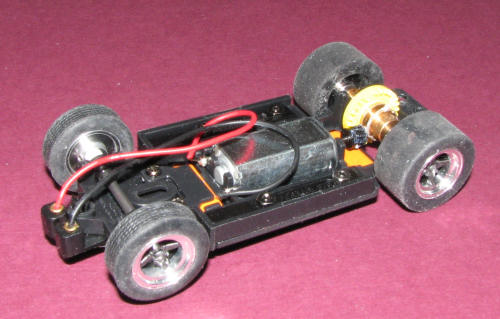 slotted in place after drilling out the holes in the body to
accept it. Unfortunately, I had run out of MV Products lenses so had to wait
while I ordered a pair. This car used part # L 129 and once they arrived
were glued in with
clear gloss paint.
slotted in place after drilling out the holes in the body to
accept it. Unfortunately, I had run out of MV Products lenses so had to wait
while I ordered a pair. This car used part # L 129 and once they arrived
were glued in with
clear gloss paint. | CONCLUSIONS |
For a rundown on what was spend on this (and you have to realize that I frequently over-order parts in anticipation for these sorts of projects) it came to this:
 Body: $35
Decals: $0 (Already had them)
Wheels: $16 for the four
Chassis, motor and guide: $21 (the car was $33 and I sold the parts I didn't use
for $11
Inserts: $4 for four
Crown Gear: $5
Pinion Gear: $0 (there was one on the motor)
Axles: about 10 cents for two
Bearings:$0 (I used the plastic ones on the chassis)
Indy Grip rear tires: $4.50
MV Products LS 129 lenses $1.80
That brings my expenditure to about $86.00 for the various parts.
Yes, pricey it is in some respects, but then I have a car that few would have and I got the enjoyment of working out the problem areas and adding my own touches to the car. Worth it? Yes, to me and I guess that is really what this is all about.
April 2010
If you would like your product reviewed fairly and quickly, please contact me or see other details in the Note to Contributors.