| KIT #: | 88311 |
| PRICE: | I paid $32.95 ($44.95 MSRP) |
| DECALS: | None |
| REVIEWER: | Scott Van Aken |
| NOTES: | Slot car kit |
| HISTORY |
The Porsche 908 was a racing car from Porsche, introduced in 1968 to continue the Porsche 906/Porsche 907/Porsche 910 series of models designed under Ferdinand Piech.
As the FIA had announced in 1967 to change the rules for the World
Championship for Marques by limiting the displacement of prototypes to 3000
cc, as in Formula One, (many felt this was to keep the big Ford GT-40s from
winning the championship again)
 Porsche
designed the new 908 as the first Porsche sports car to have an engine with the
maximum size allowed. The previous Porsche 907 only had a 2200 cc flat-8 engine
with 270 hp. The new 3 litre Flat-8 engine produced initially 257 kW (350 hp) at
8400 rpm, as well as some teething problems. Also, being traditionally
air-cooled and with only 2 valves per cylinder, it was still down on power
compared to more modern F1 designs which delivered over 400 hp (300 kW), but
were not suited to last in endurance races.
Porsche
designed the new 908 as the first Porsche sports car to have an engine with the
maximum size allowed. The previous Porsche 907 only had a 2200 cc flat-8 engine
with 270 hp. The new 3 litre Flat-8 engine produced initially 257 kW (350 hp) at
8400 rpm, as well as some teething problems. Also, being traditionally
air-cooled and with only 2 valves per cylinder, it was still down on power
compared to more modern F1 designs which delivered over 400 hp (300 kW), but
were not suited to last in endurance races.
The 908 originally was a closed coupe to provide low drag at fast tracks, but from 1969 on was mainly raced as lighter open spyder named 908/2, the subject of this kit. Though the 908/2 was soon replaced by a shorter, lighter and slightly more powerful (and more ugly) 908/3, the 908/2 continued to race with much success in the hands of privateer racers for many years.
| THE KIT |
For those not really familiar with the hobby of slot car racing as it is today, here is a bit of background. The hobby never really died away after the hey-days of the mid-1960s to early 1970s. Commercial speedway racing with 1/24 sale cars nearly died out, but thanks to HO scale and 1/32 scale, which was raced at home in local clubs, the hobby continued 'underground' for decades.
About 8-10 years ago, the hobby had a slow re-emergence, mostly in
Europe. This time, 1/32 scale was the scale of choice with
 the cars
becoming more and more accurate over what was around 30 or so years ago. The
sport seems to have gravitated to Spain as the major country of influence. Even
today, in Barcelona, there are at least 85 commercial establishments where one
can go and race slot cars. Most of these are on courses built up of plastic
tracks, just like what you can buy for your home.
the cars
becoming more and more accurate over what was around 30 or so years ago. The
sport seems to have gravitated to Spain as the major country of influence. Even
today, in Barcelona, there are at least 85 commercial establishments where one
can go and race slot cars. Most of these are on courses built up of plastic
tracks, just like what you can buy for your home.
One of the major innovators and the company that lead in the scale car
appearance movement was a company called Fly. They are known for good body
reproductions and dodgy mechanical engineering, with almost every car one buys
from them needing some sort of tweaking to get running. As a comparison, the
Italian company Slot.it and the British Scalextric produce cars you can take
from the box and run right away. But it was Fly that really got things going.
They are either liked or loathed, depending on who you talk to. I like them
because their line of cars are from an era I find particularly inviting; the
late 1960s and early 1970s. Unfortunately, the company has recently had a major
downturn and laid off
 most of its
workers. It may well be going into receivership, partly because it still builds
in Spain where the majority of other companies have their product made in China.
most of its
workers. It may well be going into receivership, partly because it still builds
in Spain where the majority of other companies have their product made in China.
In addition to ready to run cars that are already painted, Fly has often offered kits. Some are prepainted and other, like this one, are 'white' kits. The body is prepainted white and the builder then paints it. All the rest of the parts are unpainted as well, requiring the builder to use his skills. From my experience in returning to the hobby for a couple of years, most slot car people are pretty clueless when it comes to painting skills, so these kits sell fairly well, but don't zoom off the shelves, so to speak. Most of the hobby is through mail order from various on-line shops and those few brick and mortar stores around. In the St. Louis area, there are two places to go and buy slot car stuff. Both are a long drive for me and carry only a limited number of items; mostly complete racing sets.
 So
let's look at the kit. This one is a standard sidewinder configuration where one
does a lot of snapping of pieces into place. At least for the chassis. It
includes a magnet as most home set cars attain great cornering speeds by having
a magnet in the chassis. This is drawn to the metal power rails and keeps the
car on the track. The car is fast and boring to drive. Many of us remove this
magnet to allow the car to slide around. This, in turn, requires replacing the
rear tires with something that has more stick, but that is for later.
So
let's look at the kit. This one is a standard sidewinder configuration where one
does a lot of snapping of pieces into place. At least for the chassis. It
includes a magnet as most home set cars attain great cornering speeds by having
a magnet in the chassis. This is drawn to the metal power rails and keeps the
car on the track. The car is fast and boring to drive. Many of us remove this
magnet to allow the car to slide around. This, in turn, requires replacing the
rear tires with something that has more stick, but that is for later.
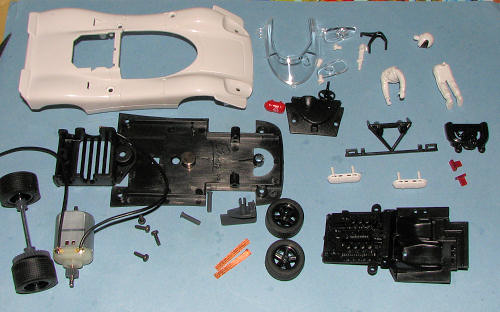
A standard Mabuchi-style FC motor with the rear gear/axle/wheel assembly already together are provided. The front wheels will be press fit on stub axles. These stub axles are a bit sloppy so many will install a straight axle. I use 3/32 piano wire cut to length for this operation, but again, that is for later as this is an out of the box build. Four body mounting screws are provided. There should be five.
The body shell is nicely done with some horrible headlights/covers a nice interior, driver figure, engine and transmission/exhaust detail. At the factory in Spain, these parts are held onto the body by melting the attachment pins with a soldering iron. Makes for quick assembly but also for some misalignment and it is something I just won't do. I use glue (YAY!). A three piece driver is provided. In this case, the driver has a later full-face helmet so isn't really accurate for this era car. The clear windscreen is well done and accurate for this version of the 908/2. The last things are a nice guide flag and copper braid. All of this is packaged in a clear view box with a good set of pictorial instructions, though after a while, most of us don't need them.
| CONSTRUCTION |
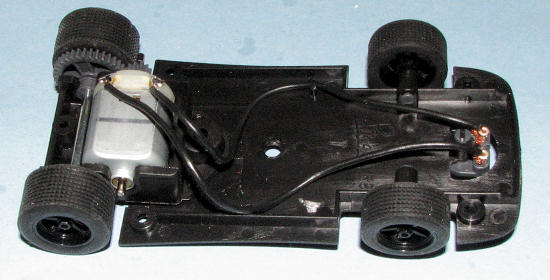 Actually,
most of this will be painting and decaling the body. The chassis can be
built up in about 10 minutes as one basically snaps in the rear axle assembly,
the motor assembly and then presses the two front wheels onto the stub axles. On
some of these kits, I've had the motor lead wires as separate items. This would
require soldering them on, but for whatever reason, this one came with the wires
attached. The guide is snapped into its holder, the two braid inserted and the
motor lead wires, which are stripped and pushed into long ferrules) are then
slid in front of the braid in the guide. Friction keeps them in place and it is
very effective. If one is to use the magnet, it fits into a holder just in front
of the motor pod, but I don't use them so leave it out. To help keep the guide
in the slot, I may add a touch of lead sheet weight behind the guide, but rarely
is much needed.
Actually,
most of this will be painting and decaling the body. The chassis can be
built up in about 10 minutes as one basically snaps in the rear axle assembly,
the motor assembly and then presses the two front wheels onto the stub axles. On
some of these kits, I've had the motor lead wires as separate items. This would
require soldering them on, but for whatever reason, this one came with the wires
attached. The guide is snapped into its holder, the two braid inserted and the
motor lead wires, which are stripped and pushed into long ferrules) are then
slid in front of the braid in the guide. Friction keeps them in place and it is
very effective. If one is to use the magnet, it fits into a holder just in front
of the motor pod, but I don't use them so leave it out. To help keep the guide
in the slot, I may add a touch of lead sheet weight behind the guide, but rarely
is much needed.
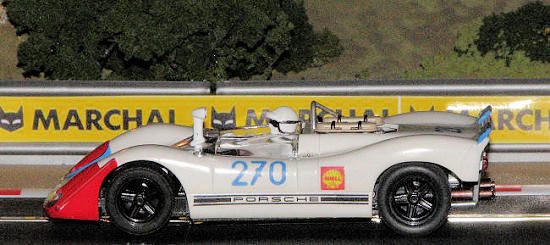
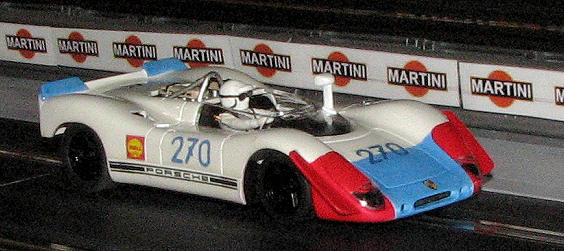
| COLORS & MARKINGS |
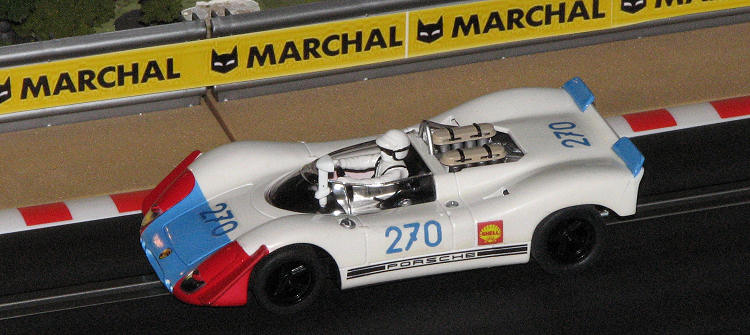
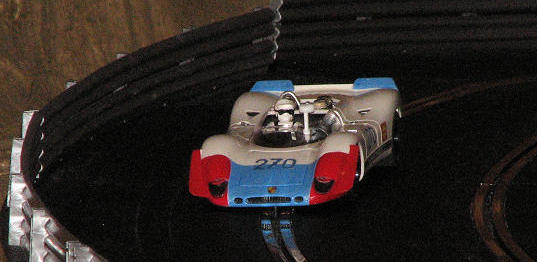
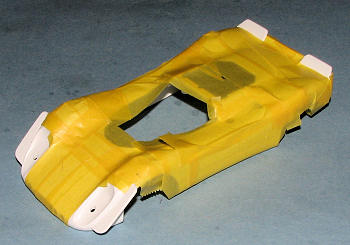 The
body is where most of the work goes. I had chosen a scheme from the internet
from the Targa Florio race. It was basically white with red and blue sections in
the front and blue spoilers on the rear.
The
body is where most of the work goes. I had chosen a scheme from the internet
from the Targa Florio race. It was basically white with red and blue sections in
the front and blue spoilers on the rear.
First step was to remove the mold seam from the body.
Once that was done, several coats of Testors gloss white were applied. When dry,
I masked it off (and I mean masked it off as overspray is one of my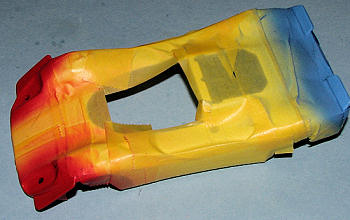 biggest problems painting cars) and sprayed on the red, using Tamiya red. The
blue was mixed from several shades and the rear spoilers were painted. Once that
was dry, the front red was masked and the blue sprayed on. I then removed the
masking and using a sharp scalpel blade, scraped away the inevitable leaks. Then
a couple of coats of Testors gloss clear enamel in a rattle can were applied. I
don't like this stuff, but the lacquer I usually use has been on backorder for
weeks and it does dry hard, though takes time to do so.
biggest problems painting cars) and sprayed on the red, using Tamiya red. The
blue was mixed from several shades and the rear spoilers were painted. Once that
was dry, the front red was masked and the blue sprayed on. I then removed the
masking and using a sharp scalpel blade, scraped away the inevitable leaks. Then
a couple of coats of Testors gloss clear enamel in a rattle can were applied. I
don't like this stuff, but the lacquer I usually use has been on backorder for
weeks and it does dry hard, though takes time to do so.
With the colors in place, it was time for markings. Cars of this period
were not festooned with all the adverts you see on today's cars. Just a few
basic sponsors and that was it. A decal maker (actually
 a person
who pirates other people's work and makes decals from it) had a sheet for the
Targa Florio racer I was seeking. It consists of basically numbers, a Porsche
logo on the side, a Shell logo and license plate. Five sets of these were on the
sheet. As his decals are notorious for being translucent, somewhat brittle, and
for the clear area being 'dirty', some work was needed. First I gave it several
coats of Testors Metallizer Sealer. This helped somewhat on the brittle part,
but they won't easily go ove
a person
who pirates other people's work and makes decals from it) had a sheet for the
Targa Florio racer I was seeking. It consists of basically numbers, a Porsche
logo on the side, a Shell logo and license plate. Five sets of these were on the
sheet. As his decals are notorious for being translucent, somewhat brittle, and
for the clear area being 'dirty', some work was needed. First I gave it several
coats of Testors Metallizer Sealer. This helped somewhat on the brittle part,
but they won't easily go ove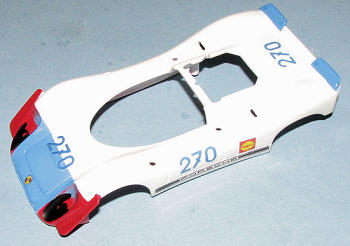 r
sharp curved surfaces, even with setting solution. I cut each of the markings I
needed quite closely to eliminate much of the crud in the clear as I could. The
Porsche logos on the side were too short, but since there were several, I cut
sections to lengthen it. The Shell logos were double placed to add some
intensity to the colors. I also did this on the front section.
r
sharp curved surfaces, even with setting solution. I cut each of the markings I
needed quite closely to eliminate much of the crud in the clear as I could. The
Porsche logos on the side were too short, but since there were several, I cut
sections to lengthen it. The Shell logos were double placed to add some
intensity to the colors. I also did this on the front section.
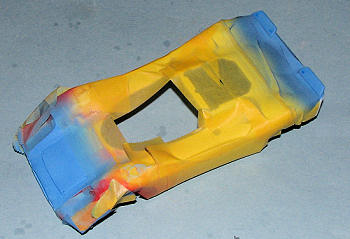
With all that in place, a couple more coats of the gloss clear were applied. Much to my disgust, though it doesn't show in the photos, the white car was turning a bit of a yellowish shade, thanks to the 'clear'.
| FINAL CONSTRUCTION |
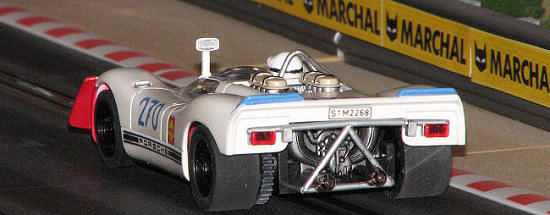
OK, painting and decals done so time to assemble the bits. While all the body painting was going on, I had painted the various pieces. The metal bits got aluminum or steel or burnt iron. Rear view mirror had its considerable mold seam removed and painted white. Interior was left black but the motor was painted aluminum. Roll bar was polished aluminum. The air cleaners that went over the carbs on this car were a tan shade so an appropriate Gunze acrylic shade was chosen. On this car, the upper portion of the headlight covers was painted, so first white, then red. Looking at photos, I noticed that the headlight area itself was black so that was brush painted.
 The
headlight covers and windscreen were glued in place. Then the steering wheel had
the shaft trimmed (too long) and glued on. In hindsight, it would have been
better to drill out the attachment hole. The lower section of the driver was
glued into the seat and the dash was glued in place, followed by the rest of the
interior. I then attached the upper body. If you leave the upper body in place,
you'll never get it past the steering wheel, so it has to be installed later.
The
headlight covers and windscreen were glued in place. Then the steering wheel had
the shaft trimmed (too long) and glued on. In hindsight, it would have been
better to drill out the attachment hole. The lower section of the driver was
glued into the seat and the dash was glued in place, followed by the rest of the
interior. I then attached the upper body. If you leave the upper body in place,
you'll never get it past the steering wheel, so it has to be installed later.
As I mentioned, the head had the wrong helmet so I substituted a resin head with the correct style helmet. My detail painting sucks. Then the carb covers were glued on followed by the roll bar. In the back, the engine, exhaust and tail light assemblies were installed, then the filler caps. That was it for the body.
Using the four screws, I screwed the body in place and was done. Test running showed the usual glitches, including the fact that the rear axle gear wasn't put on all the way, allowing the knurled area to slide into the rear bearings, locking up the rear. I removed the wheels and gear, reversing the way the gear was installed and pushing back on the rear wheels. This cured that problem, but I fully expect to have to replace the rear axle assembly with aftermarket in the near future as this area is a weak one for Fly.
| CONCLUSIONS |
OK, so why do all this work? Well, it allows me to have a slot
car in a livery that hasn't been cranked out of the factory by the thousands. It
also adds another
 nice Porsche 908 to my growing collection as it is a car I
happen to like. Sure, it will take more tweaking to run as well as other cars do
right from the box, but then, that is part of the enjoyment of the hobby and
eventually, it will run better than stock.
nice Porsche 908 to my growing collection as it is a car I
happen to like. Sure, it will take more tweaking to run as well as other cars do
right from the box, but then, that is part of the enjoyment of the hobby and
eventually, it will run better than stock.
| REFERENCES |
April 2009
Thanks to me once again for this one and keeping an eye out on the 'sales'
pages.
If you would like your product reviewed fairly and quickly, please
contact
me or see other details in the
Note to
Contributors.