| THE KIT |
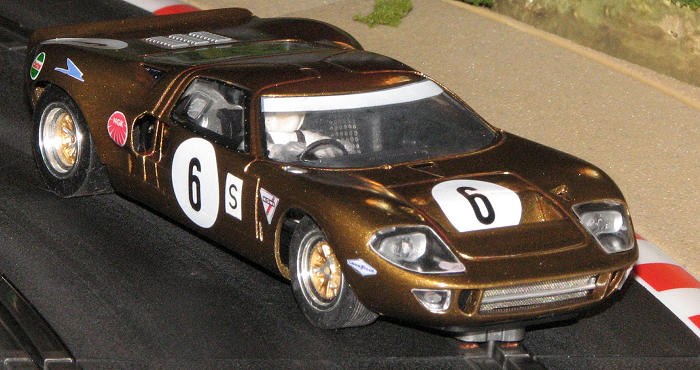
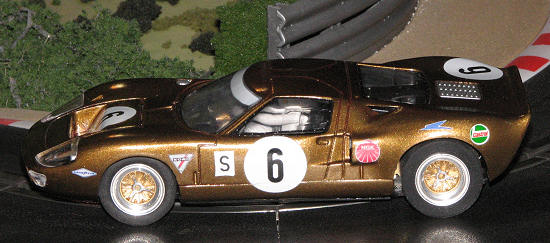
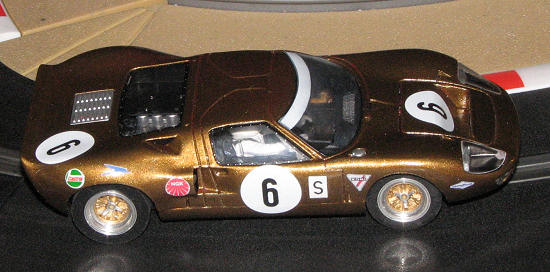
Fly 1/32 #6 Ford GT-40
| THE KIT |
There isn't any. This is a slot car and it was one that had been
through a lot. The previous owner had been less than kind to it and it was raced
hard. Sometime during the racing season, one of the four body mounting posts had
broken, several body bits had
 gone astray, and the front wheel well on one side
had been hacked larger, though I couldn't see why as there was no rubbing. The
front tires were a mess of caked on traction compound, the chassis was cracked
and typical of Fly cars, several hubs were broken and had been glued back in
place.
gone astray, and the front wheel well on one side
had been hacked larger, though I couldn't see why as there was no rubbing. The
front tires were a mess of caked on traction compound, the chassis was cracked
and typical of Fly cars, several hubs were broken and had been glued back in
place.
However, I bought it for a steal as it was complete and had a good running motor. In the process of restoration, there were a number of components replaced. This all brought the overall cost of the car back up, but it was still less expensive than a brand new one and I had a car in a livery that was not mass produced by the thousands.
| PREPARATION |
This sort of thing isn't really so much a 'construction' as it is, as
the Air Force calls it, an IRAN (Inspect and Repair As Necessary) process. First
step is to remove all of the bits that one can take off. Fortunately, this
particular car is not all that parts intensive,
 though some are a bit difficult
to remove. As slot cars have the parts melted in place at the factory, the first
job is to grind away the melted bits so the pieces can be removed. The headlight
assembly was particularly difficult as these areas hold in the turn signal and
radiator grille pieces.
though some are a bit difficult
to remove. As slot cars have the parts melted in place at the factory, the first
job is to grind away the melted bits so the pieces can be removed. The headlight
assembly was particularly difficult as these areas hold in the turn signal and
radiator grille pieces.
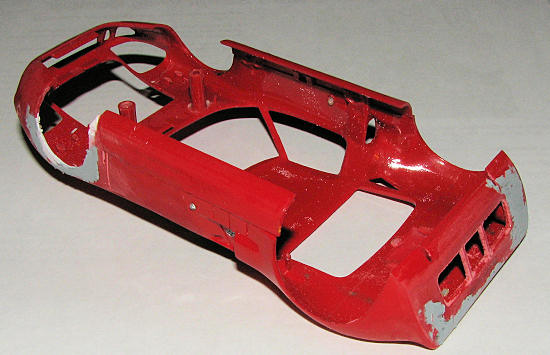
Once all the bits were removed I broke out the sandpaper to remove the markings. Unfortunately, Fly uses a type of paint that is not easily stripped off with 91% alcohol. In fact, most of it is impervious to it and Strip-A-Kit as well as ELO. I wasn't feeling like dunking this in brake fluid or using oven cleaner on it so it was sandpaper. This worked out well anyway as I had to remove the mold seam lines and that work eventually required sanding about half the body anyway.
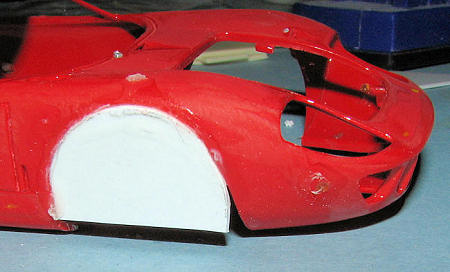 With the sanding done, I turned my attention to rebuilding the gouged
out wheel well. First, using a motor tool and sanding drum, I smoothed out the
rather ragged area. I then put a piece of card behind it and drew an outline on
it. This was cut out and cemented to the wheel opening. I first used standard
Tamiya cement and then reinforced it with
With the sanding done, I turned my attention to rebuilding the gouged
out wheel well. First, using a motor tool and sanding drum, I smoothed out the
rather ragged area. I then put a piece of card behind it and drew an outline on
it. This was cut out and cemented to the wheel opening. I first used standard
Tamiya cement and then reinforced it with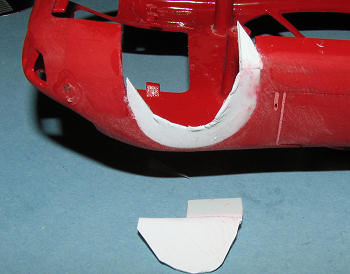 super glue.
Once it was in place, I cut out the majority of it to leave a basic wheel arch.
Then the filler was added and several treatments of sanding were provided.
During all this, some of the other features of the car were filled, such as all
the closed vents in the rear and some of the small 'marker' lights on the nose
and tail section that were not on this particular car.
super glue.
Once it was in place, I cut out the majority of it to leave a basic wheel arch.
Then the filler was added and several treatments of sanding were provided.
During all this, some of the other features of the car were filled, such as all
the closed vents in the rear and some of the small 'marker' lights on the nose
and tail section that were not on this particular car.
 In the
rear, I used a drill bit to make new tail light holes. The car I was modeling
had two smaller tail lights on each side, one red and one amber, instead of the
larger one provided on the original car. The large holes were filled with sprue
and then filler. It also did not have the open area near the top of the rear
body, so those were filled with super glue and then putty. Once all that
was taken care of, I redrilled the tail light holes to accept MV Productions
amber and red lenses.
In the
rear, I used a drill bit to make new tail light holes. The car I was modeling
had two smaller tail lights on each side, one red and one amber, instead of the
larger one provided on the original car. The large holes were filled with sprue
and then filler. It also did not have the open area near the top of the rear
body, so those were filled with super glue and then putty. Once all that
was taken care of, I redrilled the tail light holes to accept MV Productions
amber and red lenses.
Up front, the radiator exhaust piece had the large 'hump' that was for the spare tire sanded down. This was a lengthy process and the result is OK, but in reality, the angle of the exhaust ramp is too steep. Most won't notice the difference.
| COLORS & MARKINGS |
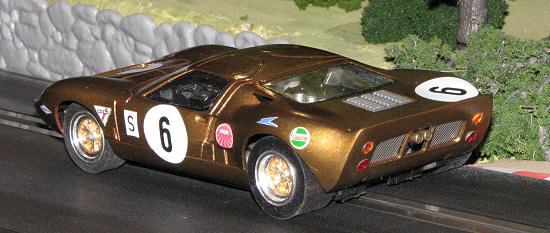
With all that sanding now done, it was time for paint. The two photos I
had showed one a very dark golden brown and another showed a lighter shade. The
lighter shade seemed overexposed so I looked for a match to the darker color. I
found it with Testors
 rattle can
Dark Bronze. A couple of coats seemed to work, though under the glaring eye of
the flash, I can see a few hints of the red car body. Guess I needed a few more
coats.
rattle can
Dark Bronze. A couple of coats seemed to work, though under the glaring eye of
the flash, I can see a few hints of the red car body. Guess I needed a few more
coats.
Decals came from a variety of sources. The roundels and numbers came from a Monogram sheet that has just those on it. The various sponsor logos all came from the Internet and were printed on white decal paper. These all were coated with Testors Metallizer Sealer to keep the colors intact. It meant some very careful cutting out of each one and thanks to the rather transparent qualities of the paper, all the sponsor logos are double thick.
When all was dry, a couple of coats of clear gloss lacquer were applied to seal it all in and provide protection from the inevitable shunt.
| FINAL CONSTRUCTION |
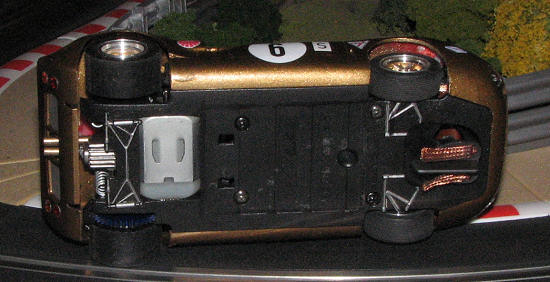
 I
then installed the MV lenses in the back and reattached all the various bits and
pieces. I did not replace the broken chassis mounting post, but used a longer
screw instead. As Fly cars are notorious for out of round wheels, I took the
opportunity to replace all the running gear. New axles were cut from 3/32 piano
wire, a new set of Slot.it gears were installed as were BWA aluminum wheels with
GT-40 resin inserts. The inserts were painted gold with silver knock-offs.
In the back, A couple of pieces of screen mesh were cut and glued in place.
Seems like if there are twin tail lights on each side, there is screen. If one,
there is not.
I
then installed the MV lenses in the back and reattached all the various bits and
pieces. I did not replace the broken chassis mounting post, but used a longer
screw instead. As Fly cars are notorious for out of round wheels, I took the
opportunity to replace all the running gear. New axles were cut from 3/32 piano
wire, a new set of Slot.it gears were installed as were BWA aluminum wheels with
GT-40 resin inserts. The inserts were painted gold with silver knock-offs.
In the back, A couple of pieces of screen mesh were cut and glued in place.
Seems like if there are twin tail lights on each side, there is screen. If one,
there is not.
Some things just couldn't be fixed well. One was the badly scratched windscreen. Try as I may, it just did not respond to treatment. Also not fixed was one of the headlight covers. However, the rest of it looks a heck of a lot better than it did when I started and the chassis upgrades make it a smooth and quiet runner.
| CONCLUSIONS |
I really like doing these sorts of things. I have two more cars that are even greater basket cases awaiting restoration and will eventually get those done once I get a good scheme for them. Thanks to my growing confidence with making my own decals, just about any part for which I have a photo can be reproduced. As often happens, I later found another photo of this car and the paint I picked is too dark. Option A....do nothing. Option B....strip it and repaint it. Option A is the winner! Stay tuned for more.
June 2009
If you would like your product reviewed fairly and quickly, please contact me or see other details in the Note to Contributors.