
Arii 1/32 Mazda K360
| KIT #: | 41017 |
| PRICE: | $2.00 - started |
| DECALS: | One option |
| REVIEWER: | Scott Van Aken |
| NOTES: | Kit was started. see article |
| HISTORY |
The
Mazdago (or TCS) was a three-wheeled open "truck" first produced
in 1931 that resembled a motorcycle with an open wagon or truck bed. It was
steered with handlebars and powered with an air-c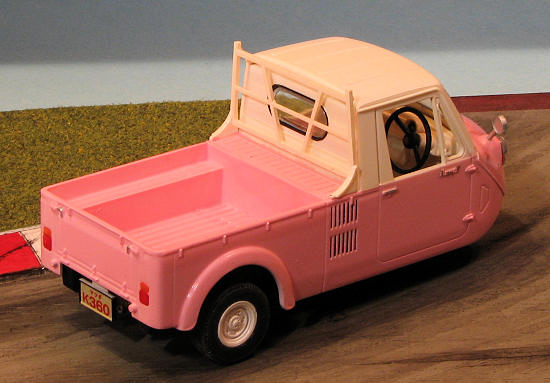 ooled 1-cylinder
engine/transmission combination unit. It was sold by Mitsubishi in Japan. It was
considered to be the first autorickshaw. Over the years, it would be produced in
different variants and spawned other similar designs such as the Hopestar and
Daihatsu Midget. It was also the first vehicle manufactured by Mazda.
ooled 1-cylinder
engine/transmission combination unit. It was sold by Mitsubishi in Japan. It was
considered to be the first autorickshaw. Over the years, it would be produced in
different variants and spawned other similar designs such as the Hopestar and
Daihatsu Midget. It was also the first vehicle manufactured by Mazda.
| THE KIT |
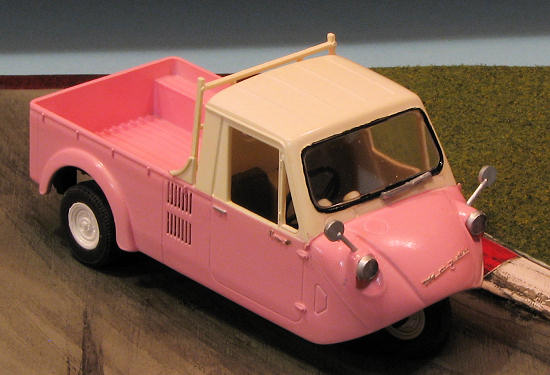
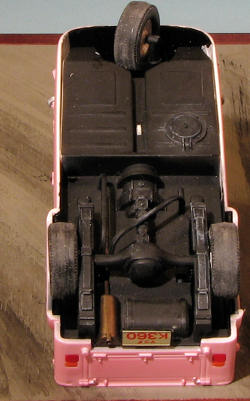
Molded in white plastic, this curbside is really a pretty simple kit. If you can see it from the outside, it is included. There are four vinyl tires of which only three are needed. The kit includes a nicely done suspension fore and aft with a 'snap in' front fork. The interior has a pair of seats, and instrument panel and steering wheel. There are decals for the instruments. In the bed there is a frame for behind the cab to keep stuff from sliding forward and damaging the passenger compartment. No cover is supplied. The kit also has no chrome parts so one will need to break out the Alclad II Chrome paint for the few bits that will need it. A small decal sheet with some Kanji writing and the aforementioned instruments is included. Despite its obvious age, it looks like it is still viable.
| CONSTRUCTION |
I bought this kit started. The previous owner had glued the license plate bracket and the rear springs and the instrument panel to the chassis assembly. Despite not removing the flash from the springs, he had done a good job. This is where I came in.
 I cleaned up and glued two 'hoops' to the underside of the chassis and then
cemented in the rear end. I also removed the mold seams from the body. The
engineering of the body is excellent and left me only two seams in the back and
two in the front to have to sand away. I also detail painted the steering wheel
in black along with the front fork.
I cleaned up and glued two 'hoops' to the underside of the chassis and then
cemented in the rear end. I also removed the mold seams from the body. The
engineering of the body is excellent and left me only two seams in the back and
two in the front to have to sand away. I also detail painted the steering wheel
in black along with the front fork.
| COLORS & MARKINGS |
As with all car models, painting was done during the construction phase. It seems that these vehicles were mostly two tone (as was popular in the 1950s) with a white upper section and the lower section in various shades. For this one, I painted the upper body and interior with Tamiya 'Racing White' in a rattle can. It is really an off-white similar to Classic White and isn't as stark as pure white. The underside of the chassis was painted in matte black. I masked off the upper section of the body and painted the rest in a lovely pink shade using Vallejo acrylics mixed with Future. I mixed it a bit too thin so it took several coats to cover properly. This is not a fantasy color as I found photos in Google of similarly painted vehicles. The wheels were painted white using Floquil's lacquers for Lexan bodies. For the interior, I painted the seats a neutral grey and rest of the insides in Racing White. These vehicles had pretty much no fabric in them aside from what may have been on the seats.
| FINAL CONSTRUCTION |
Once the body is painted, it is time to tackle the
rest of the vehicle. The front fork and wheel were attached as were the rears.
The tires had the large mold seam sanded away with a coarse sanding stick. For
the interior, the brake handle was cemented in place
 and the
instrument decal attached. There is no positive indication on just where the
shift lever fits. Looking at several videos on the operation of this vehicle, I
made an assumption that it fit on the floor in the passenger side as sitting it
on the interior 'hump' would have put the shift knob too high and too far back.
I'm probably wrong on this, but until proper photos show up, I'll live with it.
The steering wheel was then glued in place at a bit of an angle. The videos I
watched showed many times that the wheel was not properly aligned when going
straight. Besides, one can turn the front wheel.
and the
instrument decal attached. There is no positive indication on just where the
shift lever fits. Looking at several videos on the operation of this vehicle, I
made an assumption that it fit on the floor in the passenger side as sitting it
on the interior 'hump' would have put the shift knob too high and too far back.
I'm probably wrong on this, but until proper photos show up, I'll live with it.
The steering wheel was then glued in place at a bit of an angle. The videos I
watched showed many times that the wheel was not properly aligned when going
straight. Besides, one can turn the front wheel.
Gluing in the rear bulkhead was a bit of a poser. If the the top of the bulkhead mated with the inner roof, the bed attachment area would be too high. If it matched the bed attachment section, there would be a small gap near the roof. I went with the second option on this. Headlights were painted as were the tail lights. The mirrors were attached and the decals applied. There are decals for the horn, license plate and the logos on the side and front. Those for the side and front are oversize so those with a steady hand (of which I am not one) would be better served to paint. The front bed protection section was then glued in place. I just realized that I neglected to glue on the two front bumpers and in fact, it seems I accidentally tossed them out. This will require some quality time going through the litter bin next to the bench to see if I can locate them.... I hate it when I do things like that.
| CONCLUSIONS |
 Overall,
it is like the other Arii/LS 1/32 kits I have built. They are relatively easy
builds with few problems and produce models that are somewhat unusual from the
norm. If you have the opportunity to pick up one of these, then do so and you
will be glad you did.
Overall,
it is like the other Arii/LS 1/32 kits I have built. They are relatively easy
builds with few problems and produce models that are somewhat unusual from the
norm. If you have the opportunity to pick up one of these, then do so and you
will be glad you did.
| REFERENCES |
http://en.wikipedia.org/wiki/Mazda_Mazdago
October 2011
Thanks to me for this one
If you would like your product reviewed fairly and fairly quickly, please contact the editor or see other details in the Note to Contributors.