AMT 1/25 Lotus 29 Indy Car
| KIT #: | ? |
| PRICE: | $Don't remember but it was not expensive |
| DECALS: | Two options |
| REVIEWER: | Scott Van Aken |
| NOTES: |
| HISTORY |
Although the 1963 Lotus 29 Indy car was memorable by
being a competitive rear engine car in a field still full of front engine
roadsters, it was not the first rear engine car to beraced at Indianapolis. In
1937, Lee Oldfield showed up with a rear engine car, but did not qualify it. in
1939, George Bailey did qualify a four wheel drive mid-engine car that was
powered by a supercharged six
 cyliner engine.
It wasn't until 1961 when Jack Brabham brought a rear engine Cooper Formula One car to the race and finished well enough that the other drivers and team owners took notice of this car. Thanks to the nearly neutral weight distribution, the car was quite quick in the turns though didn't have the horsepower for good speed on the straights.
Thanks to the influence of Dan Gurney, Ford was convinced to team with Lotus to produce the Lotus 29 for the 1963 event. Two cars, one driven by Gurney and the other by Jim Clark were entered with Ford providing the engines and money while Lotus provided the cars and team organization. While the cars didn't win, Jim Clark came in second to Parnelli Jones while Dan Gurney finished seventh, both of the Lotus cars on the same lap as the winner. Two years later, in 1965, Jimmy Clark won the race in a Lotus 38 and a front engine roadster has not won at Indy since.
| THE KIT |
This kit was released in the mid 1960s and originally had vinyl tires. Now this particular kit has to be one from the three car Speedway set as I got it in a bag. It has plastic tires instead of the vinyl ones and as you might guess, they are devoid of tread. The vinyl ones from the original boxing would have probably degraded long ago so perhaps it is for the best.
The kit parts are still fairly well done. You have to realize this was a highly detailed kit for the time and we are talking about a 40 plus year old molding. There are mold seams that are a bit more than usual. There are ejector pin marks in some difficult to remove locations. Much of the kit is chrome plated so most modelers will be wanting to strip that off. Still, there are quite a few options.
 One of them is to do a test car with the later 255
cubic inch double overhead cam engine that Ford used in the later Lotus 38 to
finally win at Indy. Both this and the standard engine use the same block so
unfortunately ,it can't be built by itself. The Lotus 29 was used as a test car
for this engine, though never raced with it (at least as far as I know).
One of them is to do a test car with the later 255
cubic inch double overhead cam engine that Ford used in the later Lotus 38 to
finally win at Indy. Both this and the standard engine use the same block so
unfortunately ,it can't be built by itself. The Lotus 29 was used as a test car
for this engine, though never raced with it (at least as far as I know).
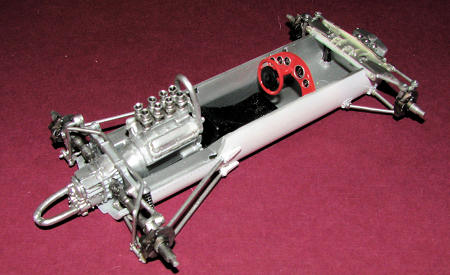
You get a full cockpit area with the seat, instrument panel and other bits. No pedals or harness is provided. I'm sure they used a harness by this time and you can find aftermarket racing harnesses quite easily. The engine is very nicely done and you get all the various suspension bits and pieces. One will have to build this kit with caution and care as AMT Indy car kits of this era are not easy builds. Each of the eight exhaust pipes are separate and quite complex. These lead into a collector to the two exhaust. The body is in several sections so getting this all aligned along with the complex suspension set up will be tricky. As mentioned, this has plastic tires which fit on separate wheels. I find it interesting that the front and rear wheel designs are a bit different from each other. The windscreen is the lone clear piece in the kit.
Instructions are well done. They provide names for all the parts and some preliminary painting info, though many of the parts used are chrome. I would think that for the most part, one could paint a number of these aluminum as the photo in the instructions doesn't seem to show a lot of shine. Markings, though not in the best of shape, are for three cars. One is Jim Clark's Green with yellow trim car and the other race car is Dan Gurney's white with blue trim car. The third is an unmarked test car with the double overhead cam engine. No color information is supplied for that one at all. Thankfully, there are replacement markings available from several aftermarket sources. Just do a google to find them. The kit instructions do provide a fairly good placement guide.
| CONSTRUCTION |
Since the kit has been repopped several times, it is not surprising that there is some flash. Typical of kits of this era, there are ejector pin marks on all the parts, many of them somewhat difficult to remove. However, one does has to spend the time cleaning up the parts in order to get a decent fit.
 I started this one by building up the engine. When it got time to put on
chrome parts, I stopped and stripped the chrome from just about all of them. As
you can see from the image, these cars did not have much in the way of chrome.
Chrome adds weight and those parts were pretty much aluminum and steel as you
can see from the photo.
I started this one by building up the engine. When it got time to put on
chrome parts, I stopped and stripped the chrome from just about all of them. As
you can see from the image, these cars did not have much in the way of chrome.
Chrome adds weight and those parts were pretty much aluminum and steel as you
can see from the photo.
Construction was sort of a deal where I built things as I could. For instance, I filled the huge sink areas in the inside fuel tanks and a few other bits. Then sanded these down and painted them the appropriate color. Much of these parts were painted with various shades of aluminum using the fine Alclad II lacquers. With much of the engine built up and the carburetors firmly in place, I used my motor tool to drill out the inlets as much as I could.
Then I went to work on the cockpit tub. There are the two fuel tanks that fit
inside and those actually fit fairly well. I glued on the forward bulkhead and
painted it all with Aluminum. The underside had the huge seam and some sink
areas taken care of in preparation for painting. I then spent quite a
considerable amount of time doing little more than stripping chrome, removing
mold seams and ejector pin marks, and painting with various metallic shades.
These are kits that pretty much require the parts to be pre-painted before
assembly. There were several weeks spend doing just that. During this time, I
pondered if it would be worth it to get aftermarket resin wheels. In the end, I
decided to go with the plastic
 ones in the kit. They were glued together and the
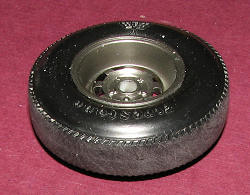
seams and sink areas on the tread taken care of. This meant no tread pattern
(there wasn't one to start with) but looking at the photo above, it seems there
wasn't much of one anyway. At least not after a bunch of laps had been run.
Besides, the sanded tread area looks great as it is a lighter black than the
rest of the tire.
ones in the kit. They were glued together and the
seams and sink areas on the tread taken care of. This meant no tread pattern
(there wasn't one to start with) but looking at the photo above, it seems there
wasn't much of one anyway. At least not after a bunch of laps had been run.
Besides, the sanded tread area looks great as it is a lighter black than the
rest of the tire.
With the tub done, I painted the seat black and glued
that in place. Then I attached the front suspension pieces. This was a bit
tricky and as fate would have it, I did break one of the circular attachment
points. No big deal for me as I was not planning on having operating steering
anyway. It didn't surprise me that the front axle shafts are not perfectly
aligned with each other. The forward oil tank with the brake reservoirs was
glued to the front of the tub. In the back. the engine was installed, though not
glued in. Much trimming needed to be done to the lower
 mounts and the front
accessory drive to get this to fit. As it is hidden behind the seat, no one will
really notice it.
mounts and the front
accessory drive to get this to fit. As it is hidden behind the seat, no one will
really notice it.
The radiator was assembled and after paint, glued into the nose section. There is a small fuel tank that also fits in the upper body. All of the inside body panels were painted Aluminum and the radiator got a black wash to provide some details.
At this time, I gathered all the rear suspension bits and the rear bulkhead together and with much fussing and fiddling around, cemented everything into place. The engine was cemented to the rear bulkhead which still left it somewhat loose once all the cement had dried. I then attached the brake discs (which do not fit at all well) and the instrument panel. This had been painted a reddish brown (actually RLM 23) along with the steering wheel as photos of the extant #92 car showed them to be this shade (thanks Indy Dog). The steering wheel is pure imagination as aside from being round, is not like the one in the car at the Indy Museum. I have to say that I'm guessing both Clark and Gurney's car interiors were the same.
| COLORS & MARKINGS |
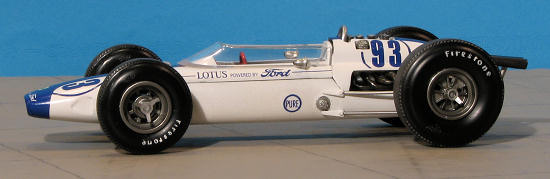
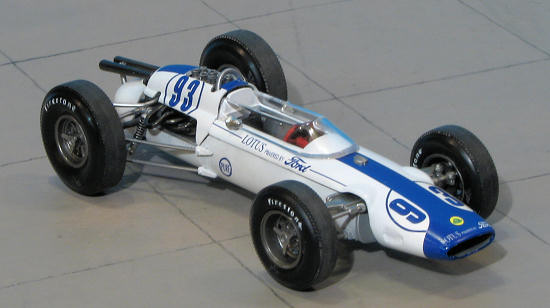
Let me back up a bit at this point. I've got a car that is about 95% done, but thought I'd share some color information. As this was to be Dan Gurney's car, the body on this one is white. I used Testors Boyd's Gloss white for this as it covers very well and is actually white. It was thinned with lacquer thinner. The attachment points on the rear suspension radius arms have to be painted this color as well.
 Much of the car,
aside from the bodywork, is a variety of metallics. I used
Alclad II for this task and used a number of shades on various pieces including
Aluminum, Jet Exhaust, Magnesium, Duraluminum, Steel, Dark Aluminum and
Airframe Aluminum. The variety adds some spice though in reality, I'm sure most
of these bits were either Aluminum or Steel. I also gave many pieces a wash with
black acrylic to bring out some details.
Much of the car,
aside from the bodywork, is a variety of metallics. I used
Alclad II for this task and used a number of shades on various pieces including
Aluminum, Jet Exhaust, Magnesium, Duraluminum, Steel, Dark Aluminum and
Airframe Aluminum. The variety adds some spice though in reality, I'm sure most
of these bits were either Aluminum or Steel. I also gave many pieces a wash with
black acrylic to bring out some details.
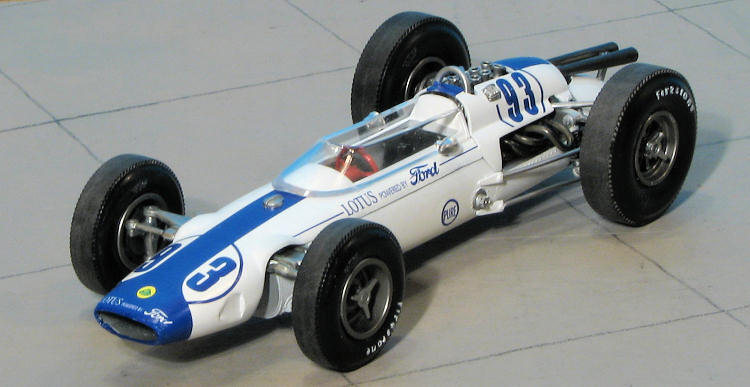
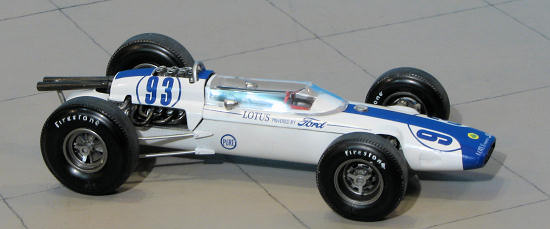
For decals, I used IndyCals' replacements for the kit decals. They are well done and though not exactly like the kit markings (mostly sponsor decals), do include tire markings. To use these, one would have to sand off the extant raised markings as they are not the same size. I did not use them. One of the reasons I picked the Gurney car (besides the fact that everyone does the green Lotus) is that I wasn't sure how opaque the yellow would be and didn't want to do all that work just to find out the decals wouldn't cut it. The IndyCals markings worked fairly well, but were not all that amenable to setting solutions, so the nose decal was a real mess where it had to conform to the intake. Were I to do another, I'd recommend painting the nose area to match the decal as it would save a lot of time and trouble. The glitched areas were touched up with Tamiya H15 Bright Blue which is very close and may actually match if air-brushed. With a paint brush it is a tad dark.
| FINAL CONSTRUCTION |
With the decals in place, it was then time to what I
felt would be the most challenging part of the built, the 'bundle of snakes'
exhaust. Cleaning these up was time consuming, but worth it. Each of the exhaust
is numbered and the instructions provide a full build sequence. What I did was
to first lay out all the pipes in the pair sequence shown in the instructions.
Then I put glue in the exhaust ports and let it set up a bit. Next the pipes
were inserted and I left the glue to get pretty well dry. About an hour. After
that, 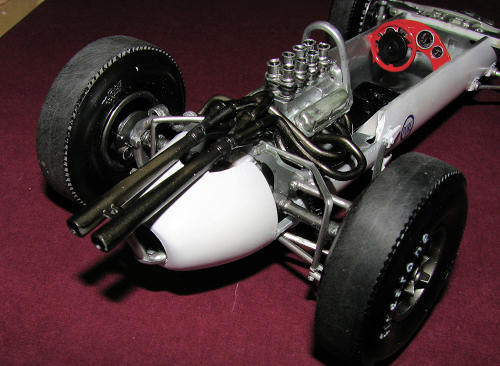 I
attached the exhaust collectors. This was not an easy task as the pipes were
always wanting to pull out. I also could not get the collectors perfectly
square. A bit more drying and the exhaust pipes were glued on. At this time, you
have to glue on the tail cone as the brace at the back of the push bar needs to
be attached to the pipes. Thanks to the too-short brace, the exhaust does not
stick out straight but a bit down angled. This isn't helped by the collector
pieces being a tad too large. This all keeps the collector section too high up
as it hits against the rear suspension bulkhead. It is a panoply of very small
glitches that causes this alignment situation.
I
attached the exhaust collectors. This was not an easy task as the pipes were
always wanting to pull out. I also could not get the collectors perfectly
square. A bit more drying and the exhaust pipes were glued on. At this time, you
have to glue on the tail cone as the brace at the back of the push bar needs to
be attached to the pipes. Thanks to the too-short brace, the exhaust does not
stick out straight but a bit down angled. This isn't helped by the collector
pieces being a tad too large. This all keeps the collector section too high up
as it hits against the rear suspension bulkhead. It is a panoply of very small
glitches that causes this alignment situation.
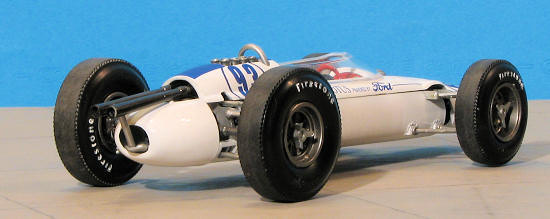
Anyway, with the exhaust dry, I attached the tires/wheels. I had to drill out the knock-offs that hold them in place but once done, it wasn't a difficult attachment. Naturally, not all four tires touch the ground, but it is quite minor. Then there were a number of smaller items to attach like the mirrors and the two filler caps. I decided to glue the cockpit cover in place as there really wasn't much that couldn't be seen from the opening. The windscreen was glued in the back, leaving the majority of it un-cemented (less chance of goobering the finish). I was undecided about gluing in the engine cover as it will hide much of the engine. However, it doesn't fit well by itself. As I'm of two minds about things, I decided to leave it removable for the time being. Until it decides to constantly pop off on its own accord, it looks fine as it is (such as it is).
No clear coat (as I'm afraid the decals will silver, no gunk and dirt, but a lot of care when handling it and I'm done.
| CONCLUSIONS |
I have to say that the kit presented a number of
challenges during construction. None of them catastrophic although it could have
been worse had I not planned ahead and done a lot of test fitting. Some pieces
were left off (distributor cap and an oil filler tank) as they just wouldn't fit
as planned, but they can't be seen anyway. I'm really surprised that there is
not shifter included with the
kit. Seems
to me to be a major oversight. Sure, it can be made from plastic rod, but I
wanted to build this one out of the box as much as possible. I also think the
rear tires are too tall. If anything, they should only be wider than the fronts.
Photos show the rear tires about level with the top of the engine cover. These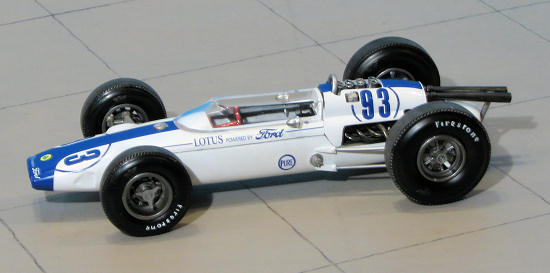 would look fine on a roadster, though and that may be where they came from.
The IndyCals were not bad but not the best I've used in terms of ALPS decals, but they are tons better than the kit ones (which had gotten damp so you know what that means). If I had a real complaint about the IndyCals, it is that there wasn't sufficient blue stripe material. The nose stripes were too short as it should extend all the way under the windscreen, the rear engine cover stripe was too short so it meant cutting a section from the other stripe to match and it meant there wasn't enough to go down behind the driver as on the real car. it would also be nice to have spare blue bits to take care of glitches. There is plenty of clear space on the sheet so it isn't like it is not possible.
I also did not use the 100% proper metal shades on things. Both the wheels and exhaust should be lighter, but I like the way it turned out so in that case I'm pleased. In fact, I'm just happy that everything sort of fit well enough to be able to be finished. I guess that is what it is all about.
Oh yes, for those of you wondering if the right side of the car's suspension is longer than the left; yes it is. for oval racing, it was best to have the weight shifted to the inside of the track, hence the longer suspension pieces on the right. If you look at photos of the older roadsters, you'll see that often times, the driver is more to the left than he'd be if in a formula car.
| REFERENCES |
 http://en.wikipedia.org
July 2010
Copyright ModelingMadness.com. All rights reserved.
Thanks to me for this one
If you would like your product reviewed fairly and quickly, please contact the editor or see other details in the Note to Contributors.