Monogram 1/24 Kurtis Kraft Racer
| KIT #: | 0012 |
| PRICE: | $18.95 MSRP |
| DECALS: | One options |
| REVIEWER: | Scott Van Aken |
| NOTES: | SSP reissue. 1956 mold |
| HISTORY |
Kurtis Kraft was a designer and builder of race cars. The company was founded by Frank Kurtis who designed and built midget cars, quartermidgets, sports cars, sprint cars and USAC Championship Cars.
Kurtis Kraft was started when Kurtis built his own midget car chassis in the late 1930s. He also built some very low glass-fibre bodied two-seaters sports cars under his own name in Glendale, California between 1949 and 1955. Ford (US) running gear was used. About 36 cars had been made when the license was sold to Madman Muntz who built the Muntz Jet. In 1954 and 1955, road versions of their Indianapolis racers were offered.
Kurtis-Kraft created over 550 ready-to-run midget
cars, and 600 kits. The Kurtis-Kraft chassis midget car featured a smaller
version of the Offenhauser motor. The National Midget Auto Racing Hall of Fame
desc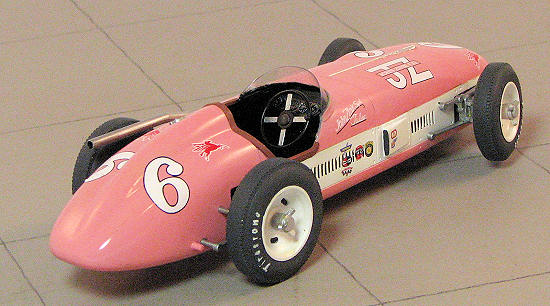 ribes the combination as "virtually unbeatable for over twenty years." Kurtis-Kraft created 120 Indianapolis 500 cars, including five winners in the
mid-late 1950s. This kit
is a representation of one of those Indianapolis roadsters.
ribes the combination as "virtually unbeatable for over twenty years." Kurtis-Kraft created 120 Indianapolis 500 cars, including five winners in the
mid-late 1950s. This kit
is a representation of one of those Indianapolis roadsters.
Kurtis sold the midget car portion of the business to Johnny Pawl in the late 1950s, and the quarter midget business to Ralph Potter in 1962.
Frank Kurtis was the first non-driver inducted in the National Midget Auto Racing Hall of Fame (U.S.).
The FIA World Drivers' Championship included the Indianapolis 500 between 1950 and 1960, so many Kurtis-Kraft cars are credited with competing in that championship. One Kurtis midget car was also entered in the 1959 Formula One United States Grand Prix driven by Rodger Ward. It was not designed for European-style road racing and with an undersized engine it circulated at the back of the field for 20 laps before retiring with clutch problems.
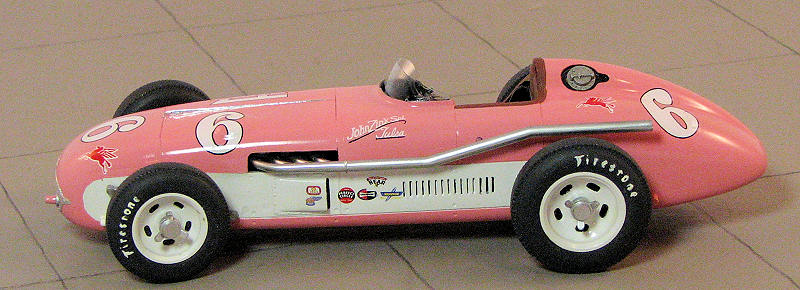
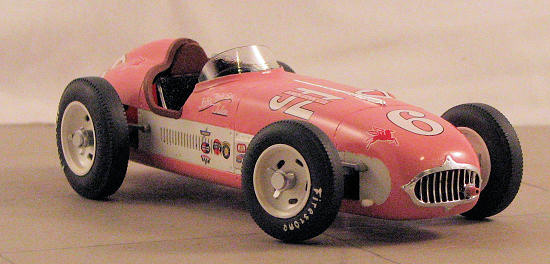
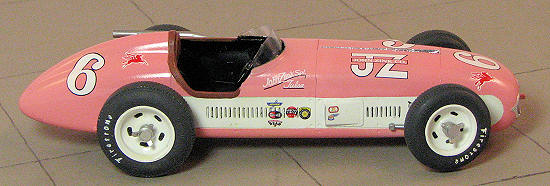
The 1955 Indy 500 was memorable in a tragic way. While in the lead, Bill Vukovich hit the 3-car pileup of Al Keller, Johnny Boyd, and Rodger Ward. He was killed (by fracture to the skull) when his car became airborne and went out of the course on the back long straightaway, landing upside down and on fire. His death concluded a streak of three straight years leading the most laps in the race (likely to have been four straight, 1955 inclusive), a feat unequaled since. The eventual winner, Bob Sweikert, drove the pink John Zink Special to victory in a little under four hours. Sweikert was himself killed in a sprint car racing accident the next year at Salem, Indiana. Of the top twelve finishers, eleven were in Kurtis Kraft cars. Though the Indy 500 was part of the Formula One World Championship, all of the race entrants were American, something you will not see in today's Indy 500 events.| THE KIT |
This is one of Monogram's earliest kits having
been molded in 1956. I've seen several moldings of this car over the years in various color plastics
and this one is in yellow to match the box art. Though a rather simple kit, it
does come with a full engine, working steering and a driver and mechanic figure.
The car itself is
 fairly accurate as things go so should build into a fairly
nice replica.
fairly accurate as things go so should build into a fairly
nice replica.
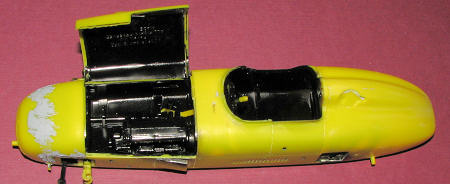
I was quite pleased at how well the molds have done over the years. There is little in the way of flash or sink marks. The driver figure is quite basic and the inside of his legs and arms are hollow. There is nothing really in the driver's compartment aside from a steering wheel, instrument panel, and seat so perhaps it would be prudent to fill the inside of the legs and arms with epoxy putty and form something that will look proper. The engine is little more than two halves and a place on which to attach the exhaust. I'm sure most builders will cement the engine compartment shut. A sheet of clear acetate is provided to make the windscreen. A template is provided and you have enough for several attempts.
The instructions are modern day Revell types with the parts names and any colors needed so indicated. The decal sheet is quite well done, but from what I can tell, is totally fictitious. Fortunately, there are places that make markings for this kit so you are not doomed to the kit offerings. The instruction sheet comes with an addendum sheet as there were a few glitches and omissions, even on a simple kit like this one.
| CONSTRUCTION |
 The molding has held up surprisingly well over the last 50 years. There were
no molding glitches and even flash was nearly non-existent. There are ejector
pin marks to deal with, but nothing major. The first thing I did was to assemble
the engine. It was then glued into the left side of the body. The steering bits
were glued into the right side. Fit is actually quite good. The only reason I
used the engine is that I need something to attach the exhaust to. It is my plan
to glue the engine cover shut. Frankly, you'll see little more than the engine
block and the bits that make up the steering under the hood so why have it open?
The molding has held up surprisingly well over the last 50 years. There were
no molding glitches and even flash was nearly non-existent. There are ejector
pin marks to deal with, but nothing major. The first thing I did was to assemble
the engine. It was then glued into the left side of the body. The steering bits
were glued into the right side. Fit is actually quite good. The only reason I
used the engine is that I need something to attach the exhaust to. It is my plan
to glue the engine cover shut. Frankly, you'll see little more than the engine
block and the bits that make up the steering under the hood so why have it open?
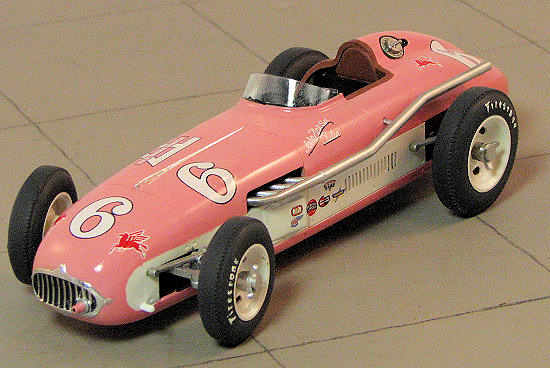
I then glued the fuselage halves together and installed the steering bits. The main upright fits in a rather convoluted manner. You need to be sure that the steering arm piece can fully move fore and aft or you'll never get the upright in place. The instructions are quite clear on how this is to be installed. Once these parts were attached and dry, all of the inside pieces were painted gloss black using Pactra Racing Lacquer. The outside got several coating of filler. Mostly on the underside as there are quite a few sink areas under there. I also took the time to glue the wheels together while waiting for the filler to dry.
 Then I glued on the nose
piece, trapping the hood on its hinges. These large hinges are not on the real
car, so once the hood is cemented shut, those will be removed and the gaps
filled and sanded. But for now, I left it hinged. This is because one still has
to fit in the steering arm from the steering wheel. This piece fits into the
instrument panel from the back and then into the the fork in the piece that was
installed earlier. Though there isn't much play, it should move the steering wheel
when that is attached.
Then I glued on the nose
piece, trapping the hood on its hinges. These large hinges are not on the real
car, so once the hood is cemented shut, those will be removed and the gaps
filled and sanded. But for now, I left it hinged. This is because one still has
to fit in the steering arm from the steering wheel. This piece fits into the
instrument panel from the back and then into the the fork in the piece that was
installed earlier. Though there isn't much play, it should move the steering wheel
when that is attached.
Meanwhile, the nose section required some attention from some filler. I also glued the driver halves together as the cockpit is pretty barren without one. I glued the engine cover shut and took care of the major gaps that are present. To be honest, I think that the hood on the real car may be hinged in the middle with both sides opening or even not be hinged at all, coming off as one piece. Anyway, several applications of filler later, it was done. During this time the hinge bulges on the hood and body were sanded away as these don't exist on any of the real cars.
 It was
also time to decide if I should do all the modifications needed to accurately
portray the 1955 winning car. As doing these would essentially mean getting
another kit to cut away some of the extra louvers needed, I decided to keep it
stock. Just for posterity what needs to be done is to sand off the bulge on the
left forward side of the hood, remove the the two rather large exhaust vents on
the side of the body and replace most blank areas between the front and rear
axles that do not have louvers with louvers. It is because of these louvered
sections that one would need another kit from which to cut out these pieces. Oh
yes, there is an intake just behind the hood on the right side before the
windscreen. A lot of work, though not an impossible amount.
It was
also time to decide if I should do all the modifications needed to accurately
portray the 1955 winning car. As doing these would essentially mean getting
another kit to cut away some of the extra louvers needed, I decided to keep it
stock. Just for posterity what needs to be done is to sand off the bulge on the
left forward side of the hood, remove the the two rather large exhaust vents on
the side of the body and replace most blank areas between the front and rear
axles that do not have louvers with louvers. It is because of these louvered
sections that one would need another kit from which to cut out these pieces. Oh
yes, there is an intake just behind the hood on the right side before the
windscreen. A lot of work, though not an impossible amount.
| COLORS & MARKINGS |
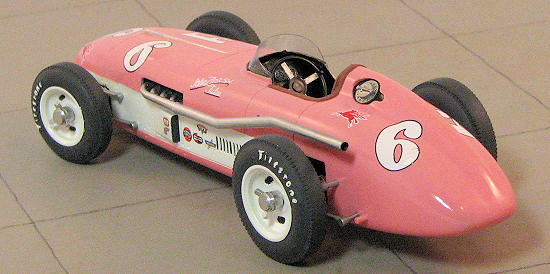
Time for paint. As the 1955 winning car was basically
pink with a wide white stripe along the sides, painting would be rather easy. I
first painted the car white after masking the interior. Then the white section
was masked off and using a circle template, I cut the mask for the curved
forward section. The rest was painted a nice Cadillac Pink using Humbrol paint,
the closest I could find. After
 letting
all that dry, I started attaching other bits. For instance, the rear axle
assembly was glued in place along with the various suspension bits. Same with
the front of the car. The steering knuckles were attached and though it doesn't
look like it, I can move the wheels. I posed them turning as, naturally, when
the suspension was finished, the wheels were horribly toed in at the front.
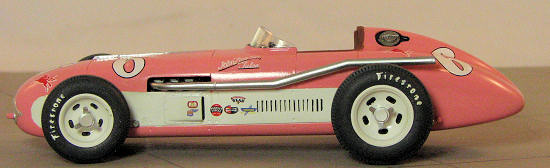
Suspension bits were painted Dark Aluminum using Alclad II, or Mithril Silver
using Citadel paints. The very front was coated in Bare Metal Foil Chrome as was
the hinge line down the center of the hood. The front took a bit of work to get
it looking right.
letting
all that dry, I started attaching other bits. For instance, the rear axle
assembly was glued in place along with the various suspension bits. Same with
the front of the car. The steering knuckles were attached and though it doesn't
look like it, I can move the wheels. I posed them turning as, naturally, when
the suspension was finished, the wheels were horribly toed in at the front.
Suspension bits were painted Dark Aluminum using Alclad II, or Mithril Silver
using Citadel paints. The very front was coated in Bare Metal Foil Chrome as was
the hinge line down the center of the hood. The front took a bit of work to get
it looking right.
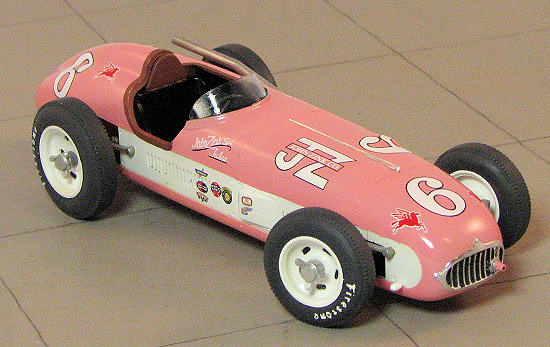 In the
cockpit, I painted the seat, instrument panel, steering wheel and the rest of
the inside with black. The wheel spokes were painted silver and the head rest
with Vallejo's Cavalry Brown. I used the same brown shade for the surround to
the cockpit. Wheels were painted white with the tires painted in Floquil's
Weathered Black. I also painted the exhaust with first Dark Aluminum and later
with Stainless Steel. The back was drilled out and painted black. This was set
aside until later.
In the
cockpit, I painted the seat, instrument panel, steering wheel and the rest of
the inside with black. The wheel spokes were painted silver and the head rest
with Vallejo's Cavalry Brown. I used the same brown shade for the surround to
the cockpit. Wheels were painted white with the tires painted in Floquil's
Weathered Black. I also painted the exhaust with first Dark Aluminum and later
with Stainless Steel. The back was drilled out and painted black. This was set
aside until later.
The decals are from Indy Decals and provide the markings needed. They are quite thin and each individual decal needs to be cut out. They fit well after a dose of Solvaset. Even the hood number conformed over the bulge after a few applications. I managed to scratch one of the rear decals and had to paint over the white. The entire car (minus wheels and exhaust) was given a coat of Testors one-coat clear gloss lacquer from a rattle can.
| FINAL CONSTRUCTION |
 I then
attached the wheels. The front ones were a very tight fit, while the rear ones
were loose as a goose. I ended up super gluing the rear wheels in place.
Knock-offs were then glued in place. I next tackled the windscreen. Revell
provides a templat and a large clear acetate sheet. After cutting out a
windscreen, I then glued it in place with super glue. What a chore!. The acetate
showed stress marks where I bent it into a curve and getting it to actually fit
in place took several tries. Once in, I added a bit more super glue and then
some clear gloss. Then I tried to get the driver and steering wheel to fit. No
joy and after an hour of fussing around, I gave up on it and glued on the
steering wheel. Last bit was the exhaust and the car was done.
I then
attached the wheels. The front ones were a very tight fit, while the rear ones
were loose as a goose. I ended up super gluing the rear wheels in place.
Knock-offs were then glued in place. I next tackled the windscreen. Revell
provides a templat and a large clear acetate sheet. After cutting out a
windscreen, I then glued it in place with super glue. What a chore!. The acetate
showed stress marks where I bent it into a curve and getting it to actually fit
in place took several tries. Once in, I added a bit more super glue and then
some clear gloss. Then I tried to get the driver and steering wheel to fit. No
joy and after an hour of fussing around, I gave up on it and glued on the
steering wheel. Last bit was the exhaust and the car was done.
| CONCLUSIONS |
In many ways, it is hard to believe this is a 50 year old mold. I've built modern kits that have been more trouble than this one. Sure, it isn't something that everyone is into, but if you are into car, and especially Indy cars, then you really need to give this one a go.
| REFERENCES |
http://en.wikipedia.org/wiki/Kurtis_Kraft
September 2010
Copyright ModelingMadness.com. All rights reserved. Thanks to me for
picking up this one. Hope you liked it. If you would like your product reviewed fairly and quickly, please
contact
the editor or see other details in the
Note to
Contributors.