
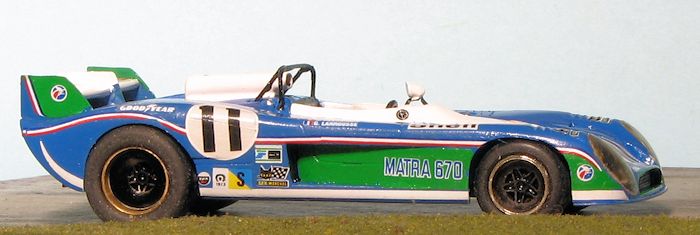
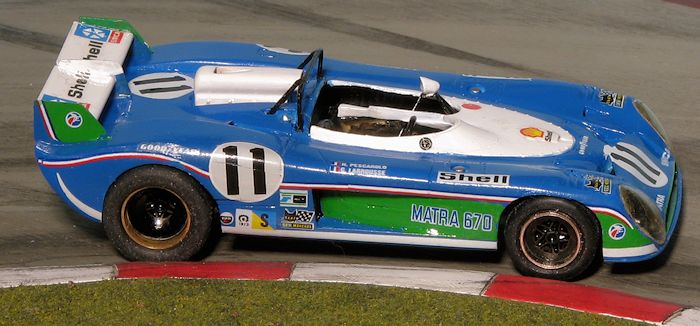
Starter 1/43 Matra 670B
| KIT #: | ? |
| PRICE: | ? |
| DECALS: | One option |
| REVIEWER: | Scott Van Aken |
| NOTES: | Resin, white metal and vacuformed parts |
| HISTORY |
Mécanique Aviation Traction or Matra (Mécanique Aviation TRAction) was a French company covering a wide range of activities mainly related to automobile, bicycles, aeronautics and weaponry. In 1994, it became a subsidiary of the Lagardère Group and now operates under that name.
Matra was owned by the Floirat family. The name Matra
became famous in the 1960s when it went into car production by buying
Automobiles René Bonnet. Matra Automobiles produced racing cars and
 sports cars,
and was successful in racing.
sports cars,
and was successful in racing.
While the company raced cars in F.1 and Group 5, its greatest successes came in sports car racing.
In 1973, Matra competed against Ferrari for the World Champion title, and Ferrari came to Le Mans, as the race could be decisive for the title. The beginning of the championship had showed that the Matra 670s had better handling, but the Ferraris showed better reliability.
The Matras 670s were updated to the 670B specification consisting mainly of larger spoilers. The main weakness of the 1972 670 was the ZF gearbox (the gearbox used in the stock GT40 Mk1 and the De Tomaso Pantera). By the end of the 1972 race, it had showed so much wear that it was obvious that it could not finish a 24 hour race with serious opposition. New Porsche "Type 1983" gearboxes especially built for Matra by Porsche were fitted in the 670B.
| THE KIT |
I've enjoyed building Starter kits. They are not
overly complex and provide enough detail to satisfy most modelers in this
scale. Sadly, the company is no longer extant due to the death of the owner in
the 1990s, but kits are still to be found from time to time, mostly from folks
selling off their unbuilt collections. Interestingly, the company's assets were
purchased by a competitor, Provence Moulage.
 Unfortunately for many of us, PM
also went under about a decade or so later.
Unfortunately for many of us, PM
also went under about a decade or so later.
I picked this one up from an on-line seller many years back and unfortunately, did not remember what was paid for it, though it couldn't have been that much as I'm basically cheap. Currently you can find Starter kits from about $30 to the ridiculous.
The kit consists of the body, interior, engine intake scoop, and rear piece in resin. Also in resin are the wheel inserts and the rear view mirror. The lower floor piece and the rear wing are injected plastic. A clear plastic 'shape' is provided from which you will cut out the lights and windscreen. These items are not well delineated on the clear so you simply have to do a best guess sort of thing and whittle the pieces down.
Metal parts are the wheels and axles as well as a heft mounting screw. The four tires are rubber. Photo etch is taped to the inside of the box and consists of the front spoiler, rear wing mounts, the mirror support, the rear chassis support cage and a few other bits that I'm not sure what they are. Hopefully their reason for being will become more clear as the build progresses. Four plastic light lenses are also included along with a steering wheel and rear wing;, these part look to be injected plastic.
Instructions consist of a layout of the photo etch
bits, a shot of how the mirror frame attaches in the interior, one of how the
rear framework looks installed and a side view of the completed model to assist
with installing the decals. This 3x5 inch sheet also includes the color of the
body and if I could find
 some Fiat Hellblau 497, I'd use it. Otherwise I'll be
mixing paints. The decal sheet is quite large and contains all of the green bits
as well as the stripes. The white bits are included on the decal sheet, but a
wise builder will paint the large areas as getting these big decals to conform
will be a challenge as best. The decals are nicely printed and based on other
Starter kits I've done (well one at least), they should not be an issue.
some Fiat Hellblau 497, I'd use it. Otherwise I'll be
mixing paints. The decal sheet is quite large and contains all of the green bits
as well as the stripes. The white bits are included on the decal sheet, but a
wise builder will paint the large areas as getting these big decals to conform
will be a challenge as best. The decals are nicely printed and based on other
Starter kits I've done (well one at least), they should not be an issue.
| CONSTRUCTION |
First step was to remove the mold seam from the inside
of the body. This piece prevents the one piece interior from fitting in place. I
then primered the body, wing and intake box using Tamiya white primer. These
parts then got a coat of Tamiya X-2 gloss white. While I was at it, I painted
the wheel inserts,
 most of the cockpit and the rear transmission bit with Tamiya
X-18 semi-gloss black. It was at this time that I realized the my kit was
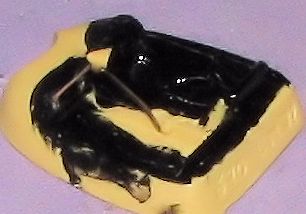
missing the roll bar, not exactly a small omission. Since the chance of getting
a replacement is pretty much zero, I would have to make a replacement.
most of the cockpit and the rear transmission bit with Tamiya
X-18 semi-gloss black. It was at this time that I realized the my kit was
missing the roll bar, not exactly a small omission. Since the chance of getting
a replacement is pretty much zero, I would have to make a replacement.
While waiting for the paint to dry, I pressed the rubber tires onto the metal wheels. I then drove the axles into one wheel and since these basically just sit in the wells, held in by the bottom plate, I attached the other wheel. The rear axle is too long and that was shortened with a pair of cutters. I also took this time to remove some of the bits from the p.e. fret. These parts are easily twice or perhaps three times thicker than what many of us are used to working with in today's kits.
I then installed the outer fins and the front spoiler
onto the body. Cleaning up the rear suspension cage, I folded it and test fit it
to the rear transmission piece to see how it would fit. Clearly the instructions
 leave a great deal to be
desired when it comes to the placement of this item. The next item installed was
the rear view mirror assembly. Once the frame was glued in, the mirror itself
was attached to the top. I then finished painted the cockpit with black,
including the frame.
leave a great deal to be
desired when it comes to the placement of this item. The next item installed was
the rear view mirror assembly. Once the frame was glued in, the mirror itself
was attached to the top. I then finished painted the cockpit with black,
including the frame.
While this was drying, I took the body as it was to the paint shop after masking off the white areas. Not having either of the colors that were recommended, I picked out a bottle of French Blue from Testors enamel line and used that for the blue shade. Looks about right. Once the blue was painted on and dry, the masking was removed from the white parts. I then installed the engine air scoop piece. I also took the time to glue in the wheel inserts.
Next step was the installation of the exhaust/gearbox piece. There is no indication as to how far back this fits so I put it as far back as it would go. The p.e. framework was installed once that was in. Then I went to work on the rear spoiler. I had originally thought to blow off the center support for the wing, but once I realized that Starter had only given me a standard length of rear wing that would have to be cut anyway, I glued on the center support. Naturally, I cannot make a square cut, but eventually got things installed.
 Once
the wings were installed and looked fairly nice, I did some detail painting that
included the tail lights, head lights and headlight cavity. I also had to do
something about the roll bar. I used some .025 inch bronze rod. The main bar was
bent to shape and the two smaller braces were soldered in place. Fortunately,
bronze solders very easily. That was then painted black. The interior was
installed at this time. I had to drill out the steering wheel attachment point.
Once
the wings were installed and looked fairly nice, I did some detail painting that
included the tail lights, head lights and headlight cavity. I also had to do
something about the roll bar. I used some .025 inch bronze rod. The main bar was
bent to shape and the two smaller braces were soldered in place. Fortunately,
bronze solders very easily. That was then painted black. The interior was
installed at this time. I had to drill out the steering wheel attachment point.
Next were the decals. I cut off one of the green side stripes and found out that not only were they oversize, but they broke into many pieces. Hmmm. I then coated the remaining sheet with Testors Metallizer Sealer to see if the rest of the markings could be salvaged. That seemed to do the trick and while the decals still were a bit brittle, with some of them still breaking up a bit, it wasn't anywhere as bad as before coating them. As you'd expect, applying the decals took nearly a week as I'm a bit slow when it comes to this part of model building. I simply could not get the green nose intake decal to fit so painted that area using Tamiya X-28 green. I also did detail painting of things like fuel filler caps, tail lights, headlight sockets and so on.
 Once the
decals were all in place, the entire car was given a coat or two of clear
acrylic gloss. I then installed the four headlights using clear gloss paint.
Once those were dry, I embarked on the next to final step; cutting out and
attaching the clear acetate parts. It was time consuming, but I managed to
carefully trim down the headlight covers until they fit fairly well. Again,
clear gloss paint was used to hold them in place. I wish the small windscreen
had fared better, but I was foiled by the tweezers I was using to attach it and
it went flying to who knows where. The wheel and axle assemblies were put in
place and the bottom glued on. I first tried to screw it into position as the
kit provides screws, but that just did not work out well so the glue was used. A
bit more touchup where I'd worn away some of the blue paint in handling and that
was it.
Once the
decals were all in place, the entire car was given a coat or two of clear
acrylic gloss. I then installed the four headlights using clear gloss paint.
Once those were dry, I embarked on the next to final step; cutting out and
attaching the clear acetate parts. It was time consuming, but I managed to
carefully trim down the headlight covers until they fit fairly well. Again,
clear gloss paint was used to hold them in place. I wish the small windscreen
had fared better, but I was foiled by the tweezers I was using to attach it and
it went flying to who knows where. The wheel and axle assemblies were put in
place and the bottom glued on. I first tried to screw it into position as the
kit provides screws, but that just did not work out well so the glue was used. A
bit more touchup where I'd worn away some of the blue paint in handling and that
was it.
| CONCLUSIONS |
It has been quite a while since I built one of these 1/43 resin/metal car kits and I'd forgotten how much effort needs to be put into building one. I certainly did not help that the decals were less than fresh, but with a bit of modeling effort and the use of those skills we gain over the years, I think that the result turned out to be worth it. Oh yes, for those wondering, the finished car is about 3.5 inches long.
| REFERENCES |
http://en.wikipedia.org/wiki/1973_24_Hours_of_Le_Mans
December 2013
Thanks to me for picking up the review kit.
If you would like your product reviewed fairly and fairly quickly, please contact the editor or see other details in the Note to Contributors.