| HISTORY |
Starter 1/43 Ferrari 250 GT SWB(Short Wheel Base)
| KIT #: | 56 |
| PRICE: | $21.00 (second hand) |
| DECALS: | None |
| REVIEWER: | Scott Van Aken |
| NOTES: | Resin body multimedia kit. |
| HISTORY |
One of the most notable GT racers of its time, the 1959 250 GT Berlinetta
SWB used a short (2,400 mm (94.5 in)) wheelbase for better handling. Of the
176 examples built, both steel and aluminum bodies were used in various road ("lusso")
and racing trims. Engine output ranged from 240 PS (177 kW; 237 hp) to 280 PS
(206 kW; 276 hp). The "lusso" road car version was originally fitted with
 185VR15
Pirelli Cinturato (CA67).
185VR15
Pirelli Cinturato (CA67).
Development of the 250 GT SWB Berlinetta was handled by Giotto Bizzarrini, Carlo Chiti, and young Mauro Forghieri, the same team that later produced the 250 GTO. Disc brakes were a first on a Ferrari GT, and the combination of low weight, high power, and well-sorted suspension made it competitive. It was unveiled at the Paris Motor Show in October and quickly began selling and racing. The SWB Berlinetta won Ferrari the GT class of the 1961 Constructor's Championship.
In 2004, Sports Car International placed the 250 GT SWB seventh on a list of Top Sports Cars of the 1960s, and Motor Trend Classic placed it fifth on a list of the ten "Greatest Ferraris of all time".
| THE KIT |
I
mentioned earlier that one of the three major 1/43 multimedia car kit makers was
Starter. This is very much typical of their work in that they have a resin body
and
interior/pan. There are pips on the resin pieces where the mold bits have been
cut away. Air bubbles are present, but mostly on the lower part of the body.
These are easily filled and are normal for these kits. There was one air bubble
on the top of the driver's seat. This one is a
bit different as it has some very nicely done wire wheels in metal/p.e. already
assembled. It has metal for the gas cap on the back and head light bezels. The
head lights are in resin. Tires are a rubber or vinyl and still fairly soft.
There are a pair of body screws an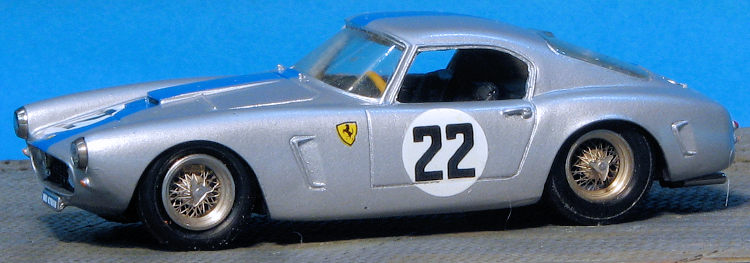 d a plastic steering wheel. No gear shift
lever, but easy enough to make from a straight pin or section of wire. There is also a single vacuform windows piece.
Not shown is a piece of brass tubing for the axles.
It will need to be cut.
d a plastic steering wheel. No gear shift
lever, but easy enough to make from a straight pin or section of wire. There is also a single vacuform windows piece.
Not shown is a piece of brass tubing for the axles.
It will need to be cut.
In line with other cars I bought from this same vendor, there are no instructions. Now I know that with racing cars from other lines I've had instructions so I'm not sure if they are supposed to come with them or not. It actually doesn't matter all that much as the parts count is relatively low and assembly should be pretty easy, but it would be nice to have anyway. What is included is a decal sheet with two racing options and a set of placement instructions. Not sure how viable the decals are, but at least there are some I can use for tests. One of the markings options is a car that does not have vent wings. The kit includes them so the body will need some modification to properly duplicate this vehicle if that option is chosen. I should also mention that the vacuform windows have started to yellow a bit, but that should not be all that much of an issue.
| CONSTRUCTION |
 A majority of the work involved in building these kits is cleaning up the
resin parts. The first thing one wants to do is to take care of the
pinholes. These were filled with superglue, followed by sanding and
additional applications as needed. One has to be quite careful during the
sanding process not to open up other pinholes. Once that was done the rest
of the mold seams were dealt with. It is often difficult to see them all in
tan resin, so a primer coat of grey was sprayed on them, and sure enough, it
was obvious what had been missed so another round was completed before yet
another coat of primer was added. I used Tamiya's fine grey for this. You
can see from the image where I needed to focus my attention after the first
primer coat was applied. Often these areas can be best found by simply
running a finger over the surface to feel the depressions and such.
A majority of the work involved in building these kits is cleaning up the
resin parts. The first thing one wants to do is to take care of the
pinholes. These were filled with superglue, followed by sanding and
additional applications as needed. One has to be quite careful during the
sanding process not to open up other pinholes. Once that was done the rest
of the mold seams were dealt with. It is often difficult to see them all in
tan resin, so a primer coat of grey was sprayed on them, and sure enough, it
was obvious what had been missed so another round was completed before yet
another coat of primer was added. I used Tamiya's fine grey for this. You
can see from the image where I needed to focus my attention after the first
primer coat was applied. Often these areas can be best found by simply
running a finger over the surface to feel the depressions and such. 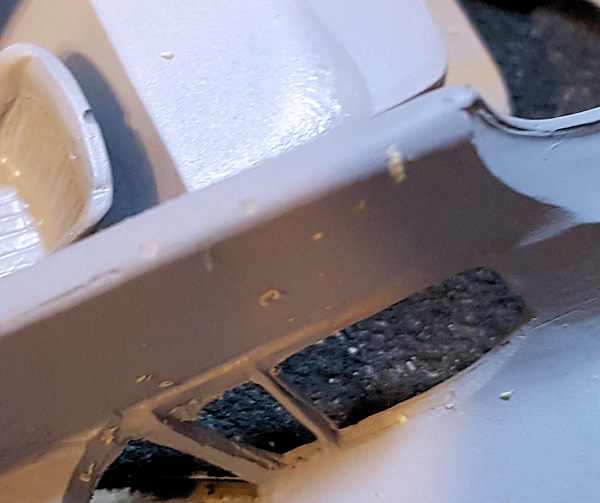 I removed the vent wings as I was planning on doing the racer. One of the
possible issues here is that the interior is not a stripped out race car
interior, but I felt that in 1960 when this one raced, a relatively stock
interior was required by the rules. Perhaps not, but I'm sticking with that!
Once that was done, the interior was given a spray of matte black and the
body a coat of Tamiya TS-17 gloss aluminum. Naturally, the aluminum shows
every tiny fault so I had a little more work to do.
I removed the vent wings as I was planning on doing the racer. One of the
possible issues here is that the interior is not a stripped out race car
interior, but I felt that in 1960 when this one raced, a relatively stock
interior was required by the rules. Perhaps not, but I'm sticking with that!
Once that was done, the interior was given a spray of matte black and the
body a coat of Tamiya TS-17 gloss aluminum. Naturally, the aluminum shows
every tiny fault so I had a little more work to do. 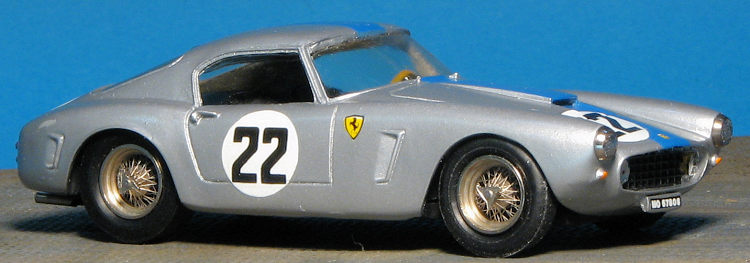 lace
with super glue. Back at the body, I started applying decals. Something I've
noticed using Microscale decal film is that it tends to make the decals
curl. I'm not sure why that is the case, but every one I used exhibited this
trait. It was overcome by a light application of Mr. Mark Softer. I started
with the roundels and when dry put the numbers and other logos onto the
body. This was all sealed in with a coat of Testors clear lacquer from a
spray can.
lace
with super glue. Back at the body, I started applying decals. Something I've
noticed using Microscale decal film is that it tends to make the decals
curl. I'm not sure why that is the case, but every one I used exhibited this
trait. It was overcome by a light application of Mr. Mark Softer. I started
with the roundels and when dry put the numbers and other logos onto the
body. This was all sealed in with a coat of Testors clear lacquer from a
spray can. 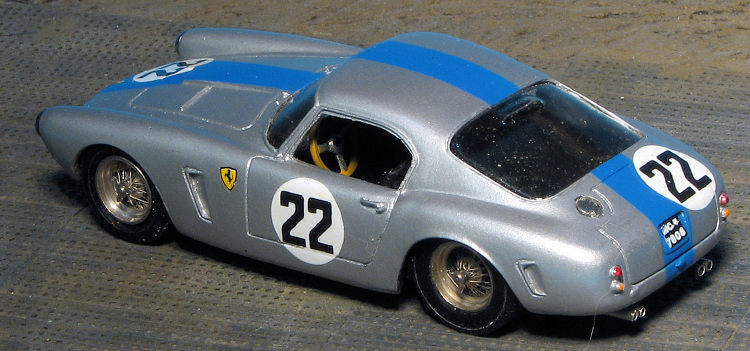 Not
done yet. Headlight bezels were glued in, followed by the resin head lights.
I also installed the driving lights. They just did not look right so I
painted them with chrome paint. The kit comes with no exhaust and the dual
pipes on each side of the rear are quite prominent. I used some .058 inch
stainless steel tubing for these. These were simply cut out and glued to the
pan. Not the same length and nothing is attached to them, but few will be
turning the car over and it looks better. I then painted the brake lights,
turn signals and the grille. That was it.
Not
done yet. Headlight bezels were glued in, followed by the resin head lights.
I also installed the driving lights. They just did not look right so I
painted them with chrome paint. The kit comes with no exhaust and the dual
pipes on each side of the rear are quite prominent. I used some .058 inch
stainless steel tubing for these. These were simply cut out and glued to the
pan. Not the same length and nothing is attached to them, but few will be
turning the car over and it looks better. I then painted the brake lights,
turn signals and the grille. That was it.
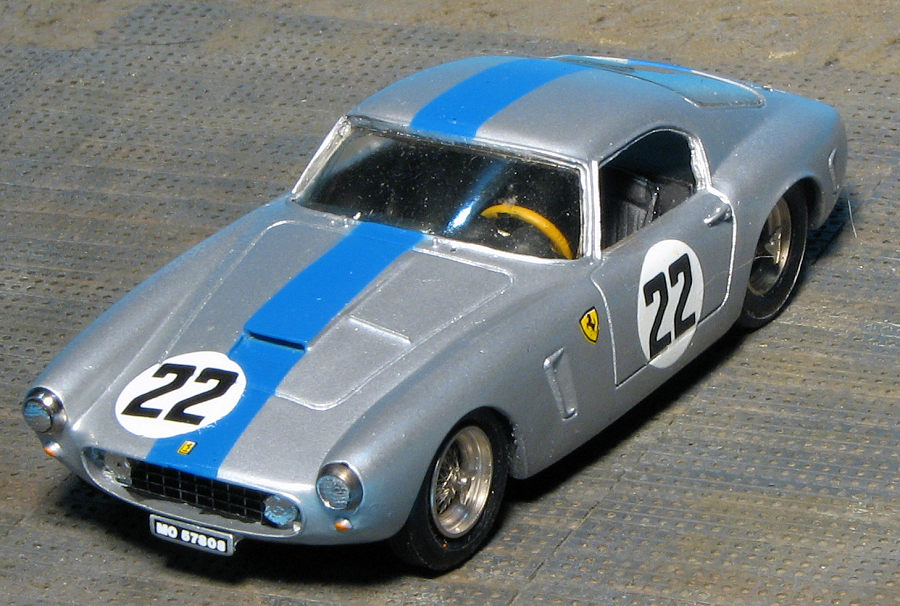
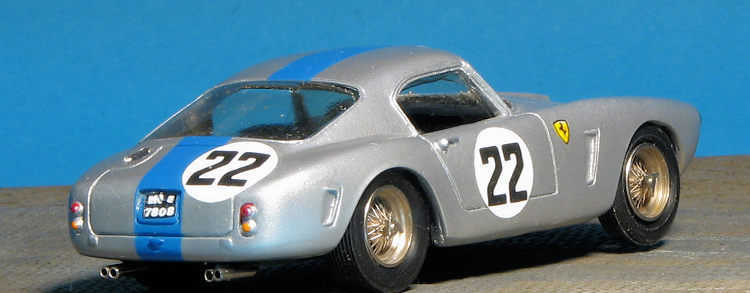
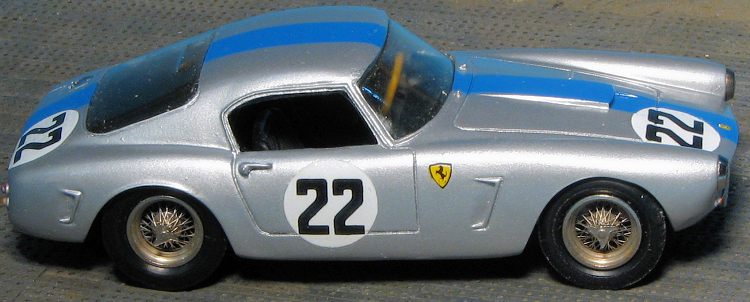
| CONCLUSIONS |
| REFERENCES |
https://en.wikipedia.org/wiki/Ferrari_250
16 June 2017
Copyright ModelingMadness.com. All rights reserved.
If you would like your product reviewed fairly and fairly quickly, please contact the editor or see other details in the Note to Contributors.
Back to the Main Page Back to the Previews Index Page Back to the Review Index Page