
Monogram 1/24 Jet Powered Racer 'Firebolt'
| KIT #: | PC-51 |
| PRICE: | around $15-20 by the time you get it to your mailbox on the used kit market |
| DECALS: | One option |
| REVIEWER: | Scott Van Aken |
| NOTES: | Reissue from 1959 |
| HISTORY |
It is interesting how things have changed in the last 50-60
years when it comes to model kit. Back when I was a youngster, model companies
prided themselves on accuracy, hence things like Revell Authentic Kits being a
big banner on the company logo. Now we know that these were not really what we'd
call accurate today, though most of those kits did have the proper shape. I say
most as anyone building an old Aurora kit today can attest that accuracy was
often general in terms. These kits were frequently to whatever scale fit the box
and often were not only covered in golf ball size rivets (at least in terms of
aircraft) but frequently had the areas for decals embossed on the surface.
terms of
aircraft) but frequently had the areas for decals embossed on the surface.
Then there was a perceived requirement for play value. These products were strictly aimed at young makes under 14 or so and needed to have working parts or something similar so that one's hour of gluing and painting could be followed by imaginary play time. Many think that this lack of imaginary play is what is seriously lacking in today's parent-programmed youth, but that is another subject.
Unsupervised outdoor activities were the norm in most parts of the United States and what is looked upon in horror by modern parents who wish to keep their kids in a safe bubble, was simply part of growing up as a child in the 1950s and 60s. One of those were things like CO2 powered cars. CO2 cartridges were available at every drug store for a quarter or less and the model makers adapted a number of kits specifically for this purpose. These cartridges were designed for inflating life preservers, but someone thought it would be cool to have them power toy cars.This is one of several kits produced by Monogram that were adapted to this feature.
| THE KIT |
Not that long ago, Revell-Monogram thought it would be a neat idea to reissues classic kits from the 50's and 60's in their original packaging. The first batch of releases were not clearly marked as reissues and several unscrupulous people took advantage of the rubes by offering these on e-paid as originals. This is one of those early releases.
 The kit itself is quite minimalist in terms of parts. An upper
and lower body, four three piece wheels, a driver, steering wheel and canopy
complete the kit. Not included are the bits to attach the CO2 bottle . These
cars could also be powered by Jet-X solid fuel rocket motors (also easily
available back then), but this adapter is also missing from this particular kit.
The kit itself is quite minimalist in terms of parts. An upper
and lower body, four three piece wheels, a driver, steering wheel and canopy
complete the kit. Not included are the bits to attach the CO2 bottle . These
cars could also be powered by Jet-X solid fuel rocket motors (also easily
available back then), but this adapter is also missing from this particular kit.
Instructions are straight from the original including a notice that the CO2 cartridge and the Jet-x bits are available from your local dealer. There is a single decal sheet included that is basically numbers and stripes. This kit's decals have not fared well, and may be unusable, but then finding a suitable replacement may well be as close as your spares stash.
| CONSTRUCTION |
 I'm oddly attracted to kits like
this. I knew from looking at it that quite a bit of work would be needed. Two
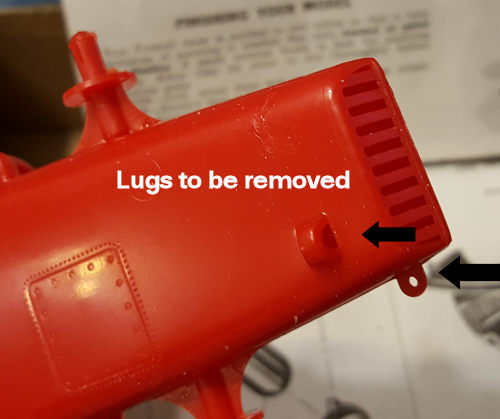
things had to be dealt with. One was the large open area in the back where one
would normally put the CO2 cartridge or the Jet-X. The other were the engine
attachment holes on the underside and the ones created by cutting away the line
guides. You see, these cars when powered could either run along a guide string
in a straight line, or in a large circle using attachment holes on one side.
These would have to be removed and in the case of the straight line guides, the
holes in the underside where they used to be filled.
I'm oddly attracted to kits like
this. I knew from looking at it that quite a bit of work would be needed. Two
things had to be dealt with. One was the large open area in the back where one
would normally put the CO2 cartridge or the Jet-X. The other were the engine
attachment holes on the underside and the ones created by cutting away the line
guides. You see, these cars when powered could either run along a guide string
in a straight line, or in a large circle using attachment holes on one side.
These would have to be removed and in the case of the straight line guides, the
holes in the underside where they used to be filled.
 Filling
these holes is actually pretty simple. What I do is take a section of the red
sprue that holds the wheel hubs, insert it into the hole at an angle and apply
lots of cement. When the glue dries, the sprue is cut and put in the next hole.
These are then filled and sanded as usual. The body halves were glued together
with those seams worked over. The large opening in the back took a
bit mo
Filling
these holes is actually pretty simple. What I do is take a section of the red
sprue that holds the wheel hubs, insert it into the hole at an angle and apply
lots of cement. When the glue dries, the sprue is cut and put in the next hole.
These are then filled and sanded as usual. The body halves were glued together
with those seams worked over. The large opening in the back took a
bit mo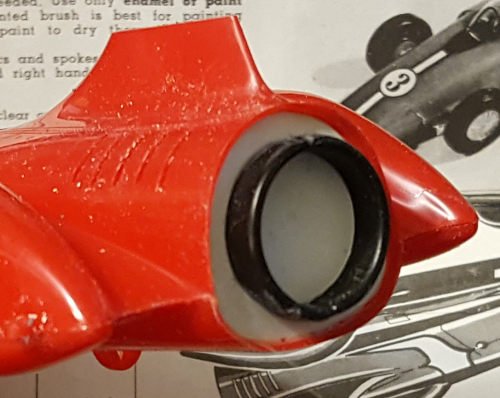 re
work. I used a piece of plastic card, sanded to shape and glued in. That
successfully blocked the hole. Now since I did not have a jet engine exhaust
piece of proper size to fit onto it, I used the one piece on the black sprue
that was to hold down the CO2 bottle, sanded it down, and glued it in place.
It isn't pretty, but once painted matte black will do the job. I also glued
together all the wheels and sanded the seam on the tread area. It was then time
to paint.
re
work. I used a piece of plastic card, sanded to shape and glued in. That
successfully blocked the hole. Now since I did not have a jet engine exhaust
piece of proper size to fit onto it, I used the one piece on the black sprue
that was to hold down the CO2 bottle, sanded it down, and glued it in place.
It isn't pretty, but once painted matte black will do the job. I also glued
together all the wheels and sanded the seam on the tread area. It was then time
to paint.
Painting also took a bit of time. I
primered everything with Tamiya grey primer as red is the dickens to paint over
in any color other than red. Were I smart, I'd have painted the inside of the
body halves in black
 first, but I'm not so I didn't. I then applied the first
color to the body. This and the other shade are metallics from the Testors
lacquer line. The nose was painted silver and when dry, I masked a flame motif
on the nose. Then the rest of the body was painted with a nice darkish red. This
dries pretty fast so painting was only a couple of days. I also painted the
wheel covers red, along with the masked canopy, and the wheels themselves
with the silver.
first, but I'm not so I didn't. I then applied the first
color to the body. This and the other shade are metallics from the Testors
lacquer line. The nose was painted silver and when dry, I masked a flame motif
on the nose. Then the rest of the body was painted with a nice darkish red. This
dries pretty fast so painting was only a couple of days. I also painted the
wheel covers red, along with the masked canopy, and the wheels themselves
with the silver.
I also painted the driver with
white. The tires got a brush job of NATO black from the Tamiya line. I also
brush painted the interior and the exhaust area with Tamiya flat black. I used
liquid chrome for the front grille and the inside of the steering wheel. A red
sharpie took care of the stripe on the driver's uniform and his face and hands
were painted with Vallejo flesh. I removed the masking from the body and applied
most of the kit decals. Despite their age (the clear portions of the decal were
just starting to yellow), they
 fit well and succumbed to Mr. Mark Softer without
too many issues, though some of the clear area did silver, despite multiple
applications. The driver and steering wheel were glued in. The canopy was glued on
with some neat clear cement Kevin Dolin sent me from Japan. I used a toothpick
to apply it to the canopy. The wheels were snapped in place. They are a touch
wobbly and I'm sure that back in the day, I'd have applied Vaseline to the
axles, but for a display model they are fine. The 'exhaust' pipe was brush
painted with Vallejo's burnt iron. I then removed the wheels and gave everything
a nice coat of clear, also using the Testors lacquer. The last thing I did was
remove the masking and because I am inept, I had to scratch some paint that had
bled under the tape, though there was nothing I could do about a bit that got on
the inside (Grrrr). The wheels were then snapped back on and I was done.
fit well and succumbed to Mr. Mark Softer without
too many issues, though some of the clear area did silver, despite multiple
applications. The driver and steering wheel were glued in. The canopy was glued on
with some neat clear cement Kevin Dolin sent me from Japan. I used a toothpick
to apply it to the canopy. The wheels were snapped in place. They are a touch
wobbly and I'm sure that back in the day, I'd have applied Vaseline to the
axles, but for a display model they are fine. The 'exhaust' pipe was brush
painted with Vallejo's burnt iron. I then removed the wheels and gave everything
a nice coat of clear, also using the Testors lacquer. The last thing I did was
remove the masking and because I am inept, I had to scratch some paint that had
bled under the tape, though there was nothing I could do about a bit that got on
the inside (Grrrr). The wheels were then snapped back on and I was done.
| CONCLUSIONS |
I picked this one to build for two reasons. One is that I'm drawn to these old kits and generally have a good time putting them together. The second is that I wanted something fairly quick to build. Little did I realize when I started that I'd have a lot more work to do than the parts count suggested. However, I should have known better as this happens every time I do one of these. Probably the start of some sort of old age memory issues. Regardless, the finished product is pretty neat and while it won't win awards, it is worth the effort and I can pretty much guarantee you that few of your fellow modelers will have built one.
28 July 2017
Copyright ModelingMadness.com. All rights reserved.
If you would like your product reviewed fairly and fairly quickly, please contact the editor or see other details in the Note to Contributors.
Back to the Main Page Back to the Review Index Page Back to the Previews Index Page