Tamiya 1/20 Tyrrell-Honda 020
| KIT #: | 20029 |
| PRICE: | $22.00 |
| DECALS: | Two options |
| REVIEWER: | Scott Van Aken |
| NOTES: | Kit released in 1991 |
| HISTORY |
The Tyrrell 020 was a Formula One racing car designed by
Harvey Postlethwaite and George Ryton for Tyrrell Racing and raced during the
1991 Formula One season. The car was powered by the Honda V10 engine previo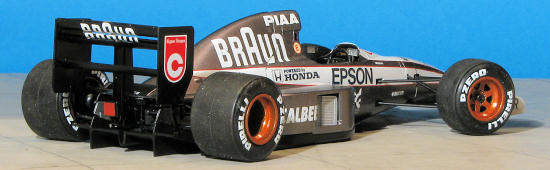 usly
raced by McLaren in 1990. The 020 was driven by Satoru Nakajima who brought the
Honda engine contract with him (in 80 F.1 races his best results were two 4th
place finishes) and also by Stefano Modena (in 81 F.1 races, he finished on the
podium two times). The car's best result was a second place by Modena in the
Canadian Grand Prix. Tyrrell scored 12 points to finish 6th in the Constructors
Championship.
usly
raced by McLaren in 1990. The 020 was driven by Satoru Nakajima who brought the
Honda engine contract with him (in 80 F.1 races his best results were two 4th
place finishes) and also by Stefano Modena (in 81 F.1 races, he finished on the
podium two times). The car's best result was a second place by Modena in the
Canadian Grand Prix. Tyrrell scored 12 points to finish 6th in the Constructors
Championship.
Despite not being a very successful car, its design included the distinctive anhedral shaped front wing, which immediately became popular with other Formula One car builders. This wing design along with the raised nose section, allowed greater airflow under the chassis. This in turn provided greater down-force and allowed higher cornering speeds with a properly set up chassis.
| THE KIT |
Despite being one of Tamiya's earlier kits, this one is just as superbly molded as you'd expect from the premier F.1 car kit company. Undoubtedly to reduce painting requirements, this one is molded in black plastic with the body parts in a metallic dark grey, relying, for the most part, on decals for parts of the paint work that are white. I did find some sink areas on a few parts, including the body parts so that kind of abrogates the efforts to provide a ready to go body color.
As you'd expect, there is a full engine and fully developed
suspension provided with the kit. Much painting in silver and semi-gloss
 black
will be required and so this one of those 'paint as you go' sort of kits.
Actually, that probably fits just about any car kit as I can't recall one where
I painted things after building most of it, unlike an airplane. The kit does not
include engine wiring , aftermarket being what you'd need for both of those. It
does include nicely molded Pirelli tires and this also has dry transfer
lettering to go on the tires.
black
will be required and so this one of those 'paint as you go' sort of kits.
Actually, that probably fits just about any car kit as I can't recall one where
I painted things after building most of it, unlike an airplane. The kit does not
include engine wiring , aftermarket being what you'd need for both of those. It
does include nicely molded Pirelli tires and this also has dry transfer
lettering to go on the tires.
The driver's seat includes a molded on harness which is quite nice. A decal is provided for the instrument panel as this is the era before the instruments were incorporated into the steering wheel. This was also before paddle shifters so a shift lever is part of the interior.
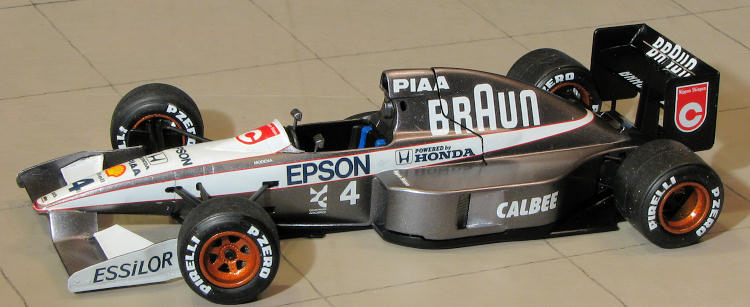
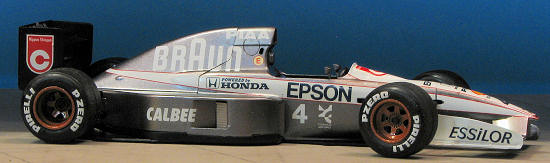
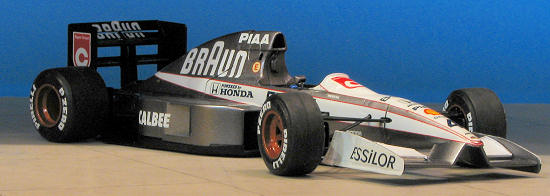
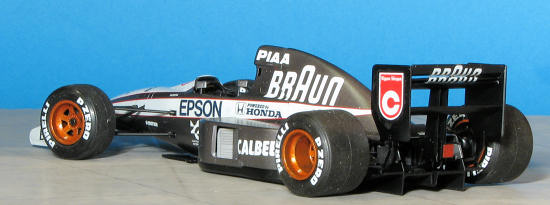
Decals are for the two cars, which differ in number only from the look of things. Though it doesn't state so in the instructions, car #3, which is shown in just about all the images on the box and instructions, was the car of Satoru Nakajima, which makes sense as this is, after all, a Japanese kit maker doing the car. Decals look to be well printed and I'm sure the white bits will darken when put on the gunmetal finish of the body. One would be tempted to paint the front wing white instead of using the decals for that, but it would just make that section brighter compared to the rest of the white markings. Not sure how setting solution will react with these. I've had some major decal disasters trying solutions on Tamiya decals, though the Mr. Mark Softener is supposedly specifically formulated for standard Japanese kit decals.
| CONSTRUCTION |
 It is hard to believe that I've not built an injected plastic Formula One car
kit in over 30 years. Last one was a Tamiya kit as well, the 1/12 scale Matra
driven by Jackie Stewart. Well, this one is not as large nor as parts intensive
as that older Tamiya kit, and so I was looking forward to giving this one a go.
I'd last built a Tamiya racing car kit when I did the Porsche 936-78 back in
2007, so I thought I'd give one of their F.1 cars a go. Our buddy Mark Hiott has
done some of these sorts of kits and has always spoken highly of them. One of
the reasons I decided to build this one is that I have a spray can of the color
of the outside of the car. Heck of a justification for starting a kit, but it
beats the usual 'I've got a nice decal sheet for that'.
It is hard to believe that I've not built an injected plastic Formula One car
kit in over 30 years. Last one was a Tamiya kit as well, the 1/12 scale Matra
driven by Jackie Stewart. Well, this one is not as large nor as parts intensive
as that older Tamiya kit, and so I was looking forward to giving this one a go.
I'd last built a Tamiya racing car kit when I did the Porsche 936-78 back in
2007, so I thought I'd give one of their F.1 cars a go. Our buddy Mark Hiott has
done some of these sorts of kits and has always spoken highly of them. One of
the reasons I decided to build this one is that I have a spray can of the color
of the outside of the car. Heck of a justification for starting a kit, but it
beats the usual 'I've got a nice decal sheet for that'.
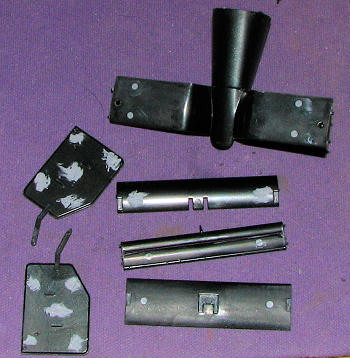 So the first thing I did
was to look over the parts and see what I could do as subassemblies. There were
three I spotted right off. One was the nose and front wing, then the cockpit and
front suspension, the rear wing, finally the engine and rear suspension. Judging
by the ejector pin holes I'd have to fill, this was going to be another kit
where I'd have to prep the part, paint, and then assemble. With all those struts
dangling in the breeze, there was plenty of seam scraping to go around.
So the first thing I did
was to look over the parts and see what I could do as subassemblies. There were
three I spotted right off. One was the nose and front wing, then the cockpit and
front suspension, the rear wing, finally the engine and rear suspension. Judging
by the ejector pin holes I'd have to fill, this was going to be another kit
where I'd have to prep the part, paint, and then assemble. With all those struts
dangling in the breeze, there was plenty of seam scraping to go around.
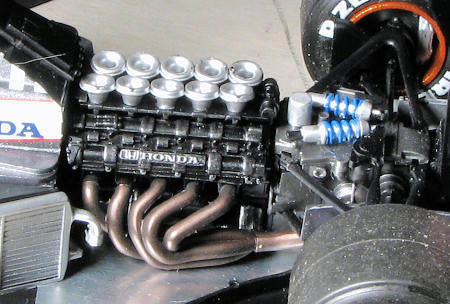
I got down to it by starting to assemble the engine block/transmission. Many
of the parts are painted X-18 semi-gloss black and so I used Tamiya's own for
this, which I air-brushed after thinning it with lacquer thinner. The
transmission is supposed to be a dark grey, but I misinterpreted the mix numbers
to mean a steel and so it was done. Slowly the engine assembly was being built
up. And I do mean slowly as frequently a day's work would be to prep, paint and
glue perhaps two or three parts.

The cockpit was a rather easy to build assembly and though light on detail,
it required some conscientious painting. I was pleased that it had belts, even
ones that are molded in place as an F.1 car looks odd without them. When it came
 time to cement the cockpit
halves together, I used super glue for the seam work. The front suspension
pieces are a very tight fit and literally click into place. Once hooked up, they
won't come loose. I highly recommend threading the steering bar in before
installing the upper and lower suspension arms. It took me an age to get this
part installed because I did it in the reverse order.
time to cement the cockpit
halves together, I used super glue for the seam work. The front suspension
pieces are a very tight fit and literally click into place. Once hooked up, they
won't come loose. I highly recommend threading the steering bar in before
installing the upper and lower suspension arms. It took me an age to get this
part installed because I did it in the reverse order.
During all this, I put together the rear wing assembly. It is quite fluid to put together (meaning no large, solid connections), but is very sturdy when you get it done. This was painted our favorite semi-gloss black. The front wing was also glued to the nose and that assembly painted. It was after this that I started thinking about the decals. I was warned that the white kit decals are not very opaque at all so to forestall any glitches here, I copied the sheet so that at least I wouldn't have to mask and paint the large side stripes.
 I also took the time to glue in the side pod vents and fill those in so it
looked like a single aluminum (or fiberglass or even carbon fibre) casting. The
exhaust were cleaned up and painted Alclad II 'exhaust manifold', which looks
quite convincing. I also attached the rear brake ducts at this time. These were
simply snapped in place without gluing. I did have to open up the upper strut
holes a bit.
I also took the time to glue in the side pod vents and fill those in so it
looked like a single aluminum (or fiberglass or even carbon fibre) casting. The
exhaust were cleaned up and painted Alclad II 'exhaust manifold', which looks
quite convincing. I also attached the rear brake ducts at this time. These were
simply snapped in place without gluing. I did have to open up the upper strut
holes a bit.
Then I looked at the instructions and saw that I was going to have to remove the front suspension bits in order to put on the large side stripes. I'd already used the kit decals on the small front wing bits. One went on quite well while the other had every attachment glitch you can think of from tearing to bunching up and not covering very well. Anyway, it wasn't as difficult to disassemble the front suspension bits (and I had to do them all) as I feared. I used Mr.Mark Softener for all these decals as it didn't seem to cause any issues with the Tamiya markings. With those sections done, the front suspension was reassembled. The nose wing was also glued together while I thought about how to tackle the glitches.
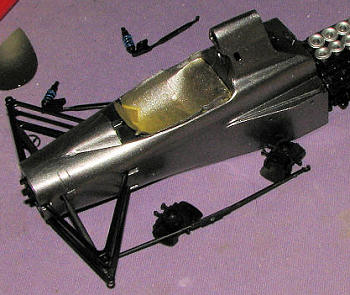
The lower body plate was then cleaned up and
 painted. The rear half of
this on the inside and the back of the cockpit tub are supposed to be painted
X-11 silver, but being lazy, I used Bare Metal foil and I have to say it looks
pretty nice.I used a Q-tip/cotton bud to smooth it all out. The assembled engine
was again simply clicked into place without cement. I was quite surprised and
pleased at how well it all fit. I then glued on the front nose section to the
cockpit tub. Fit is only fair as there is a bit of a gap here. The small piece
above the steering wheel area was cemented in place at this time and more decals
applied.
painted. The rear half of
this on the inside and the back of the cockpit tub are supposed to be painted
X-11 silver, but being lazy, I used Bare Metal foil and I have to say it looks
pretty nice.I used a Q-tip/cotton bud to smooth it all out. The assembled engine
was again simply clicked into place without cement. I was quite surprised and
pleased at how well it all fit. I then glued on the front nose section to the
cockpit tub. Fit is only fair as there is a bit of a gap here. The small piece
above the steering wheel area was cemented in place at this time and more decals
applied.
A few other small bits were attached and while I considered what to use for the wheels (mix 2 parts red, one part gold and one part black) I applied more of the decals to the nose and the rear wing. Eventually I used some dark bronze spray paint from the Testors One Coat line of lacquers. A bit lighter than what it should be, I suppose, but looks good.
| COLORS & MARKINGS |
Some brief words on painting. The overall color of the
car, aside from the black undertray is a gunmetal shade that is available in a
Tamiya rattle can, XF-52. One thing that Tamiya will do is that if there is a
new color required for a car kit's overall painting, they
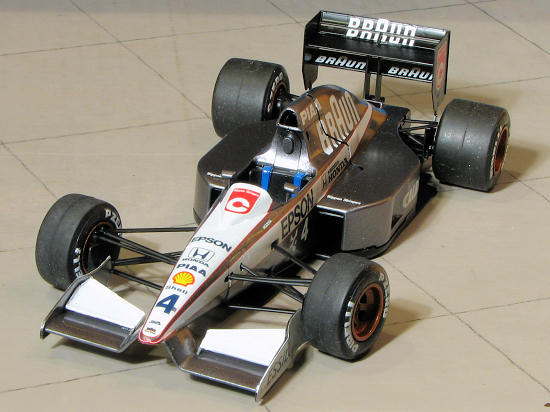 will
produce it in a rattle can. This really makes things easy for the builder as
Tamiya's spray paints are first rate.
will
produce it in a rattle can. This really makes things easy for the builder as
Tamiya's spray paints are first rate.
Second, let me comment on the decals. These were attached throughout the final stages of building while the areas on which they fit would be easiest to reach. Though a bit transparent, they generally fit and worked well. Two areas gave me trouble. One was the white sections on the inside and outside of the front wing. These decals generally did everything bad a decal could do in terms of not fitting, or bunching up or wrinkling or not succumbing to setting solutions. Paint these areas white. Don't think about it. Do it. Second area that was a pain were the split Braun decals on the wing. Trim these to within an inch of their lives or the clear sections left over will give you fits. The rest of the markings went on beautifully, though I did have a bit of issue with those going across the engine cover splitting a bit when they were cut. The glue on these is very thick and so the decals will stick almost where they touch. Lubricate the area under them liberally with soapy water or saliva. According to the instructions, the 'powered by Honda' decals on the body stripe are supposed to be at an angle. They look a touch odd so I'd center them were I you. I used Mr Mark Softener on these with no issues other than those aforementioned. Oh yes, I also decided to do Stefano Modena's car as he had the best results with it.
| FINAL CONSTRUCTION |
The brake cooling scoop parts were literally snapped in place, though I did have to open up the small holes in the ends of the suspension bits a tad to get the posts to click in place. It saved me from probably breaking one or two of these as otherwise they are incredibly tight. Then the forward section was cemented onto the lower plate, just ahead of the engine. Use quite a bit of glue on this as you want this to stay fixed and it is not a snap fit as is the engine.
 With
that done, the mirrors and steering wheel were glued on. Side scoop pieces were
then glued in (though again, the upper section was just snapped in place. Then
came the radiators. I test fit the engine cover to be sure it fit well and it
did. Not much left, so time to attach the wheels. Tamiya has four long screws
for this and a small tool to screw in the bits. Do not 'pre screw' the holes,
just attach the wheels/tires as they are. A word on the tire decals. These are a
bit different from the rest. The sticky side is the one you see. You will soak
these like regular decals, then press them on the rubber when it is time. The
arc of the decals is greater than the arc of the tire sidewall, so you need to
have these not stick so you can shift them around a bit. They are incredibly
thin and even thinking bad thoughts about them is enough to cause trouble.
Though it took quite a while and a lot of water, I did get most of them to look
good. Those wondering why I left the mold seam on the tires should know that
these tires will have that seam before they get worn off.
With
that done, the mirrors and steering wheel were glued on. Side scoop pieces were
then glued in (though again, the upper section was just snapped in place. Then
came the radiators. I test fit the engine cover to be sure it fit well and it
did. Not much left, so time to attach the wheels. Tamiya has four long screws
for this and a small tool to screw in the bits. Do not 'pre screw' the holes,
just attach the wheels/tires as they are. A word on the tire decals. These are a
bit different from the rest. The sticky side is the one you see. You will soak
these like regular decals, then press them on the rubber when it is time. The
arc of the decals is greater than the arc of the tire sidewall, so you need to
have these not stick so you can shift them around a bit. They are incredibly
thin and even thinking bad thoughts about them is enough to cause trouble.
Though it took quite a while and a lot of water, I did get most of them to look
good. Those wondering why I left the mold seam on the tires should know that
these tires will have that seam before they get worn off.
The last step was to glue on the wing and let it dry. There is an intake piece that simply sets above intake trumpets and this may keep the engine cover from fitting snugly. At least, that was the case with me. The cover fits pretty tight so one can easily remove it to display the engine.
| CONCLUSIONS |
 I very
much enjoyed putting this one together. Sure, I ran into a few areas of
interest, but that happens to me all the time. It was a pleasure to build and I
did go rather slowly on it, only doing a bit at a time. You spend a lot of time
cleaning parts, painting them, attaching them and then repeating the sequence as
you move along in the build. Quite different from doing aircraft or armor where
you can pretty well do most of the painting at one time. It was a ton of fun and
I very much will do another one of these in the near future. If you are looking
for something a bit different, you can find these older Tamiya F.1 cars for a
reasonable price so go for it.
I very
much enjoyed putting this one together. Sure, I ran into a few areas of
interest, but that happens to me all the time. It was a pleasure to build and I
did go rather slowly on it, only doing a bit at a time. You spend a lot of time
cleaning parts, painting them, attaching them and then repeating the sequence as
you move along in the build. Quite different from doing aircraft or armor where
you can pretty well do most of the painting at one time. It was a ton of fun and
I very much will do another one of these in the near future. If you are looking
for something a bit different, you can find these older Tamiya F.1 cars for a
reasonable price so go for it.
| REFERENCES |
http://en.wikipedia.org/wiki/Tyrrell_020
June 2011
Thanks to me for picking up this one.
If you would like your product reviewed fairly and quickly, please contact me or see other details in the Note to Contributors.