MA Models 1/43 Honker II
| KIT #: | 251 |
| PRICE: | $42.98 plus $6 s&h |
| DECALS: | One option |
| REVIEWER: | Scott Van Aken |
| NOTES: | Resin body with metal and rubber parts. Vac windscreen |
| HISTORY |
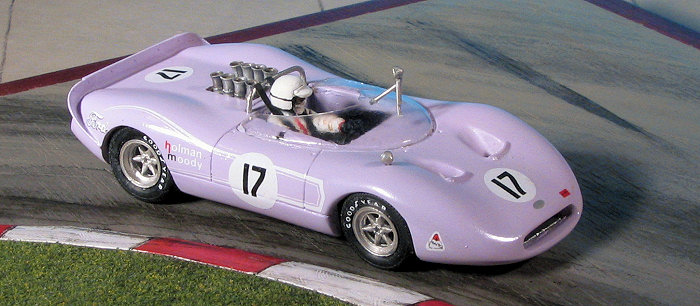
 The Holman/Moody Honker II, was
raced by Mario Andretti in the 1967 Can Am series. The Honker II was basically
paid for by Ford, with some GT40 parts and a 377 cubic inch Ford normally
aspirated V-8 engine. The body shape was a result of thorough wind tunnel
testing. It never was a real success and according to Mario Andretti it was the
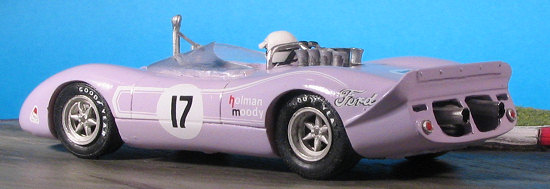
worst car he has ever driven, not helped by the left hand shifter. The name of
team manager Paul Newman appeared prominently on the front of the car after the
first race. Referring
to this, Mario Andretti once said: 'Why don't you put my name on the car and let
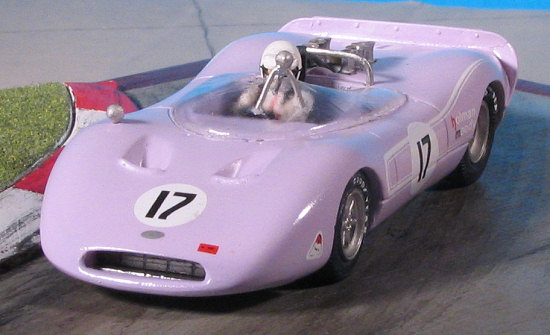
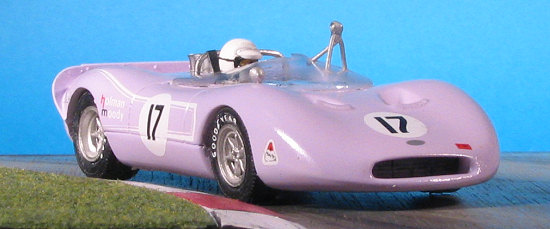
Paul Newman drive?'. I tend to think that it was the light lavender paint scheme
as much as anything. Three coupe bodied cars with three liter Cosworth DFV
engines were used in European endurance racing as the Ford 3L, but they were not
a success either.
The Holman/Moody Honker II, was
raced by Mario Andretti in the 1967 Can Am series. The Honker II was basically
paid for by Ford, with some GT40 parts and a 377 cubic inch Ford normally
aspirated V-8 engine. The body shape was a result of thorough wind tunnel
testing. It never was a real success and according to Mario Andretti it was the
worst car he has ever driven, not helped by the left hand shifter. The name of
team manager Paul Newman appeared prominently on the front of the car after the
first race. Referring
to this, Mario Andretti once said: 'Why don't you put my name on the car and let
Paul Newman drive?'. I tend to think that it was the light lavender paint scheme
as much as anything. Three coupe bodied cars with three liter Cosworth DFV
engines were used in European endurance racing as the Ford 3L, but they were not
a success either.
Honker II's race results from 1967:
Bridgehampton: 8th Place.
Riverside: 32nd place; out after 10 laps.
Las Vegas: Did not start; broke engine during practice (could have been self
inflicted!).
| THE KIT |
 Over the last few
months, I have bought a number of 1/43 racers from various manufacturers, just
to see what they have to offer and if one is 'better' than the other. This will
make the fifth different maker following FDS, Marsh, ESDO, and Provence Moulage.
MA Models has a pretty incredible range of cars and the most of any Cam-Am range
this side of Marsh. So let us see what these folks have to offer.
Over the last few
months, I have bought a number of 1/43 racers from various manufacturers, just
to see what they have to offer and if one is 'better' than the other. This will
make the fifth different maker following FDS, Marsh, ESDO, and Provence Moulage.
MA Models has a pretty incredible range of cars and the most of any Cam-Am range
this side of Marsh. So let us see what these folks have to offer.
I should first point out that it took under 2 weeks to get this kit after it was ordered. Now you'd think that the kit would have arrived earlier since it was paid for by credit card and the card passed within minutes of it being sent in for validation. However, I get the feeling that MA Models doesn't have a huge warehouse full of kits and instead makes them as the orders come in. I could be wrong, but that is my gut feeling. This isn't a problem as few of us actually start building a model kit the day it comes in.
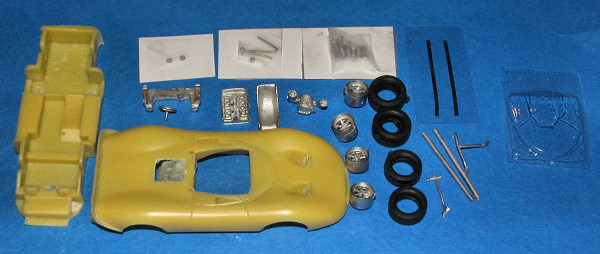
 It seems there is a standard box for these kits, and
this one arrived in one with nothing on it but a kit number and the word Honker.
Fine by me as it means the guy isn't spending money on graphics and so doesn't
pass this cost along. Inside the parts are all carefully packaged in bubble wrap
to prevent damage. The smaller metal bits are taped to pieces of card to keep
them from being damaged or lost. A very thoughtful touch. Two pieces of tape are
provided for the racing harness. I'm thinking that buckles will have to be
scrounged by the builder and the tape does seem a tad thin for a racing harness,
but what the hey.
It seems there is a standard box for these kits, and
this one arrived in one with nothing on it but a kit number and the word Honker.
Fine by me as it means the guy isn't spending money on graphics and so doesn't
pass this cost along. Inside the parts are all carefully packaged in bubble wrap
to prevent damage. The smaller metal bits are taped to pieces of card to keep
them from being damaged or lost. A very thoughtful touch. Two pieces of tape are
provided for the racing harness. I'm thinking that buckles will have to be
scrounged by the builder and the tape does seem a tad thin for a racing harness,
but what the hey.
Four nicely molded tires (in what seems like real rubber) with 'Goodyear' on them in raised lettering. The 'sprue' attachment area is large so be sure this is facing down when attaching them. The quality of the cast metal parts is really quite good. Better than some of the bits I used in my last builds and for that I'm thankful as cleaning up mis-aligned mold seams is a pain. The engine injector assembly is particularly well done with good detail. Other bits in the metal are axles, shifter, roll bar, engine injectors, steering wheel, dash, transaxle cover/exhaust, and some other little bits. No photo etch with this one.
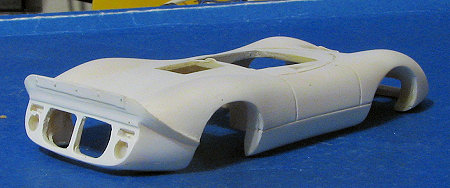
A fairly well formed vac windscreen is also provided
and I do wish these folks would provide a spare, as not only do they sometimes
come in handy, but knowing an extra is available is quite reassuring. The resin
body and underside are fairly well done. I did find that the areas above the
tail lights were incompletely molded, but nothing a piece of card can't fix.
There is the usual fine flash in the various openings that one finds on these
kits. The upper surface is free from blemishes and mold glitches
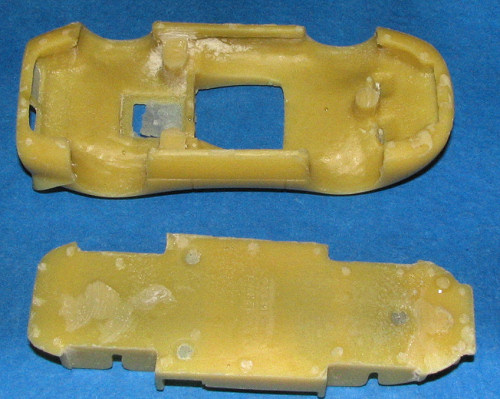 like
air bubbles. The undersides are a real nightmare of unsmooth resin, but you
know, you won't see it when the car is finished so it doesn't matter! There are
remnants of what seems to be talcum powder or other release agent on these
parts. Washes off easily. I did find that the fit of the underside is not
perfect, but it should be easy enough to work around. It seems as if there were
thoughts of doing screw mounts, but no
like
air bubbles. The undersides are a real nightmare of unsmooth resin, but you
know, you won't see it when the car is finished so it doesn't matter! There are
remnants of what seems to be talcum powder or other release agent on these
parts. Washes off easily. I did find that the fit of the underside is not
perfect, but it should be easy enough to work around. It seems as if there were
thoughts of doing screw mounts, but no
 screws or pre-drilled holes are
provided, which is probably just as well.
screws or pre-drilled holes are
provided, which is probably just as well.
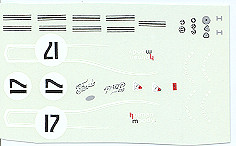
There is a decal sheet for this car and while it does have the proper stripes and numbers, it is missing the Paul Newman name on the hood and some of the sponsor decals like STP. Perhaps they were unable to get licensing. The sheet is also not as crisply done as some others, reminding me of very old Microscale decals in this regard. The kit also comes with two photos of the built up model for a reference when it comes time to place the markings and for general painting. The kit instructions themselves are somewhat crudely hand drawn, though they do provide all the information needed to assemble the kit. The only painting information given is for the injectors.
| CONSTRUCTION |
 First steps are to clean up the body and various bits.
The resin molding is fair but a bit crude compared to some other kits. There
were a number of pinholes on the lower part of the body that had to be filled.
The area between the tail lights and vents above them was short shot and I used
a section of plastic to fill that.
First steps are to clean up the body and various bits.
The resin molding is fair but a bit crude compared to some other kits. There
were a number of pinholes on the lower part of the body that had to be filled.
The area between the tail lights and vents above them was short shot and I used
a section of plastic to fill that.
The metal wheels needed to have the mold stubs sanded
down and there were
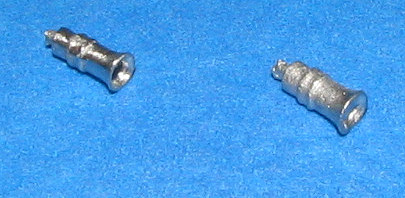 quite
a few mold lines on the injectors to deal with. This latter part was especially
tedious to clean up, so I was a little less thorough with the rest of them. With those cleaned up as best as possible, I went to
install them into the upper engine section. The holes for them are too small and
I had to drill them out to accept the injector trumpets.
quite
a few mold lines on the injectors to deal with. This latter part was especially
tedious to clean up, so I was a little less thorough with the rest of them. With those cleaned up as best as possible, I went to
install them into the upper engine section. The holes for them are too small and
I had to drill them out to accept the injector trumpets.
I also glued some interior bits in place. First the
seat, once its mold seams were cleaned up and then the instrument panel piece,
which also needed a lot of clean-up.The shifter and linkage suffered from mold
mis-alignment and in this scale was difficult to clean. In hindsight, I should
have scrapped it for pieces of plastic rod. Anyway, it was glued in place. Then
the interior was sprayed with several coats of Alclad II Airframe Aluminum as
that is a brighter shade than the standard. I also did the radiator grilles at
this time. The instrument panel was then painted black in preparation for the
instrument decals.Next item to be installed was the rear transmission housing
and exhaust piece. This had a HUGE metal sprue gate to clean off and was
suffering quite a bit from mold mis-alignment. I spent considerable time
 just
trying to get this to where the exhaust were somewhat symmetrical. I then
drilled out the end and glued this on the back of the chassis piece.
just
trying to get this to where the exhaust were somewhat symmetrical. I then
drilled out the end and glued this on the back of the chassis piece.
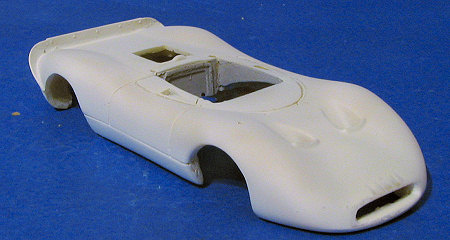 Meanwhile,
I had smoothed the body out where I thought it was better and sprayed a coat of
matte white on it. Found a number of areas I'd missed so it was back to the
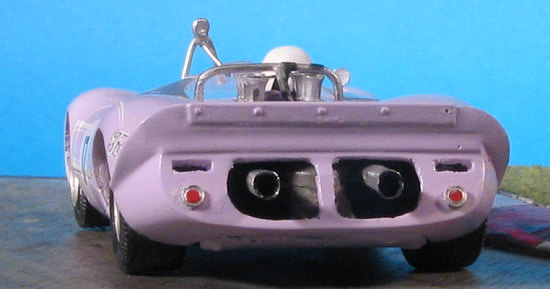
bench. During this time, I test fit the tail lights and found they were quite
small and basically looked like a dinner plate at the bottom of a well. I then
filled in these areas after finding some images of the real car that has been
restored. Through these photos, I noticed several other discrepancies between
this car and the kit. Mostly the restored car had a much different rear section
in terms of vents and the way the spoiler was shaped. I also noted that there
with small spoilers on the front of the restored car as well. It is quite
possible that the kit is the initial design of the car and as it was during its
first race. As you all know, race cars can easily change from event to event.
Meanwhile,
I had smoothed the body out where I thought it was better and sprayed a coat of
matte white on it. Found a number of areas I'd missed so it was back to the
bench. During this time, I test fit the tail lights and found they were quite
small and basically looked like a dinner plate at the bottom of a well. I then
filled in these areas after finding some images of the real car that has been
restored. Through these photos, I noticed several other discrepancies between
this car and the kit. Mostly the restored car had a much different rear section
in terms of vents and the way the spoiler was shaped. I also noted that there
with small spoilers on the front of the restored car as well. It is quite
possible that the kit is the initial design of the car and as it was during its
first race. As you all know, race cars can easily change from event to event.
| COLORS & MARKINGS |
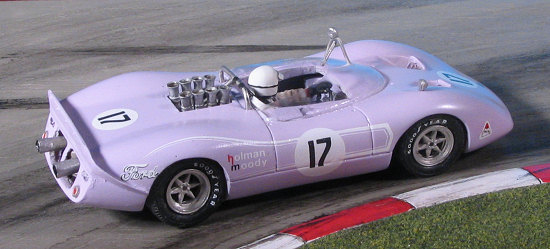
 I mixed up some lavender paint by taking white and
adding single drops of purple then shaking it until I got a shade I liked. The
photos that came with the kit show a color that is much too dark. The only image
I have is in a 1969 edition of Automobile Quarterly and shows a
lighter shade. If anything, my model is too dark. I then put on several coats of clear gloss
to help seal the paint.
I mixed up some lavender paint by taking white and
adding single drops of purple then shaking it until I got a shade I liked. The
photos that came with the kit show a color that is much too dark. The only image
I have is in a 1969 edition of Automobile Quarterly and shows a
lighter shade. If anything, my model is too dark. I then put on several coats of clear gloss
to help seal the paint.
| MORE CONSTRUCTION |
 With this done, I test fitted the interior. Several
glaring discrepancies made themselves known. One is that the instrument panel
piece was crooked. This was because the mounting sections on each side are
either a different height, or the floor onto which they sit is a different
thickness. I'm tending to think it may be the latter as the resin castings are
rather crude. Regardless, removing the metal instrument section is not
possible. I tried and broke a chunk out of the floor section which left a large
hole in the chassis. I quickly glued it back in place.
With this done, I test fitted the interior. Several
glaring discrepancies made themselves known. One is that the instrument panel
piece was crooked. This was because the mounting sections on each side are
either a different height, or the floor onto which they sit is a different
thickness. I'm tending to think it may be the latter as the resin castings are
rather crude. Regardless, removing the metal instrument section is not
possible. I tried and broke a chunk out of the floor section which left a large
hole in the chassis. I quickly glued it back in place.
Second, the alignment for the exhaust/transaxle piece was off center. That came away with a bit of prying for re attachment later. Third, the mass of resin on the inside prevented the chassis from fitting flush with the body so some grinding had to be done. I also found that the back bulkhead of the cockpit would not meet the lower chassis piece properly and had a large gap that will have to be dealt with. This was handled with Apoxie Sculpt epoxy filler. I simply put some in the gap and let it dry. Later, I removed the body and chassis with the filler sticking to one part. Then it was sanded flush and repainted. Simple, eh?
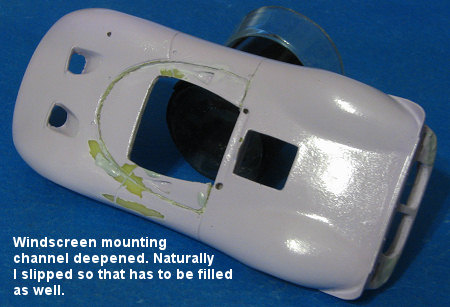 While
grumbling about all this, I decided to cut out the windscreen and see how it
fits. The vacuform molding of this is only fair and it is rather distorted. MA
Models has provided a channel for this to fit into, which really helps. What
doesn't help is that the channel is of varying depth, being almost non-existent
in some areas and quite deep in others. Using my razor saw, I started deepening
the channel. Two things happened here. One is that the paint along the edges
started to chip away while doing this. Secondly, I slipped a couple of times and
so left a gouge or two that will have to be filled and re-painted.
While
grumbling about all this, I decided to cut out the windscreen and see how it
fits. The vacuform molding of this is only fair and it is rather distorted. MA
Models has provided a channel for this to fit into, which really helps. What
doesn't help is that the channel is of varying depth, being almost non-existent
in some areas and quite deep in others. Using my razor saw, I started deepening
the channel. Two things happened here. One is that the paint along the edges
started to chip away while doing this. Secondly, I slipped a couple of times and
so left a gouge or two that will have to be filled and re-painted.
Thanks to the various glitches, some of which can't be
fixed. I'm using this kit as a learning experience for any others of this brand
that I might get in the future. Frankly, I can't see that being done s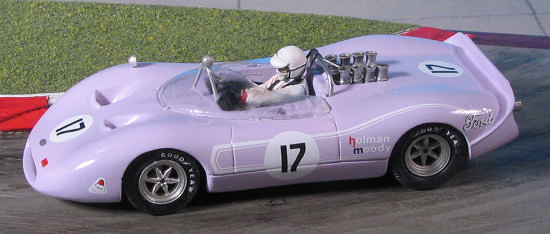 oon.
oon.
While waiting for all this to dry and for me to regain my composure, I decided to work on the driver. No, one is not supplied, but Denizen Motorsport in the UK has a wide selection of 1/43 figures for racing dioramas and it includes a number of seated drivers for this era. There are also optional heads available. Now these seem to be made for F1 cars as part of the seat is molded to the back. For a sports racer, this isn't needed and so it was filed away. I also had to slightly modify the arm mountings and the lower brace to get things to fit into the seat. But they do fit and so I spent some time working on that.
Back at the rest of the kit, I had repainted my mistakes and was ready to start installing some hardware. I first glued on the intake/engine assembly. This was a teeny bit too large to fit into the hole made for it from underneath. With no other option, I carefully trimmed away at the thickness of this opening until I was able to squeeze the part in place. It was then glued in. Next, the roll bar was glued in place. This had to have some fudging around to get the arms the same depth in the body holes and to attach into the hole in the engine block/intake assembly.
 In the back, the tail lights were glued on. I'd
considered re-drilling the housings, but the thought of repairing shattered filler
did not appeal so I just glued them on. Since most of this area seems to be
inaccurate anyway, what is one more thing? Back at the top, the right fender
mirror was glued in.
In the back, the tail lights were glued on. I'd
considered re-drilling the housings, but the thought of repairing shattered filler
did not appeal so I just glued them on. Since most of this area seems to be
inaccurate anyway, what is one more thing? Back at the top, the right fender
mirror was glued in.
Test fitting the body/chassis showed a need for more work. The rear exhaust/transmission piece was off center. I popped it off, cleaned up the mass of super glue and reattached it. It is a lot better now and I had to grind away at the inside of the back of the body to get a better fit. This also resulted in multiple attachments and reattachments of the body/chassis to get the bottom to fit as flush as I could. During all these, some additional grinding took place until I was finally satisfied that it was as good as I was going to get it.
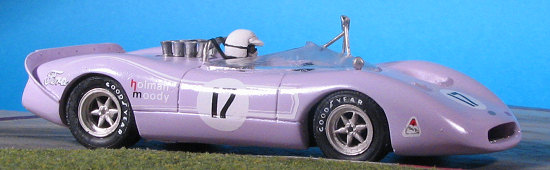
Now for the driver. I painted the driver in a non-descript white suit with red bits on it as there wasn't the fancy 'disco-suits' that you see drivers in nowadays. Same with the helmet. Just white. I glued the left arm in place and then stuck it in the seat to find out where the steering wheel would fit. With the position figured out, I glued the wheel to the right arm. Then I glued on the left. Happy that the positioning was good, the figure was glued into the seat. I still left off the head until the very end.
The wheel wells and back portion of the chassis were
then painted flat black and when dry, the chassis was cemented to the body,
keeping everything as flat as I could. I then glued the axles to one of the
wheels, fore and aft. When dry, this was threaded through the chassis holes, cut
to length and the other wheel glued on. Back atop the body, I glued in the
windscreen. This was not an easy process as the piece is a teeny bit too large.
I found that out when I worked my way from one side to the other. To fix it, I
 chopped the corner out, trimmed the end and bent the corner to fit into the
slot. Originally I used white glued to hold it in place. When dry, I put little
dabs of super glue at various spots to secure it in place. Seems to have worked
and only in one spot did I have any fogging. I also had to widen the opening of
the windscreen as it was too small. I used a scalpel blade to do that and worked
carefully.
chopped the corner out, trimmed the end and bent the corner to fit into the
slot. Originally I used white glued to hold it in place. When dry, I put little
dabs of super glue at various spots to secure it in place. Seems to have worked
and only in one spot did I have any fogging. I also had to widen the opening of
the windscreen as it was too small. I used a scalpel blade to do that and worked
carefully.
Next was the rear view mirror that fits atop/through the windscreen in a tripod arrangement. Of the cars I've built that have this feature, none of them look right when done. I glued the assembly together (at least a half dozen times as it kept falling apart) and marked the location of the 'feet' on the windscreen. Then, taking several sizes of drill bits, drilled holes for the tripod. Once I was sure it would fit, I removed it and started on the decals.
For the decals, I did the top, then one side and then the other. The decals are fair in terms of sharpness. They took an age to come free of the backing sheet. The roundels all cracked when taken off the backing but held up enough to get into place. No problems like this with the other markings. They all succumbed to Solvaset. I should also mention that the tires have a raised 'Goodyear' on one side and the other is blank. Use the blank side if using the tire decals.
With those all in place, I attached the seat harness. This is a sticky material that I wrapped around the roll bar as directed and snipped about waist level on the driver figure. Another piece was placed across the belt and cut to length. I didn't install the other two pieces as there was not any way to do that and have it look reasonable. Still better than nothing!
The tripod rear view mirror was attached using white glue, and is probably one of the shakiest parts of the build. The driver's head was then glued in place and basically that was it. For those wondering, these models are about 4 inches long when they are done. The base I have is not appropriate for 1967, as it has those red/white FIA curbs that were not around in the mid 1960s. Back then, there was either nothing or tires buried in the ground and painted white to delineate the inside of a corner.
| CONCLUSIONS |
This is a garage kit, pure and simple. It is not an easy kit to build and probably took me about four times as long to complete as a similar kit from another, larger company. The resin castings can only be graded as fair, the metal castings about the same. Instructions are about as basic as one could get. The body itself is inaccurate in terms of the restored car. As I mentioned, the back is considerably different (besides the personal tail light mod) and the car ran with clear light covers instead of the ones painted over on the kit.
 It is a
kit that I would recommend with reservation. Those who are used to doing the
extra work needed will probably do well. It is not unbuildable as you can see.
So why did I get this kit. First off, I'd never done an MA Models kit and
secondly, I wanted to do a Honker II and the only other kit I knew about was
constantly out of stock from the various internet places that I visited.
It is a
kit that I would recommend with reservation. Those who are used to doing the
extra work needed will probably do well. It is not unbuildable as you can see.
So why did I get this kit. First off, I'd never done an MA Models kit and
secondly, I wanted to do a Honker II and the only other kit I knew about was
constantly out of stock from the various internet places that I visited.
Would I build another from these folks? Well, I'd have to say that it would have to be a similar situation to this. They do a car that I can't get from anyone else. One thing about MA Models is that they release about a dozen new kits a year. From what I can tell, they make them as the orders come in as this kit took about 6-7 weeks to arrive after I'd ordered and paid for it. One thing I can tell you is that the addition of the driver figure really adds a LOT to the completed model.
Bottom line is that I'm glad I built it as it adds another neat Can-Am car to my collection.
February 2007
Copyright ModelingMadness.com. All rights reserved.
If you would like your product reviewed fairly and fairly quickly, please contact the editor or see other details in the Note to Contributors.
Back to the Review Index Page 2019