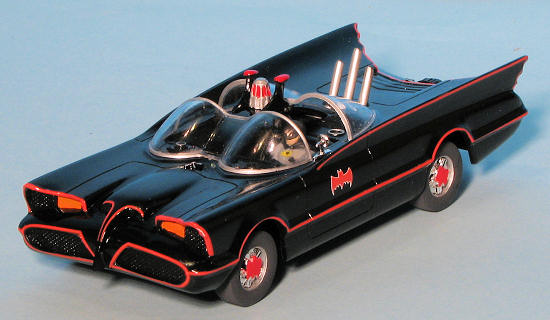
Polar Lights 1/32 Batmobile (TV)
| KIT #: | POL 821 |
| PRICE: | $21.95 MSRP |
| DECALS: | One option |
| REVIEWER: | Scott Van Aken |
| NOTES: | ex-Aurora kit, though significantly cleaned up. |
| HISTORY |
The Batmobile is the automobile of DC Comics superhero Batman. The car has evolved along with the character from comic books to television and films. Kept in the Batcave, which it accesses through a hidden entrance, the Batmobile is a gadget-laden vehicle used by Batman in his crime-fighting activities.
Batman first drove in Detective Comics #27 (May,
1939). A sedan, the vehicle was simply referred to as "his car". It soon
began featuring an increasingly prominent bat motif, typically including
distinctive wing-shaped tailfins. In the early stages of Batman's career, he
modified it with armor and technologically-advanced automotive customization
and turned the Batmobile into a sleek street machine. The Batmobile has gone
through numerous incarnations, and as state-of-the-art technology has
continued to
 advance, the vehicle has had to change to stay a step ahead of
real-life cutting edge advances.
advance, the vehicle has had to change to stay a step ahead of
real-life cutting edge advances.
The Batmobile built for and used in the 1966–1968 live action television show Batman and its film adaptation was a customized vehicle that originated as a one-off Ford concept car of the 1950s.
The TV Batmobile was based on the Lincoln Futura Show Car, originally created by William M. Schmidt and his design team at the Lincoln Styling Department; its rakish lines are said to have been inspired by the mako shark and the manta ray. In 1954 the Futura prototype was built entirely by hand by the Ghia Body Works in Turin, Italy at a reported cost of US$250,000; it was unveiled in its original pearlescent Frost-Blue white paint finish on 8 January 1955 at the Chicago Auto Show. In 1959, sporting a fresh red paint job, the Futura was featured in the film It Started with a Kiss, starring Debbie Reynolds and Glenn Ford.
In late 1965 20th Century Fox Television and William Dozier's Greenway Productions contracted renowned Hollywood car customizer Dean Jeffries to design and build a "Batmobile" for their upcoming Batman TV series. He started customizing a 1959 Cadillac, but when the studio wanted the program on the air in January 1966, and therefore filming sooner than he could provide the car, Jeffries was paid off, and the project went to Barris. Barris had somehow already come into possession of the Futura, which had been parked behind his Hollywood shop for several years. With only three weeks to finish the Batmobile (although in recent years Jeffries says that his car was dropped because he was told it was needed in "a week and a half", he was quoted in 1988 as saying "three weeks" as well), Barris decided that, rather than building a car from scratch, it would be relatively easy to transform the distinctive Futura into the famous crime-fighting vehicle. Design work was conducted by Herb Grasse, working as an associate designer for Barris.
 Barris hired Bill Cushenberry to do the metal
modifications to the car and its conversion into the Batmobile was completed
in just three weeks, at a reported cost of US$30,000. Barris retained
ownership of the car and leased it back to 20th Century Fox and Greenway
Productions for use in the series. The estimated 1966 value of the Barris
Batmobile was about $125,000, but today it is estimated to be worth at least
US$2 million.
Barris hired Bill Cushenberry to do the metal
modifications to the car and its conversion into the Batmobile was completed
in just three weeks, at a reported cost of US$30,000. Barris retained
ownership of the car and leased it back to 20th Century Fox and Greenway
Productions for use in the series. The estimated 1966 value of the Barris
Batmobile was about $125,000, but today it is estimated to be worth at least
US$2 million.
In December 1965 Ford sold the Futura to Barris; despite its huge original production cost—the equivalent of approximately US$2 million in 2009 -- Barris was able to purchase the vehicle for the nominal sum of $1.00 and "other valuable consideration".
When filming for the series began, several problems arose due to the age of the car: it overheated, the battery went dead, and the expensive Mickey Thompson tires kept blowing. By mid season, the engine and transmission were replaced with a Ford Galaxie's. The most frequent visual influence of this car is that later Batmobiles usually have a rear rocket thruster that fires as the car makes a fast start. Visit the reference link to find out more.
| THE KIT |
When
I visited the LHS recently, I found this kit on the 'new kit' shelf as well as
several more on the regular shelves. Naturally, I grabbed one so fast I
nearly hurt myself. I've always wanted a model of the TV show Batmobile and
wasn't into forking out the exorbitant funds for the old Aurora kit. I had
wondered why no one had produced this since as it surely would be popular.
The  owner of the LHS told me that Revell had already started cutting molds
for this car (apparently in 1/25) when it was discovered that the real owner
of the rights to the Batmobile could not be determined. DC comics thought
they owned the rights, George Barris thought he owned the rights, the
current owner of the car itself thought he owned the rights and the company
that produced the TV series thought they owned the rights. Regardless, the
Revell project was still-borne, much to the detriment of us all. I note on
the box that the only licensing note is for DC comics so perhaps they got
things straightened out.
owner of the LHS told me that Revell had already started cutting molds
for this car (apparently in 1/25) when it was discovered that the real owner
of the rights to the Batmobile could not be determined. DC comics thought
they owned the rights, George Barris thought he owned the rights, the
current owner of the car itself thought he owned the rights and the company
that produced the TV series thought they owned the rights. Regardless, the
Revell project was still-borne, much to the detriment of us all. I note on
the box that the only licensing note is for DC comics so perhaps they got
things straightened out.
This is not a complex kit and coming from the late 1960s, there are certain
niceties that you won't see. For instance, most of the parts have large
ejector pin marks and part numbers molded on the part itself. Some of these
will need to be removed. This is also a curbside so no atomic engine for
fans. In addition, the kit has plastic axles and plastic wheels that take an
insert.
The general molding is actually quite good for a kit of this age so Polar
Lights did a fine job of cleaning things up. Still, the parts are thick and
'fit' was a word that was rather cavalierly bandied about in those days. I
had to use a BAF just to see how well the nose adjusted to the rest of the
body. I'd rather not have chrome seats, but there it is and one can
always strip the chrome. There are interior door panels so things aren't as
raw as they might seem. The body is pretty well one piece with a separate
nose cap. I
 wouldn't doubt that perhaps some filler might (let's make
that will) be required, though the join line on the top of the nose
cap matches the hood opening seam. Included are two figures, one of Batman
and one of
Robin.
Naturally, I would have liked to have seen a Julie Newmar Catwoman figure
included as well........
wouldn't doubt that perhaps some filler might (let's make
that will) be required, though the join line on the top of the nose
cap matches the hood opening seam. Included are two figures, one of Batman
and one of
Robin.
Naturally, I would have liked to have seen a Julie Newmar Catwoman figure
included as well........
The kit instructions are very much like the old Aurora versions. There are
only three construction steps as this kit has fewer than 30 pieces. Generic
color information is also supplied. A decal sheet comes with the kit for the
red trim stripes and the red for the Bat hub caps. The color of the red is
nearly fluorescent and quite light, though I would imagine that this would
be toned down once applied to the black car. The other option would be to
paint this trim, but it would be VERY tape intensive to do so. I
should mention that the instructions' image of the build up showing where
the decals go is very dark. I recommend grabbing one of the many clear
images from the internet before applying decals. Oddly, all the markings are
not shown on the box art. Perhaps they are travelling so fast that the paint
stripped off.
| CONSTRUCTION |
First thing I did was to sand down the mold seams as much as I could. Then I
glued the nose onto the rest of the body. This was pretty much an indication as
to how well the rest of the car would fit. The fit is not good. There are huge
gaps and the only way to fill them is with an epoxy filler.
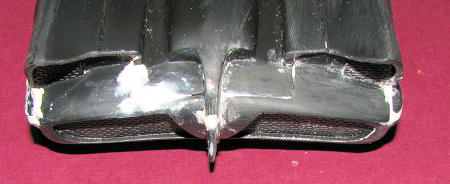 Another use for this
filler is to reshape the forward wheel wells as the front section does not fit
far enough back to make a smooth transition. There followed several sessions of
sanding and using standard fillers to smooth things out. Not an easy task in the
confines of the nose.
Another use for this
filler is to reshape the forward wheel wells as the front section does not fit
far enough back to make a smooth transition. There followed several sessions of
sanding and using standard fillers to smooth things out. Not an easy task in the
confines of the nose.
Meanwhile, I glued together the main wheels and applied filler to the seams. After sanding things down, I painted the wheels/tires with Floquil's Weathered Black. Back at the body, I installed the roll hoop and later the red light and the two side pieces. These side pieces require considerable sanding to remove the part number and huge ejector pin mark. The light is flat on the bottom and fits onto a curved surface.
I should mention that I stripped most of the chrome parts except the wheel hubs as the seams and ejector marks needed to be removed. This included the chrome seat. The seat was simply repainted black while the ejector tubes and police light were painted silver.
| COLORS & MARKINGS |
Most of the parts are to be painted black, so once the body was mostly complete, I took it and the seat to the paint booth and painted them black using Floquil lacquers for Lexan. The stuff actually works well and quickly showed a few areas that needed improvement. Those were fixed and more paint applied. The paint itself is actually a near gloss so that obviated the need for any clear coat prior to applying decals.
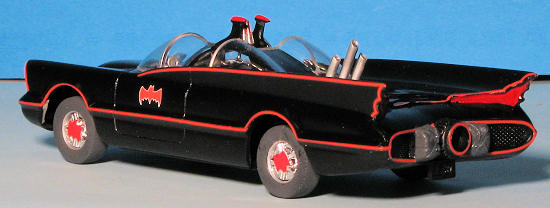
 Once the
body was painted, I started with the decals. These are actually more of a red
orange than a proper red, but one uses what is available, though I imagine I
could have painted the stripes (NOT). These actually worked rather well. All my
setting solutions worked fairly well, though I did rely on Solvaset for the most
part. The decals do not totally follow the plastic edges on the back of the fins
and are more flat in this area than the gentle curve of the plastic. They are
also not designed to go on both sides of the upper fin ridge as is the paint on
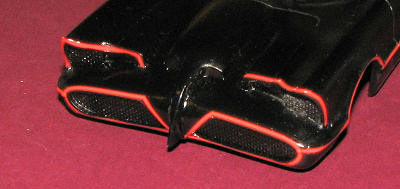
the real car. You get the outer side and that is it. Interestingly, the
headlight stripes are provided for both front and upper. Allegedly you are to
choose between the two, but I became stupid and used both. This produced gaps
that I had to fill with strips taken from the unused wheel spinner markings. In
hindsight, I'd use just the front ones as to me they look better on the finished
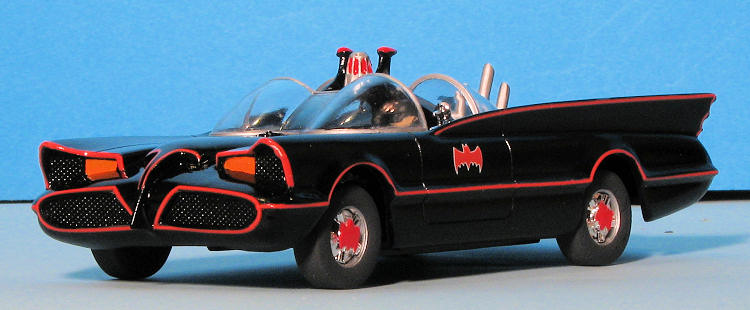
car. The image shows the front ones on the left and top ones on the right.
Once the
body was painted, I started with the decals. These are actually more of a red
orange than a proper red, but one uses what is available, though I imagine I
could have painted the stripes (NOT). These actually worked rather well. All my
setting solutions worked fairly well, though I did rely on Solvaset for the most
part. The decals do not totally follow the plastic edges on the back of the fins
and are more flat in this area than the gentle curve of the plastic. They are
also not designed to go on both sides of the upper fin ridge as is the paint on
the real car. You get the outer side and that is it. Interestingly, the
headlight stripes are provided for both front and upper. Allegedly you are to
choose between the two, but I became stupid and used both. This produced gaps
that I had to fill with strips taken from the unused wheel spinner markings. In
hindsight, I'd use just the front ones as to me they look better on the finished
car. The image shows the front ones on the left and top ones on the right.
The sheet provides 'old style' red bats for the wheel spinners. These are the proper size for the wheels as the new ones are far too small. With the markings on, I continued adding bits and pieces at a rather slow pace.
| FINAL CONSTRUCTION |
First, the wheels had the center sections painted
silver using Citadel Silver. Into these, the chrome inserts were glued after
sanding the chrome off the back. Then they were pushed on one side of the
plastic axles and threaded through the slots in the chassis. It is not a precise
fit. on the other side the opposite wheel was pushed in place. Glue if you wish,
but it is a tight fit. At this t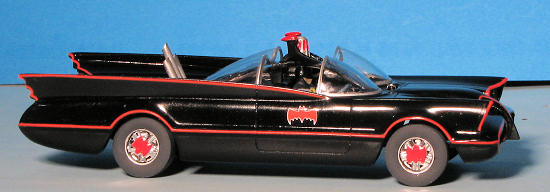 ime,
I sprayed on several coats of Future to gloss things up.
ime,
I sprayed on several coats of Future to gloss things up.
In the cockpit, the parachute handle was glued in place, while on the back, the very dark grey parachute packs were glued. I also glued in the back glass and the rear view mirror. After painting Batman, I glued him to the seat. I also glued the steering wheel into the dash. You will need to trim this about a 1/16 inch on the back if you want it to fit into Batman's hands. As it is now, the steering wheel is too close to the driver. When it falls out, I'll trim it, but it is rather strongly secured into place. There was some additional red painting in terms of the center lights and the tail lights. Remind me not to pick up a brush with red paint for a while. I'm not good with it! Once that was done, the front glass was cemented in place and the chassis mated to the body. One has to insert the front section first then squeeze the rest into place. It is a very tight fit and gluing is not needed.
| CONCLUSIONS |
 I
suspected that this would be a longer build than it looked and I was certainly
correct. While there are those who can probably slam this together in a few
days, I'm not one of them. Doing the decals alone took be about a week. Overall,
the result is quite good and actually better than I thought it would be when I
started.
I
suspected that this would be a longer build than it looked and I was certainly
correct. While there are those who can probably slam this together in a few
days, I'm not one of them. Doing the decals alone took be about a week. Overall,
the result is quite good and actually better than I thought it would be when I
started.
This is not a kit for those who are fussy about accuracy, but if you want a bonafide 1960's TV Batmobile without resorting to resin conversions, this is the one for you.
| REFERENCES |
http://en.wikipedia.org/wiki/Batmobile
June 2010
If you would like your product reviewed fairly and quickly, please contact me or see other details in the Note to Contributors.