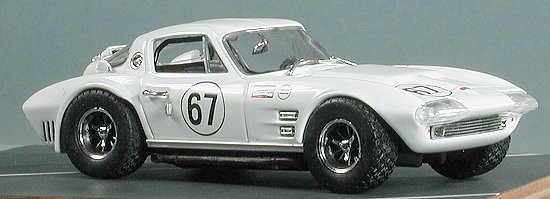
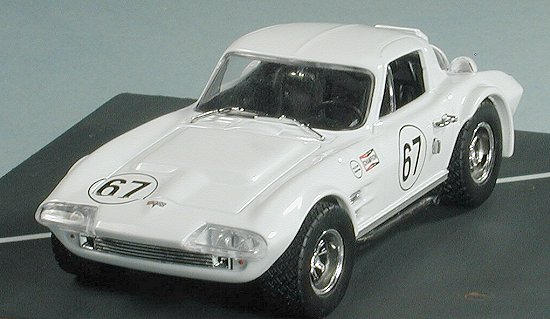
Testors 1/43
Corvette Grand Sport
|
KIT # |
147 |
|
PRICE: |
$12.00 |
|
DECALS: |
N/A |
|
REVIEWER: |
Scott Van Aken
|
|
NOTES: |
Pre-painted and decaled
metal body |

For a brief history and a look at what comes in the box,
please visit the preview.
This may come as a bit of a surprise to some folks, but I
was a major sports car nut way before I was heavily into aircraft. I
suppose there comes a time in Western culture (at least American culture)
where automobiles are paramount in the interest of young males. I can
remember begging my father to take me to car races; any kind, it didn't
matter. Since he was more interested in sports cars, I was able to attend
the local SCCA races at Wentzville, Missouri and at Elkhart Lake, Wisconsin
during the late 1960s. It was there that I became a real enthusiast.
Every copy of Road & Track and Sports Car Graphic ended up
being well thumbed as the race reports were read over and over again. Dan
Gurney, Mario 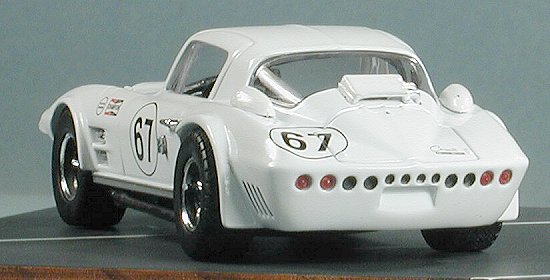 Andretti, Chuck Parsons, Bruce McLaren, Jim Hall, Hap Sharp,
Peter Revson, Mark Donohue and others were names most well known to me
thanks to the printed page. I could tell a Lola Mk I from a Mk II and even
what time of the year a mod was added to a Chaparral.
Andretti, Chuck Parsons, Bruce McLaren, Jim Hall, Hap Sharp,
Peter Revson, Mark Donohue and others were names most well known to me
thanks to the printed page. I could tell a Lola Mk I from a Mk II and even
what time of the year a mod was added to a Chaparral.
This wasn't a passion that went away once I entered the
service. I was stationed at Alameda during the early 1970s and whenever I
got the chance, I hopped in the car for a weekend at Laguna Seca to watch
whatever was racing there at the time. It was at the old Laguna circuit
that I watched probably the best race I'd ever seen. It wasn't a Can Am car
or IMSA GT, but a battle in an SCCA race between a then-new Datsun 240Z and
a Corvette of about 1965-66 vintage. I sat in a tree just below the outside
of the esses and watched these two cars trade position lap after lap. The 'Vette
had the power and blew by the 240Z on the long, curving strait; only to be
repassed in the twisty bits by the 240Z. When these cars went by the
start-finish line, they were basically neck to neck.
I could see them from the top of the esses until they
disappeared behind the hill on the fast part. In the end, the 'vette
managed a major block of the 240Z on the last lap where the Datsun normally
passed him and was able to keep that slim advantage as he blasted past the
finish line. What a race! The thundering big block V-8 of the 'vette is a
sound that all racing enthusiasts love. You can keep the 15,000 rpm sewing
machine engines of F-1 cars; for sensual excitement I'll take the big
booming American V-8 every time.
Since then, I've always had a fondness for Corvettes. Yeah,
I'll never be able to afford one, much less the insurance, but I love to
watch them race!
Tom Cleaver recently mentioned that die-cast kits were for
those who couldn't touch their fingers to their noses twice in a row. Well
I can get it done best two out of three so figured that I'd give one a try.
No sense in damning something that I haven't tried myself.
This kit isn't like some of the other metal bodied kits I've seen and
requires both some painting and actual gluing. Best of all, it is a racing
Corvette and in the scale I prefer for racing cars; 1/43.
 I first started by looking over the instructions. They are
basically an exploded view with the construction sequence annotated in
large black circles. One starts with the body, then does the chassis,
starting from front to back. Those parts that need painted are also noted
on the exploded view. It also shows those bits that need a wash or
drybrushed!
I first started by looking over the instructions. They are
basically an exploded view with the construction sequence annotated in
large black circles. One starts with the body, then does the chassis,
starting from front to back. Those parts that need painted are also noted
on the exploded view. It also shows those bits that need a wash or
drybrushed!
Not wanting to do this as anything but out of the box, I
started painting those bits that were so marked. Biggest down part is that
the transmission cooler and rear air scoops are in black plastic so you
have to paint them white. Not exactly easy. I brush painted
everything as I figured most modelers who are into this type of kit would
do the same.
Those parts that needed cemented to the metal body were
attached with superglue. Others used normal plastic cement. Due to the
large number of chrome plated parts, some scraping needs to be done to
assure a good bond. For the most part, sprue attachment points were well
thought out to be invisible when the kit was finished. Some of the parts
were tight enough to be press fits, though even some of those got a touch
of superglue just to make sure.
 Some parts not so noted as needing painted got some paint
anyway, the largest of these being the exhaust, which I painted in Burnt
Iron, a Testors Metallizer color. I used a rather wide brush to apply the
paint and it turned out rather well. With a pre-painted and decaled body,
that part of the review is rather moot.
Some parts not so noted as needing painted got some paint
anyway, the largest of these being the exhaust, which I painted in Burnt
Iron, a Testors Metallizer color. I used a rather wide brush to apply the
paint and it turned out rather well. With a pre-painted and decaled body,
that part of the review is rather moot.
I found the wheels
to be difficult to put inside the rubber tires. I'd be willing to bet that
these will split in a decade or so, but for now, they look rather good. It
would be nice to have some sort of raised lettering on the side, but
perhaps that would have required paying a royalty which would up the price
of the kit. I also found that some work with a hammer was needed to
get the wheels to mount on the axle. I used a wooden block to keep from
damaging the wheels during this process.
The final assembly
on the car was basically sticking the interior onto the chassis and then
placing this into the body shell. There is a considerable amount of slop in
the wheels, more so on the front than the rear. Some spacers of some sort
would have been appropriate (or it could be that I just didn't bang away at
the front wheel/axle join enough, though the track is the right width). A
bit of touchup and some drybrushing of the underside to bring out some
detail and the model was done.
Total time to build; about 2
days (to let some of the paint dry) and around 3 hours of actual work.
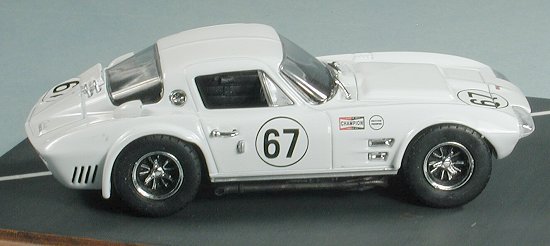 Well, it
sure didn't stretch any of my skills to build this kit, but it wasn't
exactly a toss together either. Some items needed painting and one had to
trim all the sprue attachment points and remove some of the excessively
long ejector towers to get all the bits to properly fit. I must say that
the end result looks quite good, which is what we really want anyway. I'm
certainly not going to make a steady diet of these things, but they are a
nice distraction from 'real' modeling. Because of the rather large number
of small parts, I don't think that these kits are really for the bare
beginner, but for a modeler who has had at least a few snap n glue kits
under their belts and those of us who need a break from what seems like a
steady diet of short run kits!
Well, it
sure didn't stretch any of my skills to build this kit, but it wasn't
exactly a toss together either. Some items needed painting and one had to
trim all the sprue attachment points and remove some of the excessively
long ejector towers to get all the bits to properly fit. I must say that
the end result looks quite good, which is what we really want anyway. I'm
certainly not going to make a steady diet of these things, but they are a
nice distraction from 'real' modeling. Because of the rather large number
of small parts, I don't think that these kits are really for the bare
beginner, but for a modeler who has had at least a few snap n glue kits
under their belts and those of us who need a break from what seems like a
steady diet of short run kits!
Review kit courtesy of my kit collection.
July 2003
#1274 in a series
If you would like your product reviewed fairly and fairly quickly, please contact the editor or see other details in the Note to
Contributors.